Sonic & All-Stars Racing Transformed Collection

Sonic & All-Stars Racing Transformed Collection

1,208 ratings
New Player's Guide
By Shred VII
This is a guide designed to help new players get into the game and start going fast! I've logged 200+ hours into this game and I'd love to share my knowledge of the game with anyone who will listen.
20
3
   
Award
Favorite
Favorited
Unfavorite
(UPDATE NOV. 2019)
Due to external complications, the demonstration videos previously included in this guide had to be taken down.

I will attempt to create replacements in the near future.

I deeply apologize for the inconvenience.
Welcome!
DEMONSTRATION VIDEO COMING SOON

Hello there, and welcome to my ad-hoc guide to Sonic And All-Stars Racing Transformed! (Or, as I'm going to call it from here on out, SASRT)

SASRT is, without question, one of the best kart arcade racers to hit the gaming market in years. The game is fast, smooth, relatively balanced, and also deep. There are many tricks you'll want to learn if you want to leave your opponents eating your dust.

This guide will NOT teach you how to break the game's A.I. in half - there are other guides that will help you do that. This guide is designed to help you start with an edge over the competition.
The AI, Multiplayer, and YOU
This is EXTREMELY important, so I want to get this out of the way up in front.
Jumping headlong into the game's matchmaking mode without practicing the game first is absolutely one of the worst things you can do. There will always be one player in the lobby who's logged 30, 50, or maybe even 100+ hours into the game, and he will make it absolutely certain that you don't have fun playing the game for the first time.

So... how does one go about getting good enough at the game that they can take on the Matchmaking without getting utterly annihilated? In defiance to how every other multiplayer game on earth these days handles it, playing the single player game is actually the best way to become truly great at this game. HOWEVER, this game's AI drivers will not go down without putting up one hell of a fight. You need to enter this game knowing that this game was tailor-made to give hardcore racing game fans a real challenge.

Even though I try to cover as many topics as I can cover while still speaking plain english, I really need you to understand that learning the feel of the game is entirely up to you. There's simply no way around this basic fact: the ONLY way you can become truly great at playing this game is to grit your teeth and deal with the game's spiteful AI.

Strangely enough, most experienced players will tell you that it's far easier to practice getting\staying ahead of the AI in larger maps like Rouge's Landing and Adder's Lair instead of small tracks like Ocean View and Carrier Zone. This is because those tracks have more room to maneuver around in and you're not constantly bumping into other drivers or their weapons.
Controls
There are two primary control schemes for this game: Keyboard Controls, and Xbox360 Controller controls. I'll use generic terms for what buttons to press when describing driving techniques during this guide.

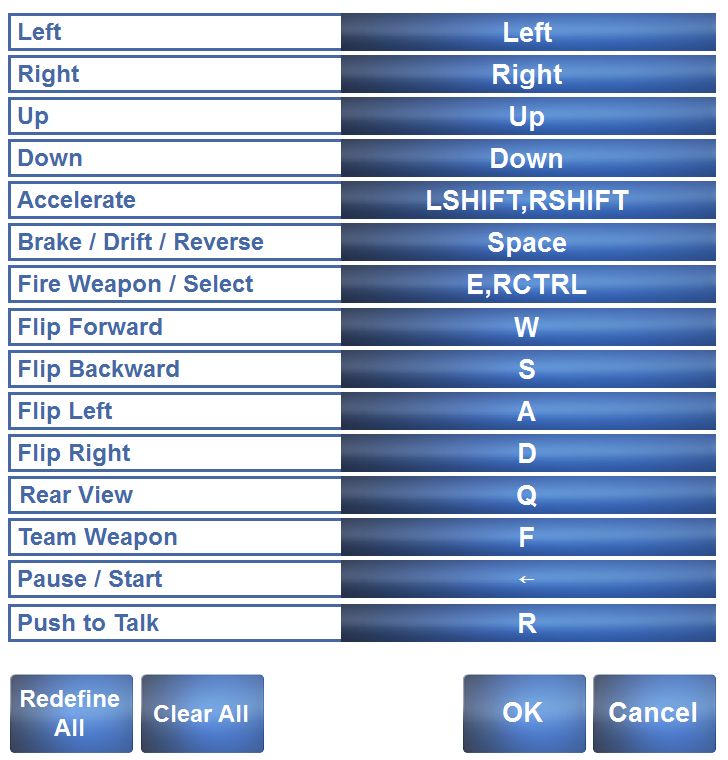
These are the default Keyboard controls:

And these are the default Xbox360 controls:
    ...
  • The RIGHT TRIGGER is your accelerator. This is what makes you go fast, as you may have guessed.
  • The LEFT TRIGGER is your brakes... but more importantly, it's also what allows you to DRIFT! This is an important technique to know for any race.
  • The LEFT JOYSTICK is your steering. It also doubles as a mute button during online matches.
  • The RIGHT JOYSTICK is what lets you perform STUNTS. In car and boat forms, landing stunts nets you a boost. In plane form, doing stunts lets you evade incoming obstructions and can be used to perform Risk Boosts.
  • The (A) BUTTON uses your currently available item. Holding it down when you have a 2x or 3x item lets you use all of those items at once, usually to devastating effect.
  • The (X) BUTTON is your rear-view camera. While in this mode, items like Fireworks and Snowballs will be shot behind you instead of in front of you.

From this point forward, I'll refer to the controls by their functions, NOT by the buttons.
Alright, LET'S RACE!!
Boost Start
The turbo start has been a staple of mascot racers since the original Super Mario Kart was created. This game is no different. You can obtain up to 3 levels of boost start in most races (exceptions include Time Trials and certain World Tour events).

In order to charge a boost start level, you must hit the accelerator as the narrator is speaking out a number. For example, once the narrator says "ONE!", press down on the accelerator, then release it as the number disappears from the screen.

You can do this for each number of the countdown before the race begins. Be careful, if you press the accelerator too early or too late, ALL of the boost levels you've charged will disappear!


The power of a boost can be identified by the color of the flames. In order from weakest to strongest:
Red, Purple, Blue, Spiky Orange, Spiky Blue, Orange with Rings.
You can only get the first three levels from boost starts and drift boosts, the other three levels can only be obtained under special conditions.
Drift Boosts & Switch Drifting
DEMONSTRATION VIDEO COMING SOON

Drifting is basically a required skill to know if you don't want to crash headlong into every other turn you're faced with. Plus, it can get you boosts as well!

In order to begin a drift, you must already be moving forward at a decent pace. When you approach the turn you want to drift through (which is about 90% of all the turns in the game) you'll want to turn in the direction of the curve and hold down the brakes at the same time. Congrats, you're now powersliding!

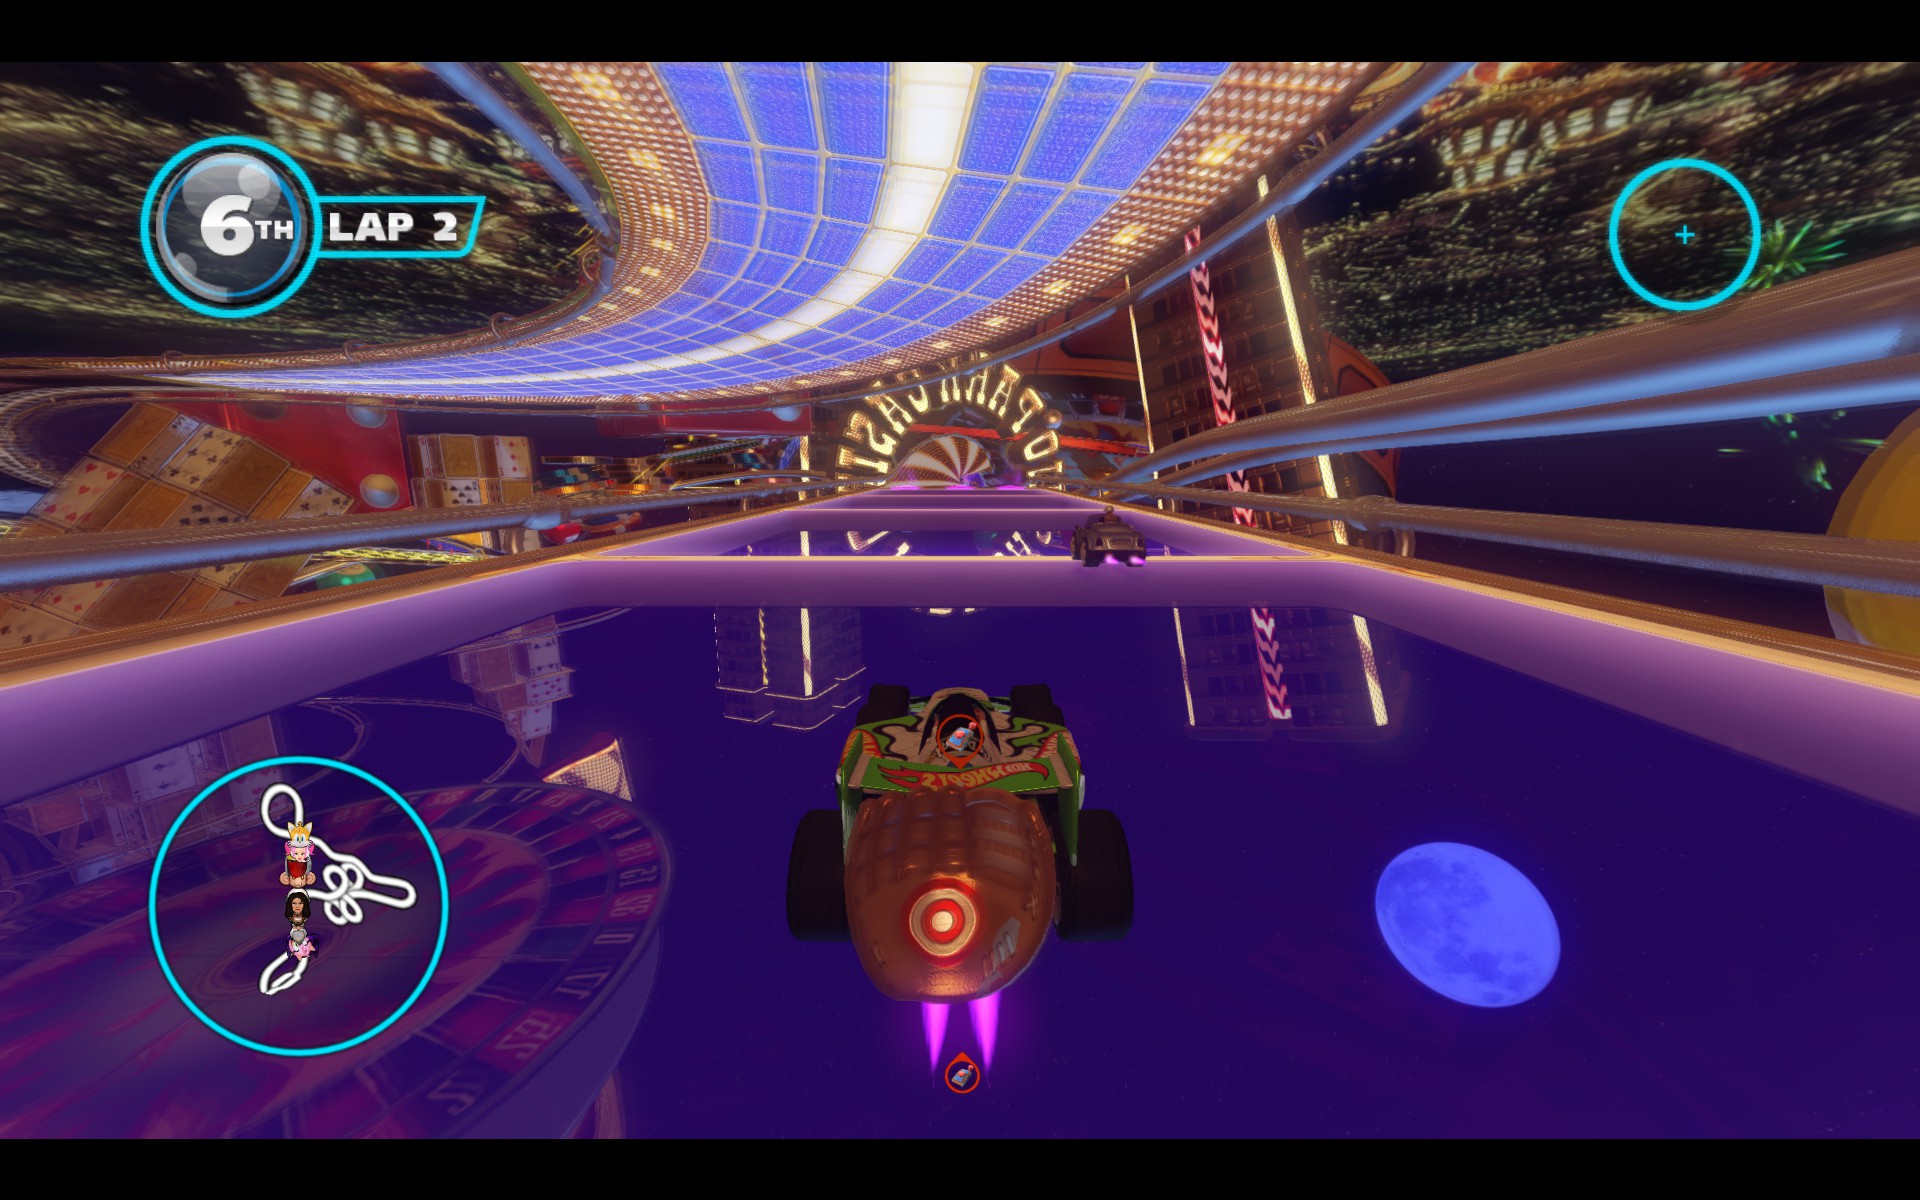
All vehicle forms can powerslide - cars, boats, and even planes. This screenshot demonstrates Shadow's plane air-drifting through the rings in the Dream Valley track.

As you're drifting, you can charge up to three levels of boost. The longer you keep a drift going, the more boost levels you can charge - up to three levels.


Also important to know is how Switch Drifting works. When you release a drift, there is about a half-second delay before the boost levels you've charged are used. During this time frame, you can begin drifting in the opposite direction. This lets you keep your charged boost levels! This means you can continue to accumulate boost levels while going through an S-Bend or other tricky curves.

HOWEVER, the ammount of time needed to fully charge the next level of boost will be reset when you do this. If you had a level 2 boost, and were 50% done charging the level 3 boost when you switched directions, you'll be knocked back down to having a level 2 boost and 0% of the level 3 boost.
Stunts - Cars & Boats
Cars and Boats can do flips and rolls when they launch off of a ramp, or a giant wave if you're a boat. These aren't just for show - chaining them together gives you boost levels, and the rolls can be used as a rough form of arial steering.

While your vehicle is airborne, stunting up or down will do a flip. This lets you keep your vehicle in place, but is slightly harder to land perfectly. On the flipside, stunting left or right causes you to roll in that direction. And you'll actually move in that direction! This is great for avoiding Wasp Swarms or other vehicles.

Performing any stunt grants you 1 level of boost, and you can get 3 boost levels from stunting.

If you're currently doing a roll, you can start the next roll during the last 10th or so of the current roll. The same can also be done for flips. HOWEVER, you can't start a flip in the middle of a roll, or vice versa - it has to be the same kind of stunt.

What's more, if you stunt too quickly by trying to start another stunt halfway through your current stunt, your engine will fail and you'll lose ALL the boost levels you charged from stunting. Stunt with patience!

Something else that's important to note is the Transform Boost. When driving through a transform ring, as long as you're airborne, you can still do stunts even while transforming. This is especially useful when transforming from a plane to a car or boat.

One more thing: It's actually possible to get a level 4 boost by stunting in 3 different directions during a single jump! For example, doing a frontflip, backflip, and roll in a single jump will give you a level 4 boost instead of a level 3 boost.
Stunts - Planes
DEMONSTRATION VIDEO COMING SOON

Planes travel faster than Cars and Boats, and there are two spots in the game where you can pass through a Boat>Plane transform ring a few seconds early to gain ground on your opponents. The first one is in the Carrier Zone level, just after the 3rd transform ring. You must jump off the sinking submarine to get to it. The second one is in the Dream Valley level. Near the end of the boat section, you can jump off a ramp between two giant rocks to transform early.

Unlike it's gravity-loving counterparts, the plane cannot charge boost levels by flipping and rolling. In fact, flipping and rolling in plane form, while NOT under the effects of a boost of any form, will cause you to LOOSE SPEED. Don't flip or roll unless you're boosting or activating a risk boost!

So what exactly IS a risk boost? When you're in plane mode, you may find yourself heading straight for a static obstacle, such as one of the many pillars in the Adder's Lair course. Instead of swerving violently to evade it, try aiming for the side of it instead. When you get close, roll or flip out of the way. If you did it right, you should hear the narrator say "RISK BOOST!" and you'll get a short level 1 boost.

There is also an exploit that arises from the way rolling works in relation to boosting. It's not game breaking, per se, but it's still a useful trick to use against A-class and S-class A.I. opponents. Green Giant covers the specifics here:
http://steamproxy.com/sharedfiles/filedetails/?id=136898421
JUST REMEMBER: If you can perform Risk Boosts consitently, it's much more efficient than the boost-rolling exploit.
Drift Rolling
DEMONSTRATION VIDEO COMING SOON

This is the most difficult-to-master trick I'm going to teach you in this guide. I wouldn't recommend attempting this until you've gotten a feel for the physics of drifting and rolling

When approaching a jump, a player's gut instinct would be to approach the jump straight-on and perform a few flips and rolls. Remember what I said about how rolling in a car or boat moves the vehicle in the direction of the roll? What if you could turn that sideways movement into forward movement?

Instead of taking the ramp head on, see if you can go off the ramp while drifting. You'll want to align your drift in such a way that you're still going "forward" on the track, but the vehicle is mostly sideways. It doesn't have to be perfect, as your rolls can help keep you centered on the track.

Once your land vehicle is drifting through the air (now there's a rare statement), you'll want to roll away from the camera. You'll retain most of your "forward" momentum, AND the roll inched you forward too! The best places to practice this is on the stairs-like tunnel curve in Temple Trouble, and the large drop-offs in Egg Hangar.

For more information on Drift Rolling (and boosting in general) check out Xenn's guide here:
http://steamproxy.com/sharedfiles/filedetails/?id=149673910
Boost Stacking
DEMONSTRATION VIDEO COMING SOON

This is really the most advanced trick I'm going to teach you in this guide. If you've only logged a few hours into the game, if any, then I STRONGLY implore you to skip this section of the guide and come back later after you've gotten more experience under your belt. The reason for this is because Boost Stacking involves a small bit of math, and may very well be useless to you if you don't give a @#$% about the metagame.

...alright, are you still with me then? Cool, let me try to phrase this in plain English.

As you already know, your vehicle can obtain up to six levels of boost. The higher your boost level, the faster your car goes. Predictably, the higher level boosts also last longer, so a Level 4 Stunt Boost would last longer than a Level 3 Drift Boost. For ease of explanation, we'll refer to the ammount of time a boost stays active as Boost Time; and more Boost Time = more speed for longer.

However, you've probably already noticed that you can 'stack' different, seperate boosts into more powerful boosts - if you've ever used a Drift Boost going over a Boost Pad or used a Boost Item after doing a Level 3 or 4 Stunt, then you've already seen this stacking effect in action.

This is where things start to get complicated. While Boost Levels will stack, Boost Time DOES NOT stack, and you obviously want your awesome Level 6 Drift-Item-Pad Boost combo to last for as long as possible, right?

When you use any kind of boost, that boost's Boost Time overrides any previous Boost Time, to a certain degree. So if you have a Level 6 boost going, and you use a Level 1 Drift Boost, then your Level 6 boost is going to have a Level 1 Boost Time instead of a Level 6 Boost Time. Obviously a pretty big waste, wouldn't you agree?

On the flipside, if you went over a Boost Pad and now have a Level 2 boost, and have a Level 3 Drift Boost charged up, using that Dirft Boost would net you a Level 5 Boost with a Level 3 Boost Time. If you had used the Drift Boost BEFORE going over the Boost Pad, this means you would still have the Level 5 boost, but it'd have a Level 2 Boost Time; that's a lot of potential speed you just lost there.

What this ultimately means is that you want to use the most powerful boost available to you LAST. For example, if you have a Boost Pad, a Boost Item, and a Level 3 Drift, you want to drive over the Boost Pad first, then use the Boost Item, then let go of your Drift Boost. This will net you a Level 6 boost with Level 3 Boost Time.

Take note that what I just described to you is an EXTREMELY simplified version of a much more complicated mathematical process (In fact, "Boost Time" doesn't actually exist in the game's code; it's simply an imaginary variable I've used to describe Boost Stacking in plain English). To make a long story short, the 'real' math behind Boost Stacking is just way too complicated for the purposes of this guide.
Using Weapons
SASRT is technically a kart racer, so obviously, the game has various weapons you can use to bring your opponents to a screeching halt. Here, I'll give you the lowdown on each weapon's basic functionality and some effective ways to use them.

  • Pickups & Super Pickups
    Pictured here are two kinds of pickups. The red pickups are the more common variety and hand out standard weapons as a result (although they may give you two items if you're towards the back of the pack).
    The golden super-pickups are far less common, usually only one or two appears on a track. They usually give you three items for the price of one (with a few variations).
    When you have multiple items at once, holding the item button down will cause you to use up to 3 of that item at once. For simplicity's sake, I'll call these "power shots".
    Some items can be launched behind you by using the rear-view mirror or holding down\back when using the item.

  • SNOWBALLS
    Snowballs, A.K.A. Ice, are the game's version of dumb missiles. They automatically come in packs of 3. Once they are used, they will fly in a straight path and disappear once they hit a wall, Blowfish, Firework, or another driver. If you hit an opponent with all 3 snowballs, they will become frozen and loose all of their forward momentum... which really sucks for them, as you could probably tell. Their power shot variant shoots all 3 snowballs at once, creating an instant-freeze projectile. Their super pickup variant grants you 6 snowballs at once.

  • FIREWORKS
    Unlike Snowballs, Fireworks are given out one-at-a-time. They're functionally similar to the Green Shells from Mario Kart. Once launched, they will bounce off of walls until their internal timer runs out or they hit something that's not a wall. Their super-pickup variety gives you 3 Fireworks at once, which can then be power-shotted. However, this is usually extremely wasteful as Fireworks cannot freeze opponents as Snowballs can.

  • BLOWFISH
    D'awww, look at the little fella's sleepy eyes. Isn't he cute~? ANYWAYS, Blowfish are handed out one-at-a-time and are used as mines. Once used, they will float in place until another cart hits them or they're popped by an opponent's weapon (such as Snowballs). Their super-pickup variant gives you 3 Blowfish at once, which can be power-shotted to create a wall of sushi-smelling pain. This is especially useful for super-narrow segments such as the car>boat transformation in Chilly Castle, the split paths in the Dream Valley boat segment, or many of the corridors in Burning Depths.
    ADDITIONALLY, Blowfish can be fired forwards by holding up\forward! They act similar to Fireworks. However, they loose all their forward momentum when they hit a wall, and they take about half a second to get up to full speed. This makes them extremely inefficient as projectiles in areas with long curves, such as Samba Studios or Egg Hangar.

  • DRONES
    Drones are R\C versions of your vehicle being piloted by sticks of TNT. I'm not making that up. They're served one-at-a-time. Once launched, they'll target one of the opponents ahead of you (usually the racer one position ahead of you, but sometimes the racer two positions ahead as well) and begin chasing them. They're not instant heat-seekers however, as they'll take a moment to align themselves with the target car before going in for the kill. They can be shot backwards but loose their targeting capabilities when launched like this. Their super-pickup variant gives you 3 drones at once, which can be power-shotted to attack 3 racers ahead of you (or one VERY unlucky racer if you're in second place).

    Interestingly, Drones tend to get stuck in the wall during the first turn of Sanctuary Falls' second lap. Don't use a drone if you're approaching lap 2.

  • GLOVES

    Gloves are this game's primary defensive item. Once activated, the Glove will float behind your vehicle and protect you from any non-solid hazard that you crash into. This includes enemy items and track hazards such as snowmen and Egg Robos. If you don't already have a weapon when the Glove blocks one, it will give the caught weapon to you - even Hot Rod explosions! This doesn't apply to Swarms, however. The super-pickup variant is the Super Glove, which lasts for a longer ammount of time and can catch more than one hazard for you.

    An interesting quirk is that Gloves will render you totally immune against two specific track hazards: The stone wheels in Ocean View, and the Steamrollers in Grafitti City. You can plow clean through these hazards and you won't loose the Glove in the process!

  • TWISTER
    The Twister can be launched forward and dropped behind you. When launched forward, it will target a nearby opponent much like a Drone. When dropped behind, it will sit in place like a Blowfish. Once a racer hits the item, their steering will be reversed (left becomes right, vice versa) for a set ammount of time... or until they crash into a wall or fall off the side of the track.

  • HOT ROD

    Once activated, the Hot Rod attaches itself to the back of your vehicle and gives you a boost level equal to how high the speedometer on the device is. Level 1 for white, Level 2 for yellow, and Level 3 for red. You must press the Use Item button a second time before the speedometer reaches the end of the red zone, otherwise the Hot Rod will backfire and drag you to a screeching halt. If you detonate the Hot Rod before then, it will create a nasty shockwave around your vehicle that can shove nearby opponents into the walls or even clean off the track. There is no super-pickup variant of this weapon.

  • SWARM
    If the soul-crushingly overpowered Blue Shell gives you PTSD, then you don't have to worry about a thing! The Swarm is not nearly as overpoweringly cheap, but it's still nothing to be sneezed at. Once activated, the Swarm will send a pack of huge wasps towards the first-place racer and anyone close behind him. They'll litter the track like a minefield of underpowered Blowfish, spinning out anyone who can't weave between their ranks. Interestingly, this weapon can be fired backwards, causing the swarm to appear immediately behind you.

  • ALL-STAR
    An All-Star Move is an incredibly powerful special ability that gives your cart a constant Level 3 boost for the duration of the All-Star, as well as a character-specific special attack! Also interesting to note is that the shorter-ranged the special attack is, the bigger the speed boost is for that All-Star (but not by TOO much)! Check out the section on All-Star moves for specifics on each character's attack.
Avoiding Weapons
For every weapon that you fire, you'll have to evade a weapon shot at you by your opponents. Here's some advice on how to evade enemy attacks (aside from just having a Glove at the right time and place).

  • UNUSED SNOWBALLS\FIREWORKS\BLOWFISH\DRONES
    If an opponent is still carrying one of the above items, the best solution is usually to make sure you're not immediately behind or in front of them.

  • LAUNCHED SNOWBALLS
    If the snowball is already headed your way and you don't have a glove, you can try to swerve (or roll) out of the way. Once it gets about two car-lengths away from you, chances are it's going to hit you no matter what. Tough it out and try to recover ASAP.

  • LAUNCHED FIREWORKS
    If the firework is already headed straight for you, then you're in the same boat as with snowballs. HOWEVER, if the firework is bouncing off the walls wildy, then you may still have a chance to avoid it. Try to read the firework's pattern and accelerate or decelerate to get out of it's estimated flight path. To put it in english: guess where it's going to bounce off the wall, and don't be there when it happens.

  • STATIONARY BLOWFISH
    If you see a blowfish sitting on the road ahead, you can just simply steer away from it, right? Not if it's sitting in front of something you really, really need! If you can't squeeze by it or nick the edge of a boost pad it's placed on top of (for example), you can always shoot it. If that's not an option, then you're better off cutting your losses and not going for whatever it's guarding.

  • LAUNCHED BLOWFISH
    If a forward-thrown Blowfish is bouncing off the walls, then try to apply the same strategy here as you do for a launched Firework. Because of the Blowfish's stop-and-go nature, I'd suggest going a little heavier on the breaks if it's in front of you.

  • HOT RODS
    You'll be able to tell if an opponent has a Hot Rod active by looking at the character icon that normally appears over their head. It will be replaced by a Hot Rod icon! You'll want to get as far away from the Hot Rod'ing opponent as you can, usually by inching towards the opposite side of the road. If you hit the opponent with an item while they're using a Hot Rod, it'll immediately destroy the Hot Rod AND slow down the opponent!

  • SWARMS
    If you find yourself approaching a swarm, DON'T PANIC. Simply ease off the gas a little and look for a clear path between the wasps. You generally can't squeeze between two wasps right next to eachother. In my personal experience, I've never been able to shoot down a Wasp with Fireworks. Gloves are your best friend when driving through a Swarm, while Super Gloves will render a Swarm harmless.

  • GLOVES
    If you can see a patch of brown floating behind an enemy's cart, don't shoot at them with a single use weapon like a Firework. If you have multiple Snowballs or Fireworks, you can get rid of the glove by shooting it with one projectile, then blast the opponent with your remaining weapons! Be careful about this trick, though, as it will usually give the opponent whatever the glove blocked - and they won't hesitate to exact revenge on you.

    Additionally, if your opponent is holding a Glove but hasn't actually used it yet, you can try to play mindgames with them by getting behind them with a weapon like Snowballs or Fireworks. If they take the bait, they'll use the Glove. Once their glove is gone... BAM! That's when you hit 'em! This works best against human opponents.

  • SUPER GLOVES
    If you see a glowing patch of blue floating behind an enemy's cart, they're basically untouchable. The only way you can attack them and not regret it is if you're using an All-Star move (and even then, they'll escape unharmed), or if you think you can ram them off the side of the road. Otherwise, you're better off just leaving them alone.

  • TWISTERS, REVERSED CONTROLS
    So you've been hit by a Twister. DON'T PANIC. The steering will not be reversed until the animation of your vehicle flipping is done playing. From that point forward, all you need to do is remember to keep your cool and to press left when you want to go right (and vice versa). If it helps, just think of it as looking in a mirror, or holding your controller upside down (don't actually try holding your controller upside down, especially if you're using a keyboard). If you panic and try to overcorrect, then you're guarnteed to mess yourself up somehow.

  • DRONES
    A backwards-fired drone is just a glorified Snowball - a dumb missile. A drone that's locked on to you, however, is a different story. You can tell it's locked on to you by a red circle with a drone icon appearing behind your car, with an arrow pointing towards the drone. There are a couple ways to get rid of one.

    1) If you swerve insanely sharply, or if you're extremely far off to one side of the track when the drone gets close to your position, it may simply drive past you by accident and decide to target the racer in the position ahead of you.

    2) If you activate any kind of boost just as the red circle icon begins flashing, you'll automatically evade the drone. You must be quick about this - there is only a very short window of time between when the circle begins flashing and when the drone hits you. This is called a "Boost Escape". This is an instant win condition - the drone will even drive right through you if it has to.

    3) If you have a Snowball, Firework, Blowfish, or another Drone, you can shoot it backwards once the chasing drone is directly behind you. If the item you used hits the chasing drone... well, the results should be obvious. The explosion from a Hot Rod can also destroy incoming drones (and other incoming weapons).
Tokens & The Slot Machine


Before starting a race, you'll be presented with a Slot Machine during the loading screen (unless you're playing a World Tour event). By coughing up 5 tokens, you can spin the reels and win a weapon or buff during the upcoming race! Tokens can be found on any track and most World Tour events in predetermined locations. Plus, new tokens will be generated when an item connects with a driver. That's generated, NOT dropped - you can't have tokens taken from you during a race.

Some of the prizes you can win include:
  • ITEMS
    You can start the race with a free weapon. A Glove or Super Glove can be a godsend during online matches.

  • ITEMS X3
    Much rarer than regular items is a 'buff' that will give you the aquired item every time you pass the finishing line, provided your item slot isn't already full.

  • WEAPON SHIELDS
    A weapon shield will lessen the effect of the specified weapon. For example, a Twister Shield will reduce the ammount of time you'll spend flipped around when a Twister hits you.

  • TITANIUM FRAME
    The same as weapon shields, except for collisions with the environment and other vehicles.

  • AUTO BOOST
    Start the race with a fully charged boost start. Kind of useless since mastering the boost start is one of the easiest things to do in this game.

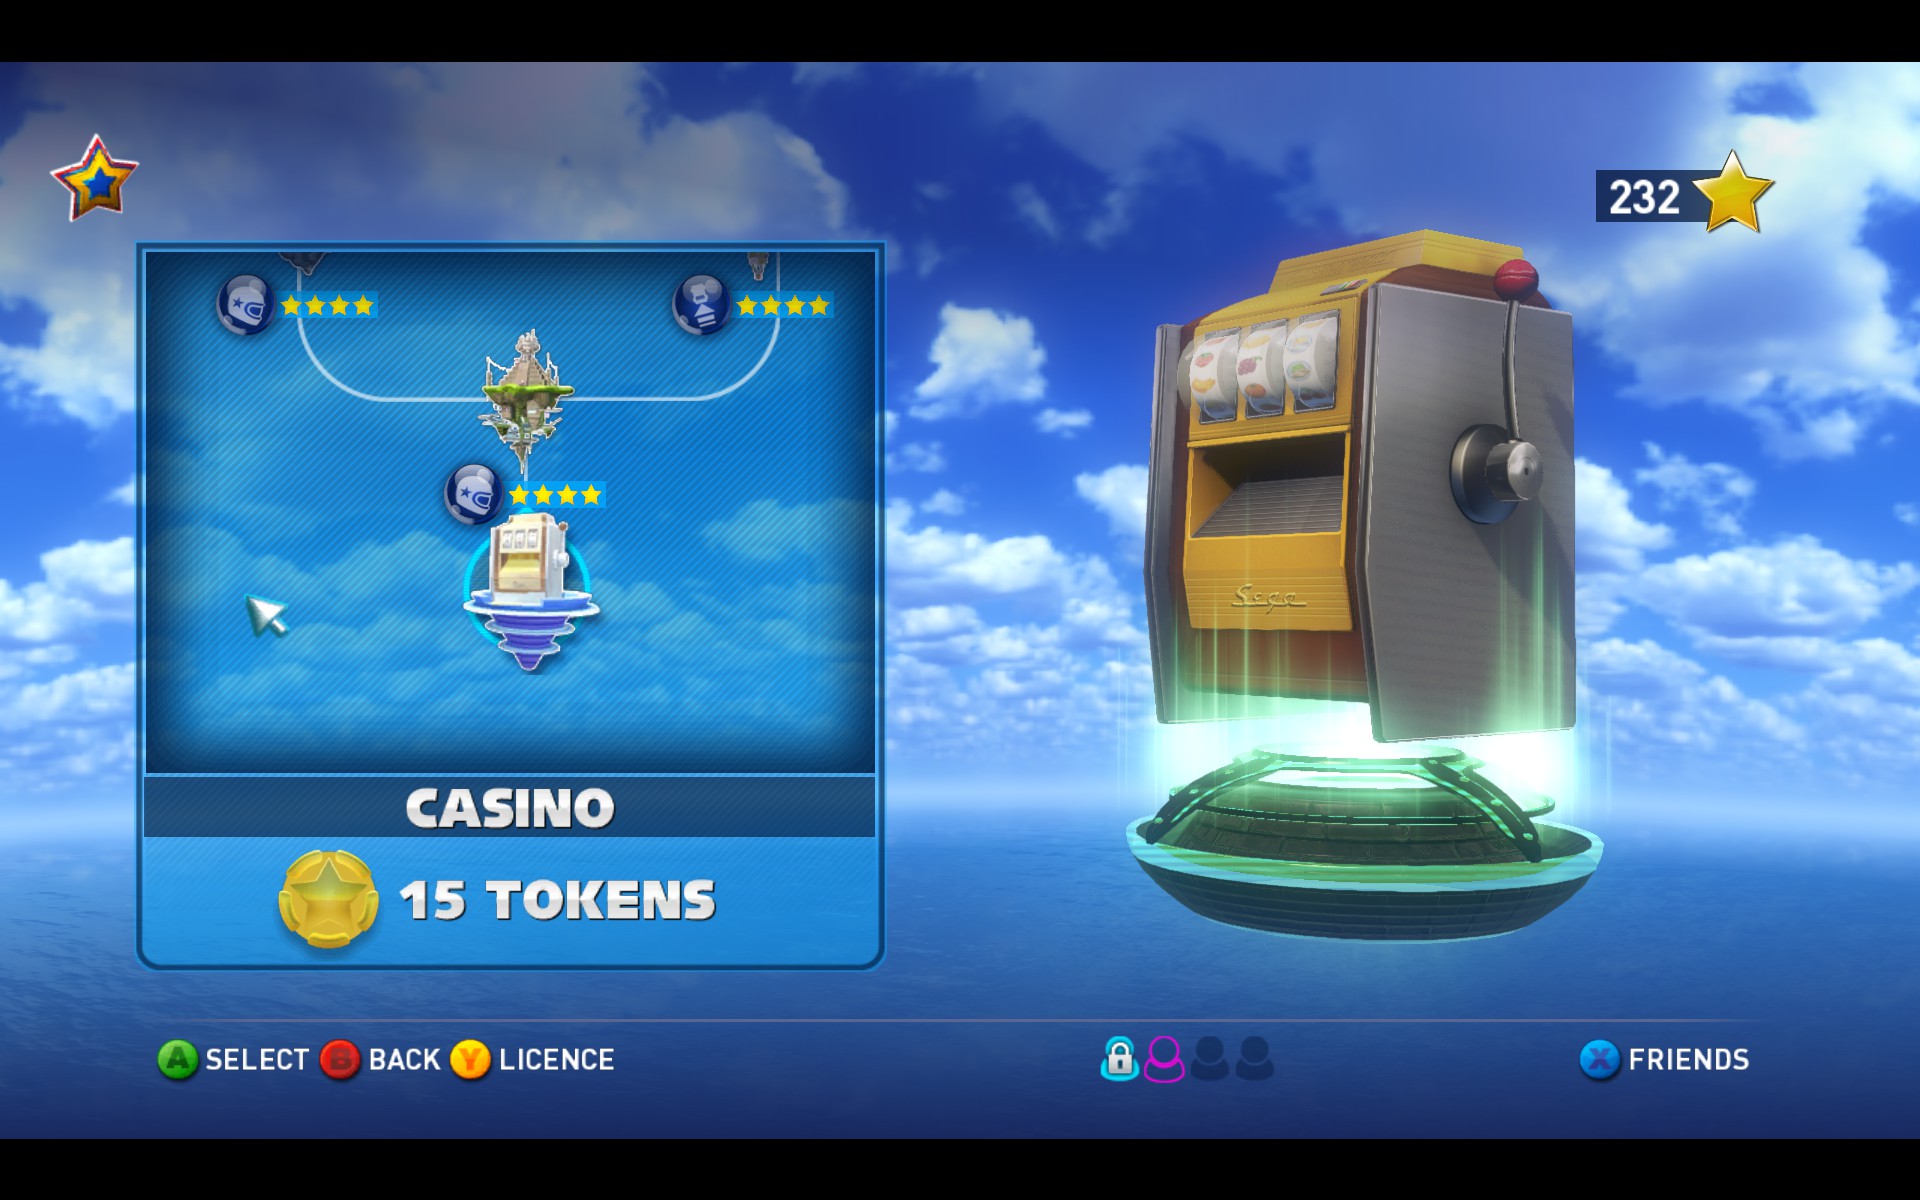
The Slot Machines can only be used by visiting a "Casino" space during World Tour. Because the Slot Machine doesn't show up before every event during World Tour, it makes it signifigantly easier to 'grind' for tokens during World Tour events. You can hold up to 99 tokens at a time.
Unlocking Vehicle Mods + The Boost Stat
After completing a race or World Tour event, the character you were playing as will gain Experience Points. Once that character maxes out their Experience bar, they'll Level Up, which unlocks a new Vehicle Mod for that character. The ammount of Experience earned is based off of how you performed in a race. The ammount of enemies you hit with items, the ammount of enemy weapons dodged, the ammount and level of drift boosts perfomed, so on and so forth.

Each character has all of the following vehicle mods:
  • Standard - the character's default stats.
  • Balanced - usually takes away one point from one stat in exchange for granting one point to another stat. Most other mods are based off of this mod's stat distribution.
  • Handling - Takes a point off of speed and gives it to handling.
  • Acceleration - Takes a point off of boost and gives it to acceleration. These are usually the most well-balanced mods, despite the existience of the Balanced Mod.
  • Speed - takes a point off of handling and gives it to speed.
  • Boost - takes a point off of acceleration and gives it to boost.
  • Console Mod - A special mod that must be unlocked in World Tour mode, rather than by Leveling Up. Usually, these throw handling and acceleration clean out the window in favor of maxed out speed and boost. The prime examples of this mod are Shadow, Vyse, and Metal Sonic.

    Additionally, the last mod a character unlocks by leveling up will be a golden "Super" version of that mod. This means various things based on the character, but usually it takes away 2 points from stat X and gives them to stat Y instead of just 1 point.

    If you're playing in this game's rather fantastic World Tour Mode, you can get away with choosing whatever vehicle mod suits your playstyle, as the AI opponents will scale their stats to be similar to yours (This means that picking Sonic with Speed Mod will allow an AI controlled MeeMee to keep pace with you).

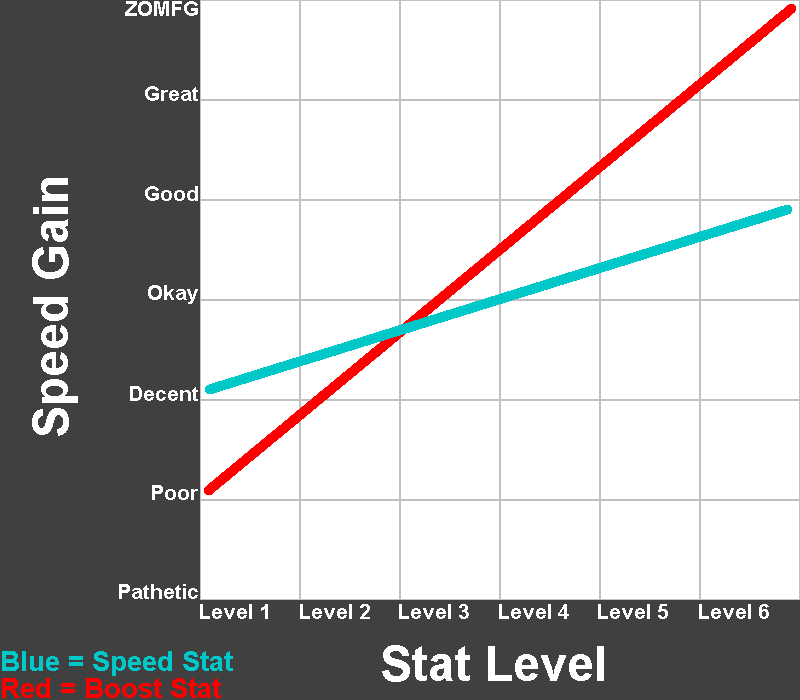
    HOWEVER, if you're playing Matchmaking or in one of our biweekly tournaments, I STRONGLY advise you to go with a Character\Mod combo with the highest Boost stat possible. The reason that veteran players value Boost over Speed can best be described in graph form:
    While this graph is actually grossly inaccurate (I made the thing in about five minutes), it still demonstrates my point: You will go FAR FAR FASTER with a level six Boost stat than with a level six Speed stat.
Would Tour Tips & Tricks
Would Tour is the game's Single Player Campaign mode (which, ironically, can be played in local multiplayer). The different events require the use of different skills - and a different vehicle setup. These are my preferences for what vehicles and mods to use for the different Would Tour events.

  • RACE
    Just pick your best racing character and drive hard!

  • BATTLE RACE
    Battle Races impose a 3-hit health bar on every driver in the race. Because evading damage is even more important than usual here, you'll want to take a vehicle with high handling stats into these events.
    Staying BEHIND the rest of the back is usually the safest way to play battle races. Stay away from the warzone, so to speak, and pick off the opponents towards the rear of the pack.

  • TIME ATTACK
    For these events, you get 3 attempts at finishing the lap faster than the ghost opponent. You'll want to go heavy on the speed and boost stats for these events. Acceleration isn't as useful because you won't be taking fire from other vehicles.

  • VERSUS
    These events are similar to standard races, except instead of just winning, you must outrun a single opponent at a time. Speed and acceleration are useful for these events, as you'll want to keep ahead of your opponent and be able to quickly recover from being attacked.

  • DRIFT CHALLENGE
    As the name implies, drift challenges require you to do a lot of drifting. A steering stat of around 2 or 3 is all you'll truly need to stay inside the drifting zones. High speed or high boost can be helpful in getting to each checkpoint quickly.

  • RING RACE
    Yeah, Superman 64!! But seriously though, you're going to want high speed and even higher handling stats for these events. Control over your vehicle is the most important thing to worry about during these events.
    If your item slot is empty, you'll gain a boost item for every 5 rings you pass through. These are best used on straightaways or very wide curves, given the plane's slippery nature.

  • PURSUIT
    The Pursuit events pits you against a gigantic boss tank! The boss tank has 3 phases: while it's blue, it leaves behind mines. While it's yellow, it'll shoot missiles. And when it turns red, it will leave behind entire walls. When the tank raises it's, uh, "turret thingy", that's when it'll take extra damage from attacks!
    The first thing to remember is DON'T PANIC. You have unlimited time to take out the boss, and the boss will kindly wait for you if you're lagging behind. Steering and acceleration are your top priorities, as you'll want to be extremely maneuverable to make avoiding attacks easier.
    Also remember that the 'ammo' pickups you collect during these events behave like snowballs. They're collected three-at-a-time and you can power-shoot them to shoot 3 of them at once. You can also collect more than 3 ammo at once!
All-Star Moves - Starter + DLC Characters

All-Star Moves can best be described as Final Smashes on wheels (err, wings). They give you a constant Level 3 boost, near-total invincibility, and a character-specific special move. It should be noted that All-Stars with short-ranged attacks have bigger speed boosts than projectile-heavy All-Stars.
They also cause that character's theme music to start playing for the user AND everyone else on the level! It's especially awesome when you're playing as Sonic or Eggman on Ocean View and the TF2 theme music starts playing.

Here, I'm going to list the special attacks each character gains when they activate an All-Star move. I'm also going to liken many character's attacks to existing items. If I liken a move to Snowballs, this does not mean that they retain the snowball's freezing effect.

These are the characters you start the game with, and the DLC character(s).

  • Sonic
    Sonic spindashes out of his vehicle (how is it still steering?!) and bounces off the walls like a firework. He has loose enemy-tracking abilities while he's bouncing around.

  • Tails
    Two toy versions of the Tornado Mk. 1 appear besides Tails' plane. They shoot a half-dozen mini-rockets that behave like non-freezing snowballs.

  • Knuckles
    The Master Emerald hovers above Knuckles' vehicle and releases a shockwave around itself and Knuckles. It's extremely similar to a Hot Rod explosion. Knuckles' All-Star is tied with Shadow's All-Star for giving the greatest speed boost.

  • AiAi
    AiAi's plane is enveloped in one of the epynomous Monkey Balls, and he can shoot large snowball-like bananas at enemies.

  • Beat
    Beat's vehicle is surrounded by a holographic, uh, equalizer. It expands and makes a scratchy-turntable sound. It's effect is similar to a Hot Rod explosion, but the hitbox lasts for a longer ammount of time.

  • Amy Rose
    Amy can throw giant snowball versions of her Piko-Piko hammer fowards. That's the gist of it.

  • B.D. Joe
    Joe leaves a trail of money behind his vehicle to distract enemies so that he can blast them with the Horn weapon from the original Sonic & SEGA Racing game. Similar to a Hot Rod explosion.

  • MeeMee
    MeeMee's plane is surrounded by pink flower petals, which can spin around her vehicle like a buzzsaw. Similar to an extended Hot Rod explosion.

  • Ulala
    Two dancing Putties appear next to Ulala's ship, and she can shoot hear-shaped lasers ahead of her. They're basically pink snowballs.

  • Ralph
    Ralph uses his helicopter during his All-Star. He attacks by swinging around two wrecking balls beneath the 'copter. It's similar to MeeMee's extended Hot Rod explosion.

  • Alex Kidd
    Two giant fists spring out on either side of Alex Kidd's vehicle. Any opponents that get punched are appropriately sent flying sideways.

  • Shogun
    Shogun fires a dozen or so rocket darts from the mouth of his dragon-plane. They're similar to Tails' mini-rocket-snowballs.

  • Football Manager
    F.M. launches a HUGE flaming football ahead of him. It's a slower but much larger version of a firework.

  • General Winter
    Winter's attack is nearly identical to Ralph's, except instead of wrecking balls, it's an absolutely terrifying hammer and sickle. WOW.

  • Team Fortress
    Spy takes command and fires two heat-seeking missiles ahead. They behave like nigh-indestructable drones.

  • Metal Sonic
    Metal Sonic's vehicle is enveloped in a pink energy bubble that acts like a close-range extended Hot Rod blast. The draw is that it stays active for much longer than other extended Hot Rod explosions.
All-Star Moves - Locked Characters
These are the All-Star moves of the characters that must be unlocked by kinda-sorta-but-not-really-BUYING them in World Tour (Except for Dr. Eggman, who is unlocked by completing all 10 GP's).

  • Amigo
    Amigo parties like a madman while throwing two snowball-like shakers ahead of him. Festive, isn't it?

  • Danica Patrick
    Danica shoots two giant firework-like flaming tires ahead of her. As TV Tropes puts it, she's literally throwing Hot Wheels at the other racers!

  • Shadow
    Shadow releases a Hot Rod explosion made of chaos energy. Shadow's All-Star is tied with Knuckles' All-Star for the greatest speed boost given during the All-Star.

  • Vyse
    Vyse's ship is engulfed in a hologram of a nonspecific airship. The cannons on either side fire in sync, shoving hit opponents aside really far, really fast.

  • Dr. Eggman
    Eggman's ship is protected by a Death Egg-shaped shield. He can fire three our four heat-seeking missiles at a time. One of the most projectile-heavy All-Star moves in the game.

  • NiGHTS
    Nights reverts to her human-like form and flies through the track. She can spiral around to turn herself into a flying hitbox.

  • Gum
    Gum's plane is surrounded by a holographic equalizer. She can leave behind 3 broken heart blowfish in a row. The only rear-attacking All-Star in the game!

  • Joe Musashi
    Joe throws four-to-six flaming shuriken at his foes. The shuriken will loosely pursure their targets. One of the most projectile-heavy All-Star moves in the game.

  • Pudding
    An electric guitar appears over Pudding's vehicle. It can create an extended Hot Rod-like shockwave by making, well, guitar sounds.

  • Gilius
    Two magic vases appear beside Gilius' vehicle. He can throw snowball-like axes with surprising frequency, AND the two pots shatter every time the attack is used, knocking back opponents within bumping distance.

  • Reala
    Reala reverts to his human-like form and flies through the track. He can shoot a firework-like meteor ahead of him.

  • AGES
    Two smaller F-14's appear besides After-Burner-AGES. AGES itself can shoot two opponent-seeking missiles. They behave like drones.
Other Useful Guides
These guides expand upon some of the tricks and techniques I've glossed over in this guide. I highly recommend checking these out if you want to improve your game even further.

A general tricks-and-tips guide containing hints and other tidbits pertaining to the individual tracks, created by Will TTVR.
http://steamproxy.com/sharedfiles/filedetails/?id=130121159

A wonderful guide by Xenn that details the specifics of Drift Boosting and goes more in-depth about Drift Rolling.
http://steamproxy.com/sharedfiles/filedetails/?id=149673910

A guide created by Zork Nemesis that focuses primarily on the Time Trial ghosts, but can be used to improve your knowledge of the tracks as a whole.
http://steamproxy.com/sharedfiles/filedetails/?id=132637314

And finally, a useless reference sheet for each Character and Vehicle Mod's stat distribution by yours truly.
http://steamproxy.com/sharedfiles/filedetails/?id=148852166
Thank You For Reading


GOOD LUCK AND HAVE FUN!!
128 Comments
ViLoN 23 Nov, 2023 @ 8:45am 
Go rating
SilverJudge 26 Oct, 2023 @ 7:34am 
On ds4, hold R2, and while you holding it, also hold L2. Hope it helped ya
AnomalyOfTheWorld (Sally Acorn) 4 Oct, 2023 @ 6:33pm 
Quesiton: How can you make Hard difficulty fair?
devious chef 7 May, 2023 @ 6:18am 
is it possible to play the game on keyboard? just asking
bleoneh333 17 Apr, 2023 @ 1:31pm 
bruh how do i drift with playstation 4 controller i try but when i do i just stop not drift
Shred VII  [author] 24 Nov, 2022 @ 4:21pm 
Whoops, it was set to "Hidden" instead of "Unlisted". I've fixed that now; thanks for the heads up!
R543 21 Nov, 2022 @ 10:38am 
Hi, this might not be the right place to ask, but do you know what happened to your Characters & Mods Quick Reference Sheet guide?
It's no longer available, and given that your other guide is still up/your Steam account still exists, I doubt this was removed intentionally?
r0xas_t0uchd0wn_ 28 Sep, 2022 @ 6:45pm 
when i launch the game and in the intro the game flickers back a frame and eventally crashes

Specs
Intel i5-6400
GT 730
8GB Ram
1TB HHD
Iriba 12 Aug, 2022 @ 9:55am 
Hey I was curious about that boost stack maths, if the boost time isn't a variable then what is it ? How/where can I find that bit of code to satisfy my curiosity other than blindly searching it on cheat engine, maybe I'm using the wrong tool but how did you discover this ? Thx in advance
Dogs-R-Dope 21 Oct, 2021 @ 5:39pm 
ever since i configured my controls the crashes immediately when i start it up plz help