Ostrich Island

Ostrich Island

27 ratings
How to add a new Ostrich Skin
By MeDungeon Games
This guide describes how to add an amazing Ostrich skin you made by yourself into the game and share it with Ostrich Island community.
   
Award
Favorite
Favorited
Unfavorite
Step One. Make a skin!
These simple steps will guide your through the process of creating a beautiful (disclaimer, result may vary) and hand made skin for your Ostrich.

  1. Find the skin template image skin.jpg on your hard drive. It is inside Ostrich Island game folder. Usually the template location looks like this: C:\Program Files (x86)\Steam\SteamApps\common\Ostrich Island\. Alternatively, you can download skin template from here: Skin Template[storage.medungeon.com]
  2. Make a copy of that file (skin.jpg) in case you would like to start from scratch or make another skins at some point.
  3. Open skin.jpg image with any image editing software. Even Windows Paint is a good option, it is that easy to modify template and get a good result. In this example I've just added 3 simple red lines across the ostrich neck.
  4. Save your work in exactly the same location and with exactly the same name skin.jpg Remember to make a copy of the original file before saving any changes.

Below is the preview of changes I just did. Image on the left is the original one. On the right you have a pleasure to see the ostrich wearing a red scarf. Well, some imagination is needed at that point. It is time to start the game and watch the magic.


Step Two. Make a preview.
In the previous section you created your very own Ostrich skin. Let's see how it looks like in-game and make some good screenshots in preparation to upload your skin and share it.
  1. Start Ostrich Island game and in the main menu click The Nest
  2. Once inside, kick the wardrobe to open customization screen. In the top row click Workshop button. The first skin in a row is the one you have modified recently. We haven't changed the preview yet, so it looks like the one from template. We are going to update the preview image soon, but right now just click on that first skin to put it on. Voila! Your ostrich has the unique look now!
  3. Leave the Wardrobe and go to your favorite island/location to make a nice screenshot, we are going to use it to make a preview for your beautifully crafted skin. Skin preview will be visible in Ostrich Island Workshop and in the Wardrobe of players who subscribed to your skin.
  4. Exit the game, start your image editing program and open the screenshot you've just made. Your task here - make a square preview, maximum size 512x512 pixels. Choose the most important part of the image for this task. When you are done, save it to the same location where skin template is. Name it skin_preview.jpg, replace the old file if it exists.
At this point you should have two modified images in Ostrich Island game folder: skin.jpg and skin_preview.jpg. In the next section of this guide you will learn how to share your gorgeous skin with Ostrich Island community.
Step 3. Share your work!
You are in the final section of this guide. It probably means you already have a new skin for your ostrich and an in-game preview, to show it inside Wardrobe. You like it a lot, perhaps even more than original skins you unlocked inside the game isn't it? Let's give other players a chance to enjoy your work. Share it with Ostrich Island community!
  1. Start the game again, in the main menu choose Settings and open the last page, clicking on WS button.
  2. Load the skin and skin preview files clicking on corresponding buttons and choosing .jpg files you have created.
  3. Fill in the skin title and skin description (you will be able to edit it later) and click Upload to Steam button. After uploading the Steam client window will appear. Now you should accept Workshop agreement (if you haven't done it before), preview your workshop item, make any changes if needed.
  4. When you are ready, change skin visibility to public. Congratulations, you have created and shared your first skin! Amazing isn't it?
13 Comments
TempusMori 24 Dec, 2015 @ 11:40am 
Ok, I'll give that a shot.
If all else fails, I'll login to a PC and do it that way. Thanks again for the fast response!
MeDungeon Games  [author] 24 Dec, 2015 @ 7:22am 
Contents or resources, sorry, I'm not familiar with mac. Try to click Choose Skin File button and see for yourself, which folder is accessible.
TempusMori 24 Dec, 2015 @ 3:01am 
Wow, I did not expect such a fast response. Thank you!!
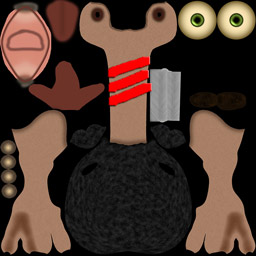
Once I have created a new skin, where should I put the file? Would it be here (see path below) or in another subfolder? Thanks again for the help. =)

OstrichIsland > Contents > Resources
MeDungeon Games  [author] 24 Dec, 2015 @ 2:36am 
TempusMori, sorry for missing skin template on Mac, you can download it from this link: http://storage.medungeon.com/main/OstrichIslandSkinTemplate.zip
TempusMori 24 Dec, 2015 @ 2:24am 
I just purchased this game today and was pleasantly surprised to find out that custom skins are an option. However, I wasn't able to find the skin.jpg file. I had no problems finding the game folder at all and all of the other resource files in there....just no skin.jpg anywhere. I am on a mac. Can anyone here offer any insights?
MeDungeon Games  [author] 31 May, 2015 @ 1:48am 
4 circles are toe nails. Three pointed thing is insides of the mouth.
7 4 17 0 17 _twelvetwenty-one 30 May, 2015 @ 7:19pm 
Going around the outlines of the legs in case I spill some color, I am now thinking that maybe the four balls are... claws or toenails? Maybe?

Still no idea what the three pointed orange thing is, though.
7 4 17 0 17 _twelvetwenty-one 30 May, 2015 @ 5:53pm 
I'm an idiot. My first post should've read
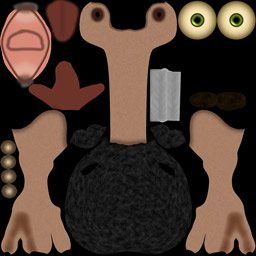
"What's it (from LEFT to RIGHT):"
I went in and painted each segment a different color to be sure of what's what and got it... for the most part.

==============

I am still confused on two things:


Below the Open Mouth and Tongue, to the left of the neck -THE THREE POINTED ORANGE THING. I figured that to be the foot/toes but I found out that the toes are part of the leg profiles.

THE FOUR BALLS to the left of the Right Leg. Absolutely no idea.
MeDungeon Games  [author] 13 May, 2015 @ 8:28am 
Aluminium foil are feathers :) Profiles on left and right are legs.
7 4 17 0 17 _twelvetwenty-one 12 May, 2015 @ 5:17pm 
Could you explain each piece of the skin template?

What's it (from right to left):
Top Left=Open Mouth, tongue, face, eyeballs.
[Unknown] Maybe a foot, [Unknown] Maybe some aluminum foil, [Unknown] Maybe some eyebrows
[Unknown] Maybe a necklace, [Unknown] Profile from the right, [Unknown] Maybe shadow of the body, [Unknown] Profile from the left

Trial-and-error will figure it, but it'd be nice to have it in the guide too :caster_wink: