Star Ruler 2

Star Ruler 2

78 ratings
[Beginner's Play Guide] A Beginner’s Attempt to Conquer the Galaxy!
By cicoles
(It's a very big guide so it may take a while to load, when you click on this, it will take about 10 seconds to load up!)

Star Ruler 2 is an amazing game with many complex subsystems with a lot of depth hiding behind an RTS.

I feel that there is much fun to be had but the structure of the game may discourage some players. Therefore I'll write a simple play-through and see if it helps others come to appreciate this gem.

In this playthrough, I'll be concentrating on introducing the UI and gameplay mechanics to beginners. And show how we can learn the game while having fun as well.

2
   
Award
Favorite
Favorited
Unfavorite
Introduction
Star Ruler 2 is an amazing game with many complex subsystems with a lot of depth hiding behind an RTS.

I feel that there is much fun to be had but the structure of the game may discourage some players. Therefore I'll write a simple play-through and see if it helps others come to appreciate this gem.

Pre game information

I'm playing the expansion/DLC. I've just bought DLC after playing the vanilla and think I may as well play it for this since I'm a beginner anyway.

I'll be playing Mono. The reason for this is that I'm a beginner. Mono as a race has some special features that encourage learning for beginners, even though the game warns beginners not to pick it as their first games!

  1. The Mono does not need food and water. They are a robotic race and thus does not consume food like normal race. Without need for water and food, complexity in managing the economic requirements is reduced. This is a gigantic advantage. But it's balanced by...

  2. The Mono's population does not grow naturally and must be manufactured. This is a disadvantage and tends to slow down the Mono in their expansion in the very beginning phase as they must devote a large part of their labour to manufacturing population. As beginners, I see this as a strength for learning because it teaches us a very important lesson in managing populations on planets and how that affects labour.

The Mono is a "turtle" race with huge potential after the initial weak period. I'll explain why as we play. They are kind of like the Industrial Klackons of MOO but behave and play like the Psilons of MOO. Expand a bit, hunker down, develop then unleash destruction on the opponents. This play style allow us to learn quite a bit about the various subsystems due to the turtling nature.
Setting Up the Game

In the setup screen I have picked the Mono. Upon choosing, the game randomly picks 2 opposing races for me.


Oops, a new expansion race is in there and since I would prefer a more familiar play through now, let's change the races.


Interface Tip: To change the race of your opponent, click on the race name just below the name of the faction. You will see a race selection screen similiar to what you had at startup.


I've change the unfamiliar races with some more familiar ones, I'm going to select the Terrakin and the Oko.

Now I'll select the difficullty of the game.

Interface Tip: To select a difficulty, click on the difficulty and select the level that you want. You can also choose the various subtraits. "Passive" means the AI will not attack you unless you initiate war on them.

I'm picking Easy + Passive for both AI since I'm only a beginner learning the ropes.

Next I'll select the Spiral Galaxy for our start.

The spiral has a simple structure with the start systems within the arm that is typically only connected through the entrance through the center of the galaxy. I am hypothesising that this makes the AI value your inner arm planets less valuable as there are no direct connection to the star systems from their borders.

The spiral is also straight forward without too many connectors between stars. This allows us to have less distraction and have a clear idea of how to expand towards the center of the galaxy.


I am using the defaults so we'l just accept that and start the game.

Summary:
  1. We have picked the race Mono for it's turtling ability.
  2. Mono also simplify the system for us because they do not need food and water.
  3. We'll be playing to their strengths and use their weakness regarding their population growth as a learning feature.
  4. We have chosen 2 easy opponents with the passive trait to allows us harrasement free game since we are pure beginners learning the ropes.
  5. We pick the spiral galaxy as a default learning ground.
A New Beginning
We wake up from our electronic slumber. The central AI have download the instructions to us. Directive is to expand and colonize this galaxy so that we can harness it's energies. We are to find the reason for our existence. The Calculators need vast energies for their calculations. We must fulfill the directive!

Ok let's take stock of where we are.

You always start with an unhelpful view... Let's fix it. While we are at it, let's pause the game while we look around and take stock of the situation.

This is an RTS game. It is important to use the pause. We can leisurely play and explore but the game AI opponents will proceed at a fixed pace and we may find ourselves falling farther and farther behind.

Interface Tip: I bind my "spacebar" key to the "pause" function. You can do that by hitting escape -> options -> keybinds. And manage your bindings there. Don't worry about the huge list there, we'll just bind those that we use so that we don't get overwhelmed. Right now we'll just bind "pause" to "spacebar".


Situational Awareness and Planning
Now let's zoom out and get a situation awareness of our immediate surroundings and form a long term plan.

Interface Tip: Zoom out using your mouse wheel.

What we want is to take a look at our star system. You should get a view like this. Let's see what we have here...

Interface Tip: Hovering over graphics gives tooltip information that is critical to give us situational awareness. But be careful, the scale you are viewing the universe sometimes causes the objects to stack. SR2 cleverly rearranges the items when you scale out. So the icon representation may not be the actual position of the described object. Keep that in mind as you get used to this cool UI feature.


As we mouse over the items in the UI we get some pop-ups that may be confusing at first but they show some very crucial information.


In all default games, the Mono starts with 2 planets. Here we have Dupo IV and Dupo I.

As you can see, Dupo I is where our starting world is. Dupo IV is uncolonized.


We also have 2 starting scout ships. You do not have to worry about what the numbers really mean now. But as a quick guide, 373.7 is the hitpoints or health of your ship. And 0.02 is the attack strength. Needless to say they are flimsy =).


But wait! We also start with a dreadnaught. Which don't look so bad. We'll use this later if need be. Note that it seems strange that this dreadnaught is represented by some dots as well that is different from the scouts.

Game Mechanics: Fleets In SR2. An individual ship/spacestation/planet can have group of "support" ships attached to them. Zoom into the dreadnaught you have and you can see individual ships surrounding the main flagship. Support ships cost money to build and attach to flagships. And they contribute to the firepower of the fleet. They consume supplies also. We'll come back to this later when we explore the combat aspect of SR2.


So let's move on.


In the systems you visit, you may occasionally find orbs like the above. Think of them as chests or loot that you may encounter. They will require "energy" to activate to make use of their special bonuses. We'll talk about these later. The Mono starts with 5 of these special orbs in their home planet but you will not get to use them until your economy is built up.

Let's take a look at the galaxy. Use your mouse wheel to zoom out.


You can now hover over stars and see how they are connected. Basically the connections show how planets within each star system can participate in the supply chain that constitute the economy in SR2.

Game Mechanics: Economic Supply The lines connecting the stars simulate how SR2 design supply lines. It's an artificial construct as real space does not work this way but it's a design decision and will present us with some strategic choices and decisions. What it means is that only planets in systems connected by these lines can transport resources to be used in other planets connected by the lines.


Now, the game generates a blackhole in the center of the galaxy. One of our objective is to build towards the center as it's where the probability for special resource and higher tiers planets exist. It's a clever way to encourage expansion towards conflict zones by the designers. Good design here.

You can take some time now to see how the stars are connected to get a sense of how you should be expanding. As noted earlier, in a Spiral galaxy. The arms are "sealed off" and not connected to the center. It offers a "safe" expansion zone. But this is balanced by the potential lack of higher quality planets.

Let's zoom back in and take a look at our surrounding stars.


Interface Tip: You will find yourself using a zoom that your are most comfortable with as you play the game. Normally. for me, it's a view that covers a few star systems. This view offers the best combination of information and awareness. The great thing is that as your empire expands, the information is still quite easily accessible from even the galaxy view. Once you get used to the screen. Things will become second nature.

Let's hover over the star Dupo. Here we see the UI updates to show us the star connections. This is important as it shows us that we'll need to get to those stars and see if we can expand there while building the economic network.

If you click on the Dupo I planet. You will notice that the lower left corner updates itself with the most important information about the planet.


Interface Tip: This information panel apply to anything that you can click on in the Galaxy Map. It shows the most critical information regarding the selected object. Here we have the name of the planet Dupo I, the "level" of the planet, and the requirement to reach the next level. We also have the special resource called the "Unobtainium" and a population counter that reads 6/3.

Game Mechanics: Planet Level Planets range from level 0 to 5.
Each level determines how much income it generates, how many people can work there which affects labour and how much "pressure" it holds. We'll talk about the basics first.

Take a look at your top left corner, you will see your Income. Hover the mouse over it and you will see a break down.


As you can see, you "budget" is 550K. The planet itself generates 770K but due to some expenditures, you have only 550K remaining. Home planets are special. They typically generate a lot more income compared to normal ones. Your level 1 Dupo I generates 770K but a typical level 1 planet much less.

A level 0 planet produces NEGATIVE income. Meaning it'll take away from your treasury every "cycle" which occurs every 3 minutes in real-time.

A level 1 planet produces POSITIVE income and hold more people. And the higher level you go, the more base income it generates. This is excluding the special planets and resources you may use in your supply chains.

A level 5 planet produces most income and hold the most people.

Needless to say, crazy expansion without regards to the levels of the planets in your empire will quickly bankrupt your economy.

As the Mono race, our requirements for building planet levels is different from the other races. We don't require food and water. Instead we need just non-food resources to level up. We'll touch on this later.
Situational Awareness and Planning Continued...
Game Mechanics: Budget Cycle Every 3 minutes, the game calculates the budget available to you. Your income fills the budget and expenses of maintaining things that you have built (buildings/fleets/orbitals/level 0 planets) deduct from your budget. You can spend up to double your current budget. Meaning if your starting budget is 550K, you can spend up to 1.1M and go into a negative of -550K. Going into negative will reduce efficiencies. But every 3 minutes, the budget is reset and the treasury replenished. If you had a deficit of 550K (-ve), it would probably recover to near to 0 because your income offset the deficit, taking into account reduced efficiencies as you operate in the negative. For us, we'll try to stay in the positive budget.

Under the 550K you will see a timer bar that reads 2m 45s, this means that in 2mins 45secs, the budget will be replenished with income from you


You can see that it's defaulted to give leftover budget to influence. Here we have a choice to make. Do we keep it at the default so that we can play diplomacy cards sooner or put it into "Power" to activate our 5 special orbs? Or shall we start our research now?

As beginners, we have no idea what is the best. In my play throughs, I never realised that this can have a huge impact in how the game progress because every 3 minutes passes very quickly and it can rapidly boost an area which we want to grow in. For now, let's keep it at Influence because I'll like to show my fellow beginners a nice implementation of diplomacy by SR2. So we'll keep it at influence generation and leave the default there. Energy production and research can wait a bit.

Let's take a look at our planet again. Hover over Dupo I in the galaxy screen.


Game Mechanics: Planets Population and Resources Each planet have a population, minimally they will have 1. If you hit 0, the planet is abandoned. Here we see 6/3. This means that the population on the planet is 6. But only 3 contribute to labour. The reason is that a level 1 planet can only allow 3 population to work. A level 2 allows up to 8, level 3 16 etc etc...

Our planet hold 3 excess population. Basically you can imagine that they are robots in storage awaiting orders.

Below that, you see the resource the planet holds. It is Unobtainium. The other planet in our system Dupo IV holds Iron, which is a tier 0 resource.

Special Tip: Unobtainium Unobtainum is VERY a special resource that can magically transform into another resource of your choice. As long as you have colonized the planet it was on. It is tempting to use Unobtainum to duplicate a good resource and grow better. But for Mono, it is crucial that you use it to duplicate the FTL resource. The reason is that Mono is dependent on "teleporting" their colonist for colonization work. That's right! Mono do not ship their colonists on ships to other planets but teleport there instantaneously. This is a double edged sword because it's extremely powerful. But it requires FTL which currently only accumulates at 1/s.

As the Mono, your Unobtainum can be used to duplicate a FTL resource and make your FTL resource issues go away in a blink! Additionally, the FTL resource at higher levels allows you to obtain a galaxy wide view of ALL FTL travel if your Dupo I becomes a level 4 planet. A level 5 planet will make your FTL usage in-system for free. We will be building up Dupo I and therefore, the duplication of FTL is the best choice in using the Unobtainum in my opinion.

The flag of the right shows the loyalty of the planet which will increase as the level of the planet and the population gets larger.

Summary:

  1. We have examined our surroundings and have an idea of where we would like to expand.
  2. We studied the galaxy map and see the key things that are of immediate concern in the UI. The treasury displaying the budget. The planet tooltip. The information panel.
  3. We saw the star connections that decide how the economic resources can be routed.
  4. We explained how the budget cycle works in 3 minutes chunk and saw how the excess budget can be redirected.
  5. We saw how the planets display the levels and briefly explained how the level 0-5 planets mean.

Next! Let's get into some action!
First Baby Steps, Colonizing
What we are going to do?
  1. Explore the nearby star systems by sending out the scout ships
  2. Prepare to colonize our first planets
  3. Produce more colonists

Some Rational
In all 4X games, industrial capacity basically decides how fast your can build those giant pew-pew death dealers that you can use to crush your enemies with.

And it's no exception in SR2. As a general rule, having more high level planets will mean having more industrial capacity. So our immediate objective is to build up our economy.

As beginners, there are many things to consider:
  1. At it's most basic level, a high level planet will have more workers which mean it will have more industrial capacity
  2. Planets can specialize by having specific resources shipped to them, as long as there is enough excess pressure (which is what the game calls capacity), the resource will be able to generate a resource value
  3. Planets can build special buildings to take advantage of resources shipped there and utilize multipliers.
  4. Needless to say, it can get quite complicated and interesting in how you combine resource and specialization.
For now in our immediate future, we'll expand our industrial capacity by focusing on point 1. Expanding our population. Which means upgrading our planet.

Let's click on our planet Dupo I and examine our information panel. Hover over the "I" circle and see that it tells you that a level 1 resource is needed at Dupo I to upgrade it to level 2.


So how do we find a Tier 1 resource? Iron, which is found on Dupo IV. is not in this list so colonizing this will not help us level up Dupo I.


So what do we do? We find what is available at the other star systems! Send out the scouts!

Zoom the galaxy map where you can view the neighbouring systems comfortably. Now click on a scout.


Let's send the scout to the system on the left as we'll prefer to expand towards the center of the galaxy. Right click near the open space near the star system. You will see a green line plotting out the path the scout will take. A right click is used. So it'll take the path to travel there. We are still paused.


So now, let's issue another explore command to the other scout, this time, we'll make it go to the star at the top. Right click onto the star.


We note here that due to scale of the UI, the designers made a very good approach to ambiguous commands. If the UI can figure that you are clicking on an open space, it will plot a route. Else a context menu will pop up. Go ahead, left click on the menu item to select move to star and a plot will be shown.

Now, before we un-pause, and proceed. I'll need to remind ourselves that we are the Mono.

Race Mechanics: Mono We are robots. And robots do not procreate by natural means. This means that our "colonists" which are currently in a box in a warehouse must be manufactured when they are used up.

In a RTS, every second counts. So instead of wasting time, let's put our industry to use. Let's build some additional colonists. Some may argue for building some buildings to boost productivity. But I typically find myself wishing for more colonists in this phase of the game. So lets do that.

Double click on the planet Dupo I

This is the planetary screen which you have probably encountered in the tutorial. I'll highlight the interesting stuff that concerns us at this stage in the picture below.


We note that even though the planet only produce 220K, we somehow get 770K planetary income from just owning this. I think the game has a boost for the home planet to signify that it's a starting planet or it has a hidden absolute value added to the planetary budget portion to assist the starting position.

Click on the production tab. And produce 3 population to be used as colonists for us.


Click on construct 1B Population 3 times. You will see that as we produce more colonists, the incremental costs increase. Also the build times increases. This reflect the reduced efficiency when we have an overpopulation of stored robots. Don't worry too much at this stage. We can nitpick and just produce 1 now and produce more as we send out the colonists. But we'll try to not micro too much at this stage and just play more naturally. After we improve ourselves, we can tackle this like a true competitive RTS and max--min every action.

Right click outside the Planetary screen and get back to the galaxy screen. Now un-pause the game (spacebar if you had previously keybind or the default "p" or click on the timer control at the top left corner) and lets see the scouts travel to new unknown worlds!


Summary:
  1. We have:
  2. Sent out our scouts
  3. Built more colonists in preparation for colony building
  4. Unpaused our game

Now we await the results for the scout's exploration
Baby Steps, Colonizing Continues...
The scouts we have sent out are travelling in non-FTL speeds. Although they are not in FTL travel, they do not take long to reach the target systems.


Interface Tip: Game Speed You can speed up by pressing the >> button next near the pause/play controls if you are really impatient. The default keybinding F7 increases the speed. and F5 decreases the speed. F6 resets the speed to realtime. Normally during the initial stages, I tend to go slow, later when the economy is humming along or when we're waiting for really long build times, then we'll increase the speed.

Now let us see what the scouts have found! Take a look at my Galaxy screen below. You will note that information is presented in a clean iconic way. As long as you understand what it means =).

Let's see what we have. Pause and take a look.


We have the following:
  • 2x water planets
  • 1x food planet
  • 4x Debris fields
  • 2x Remnant fleets

Game Mechanic: Water and Food
Unlike the Mono, other races require water and food to establish and grow a planet. So in addition to Tier 1 and Tier 2 resources, a planet will need food and water to be imported for it to grow in levels. As the Mono, being robots. Food and Water is not required. Which is why you see on you planet details that only 1x Tier 1 resource is required to grow to level 2 for our planet Dupo I. This also means that we have hit a system that we cannot immediate put to use in our growing economy. Not to worry. We will not write off these planets because a bit later, we will be making use of these seeming useless planets to make our economy much more powerful! More on terraforming later!

Game Mechanic: Debris Fields Debris fields are like treasure chests similar to the orbs we have in our Mono starting system. To see what they contain, we need to scan them with a ship equipped with a scanner. Which our scouts naturally have.

Before we send the scout to scan the debris, there is something we also note in the system. Space Monsters!

Ok the Remnants are supposed to be relics of an ancient space faring empire. The game Lore hints at a possible relation to the First (the DLC expansion race). It's very vague and leaves it to our imagination to work out the possibilities.

For our purposes, and as beginners, the Remnants fleets look scary. They are like the Guardian in the MOO, we would like to fight them for the treasure they are guarding but will most probably be obliterated!


Look at the size of that thing!

Ok comparing our starting dreadnaught to the 2 fleets shows us that it's a no contest. We'll stay away from these baddies for now. We will not be making use of the system anyway in our immediate future.

We do note that the space monsters are guarding some cool research data and a HP boost that we can use on our flagships. So we make a note and we'll come back.

Does this mean that we are done with the system? No. Because we have 4 debris fields to scan. The presence of the fleets is annoying. This means that we'll need to keep the scout out of the range of the fleets while we are scanning.

How do we scan?


A quick analysis of the situation shows us that we'll probably be out of range of the Remnants if we scan the 2 lower debris fields. The other 2 upper field may come into range. At this stage, the scout have no chance against the fleets. So we'll be careful and take some precautions.

In an RTS, I like to prepare for setbacks. Since we'll be taking a risk here, I'll like to make a backup scout from the home planet Dupo I.

Interface Tip: Quick Planet Access The SR2 design allows us to very quickly jump to any planets that we are interested in. Let me introduce the Planets tab.


The Planets tab display a summary and very big overview of all your planets. This is an invaluable screen as our empire expand. It allows us to keep tabs on things and gives a very good picture of what is happening in the empire in terms of the economy and industry.

Do you notice that we are at 7/3 population in our Dupo I. Yup, we had built our first 1B colonists, which will be put to use shortly.


Left Clicking on the planet will being us to the planetary screen.


We issue a build command to build a scout ship.


And move it up in priority so that the scout will be immediately build when we unpause later.

Interface Tip: The production queue holds all the stuff you have queued up. The only limitation seems to be your budget. Meaning as long as you have budget, you can add stuff to the production queue. To reorder priorities of the build, left click and drag items in the queue to reorder them.

Game Mechanics: Production and Budget
When you add things into queue, you will notice that the budget gets reduced. You can obtain a refund by dismissing/cancelling a build item in the queue IF AND ONLY IF the current budget cycle is not completed. Meaning, if you ordered a 200K build item and you are at 2m 59s into the budget cycle, if you cancel the order, you'll get a full 200K refund. But if your order is keyed in. And the budget cycle starts at 1 sec again, cancelling the 200K item you ordered in the last cycle gives you back nothing.

Now that our scout is ordered. Let's head back to the star system and instruct the scout to perform a debris scan.

Ok, let's right click and exit the planetary screen. You will notice that you're back at the galaxy screen with no easy way to get back to the scouts.

Let's fix that.

Interface Tip: Side Panel Quick Access and Notification Take a look at the right side of the Galaxy Screen. You will see some icons that do not make sense to us beginners. It's actually a quick access/notification/interesting panel. Go ahead and hover over the items to get a read. You can add other interesting things so that we can more easily track our stuff. Let's add the scouts here.


Add Civilian Flagship to the panel and you will see the scouts appear.
A double click to the scout brings us to the scout on the Galaxy screen.

Game Mechanics: Flagship vs Support ship Terminology In SR2, a flagship is an independent unit that can be issued individual orders like move, attack, FTL etc. A support ship is something you attach to a flagship. They cannot be independently controlled apart from being attached to something else. So a scout ship is a flagship and a miner is also a flagship as much as a space cruiser bristling with weapons and defences. Flagship just mean it's an independent unit in SR2 jargon.


We issue a "Scan Anomaly" command to the scout.

Interface Tip: LEFT - RIGHT - LEFT Clicking SR2 UI requires us to have something selected before orders can be performed in the Galaxy screen. It works uniformly on all objects. Here we want our Scout to do something. So it MUST first be selected with a LEFT CLICK. We want the scout to target a debris field for scan. so the target must be RIGHT CLICK'ed. SR2's UI will then know that we want the scout (left click) to ACT on the debris field (right click). This will bring up a list of all actions that the scout can perform on the debris field, so you LEFT CLI
Baby Steps, The First Colony
Let's check out the other system!


We find:

  • 2x Food planets
  • 1x Special Orb that must be activated with energy
  • 1x Tier Planet: Chemical Resource
Game Mechanics: Resources The economy of SR2 is based on different types of resources. Take a look at your top bar.


We have:

  1. Budget ($$$), we have already encountered this. It's mainly used to build things.
  2. Influence, this is the diplomatic currency. We use this to buy special cards and to activate the cards.
  3. Energy, this is used to activate special powers or orbs. We saw how the Mono started off with some orbs. If we accumulate enough of energy, we can activate orbs which brings special effects like, making orbital stations, activating ancient abandoned spaceships and stations, creating new planets or even new stars!
  4. FTL, this is used whenever we perform FTL travel. Mono also uses this when they teleport colonists to colonise planets. We'll see how important this is in a while.
  5. Research, in SR2 research is mainly purchased with research points. When we accumulate enough research points, we can spend them on the research "tree", it's actually a web, to unlock new technologies.
  6. Defence, defence is a special resource that is automatically used empire wide to help build support ships for defence of planets. We'll go into this later.
  7. As you can see, all our resources at at 0 production rates. Only our FTL is accumulating at 1/s. But it's capped at 250. This is because we can only store 250 FTL. Later we can build structures to accumulate more of this crucial resource. But more on that later.
So how do we increase the production of these resources? By colonizing Tier 1 resource planets and using the resources.

Let's take a look at the resource planet we found at the star.


You will wonder what does Chemical do. Let's find out. Double click on the planet.


To get an explanation on what the Chemical does, we just go into the planetary screen and hover our mouse over the Chemical icon. The UI tells us exactly what it's for!

Game Mechanics: Resources and Types To add flavour to the game, the game designers have named the resources on each planet with names like "Plastics, Chemicals, Explosives" etc etc. This will require us to get familiar what each resource type actually does. Chemicals --> Research, Explosives --> Defence etc.

As you get more familiar with the game, the resource types will start to make sense. So don't worry too much about knowing everything. You can always check the exact meaning by just double clicking on a planet and reading the tooltip to find out what resource each resource type contribute to.

Now we have a Tier 1 resource planet. We want to increase the level of our starting planet to level 2. The requirement is that we need to import a tier 1 resource. So let's get it going!

I typically zoom out to get a view of the planet I am sending colonists from and the target planet in the screen.


Now, LEFT CLICK Dupo I, RIGHT CLICK our target Imaliz III, and LEFT CLICK "Transfer 1B Population (42 FTL)"


As you can see, a new colony is founded! Our FTL is used, and 1 unit of our robots brethren is shipped over!

But wait.... something's wrong...


Interface Tip: Planets health indicator The planets have rings surround them. A blue ring indicates everything is working as it should. A red ring means something is wrong.

Let's take a look and see what is wrong with the planet. Note that this the same UI scheme for indicating planet health is also present in the Planet Screen.


Double click on the unhealthy planet and see what's wrong.


Ah! We see that the game have not updated the status of the planet due to the pause. Let's quickly unpause and then pause again. Here is the updated view.


Aha! We see the problem, we don't have enough population on our planet!

Game Mechanics: Minimum population level Each level of a planet has a minimum population for it to work properly. A level 0 planet needs 1. A level 1 planet needs at least 2 population. A level 2 needs 6 and so on. It is critically important to have the minimal population on your planets. Else everything stop working.

Game Mechanics: Planet Level and Income A planet of level 0 will cause a deficit in our income. It may seem like a small amount 80K. But if you have too many of these, the amount stack up really fast.

Let's repair the situation and send another colonist over. You can of course go to the Galaxy screen and perform the transfer. But let me show you something really cool. Let's visit the Planets screen.


Now you can perform what you did in the Galaxy Screen in the Planets Screen! LEFT - RIGHT - LEFT click! The advantage of the Planets Screen is that it only displays things you are interested in. In this case it's our 2 planets.

We perform the transfer. Now, unpause the game and pause it again for the status to update. Let's go and check out our Galaxy Screen.

We see something interesting here. On the galaxy screen, you will see the planet with an orange ring.

You can see that now. The planet has an orange ring. That is weird! Didn't we just sent 2 colonist over? It should now be a level 1 planet right? Why is it still orange?

If you double click the planet, you will get a clearer picture.


The answer lies in a very powerful advantage of the Mono Race!

Race Mechanics: The Mono's power Mono does not need any food, so on a level 1 planet, they basically does not need any inputs apart from having 2 population. On a planet with a Tier 1 resource present, all Mono level 1 planets automatically qualifies for level 2! As long as you can get 6 population onto the planet! With other races, you will minimally need 1X Water, 2X Food and a Tier 1 resource to qualify. For the Mono, the requirements is drastically reduced!

But what we'll do here is now to ship out the Tier 1 resource to Dupo I our starting planet. So that Dupo I can become a level 2 planet. Let's do that!


On the Galaxy Screen (or the Planets Screen), you can click and drag the resource to import the resource into Dupo I. You can also use the "LEFT CLICK - RIGHT CLICK - LEFT CLICK" to export the Tier 1 resource into Dupo I.

Let unpause and pause and update our screen!


Our level 2 Dupo I is updated! Remember when I said that you need a minimal of 6 to make the planet work? That was not a typo. Because Dupo I does not have a Tier 2 resource, it does not need the minimum 6 population to work properly as it does not have anything to export. The starter planet may also be special as it does not seem to to have the requirement like other planets do, so we'll keep this discrepancy in mind as we move along. The 6 pop for level 2 planets still hold for other planets we colonize.
Scouting, Auto Explore
Ok now we have expanded and is on our way. Let do something with the scout. Let it auto explore!


Our new planet is at 2/3 population and is not operating at maximum efficiency. Double click it to go to the planetary screen and build 1 population.


Ok things seems to be in order.

Summary:
  1. We have added a new colony with checmicals which will contribute to research. We have expanded with 1 more colony.
  2. Our scout is scanning the debris field.
  3. Our other scout is on auto-explore.
  4. We have another scout queue in production and the main planet is building additional colonists.
  5. We have learned quite a lot about the interface.
  6. We not that the usage of the pause function means that we're only about 1.5 minutes into the game!
  7. Next steps, await the result of the next explored star system and see what we find at the debris field!
Explaining Pressure and More on Economy
We have spent quite a lot of time looking at the various UI and ways to do things on the Galaxy and Planets Screens.

That is good that we have the basics of the UI learnt. Now, we'll explore some of the more non-obvious things.
We had just sent the scout on auto-explore. The other scout is examining the debris. Let's un-pause and take a look at things while things are happening in realtime.


Game Mechanics: Economy - Pressure If you take a look at the planet Dupo I, you see an interesting thing. I would like to draw you attention to the game concept "Pressure". Remember that we had shipped a resource called "Chemicals" from our first colony here? At our colony, it was exporting 2/3 Chemicals here, and over here, the Chemicals produce a "Pressure" on Dupo I. This pressure causes Dupo I to build a building on it's surface to utilize the resource. In this case, we see a University being built. All this is automatic. The Pressure exerted by the resource on the planet automatically generates a building that will consume the resource. As can be see, it's 73% complete at the moment and have not yet contributed anything to our resource generation. We'll let it build for a while more and see the results.

Game Mechanics: Economy - Pressure Capacity Every planet has a capacity that is dependent on it's level/space and quality and population available. Here we see that Dupo I has a capacity of 7. We have used up 2 because our colony is shipping 2 pressure worth of Chemicals to Dupo I. When capacity is filled up. Excess pressure is used at a much reduced rate. This means Dupo I can only accept 7 Pressure from various resources before becoming inefficient. We'll keep this in mind when we expand. We'll also keep a look out for technologies and buildings to see it can increase our planet's capacity.


Game Mechanics: Labour In Dupo I, our planet has a labour generation of 8/min. This means that 8 labour will be generated every min to build things. All construction require labour to build them. For example, now 1B Population will require 12.8 Labour to build. Which means that on Dupo I, it'll take slightly longer that 1m 30s to complete. As the Mono, or any other race, having high labour planet will mean having faster build queues. Which is a good thing.

Now, let's see if we can increase our labour generation. We have a few choices right out of the start.

  • We can build a factory. Which can increase 3 labour per minute.
  • Remember our Iron planet? It has labour! And it seems to be able to add 4 labour!


The factory cost 200K to build which is not a big problem. But the maintenance cost is 285K which seems very high! Take a look at our remaining budget. It's 70K, that means we had spent 700K of the 770K this cycle.

Budget is the lifeblood determining what we can do each cycle. We'll like to have a large pool so that we can safely exploit our discoveries. We'll hold off the factory for now.

On the other hand, the Iron from our neighbouring planet looks interesting. Let's colonize that and see what the Labour pressure brings. So we'll colonize it and import the Iron into Dupo I.


We now see that a industry building is automatically constructed! And our research university has been completed, contributing 0.74 research points per second.

Looks like our economy is humming along. Let's un-pause and see what other things have completed. Our timer is also reaching a new budget cycle and we're ready to see how much influence the 71K excess budget buys.

Game Mechanics: Excess Budget Earlier we covered how we can route excess budget to the various resource. It's quite expensive it seems at this stage. So we are not really expecting much. See below. 350K for a unspecified unit.

Further exploration and the debris field
Let's take a look at what is happening with our explorations.


We scouted the 3rd star, but it seems like our scout got destroyed in the process! Ok, let's put this on hold and check out our debris field scan.


We double click on the scanning scout on the right quick access panel.

And we investigate the debris field. We are offered 2 choices! A one off 400K addition to budget or a new warship.

Every 3 minutes, the budget cycles resets. We're not so pressed on money. But it seems that we are surrounded by remnants! So let's pick the warship!


Hmmmm, it seems that we'll need to fix this junk before we can use it.

Ok, so we have a destroyed scout. And our scout just finished scanning and we reaped the benefits of our first debris field. Let's make the scout scan another one. And send our newly made backup scout to visit another star.


And continue our exploration with the newly built backup scout. Precautions pay off, haha.


Next, we'll check out the star system where our scout was destroyed.
Examining our options and update our plans
Although I have written a lot explaining basic concepts and UI elements, we realise that we have not completed our 1st 3min budget cycle!

We have taken our first baby steps and have accomplished the following:

  1. We have started our 1st 2 colonies. 1 of them is a Tier 1 chemical Planet the other is a Tier 0 Iron planet.
  2. We have shipped both resource to our home planet Dupo I and we saw that Dupo I have built structures automatically due to the pressure the Iron and the Chemicals exerted.
  3. Research is now accumulating due to the Chemicals.
  4. We have explored 3 star systems.
  5. One of our scout just got destroyed at a newly discovered star system. But our newly built scout is assigned to continue exploring neighbouring stars.
  6. We've only spent 2.5min of game time so far and is awaiting the next budget cycle for more spending budget
Let's take stock of our situation


Let's take a look at the colony where our scout got destroyed.


We see things we have encountered before, more planets and orbs, a remnant and a debris field.

But we note some things that are interesting that we should take note of immediately!

  • We see planets with Thorium which is represented by a "II" on the resource icon.
  • We see an interesting orb called the "Arcology"


Game Mechanics: Planet Level and Tier 2 Resource Types Planet levels are increased when certain requirements are met. For the Mono, our planet level increase is as follows:


This is different from the other races because of the Mono's advantage. They do not need food or water.

Planet Levelup Requirements
Basically, what this means is that for a planet to achieve
Level 1: No resource is needed.
Level 2: 1x Tier 1 Resource is required
Level 3: 1x Tier 1 and 1x Tier 2 Resource is required
Level 4: 2x Tier 1 and 1x Tier 2 Resource is required
Level 5: 2x Tier 1 and 2x Tier 2 Resource is required

With each level of planet, the amount of population and the pressure the planet can use is increased. This means that an empire with high level planets will out perform one without high level planets mainly because they will be able to support high populations and pressure capacity.

It is a primary object of any empire to build up at least some high level planets if possible. Currently Dupo I is at level 2. To achieve level 3, it will need 1xTier 1 and 1xTier2 resource.


Tier 2 Resource: Thorium


It seems that we have found 2 planets with Tier 2 resource. Both of them are Thorium. But what is Thorium and what does it do? The game itself tells us! Let double click on the planet and see for ourselves!


Interface Tip: Tool Tip and General Information You will find that SR2 is actually very liberal and generous with the information that it provides to let you play the game. Once you have a basic understanding of how the game mechanics work, you will find that information is actually available. You do not really have to look for a WIKI to find meanings for obscure icons and stuff. The difficulty is actually having a basic framework and mental map of what things actually are and how they interact with each other. The information itself is present in the game via tooltips and info panels. SR2 designers have actually meticulously made sure that all the information required to make decisions are actually accessible.

Game Mechanics: The critical Tier 2 resource planets As you can see from the Planet level up requirements. We need Tier 2 resources to level up any planets. The news is that Tier 2 planets are not as common as Tier 0 and Tier 1 planets. It's pure luck that we have discovered 2 x Tier 2 in our vicinity. The RNG (random number generator) typically will provide at least a Tier 2 nearby to assist starting empires. But to level up more, we'll need even more Tier 2 planets. In all, a level 5 planet will need to be supplied with 4xTier 2 planets. And Tier 2 planets are less common. Typically they can be found closer to the galactic center. The RNG seems to generate more of them there. What this means is that there will be a rush for Tier 2 resource planets. We need to grab as many of these as possible because they determine how many high level planets we can support in our empire!

Hold the celebrations! Discovering a Tier 2 planet is normally very good news. But here we have a problem. So far, we have only discovered only 1 Tier 1 resource. Which was our Chemicals that was used to level up our Dupo I. This is frustrating because, even if we can colonize the Thorium planets, we cannot level them up to level 2 to enable them to export!

This means that we have found 2 big discovery that we cannot immediately make use of. So let's be patient and wait for a chance to exploit our findings.

Game Mechanics: Increasing Population Base and Arcology


The tooltip of the Arcology tells use an interesting fact. A planet's maximum population that can be put to work can be increased. Here we have an "Artifact" that can be activated with 1500 Energy. (Which incidentally can be generated when we make use of the Thorium resource.)

Increasing the maximum population of a planet is always welcome news. Because the as a planet contains more population, the income it generates, the pressure capacity increases!


As you can see, a point of population makes a big difference in how pressure and income is affected.

This means something for us. It is important that we keep the population at our key high level planets high! As we colonize and teleport our population to the colonies, we may find our population decrease at our production planets and affect our output. This is something we will have to manage which is why you see me building the 3 population right at the start!

There is not much we can do now. So let's wait for the budget cycle to complete to replenish our treasury and give us new budget to work with. And we'll see what our scout had discovered. While we are doing this, let's build another scout and move it up in priority so that we can get a new scout asap.

Awaiting the next budget and anticipating the next star
We un-pause the game and see goto a zoom level in the galaxy map to have a birds eye view of the situation.

Interface Tip: Tooltip Goodness When you hover over things in SR2, you will come to realise that the UI does something amazing with the Tooltip. They give you realtime information regarding that object! Take a look!


This means that in our Galaxy view, we can quickly hover over planets and see what is happening at all times! There is no need to click into planets to see what is currently building. With just a simple hover, we can see what is happening with our planets!

As we wait for the exploration to complete, let's take stock of the situation. We have explored the surrounding areas, we discovered a roadblock. There are no more level 1 planets we can use... This is worrisome. In most of my play throughs, the Tier 1 planets are typically nearby. It seems that the RNG has stumped us.

This is a concern but not an unsurmountable obstacle. In fact, I'm kind of glad this happened because I can use this as a teaching moment and show some additional mechanics in play we can use.

So let's see what our scout turn up in the next star system.

Our immediate aim is to build up our economy and find additional Tier 1 star systems to colonize.

Summary:
  1. We have found 2 tier resources but is unable to use them
  2. We discover that the RNG had generated very few Tier 1 resources around us.
  3. We would like to build up our economy
A harrowing escape
Seeing that our scout got destroyed. I kept an eye on our scout as it travelled to a new star.

And I saw a remnant in the path of the scout!

I quickly issued flight path change, wanting to escape. Here is what happened!


Game Mechanics: Inertia and the wonders of Space Flight
In SR2, spaceships do NOT turn on a dime! Even a scout travelling at high speed have a big momentum and need time to turn. You will find this play a very important role in space combat later. Huge lumbering hulks with weapons facing forward can be destroyed by a nimble force attacking their rears! It's quite amazing how SR2 actually modelled this. And this design ties in extremely well with the very complex ship builder subsystem they have in the game! FTL ships can actually teleport behind enemy fleets. Ships can actually surround and hit enemies at all their sides! This is a far cry from games where everything is abstract and just based on pure numbers. Here in SR2, weapon facing, engine sizes, thrusters, weight and momentum etc are actually important in the fight!
Bad RNG but a potential life saver

Our scout had it's narrow escape. And we note that we ended up with 2 food and 2 water planets... again we have not found any Tier 1 resource yet. Looks like the RNG really dislike us.

Interface Tip: Notifications
If you check out the bottom Right panel. You'll see 2 semi-circles. It's SR2 UI way of presenting notifications. Clicking on the scout notification will center our view to the scout and dismiss it. Clicking on the Anomaly notification will ave us a lot of clicks and bring up the "Analyze Anomaly" command screen.


A lucky break! A serendipitous find!
It seems like the RNG has given us a lifeline. Intelligence on nearby star systems! A lucky break.

Our current situation is not ideal. So far we have only found 1 Tier 1 resource. This gives us some problems as we are unable to level up our planets. We found a lot of food and water planets which are not useful to us at this stage because we cannot easily exploit them. Later they will become extremely powerful but to exploit them, the Mono need a very reliable economy that can produce colonist Populations as well as have a healthy income to generate budget. I'll touch on Terraforming later when we get to that stage.

Let's pick the free Intelligence on un-scouted systems and see what we find.


As you can see Debris Analysis can make a HUGE difference to your planning and strategy! In our case, our lucky find saved us a LOT of grief and time. We found 4 systems with just 1 click! Instantaneously! Woot!

And we have even better news!


We found our Tier 1 Resources! With with a Tier 2 and even a Tier 3! This is a tremendous find!

Game Mechanics: Debris, Anomalies and Treasure Loot!
As you can see, debris can actually be a big game changer. In our case, the debris gave us exactly what we needed. A much needed view of our needed resources! To explore the 4 stars individually, we'll need at least 2 minutes more of real time with 2 scouts. But we are now given an immediate view. Which means our scouts can leapfrog the finds and move more into the Galactic Center! Therefore, it pays to manually control at least a scout to perform the debris scan. Another way is to set the scouts to auto-explore but track the Galaxy screen closely to see if you need to retake control to perform debris scan.

Let's see what we have found.

Here are the resource planets we found. We have:

1 x Chemicals => Research (We already have 1 of these)
1 x Plastic => Influence
2 x Natural Gas => Energy
1 x Antimatter => Energy (A Tier 3 resource that produces a lot of energy pressure)
2 x Electronics => Income/Money/$$$
1 x Jewelry => A Hybrid Influence + Income Tier 2 Resource! But the top right corner shows that it's a Noxious Planet that reduce Max Population by 1.
1 x Glass => A special Income planet that also gives 1 energy

As beginners, we should take some time to check out the various planets. Double click them and take a look at the Resource they contain. They are unfamiliar to us now, so it's good to get as much information as possible about them from the nice UI. Then we can make good decisions.

Next, we'll do some maintenance stuff and then plan out how to expand our economy.

First let's handle the scouts.


Next we take a look at Dupo I, our only planet that can meaningfully produce something.


As we can see, our Dupo I has only 5 Population. We have 1 more coming up in 21 seconds. We have a production capacity of 12 labour/min. Meaning we can produce 50% faster then before we started importing Iron. We'll queue 1 more Population, then we'll formulate our expansion plan.


Race Mechanics: Mono's Disadvantage
The Mono needs to produce Populations in order to expand and populate their planets. As you can see, our production queue is tied up producing Population almost all the time. This means that at anytime, we start to build structures/orbitals/ships (that require labour) on Dupo I, our Population growth STOPS. This is a very big disadvantage because it means that we have to consciously make trade-offs between growing quantitively (adding more population) or qualitative (improving planets with structures). This big disadvantage does not go away until we have another high labour planet that can help us produce the Populations required to expand our empire. This is why Mono has a relatively weak start among the various races.

Theory Crafting
A quick analysis of the this disadvantage shows us how much more carefully we need to manage our initial periods of expansion. As you could see earlier, if we send out colonists from Dupo I, the pressure capacity gets reduces and suddenly our labour drops. A 4/8 Dupo I produces ~20% less than a 5/8 Dupo I. This means that to keep our Labour at 12/min. We'll need a minimal of 5 Population.

To settle a level 1 planet, we need 2 population. That means it'll take us approximately 2+mins of build time at our current rate.

To settle a level 2 planet and export it's resource, we need 6 population. That will take us about 7+mins to build!!!

All this time, we are not able to build any structures that requires labour at Dupo I to improve our labour. What this means is this. We must upgrade Dupo I to improve the Labour because every invested Labour improvement stack up.

But now we have a Huge dilemma. If we improve the planet, lets say with a forge instead of additional Populations, we delay colonizing. This gives us a huge problem, because our various resources like Influence and Energy etc are still at zero. Meaning that we will be late to get into the game in those areas.

And delaying getting to the Galatic center means that good resource types will be taken by our Opponents.

So now, we see a very glaring weakness of the Mono. But then again. We are the Mono! Failure is not an option! And we have not played to our biggest strength yet! Our time will come!

So with all that in mind, let's come up with an expansion plan that plays to our strength and weakness.
A Lull, Disadvantaged but Playing the patience game
We'll wait for Dupo I to build up some population and I use the lull time to keep a close watch on the scouts.


Taking a look at our Dupo I, we see that a new Population had been added. And our economic values improved.


As you can see, a 6 population Dupo brings us a better production capability. And our income also increased. I'll let the game run a bit. Let's get Dupo I to 8/8 and see what the scouts bring up before we weigh our options to expand.
More discoveries and new options
We're waiting in the lull for our Dupo I to become better at labour production by building more population.

Patience Pays off

We held off colonizing because the reduction to our population on Dupo I would have tanked our economy. Meanwhile, Our scout found an interesting system.


This is quite a nice turn of events! We found another 2 Tier 2 planets! With a Tier 1 Planet in it! What's more! The Remnant fleet is at the far right, meaning that it will not be interfering with us much due to it's limited range!

And it's connected to our Dupo I's economies via the star lanes!


Game Mechanics: Star lanes for economies and Blockade
SR2 cleverly integrates blockade mechanics into the game. Connected systems, when doing their import/exports simulate the export by sending out what I assume to be trade ships (non-controllable) between systems along the star lanes. As long as they can safely reach the target planet, everything is well and good. But if an enemy fleet blocks the path and shoots down the trade ships, then a blockade is in effect! This is a great use of the spatial simulation of the Galaxy map to integrate a crucial game mechanic into the game! I have to give it to the developers! Well done! Needless to say, blockade = bad. More on that later.


Blockade runners?
We note that the in 2 systems connecting the resource rich regions to the left; the region where we found lots of Tier 1 resources, there are Remnants near the star lanes! That is bad news for us!


We might be able to use the bottom star lanes to escape attention of the Remnants for connecting to our resource rich region.

Now we have 2 choices, to expand left towards the Galactic Center and have lots of Tier 1 resources available, or to the right. Where a nice combination of Tier 1 and 2 exist in the same system with a nicely connected trade network.

Let's take stock and pick a way forward.

Meanwhile, we'll set the scout to scan the debris.

Making a decision

We are offered 2 choices. Should we expand left towards the Galactic Center or Left where we are already connected.

Weighing the advantages

If we expand Right, the benefits are non-trivial:
  1. The trade network is already connected.
  2. We know the position of the Remnant and we are certain it will not affect the trade.
  3. This is a conservative choice as there is basically zero risk.

If we expand Left, we have some risks balanced by advantages.

  1. There are a LOT of Tier 1 planets. Offering a lot of possibilities for growth!
  2. We note that there are hybrid Resources that we can use right at the bottom! These are fantastic in getting us started in generating resources for our use. I am looking the planet providing Glass which in addition to generating 3 Income, also adds 1 Energy pressure! And it's next to a Jewelry which provides 5 Income and 2 Influence! That is a fantastic mix as it build up income which is great for budget and throws in Influence and Energy at the same time!
  3. The RISKY bit is that we do not know if there are any Remnants there.
  4. Additionally, we'll need to use up 1 colonist to colonize a planet in the connecting star system if we want to hook it to Dupo I, our main production center where we want to level up.


My preference is to expand to the left towards the Galactic Core. The main reason is that even if we choose the right path, it will still take a log time before they are developed. We are looking at 2 + 6 Populations to bump up the colonies. When you take that into account, the 1 additional Population to connect the trade network is not that big of a problem. Furthermore, if we so decide, we can build the right cluster to support a high level planet and perform colonization form there! The nearness to all the Tier 1's give a very good base for expanding our empire.

With the decision set, we'll work towards that. We'll let Dupo I build a couple more Populations and see the results of the debris scan.


Let's wait for Dupo I 8/8 to maximize the Labour and build 2 more Population for colonizing.

And it seems that the Anomaly scan is complete. Let's investigate it!


This time, we'll pick the 400K for our Treasury. The reason for this is that I'll like to buy some influence and introduce our fellow beginners to the Diplomacy screen!

Game Mechanics: Leftover Budget (Reminder)
Leftover budget is used to buy resources. They are bought in 350K chunks. So let's see if we can buy a chunk and see if it's enough to play with diplomacy!

I'll queue another Population for Dupo I since the 8th Population will finish building before this budget cycle ends.

Additionally, our scout has discovered a new star.


As we explore we find strange new resource types. In this case, we find a Marenium which is a unique resource that enables us to build a new type of reactor for our ships! From the requirement and the fact that it's unique. It would seem that Marenium Reactor is a powerful one!

Game Mechanics: Moons
Sometimes, you will come across planets with moons. You can build moon bases that can boost a planet's maximum population by 1 point each. If a planet has 2 moons, it means that you can build 2 moon bases and that will add 4 Population Max to your total. A level 1 planet will be able to utilize 3+4 Populations! It's nothing to sneeze at. Especially on a production focused planet!


Here we see that our contribution to the resource from our leftover budget last cycle is producing a effect, Influence is being produced. And we'll use the produced Influence to participate in the diplomacy system.

Meanwhile our planet Dupo is now at 8/8 meaning it's operating at maximum efficiency. Let's produce 2 more population for and prepare for our colonization effort.

We also see that our Income is very healthy. We have a 1.1 million budget. Mainly from our increased income from Dupo I, and we had some of the 400K leftover from the Anomaly we scanned earlier.


This means that we can afford to build a factory (zero labour which will not interrupt our Population construction) which will cost 285K to maintain, which we can afford presently due to a healthy maxed out level 2 Dupo. So let's add that.


I'm using undeveloped tiles because I am not sure how fast does the game generate develop tiles. The wiki is unclear on this point and I am afraid that if I use any of the developed tiles it may take too long to regenerate them. There are some forum threads that also allude that building on the developed tiles may have an adverse effect on pressure as Population "consume" tiles and interact with pressure. With such uncertainties, I apologies in advance for choosing a potentially more costly way to build our factory.

Game Mechanics: Developed vs Undeveloped Tiles
When you build on developed tiles, the costs and maintenance is reduced.


I'll add another Population to the build queue and wait for our queue debris scans and population build to complete.


This is 6 minutes into the game. We have barely expanded although we have explored a large section of our surroundings. As stated earlier, Mono have a slow start to the game because we need to devote labour to generate our colonists.

Summary:
  1. We are at the 6 min mark in the game.
  2. We have patiently built Dupo I to 8/8 population
  3. We have 2 colonists queue up.
  4. We have identified our expansion target. Towards the Galactic center via the left star systems.
  5. Our scouts are busy scanning debris.
  6. We started a factory on Dupo I because we have a healthy economy.
  7. We started accumulating Influence so that we can use the diplomacy system.
  8. Our research is approaching 500 steadily and we'll be able to use the research system soon.
Overall, we have not encountered any big problems. Let's proceed and put our colonization plans into action. The next section will proceed very quickly as I have already covered major portions of the UI. There will be less writing and more pictures!

We'll then slow down again as we discuss diplomacy and research. I'll also be keeping track of the time and highlight interesting things our scouts find.
More exploration


Research

The research tree/web from the plain vanilla looks very different from the DLC tree. In fact this is the first time I am looking at the new DLC research tree. It seems like SR2 has rebalanced the tree and have added new stuff in it.

Interface Tip: Research Screen
You can left click+drag to move around the screen. The mouse scroll zoom in and out of the screen. Hovering over the various technologies which are represented by squares brings up a helpful tooltip which briefly explains what the technology does.

Take your time and move around the Research screen while paused. There are a whole heap of technologies available for research. You can see how much each research cost clearly. Sometimes, you can use budget or other types of resources instead of research points to buy the technology. It is my opinion that we should ALWAYS buy it with budget because research accumulates at an extremely slow rate relative to budget.

For our purposes, we'll like to get some technologies that boost our economy. Let's take a look at the web.


There was a big change to the Technology web in the DLC. I see that the Industry Techs are only along a narrow band, we also not that interspaced with key techs are general improvements that may also help productivity on planets. E.g. Metallurgy which makes Factories more productive are interspaced throughout the tech web.

Let's research some powerful Economy tech. We aim for the Megacities.


And we pick up 2 technologies along the way.


All acquired technologies have a "research time" attached to them. This means that for the period of the research time, (like a cooldown), the technology benefits cannot be utilized. There is a special race that does not have any research time.


And we examine the other Anomaly.


The "Attempt to revitalize the entire system" looks quite interesting.... Let's do it!!!


And nothing! =(


And we un-pause and see how things develop.


No warship for us again...

Shifting Gears, Speeding Up
As you can see, we are basically using our scouts to explore the stars and see if we can find any interesting finds.

What'll I'll do for the following posts is to speed up the updates and show you guys how the empire is managed at a macro level. The rest of the interesting stuff you can find during exploration, I'll leave it to you to experience the joys of discovering treasures yourself =).

Near Term Goals

My near term economic goal is to build 2 more level 2 level 2 planets before upgrading Dupo I to level 3. And meanwhile I'll use the scouts to find if we can find an FTL resource. As you may have noticed, our FTL is being used at a high rate. And it will deplete even faster as we ramp up our economy for expansion.
Building our Economy: The Patience Game
Game Time: ~7mins


We found another Unobtainuim. Unfortunately, we cannot do much at the moment was we just cannot utilize our finds due to our relatively weak economy.


We'll keep producing Population at the Dupo I and we now observe that our Colony at Imaliz 3 is almost at 3/3.


Now we find that it is optimal to keep Planet Populations at Maximum so that our labour is high! It make a big difference!


Now, we have 2 Population on our Dupo I that can be used to build a new colony. Let's do that with our Glass resource at Wiltirioa III. The reason we pick it is that it'll be our Tier I planet which we'll use to build up our Tier 2 planet. In addition to Income which we'll need more of, it also generates 1 Energy.

Using LEFT CLICK Dupo I, RIGHT CLICK Wiltirioa III, LEFT CLICK "Transfer 1B Population", we colonize the Planet with our excess Population from Dupo I.


We waste no time and queue 1 Population in Wiltirioa III. We'll also ensure that Dupo I is still producing Population for the 3rd Population at Wiltirioa to jumpstart it's economy.


Now, we can see Energy increasing. It's increasing at only 0.25 per second. Yet we were told in our Planetary screen that it's generate 1 Energy. What's this?


Game Mechanics: How the Game Balance Economic Output

SR2 balances the game so that certain numbers do not get out of control. Since Energy is used to activate Artifacts which gives special bonuses and the requirements do not change, the designers have opted to "balance" Energy generation so that it's generation does not trivialize the requirements later in the game.

Each resource have a balancing curve that produces diminishing returns based on the number of planets, amount you have stocked piled as well as some hidden factors which I am not able to discern. [Many Thanks to @GGLucas for feedback on this point.]

You will find that this applies to Research and Influence as well, this is how the game balances the economy. In our case, we note that we are penalized for having more planets when it comes to Enegry generation.


Game Mechanics: Diplomacy
SR2 has a unique Diplomacy subsystem among 4X. IMO it's a fantastic design that is easy to understand and provides players with a mental map of how Empires are interacting. It also comes with a simple to understand UI.

In addition to the usual treaty making 4X does, SR2 shuffles and randomly generates a pool of cards that perform various activities, like spying, economic, sabotage, defence boosting, loyalty enhancement, planet and system annexing etc.

You purchase the cards that you want with Influence or Budget and then plays them with Influence points. The UI makes it extremely simple to use. Simple clicks and well designed tooltips makes any beginner handle this easily. I'll leave you guys to explore the Diplomacy UI.

My prediction is that a LOT more 4X will start to implement Diplomacy like this.

Some cards when played do not require a vote. But some other cards that affect other empires or have a global effect requires a vote by all the Empires that are in contact. When a vote is in effect, you can influence votes by using cards in your posession. So it's important to play the Diplomacy game to ensure maximum advantage for yourself and not let your opponents get away with playing a card that make drastically affect you. Like annexing an entire Star system from you!


As you can see, the Diplomacy cards are expensive to both purchase and play in the beginning stages. Let's leave this for a moment and continue the game.
Steadily building the Economy
We jumpstart our colony by transferring 1 more Population into Wiltirioa III. This cuts down the Population production there as we prepare to colonize another planet.


Meanwhile our scout discovered a potential rift from the debris scan.


As we do not need to travel elsewhere and would like to just patiently explore, we'll collapse it.

Game Mechanics: Space Rifts
Space rifts is another form of FTL travel. A rift is created between 2 points in space. It's very fast form of travel and is utilized by a race that can generate rifts for FTL travel.


We are now at 10/8 at Dupo I and is is ready for another colony.


Let's build this up so that it can become productive. We export from Wiltirioa III to Wiltirioa I.


We keep transferring Populations from Dupo I which is acting as our colonization engine to build up our base. But we are now getting concerned that our FTL generation is not keeping up with our colonization efforts. Our scouts have not been successful in finding a FTL resource so far ,which is unfortunate. This may mean that we'll need to interrupt our colonization to tackle FTL generation by building a building. Meanwhile let's continue to build up Wiltirioa I.


We note that Imaliz has produced a Population as well. As you can see, as we get more and more planets online, our colonizing efforts will become much easier with regards to Population. And we'll start to feel huge pressures on our FTL resource production. Hopefully, we'll be able to find a FTL resource to soon!


We'll keep exploring and building the Populations on our planets to ramp up our economy.

As we can see, our budget is getting stronger.

Our 2nd "big" planet.

Our 2nd colony produces pressures for Influence and Income. As we have excess pressure capacity on our main planet Dupo I, it'll be ready to receive the pressure from this planet. But we'll need to link our 2 separate network up before we can export these pressure to Dupo I.

FTL and Exploiting Unobtanium
We found our badly needed FTL at last!


It's really far away. And there is no way we will be able to get there by slow colonization in time. How do we make use of the FTL which we were trying so hard to find?

Racial Tip: Using Mono's Teleport Colonizing and Unobtainium

So how do we make use of a planet so far away? Our answer lies in the Mono's starting Unobtainum. Unobtainum will be able to transform into any resource that is on one of our colonies. So we'll be doing this.

  1. Teleport 1 Population into the FTL Crystal planet.
  2. Use Unobtainium on Dupo I to transform it into a FTL Crystal.
  3. Abandon the FTL Crystal planet.
  4. Basically we utilize Mono's starting Unobtainium and their instant teleport capability to address our greatest need at the moment. Generating FTL resource.


We have an excess Population on Dupo I 9/8, but it appears that we lack the FTL resource necessary to make the teleport. So we'll have to wait until we have 137 FTL to jump.

Meanwhile we'll get the scout to scan the debris. And get check on the rest of the planets. We can queue another Population on Dupo I it seems as it's has just finished building the Population.
In my excitement, I forgot research!

I was tracking the research to wait for it to reach 600. But in my excitement and search for the FTL Crystals, I lost track of it. Better late than never. Time to get another tech!


Interface Tip: Queue Research
To help us not waste any time in our research. SR2 allows us to queue our research. Our research points will be used on the queued item when it's ready and will purchase it for use automatically.

We queue the research so that I dont get over excited and lose track of research points and thus get techs as fast as possible.

We unpause the game and let it run to reach 137 FTL.
Discovering Aliens
Meanwhile... our scout found our first alien empire.


Click on the Diplomacy Tab to see the alien civilisation.


As can be seen, it seems that we are evaluated to be slightly ahead of the opposition. Which is not surprising because we're playing with Easy AI. Further more, we did a Peaceful trait so that we will not get harassed. This was a decision made at game creation so that we can develop peacefully and learn the ropes of the game.

More on interacting with the race later.
Using the Unobtainium
We've decided to transform the Unobtanium to FTL Crystals.

The way we do this is as follows:
  1. Transfer 1B Population to the FTL Crystal Planet
  2. Left Click Dupo I, Right Click the FTL planet, Left Click Morph Unobtanium
  3. Abandon the planet

Result: We now have FTL Crystal on Dupo I and because we are a level 2 planet. Our FTL generation is increased by 1.


The reason we abandoned the planet was because we didn't want to be burdened with a far off planet we cannot protect nor develop. It will also be a drain on our resources since SR2 balances resource generation by dividing the totals we generate over the planets we have.

We doubled our FTL generation!


We just made use of our racial starting advantage to tackle a huge need that our race need. FTL for our teleporting needs!

Game Mechanic: FTL is not subjected to Resource balancing/reduction
It would seem that FTL Crystal generation on our home planet is not subjected to the Resource balancing that SR2 does for Energy, Research and Influence. This is a great boon for us as FTL is a very crucial resource.
Our first outpost
We can either build an outpost or a colony planet to colonize a star. As we had learned earlier, stars must be linked up to participate in each other's the economy as imports and exports travel along starlanes.

But level 0 planet colonies drain our Income due to their -80K maintenance costs. So the Mono, food and water planets does not help us grow at all but in fact is a drain on our resources. So how do we avoid this drain and still want to colonize a star for it's starlanes.

Game Mechanics: Outposts
Outposts are Orbitals we can build to establish a presence in a star. They allow us to utilize a star's trade lanes with a minimal maintenance cost. Outposts can be constructed by a planet that is from a different star system.

Let's build an Outpost instead of colonizing a planet that is not useful to the Mono.


We use Dupo I, because it has the highest Labour, to construct the Outpost.

  1. To build an outpost, we double click into Dupo I's planetary screen.
  2. We select the orbitals tab and click on Outpost
  3. We will be brought to the Galaxy screen where we can pick a spot to build the outpost. We left click on the place we want the outpost built.
  4. We keep the Outpost out of the range of the Remnants.
  5. We wait for the build to complete.
We can reasonably delay building our Population for a while because we are also accumulating FTL for the next colonization effort to build another level 2 planet.


A Quick overview and execution of plans

Our outpost links up our trade network and we can no import and ship crucial resources around.

You will note that whenever possible, we'll like to expand to the Galatic Center. The reason for this are the abundant special resources we can make us of there. They give special bonouses and there are very good planets like "Vast Plains" that can become very productive.

Our immediate plan is this, use this time to ship our level 2 resource to Dupo I so that it can utilize the spare capacity to build the buildings to exploit the resources for the pressure they exert.

Additionally, we'll colonize another Tier 2 planet and level it up to level 2 with 6/8 population.

Then with the 3 8/8 Level 2 planets, we'll level up Dupo I to level 3 and ship Populations to it very quickly because we'll have 3x relatively good labour planets producing Populations.

Let's put this into effect.


When we take a look at Dupo I, we see it's excess spare capacity being used up.


We export the tier 2 resource from Witirioa to Dupo I. This allows Dupo to build structures and utilize the space capacity.

But we notice that the Pressure is not used immediately.

Game Mechanics: Pressure takes time to become active
If you recall, when we first imported Chemicals, it took some time for the University to build up. When Pressure is first exported to a Planet, it will automatically build buildings to take advantage of the Pressure. Before that happens, the Pressure is imported but not active.

Therefore, it is good to immediately export to a Planet that you have intended to be a recipient of resources, because it takes time for the structures to build.


This is our current Planet summary at Dupo I, you can see that our Influence is still at 0. That is because, Dupo I, although it is importing 2 Influence from Wititioa, does not have the building to generate Influence yet.

Game Mechanics: Pressure and Planet Space and Retooling of Economy
We now know that Pressure takes time to become active. And Pressure utilization requires space on the Planet. This means that we cannot willy-nilly build our own structures and expect a planet to become a "super" productive planet. We must have space for the Pressure buildings to be built.

Furthermore, whenever we decide to change pressure on Planets, we will be negatively affected in our Economic output because planets that used to have different Pressures must now demolish old unnecessary buildings and build new buildings to take advantage of the new Pressures! The demolishing and building takes place automatically and does not require management on our part. All we need to remember is that change Pressure will affect economy negatively while the Planet affected builds buildings to handle the new Pressure.


Meanwhile, I colonized a Tier 2 Jewelry planet on the right of the empire and route the newly colonized Tier 1 resource to it. And we'll build up the population to promote it to a Tier 2 planet.

It may seem odd that I do not use a nearby Tier 1 resource to promote the colony on the right.

The reason for this is that I'm rapidly expanding towards the Galatic Center. As long as I'm able to I'll use planets that are towards the core for the expansion plan.

A quick survey of our opponents

We take a quick look at the opposition. You see that it has 7 planets across a few stars, but they are not as productive as us as they have some Tier 0 food and water planets in their midst. So we are ahead of them in our development. Let's see if we can pull even further ahead.

Game Mechanics: Vision and Fog of War
In SR2, vision is only granted when you have a presence in a Star system. There are other special conditions like Sharing Vision with an alien Empire, or getting specials that allows for vision. An example we will utilize is a special bonus of the FTL Crystals we have on Dupo I, At level 4, it will grant us vision of ALL FTL travel.

So it's not safe to assume that your last view of a star system had not changed in the meantime. It's dangerous! Fog of War is real in SR2.

The wait as we boost our Economies
Once Aylayza II becomes level 8/8, we'll colonize another level 1 planet and make Dupo I into a level 3 planet. (We are already receiving 1 Tier 2 resource to meet 1/2 the requirement for level up at Dupo I).


We have achieved another level 2 planet. It's currently at 6/8 Population. We'll let it build it's own Population to fill it up. Now we will now make out Dupo I level 3 by expanding towards the Galatic Center for a Tier 1 resource again.


We pick Kipax I for it's Native Gold resource. We are fortunate in the positions of the planets and Remnants as this mean that we will not be blockaded.


Meanwhile our queued research is automatically acquired. As we can see, Megacities is being researched. This is a great tech as it allows us to increase our pressure capacity which will allow us to create planets which can be even more productive.


Dupo I now becomes a level 3 planet. We'll fill it up with Population to take advantage of the increased production capabilities. As you can see, Dupo I is becoming more powerful. As a thumb of rule, 1xLvl3 planet > 2xLvl 2 planet > 4xLvl 1 planet

Game Mechanics: Geometric Growth
In SR2, economics of a planet grows by GP, meaning effectives are multiplicative. Because you can build unique structures as well as import special resources to boost a planet with multiplicative effects. The power of a high level planet normally exceeds the sum of the productive abilities of individual planets contributing to it's levels. This is why it is necessary to have high level planets in your empire if you want to dominate your opponents.

Summary:
  1. So far we have used 16min of game time and is growing very well.
  2. We have a level 3 planet with 2 level 2 planets which can reasonably produce Populations.
  3. In a few minutes, our Dupo I would have reached 17/17 in Population. (16/16 is the standard but we had researched a Tech that gives a bonus 1 Population to Level 3 planets earlier and we now have it's benefits.)
  4. What we'll do next is to build some combat ability to clear up the Remnants and obtain the stuff they are guarding.

We'll talk about the Ship Designer next.
Ship Design: Theory and Practice
Disclaimer: I'm not an expert by any means and is writing this based on my understanding of the systems involved. Also, our research techs currently does not allow us to play around too much with the various systems like propulsion and weapons. BUT having said that I hope this section will be able to get a beginner to understand what is involved when we design and build ships and get effective at it.

Let's start because I'm excited to write this portion which will one of the more difficult to write sections of the guide.

Theory: Flag Ship and Support
There are different types of ships in SR2. We will be focusing on the combat designs so we'll learn about Flagships and Supports.

We zoom into a fleet that we have and start from there


A fleet is composed of 1 flag ship with the attached support ships. Flag ships can be issued orders and represent the command of the fleet. Think of it using modern analogy like a US Aircraft Carrier Group. The Carrier is the Flagship and it may have attendant destroyers, aircrafts, helicopters, AWACS, specialised corvettes, even an Aegis cruiser for missile and air defences, or submarines attached to magnify the power of the whole Carrier Group.

SR2's fleet is like that. A Flag Ship will typically be the most powerful ship in a fleet, but it's the entire's fleet composition with the supports that determines the overall capability of the fleet. So a fleet's overall firepower is dependent on both the Flagship and the Support Ships attached.

Theory: Support Capacity and Supplies
A Fleet is limited by the Flagship's Support Capacity which determines how many Support Ships can be attached to it. It is also limited by Supply which determines the combat endurance of the Fleet. Every time, weapons are used, the Supply is depleted. It must be replenished to allow Fleets to keep fighting battles as a zero Supply will mean that your support ships cannot attack the enemy.

Theory: Costs

A Ship carries a budget build cost and a maintenance. It also takes labour to build a ship.

It is important to remember that maintenance costs eats into your Budget. This means that you have a limit on how many fleets you can operate at any time.

Flagships and Support Ships should be built together as we do not want to micromanage later by adding Support Ships individually. And as you can see, building up a fleet can cost quite a lot. Which is why we need a powerful economy to support our combat fleets.

Summary:
  1. Flagship and Support Ships are different and generally, both of them are required in your starting career as a SR2 Ship designer.
  2. Flagships have Support Capacity and Supplies which determine the overall combat capability of your fleets.
  3. Supporting a Fleet is costly and you need a good economy to build as well as maintain good combat fleets.
Now, we have the basic terminologies regarding ships and how our economy interact with ship building. Let's move into the Ship Designer in SR2.
The Practical: Knowing your Ship Designer UI
Clicking on the Designs tab brings up a screen with lots of information at our finger tips.


The UI Tooltip makes this screen easy to understand and use. You can easily see information pertaining to your designs, you can edit your designs or obsolete designs that you do not want anymore.

Most people's difficulties does not lie with this screen. It is with how ships are actually designed as that screen seems to be the most complex in SR2.

I'll now present 2 ways to handle ship designs.

  1. For beginners who do not want to engage in this portion of the game yet AND still would like to keep up with the game.
  2. For other players who would like to explore this amazing aspect of SR2 and experience the richness the game has to offer in terms of combat tactics by taking advantage of special ships you may want to design.
For Beginners: Ship Design, the Absolute Dummy's Guide
For absolute beginners who are more interested in the macro aspects of the game. SR2 allows us to VERY easily stay competitive in the Ship Combat and Design subsystem

Imagine the scenario, you have researched some tech and have colonized many planets and everything is smooth as butter. You have a huge amount of budget. And start to wonder if you should upgrade your designs. But when you click into the Designs tab and click on "Create Design", you see this.


You have no idea where to start. So you skip this "complex" screen and decided to skip this game system. You think "As longs as I build more ships, I should be able to kill the enemy."

Then disaster strikes.... A single enemy ship seems to contain ridiculous attack power and wipes out 10 of your fleets against it.

How in the world do you proceed in SR2 without becoming an "expert" in the Designer UI??? How many hours of learning do you need!

You think "Gosh! FORGET IT!!!! SR2 SUX!!! I'm giving up. SR2 is great but it's Ship Designer is a huge letdown! NEVA BUY THE GAME"

If that's you, you have come to the right place.

Let us now see how we can handle the Ship Designs and keep up with our opponents and build designs that can match our Economic prowess.

Game Mechanics: Size is power
The KEY determinant to the combat power of SR2's Ships is actually encapsulated in 1 variable. SIZE

Let's see how, as dummies, we make use of this fact and keep up with our enemy combat capability growth.


We select a design we would like to upgrade. Pick any one, because the concept is the same.


And we are greeted with a complex screen with way too many variables for our beginner's mind to comprehend!


I draw your attention to the "Size" and the Information panel displaying the overall combat power of the design.

We will now make this design more powerful. Let's double the combat power!


We change the Size of our design. And with just a simple change, our design is transformed!

As you can now see, the combat values of the Ship is now slightly doubled. The design "look" exactly the same, but now everything is UPSIZED!

We note that the cost to build and the maintenance costs have also increased similarly.


Game Mechanics: Ship sizes
SR2 scales everything in the universe with Size. When you increase the size of a ship design, the hexes where you place the weapons and systems remain the same. But they are increased in SIZE. So subsystems hosted them gain the equivalent increase in amounts of power/damage/supplies they provide!

By using this simple way to upgrade our design, I can safely say that ALL beginners will be able to keep track with the enemy. You fleets will now grow in power as your Economy grows and you are able to fuel more expensive ships that will be able to stand toe to toe with enemy fleets and even decimate them!

You old ships can be refitted at planets with the new design. Which was why we chose to upgrade instead of designing from scratch.

Also Remember to upgrade the size of your Support Ships as well!

Summary:
  1. We learned that as absolute beginners, we are now able to keep up with ship designs. Just by controlling the Size of our designs!
Now isn't that easy?

We'll now more into the more advanced features of the Ship Designer! Stay tuned!
Practical Ship Design for the Brave
The way ships are designed affect how they perform. The starter designs that SR2 provides are quite workable. But for designers, fledging designers, we prefer to see if we can do 1 better.

At this stage of technology development, our fleet will just normally attack the enemy fleet head on. They will turn toward each other, close to attack range and fire away on each other. It is a battle of attrition.

Although it is a battle of attrition, factors like engines, weapons, armour placement all matter because a hit by the enemy on a crucial hex may disable critical systems on your ship!

You will be able to find out much more information from experts who have spent hundreds of hours on this in the forums. What I'll do is to provide some key understand on the UI and features as well as terminology so that you'll be able to glean the information from discussions.


Let's create our own design. We'll build a fairly large Carrier Type that contains the main weapon systems that will also support a fleet of Support Ships and supply them decently.

Our ship should be relatively good at turning and moving. As a Flagship it should be be able to survive the combat.

This seems like a long list of requirements. Let's see if we can meet them.

Ship design in pictures!


As you can see, you can have some fun generating ships of all kinds randomly.

They can be fun, but you will probably realise that they wont be effective because things like weapons, supply, ammo are all randomly sized and placed. If your lasers are not having correct shooting arcs, you are asking for trouble!

To assist yourself, you can see if any of the shaped appeal to you. Then you can work from there by replacing systems in the ship. That is one option.

What we'll do instead build everything from scratch.


We clear the design.


First, let's build a bridge. The bridge provide control points for the Ship. Control points are used whenever we add weapons, propulsion and other equipment to the ship. When we add systems, control points are used up. So for a ship that bristle with lots of weaponry, we'll need more control points.

The bridge is also the "heart" or core of your ship. If the enemy have a powerful weapon that can penetrate to your bridge and destroy the hexes there. You ship stop working.

Game Mechanics: Ship Hitpoints
In SR2, each hex of the ship has a health value. In D&D game terms, we call it Hitpoints. When an enemy weapon hits a Hex, the damaged caused is done against the health of the Hex, if the Hex is destroyed, the leftover damage is then applied against the next Hex in the direction of the incoming damage.


Adding Control
Let's build some control by adding some bridge hexes.


Adding Supplies
Supplies determine how long we can fight in combat. As supplies are depleted, our weapons and our Support Ship's weapons stop working. So it's important to carry supplies with us for endurance in combat.


Adding Support Command
Support Command determines how many Support Ships we can attach to our Flagship. The higher this number is, the more ships we can attach. Let's add some.


Adding Weapons
Weapons are crucial in combat. Whether you are making a missile carrier or a beam ship, you will be making some big decisions when it comes to weapon choices. Here we'll make an all rounder ship. When placing the weapon systems, the first click determines the weapon's firing position. When you add additional hexes connected to the weapon, those hexes determine the power of the weapon you had added.


I've added Railguns and Missiles and Carpet bombs to the mix.

Adding Propulsion
Engines are important to our ship as it determines how fast it can move and turn. They use a lot of power and their effectiveness is determined by how massive our ship design is. Later, when we add armour which add a lot of mass, we'll find that our acceleration and turn rates get affected.

Engines hex placement works the same way as weapons, the first click adds the main thruster. The rest of the connected hexes adds to the power of the thrusters.


Adding Armour
We have a naked ship at the moment. Any weapon shots hitting us will immediately hit one of the crucial components and reduce our combat abilities.

There are 3 kinds of armour that is accessible to us now.
  1. Ablative Armour protects against Railgun
  2. Plate Armour protects against damage in general and have high hitpoints but is heavy
  3. Reactive Armour protects against Missile Damage
Laser is ineffective against armour but can destroy subsystems.

Now, personally I feel that it's most effective to mix the armour. Say a missile hits our ship, it may burn through the Ablative Armour but will be stopped by a Reactive Armour. if you had layered it properly.

So for our ship, we'll like to build some armour in front to absorb incoming hits that are sure to come.


Ship design is an art and will require a lot of tries to get the design rightly balanced.


Ok, we've build our very first beginner ship. The design shield the ship from the front and offers some protection from the sides. It is heavily armoured from the front and sacrifices firepower to do so.

Now is there anyway to test this? How do I know that my design works properly?

Let's export our design.


And test it. First we save our game.

Then we hit ESC to access the menu and test our design in the sandbox!


You are greeted in a arena. And the design screen contains our design!

Let's head back and see how a hypothetical battle play out.


Oops, it would appear that our design failed spectacularly. I guess it'll take some more attempts before we can beat even the standard Battleship design supplied by the game!

That was quite fun and it would seem that we have an inferior design.

But I hoped that you have learned the basics of the UI and ship design and can now explore the huge possibilities available to you.

Be sure to check out some of the discussion that is happening in the forum.

Downloading designs from other people
SR2 offers you the ability to download designs from the Internet SR2 community.

In the game, you can access the community screen to access and download the designs uploaded by the community.

Seeing the Forest instead of the Trees
Let's get back to the big picture. This part of the game plays really fast because we have production capacity to do things.


With a healthy Influence generation, we can start purchasing and playing Diplomacy Cards. We see a very powerful card "Name Planet", this allows us to boost a Planet's production capability by spending influence points.

We have 9 points at the moment which allows us to purchase the 6 point cost card. And we'll wait to have 7 points to spend it.

This card adds 4 more Population and 1 Labour to a planet. Perfect for our starting capital planet!


We will spend some time and effort to grow Dupo I into a powerful planet. We'll like to reduce the amount of clicks we do to build population. Let's see if SR2 UI helps us out here.


The UI provides a toggle to repeat the production queue. Once toggles, the game automatically queue production for you as long as you have budget for it. It's a really convenient feature so that we do not have to revisit planets to queue up their production. We'll do that for all out planets producing Population.


As you can see, the Diplomacy cards offers very powerful upgrades that you can use for your empire. Have fun discovering others powerful cards that you can play.
The 1st Carrier Group

We built our 1st Carrier Group.

Game Mechanics: Fleet Strength
When you first build a fleet, the supports ships that are attached will need to join the fleet before the fleet reaches full strength. It's good to wait a few moments for the supports to join up before sending you fleet on combat missions. Similarly, if you find yourself severely depleted after a battle, it's good to visit a planet or support orbital or outpost to replenish your Fleet Strength. Fleet strength is basically a reflection of how many support ships are still available for combat.


Once we have some level 2 planets, can can still build ships at our main planet and still grow it's population.

We have completed our Megacity Research so let's build a Megacity in Cico's Capital and boost's it's Capacity. We'll be leveraging it later as we enter into the next phase of expansion.


Looks like we are spending a lot of of Budget and we are currently borrowing against our next Cycle's budget. Not to worry. We'll push on. Time is of the essence.


Game Mechanics: Defence Resource
The defence resource is used by your planets to generate "free" support ships. It's an empire wide resource and can be utilized by any of your planets. The distribution is automatic and your planets will occassionally add Support Ships that surround them and guard them against attacks.

Don't go around using defences around all your planets if you dont have a good healthy Defence Resource income. You'll come across planets that gives a boost to your defence. Colonize them and they will generate pressure that will enable the planets to build structures automatically to get the defence production going. The resource is then contributed to the global pool where any other planet can then use.


Megacity built. As you can see, it adds a sizable bonus.


At 31 minutes, we expanded rapidly and our Cico's Capital is now at level 4.


Game Mechanics: Secret Projects
Secret Projects are special projects that pops up (you cannot see them on the research tree initially), and they offer some very powerful techs. Here the Spire can be unlocked if we build 5 megacities.


Our Empire is expanding. At 36min, we have an almost fully populated Capital. It's time to take stock of the situation.

Our fleets are busy clearing up the Remnants and we are spread across a wide region of the galaxy. It takes us a lot of time to travel from system to system.

Let's see how the Mono's problem of managing and defending a far flung empire.

Race Mechanics: FTL
Travel Every race handles FTL differently. Some have FTL space drives that allow their ships to travel faster compared to normal travel. The Terrakin's FTL drives allows their ships to travel in FTL speed. It's not instantaneous but they are faster compared to normal travel. The Mono does not have an FTL drive. Their ships travel relatively slowly. But they can build a Star Gate in their systems that allow them to instantaneously teleport fleets into systems with Gates. When you have a very large Empire area, these gates are a must to enable your fleets to travel quickly between systems.

Let's build a couple of gates with our Cico's Capital.


Level 5 Planet and Preparing for War


With our planet at level 5, we'll build it up with the population required. With a powerful economy, we can prepare for war.


Let loose the dogs of War!


Commanding fleets the easy way.


Interface Tip: Group Selection
SHIFT CLICKING allows us to select fleets into a group. This allows us to issue mass command to our fleets. We'll issue an attack on the Oko's highest level planet.


We issue an attack command to our fleets. The UI tooltip helpfully tells us an estimate of how long we'll need to capture it.

We don't expect the enemy to sit still. So we're expecting some opposition.


We are about wage a war. Keep on expanding our borders in the Galactic Center and pick the good planets to colonize to deny the enemy a foothold on them. Grow them and select one to become your next level 5 planet.
The battle is joined!


In my experience, RTS Games are brutal. Anyone having a slight leg up in terms of production and military strength can and will crush their opponents at will.

Here, our fleet decimated their defences and captured the main planet that belonged to Oko.

We not that their starting planet is a special one that contains both water and food as a starting resource. It's not very good for us. But we've basically dealt the Oko a very serious blow.


We have 2 choices, to destroy them totally or to subjugate them.

Let's try subjugating them. We do it through the diplomacy screen.


The Mono's teleport capability allows us to strip a conquered planet's population for colonization really fast. Our only limitation is our FTL. Which we have a very fast generation rate thanks to our FTL Crystals on Cico's Capital which is a level 5 planet.

We'll proceed to lay waste to them since they are unwilling to surrender.

Game Mechanics: Surrender
As a player, you can actually surrender to a superior empire and still continue playing the game. The game will end when your masters rule the whole galaxy or you gets destroyed totally. This allows you to keep playing even if you have "lost" the larger war and take part in a sort of limited "victory" when you help your master conquer the galaxy!
Continuing the war


We'll be activating the reduced build costs Artefact and use it to build the next generation of increased sized Ships!


Artifacts are generated around the Galactic Center and offer extremely powerful bonuses.

Be sure to get as many of them as possible.


Capturing planets is a slow business. Maybe we should offer them a chance at surrender.


Now the empire is too large to parse meaningfully. So we'll now use the Planets screen to link our exports!


Oko Surrenders

The continual attacks on their planets forced them to surrender at last!


Accepting Surrender is easy.


With the Oko subjugated, we set our sights on the remaining opponent. The Terrakin.

New to DLC, Attitudes
I was so focused on on the guide that I forgot about attitudes.

The DLC introduced a new feature called Attitude.


The bonuses are powerful and will need time to gain levels. So it's good to start getting them as soon as you can.

Preparing for a tougher opponent
With the Oko subjugated. We prepare for war with the remaining civilisation.

What we typically do is that we'll want to produce the biggest ships so that our economic might can be brought to bear against our opponent. So we'll upgrade our ships and prepare for war.


After some preparations, ready for War!


Victory!

Which we will accept and thus end our beginner game in victory.


Some thoughts
The game is against 2 easy opponents with zero aggression. So it is very easy to win. Their economies were nowhere close to ours even when we had a slow start as Mono.

Our game played out quite typically as an RTS game. The one with the bigger economy wins.

There is not much chance to research. In the end, my research tree was only 1/4 complete, and I did not have the time to build some of the cooler end game features like Ring Worlds.


Once, the economy is built up, the wars will keep you busy. I feel that there is much more to learn about combat. There are other cool weapons technologies we have yet to see as I had focused mainly on defeating the enemy economically. I am sure that if we play against the hard AI, we'll need a lot more strategy and tactics to win.

Overall, it has been fun and I learned quite a bit about the DLC stuff.

I hope this has been enough to get you started on your own SR2 game. It's quite a joy to play. And thanks for staying with me up till now.

Until next time!
13 Comments
Hersen 13 May, 2021 @ 12:55am 
Hey mate, do you know how support ship build speed is determined? Is it labour and modifiers alone?
lecosaque[FR] 29 Mar, 2021 @ 2:46pm 
merci beaucoup !!!!!
cicoles  [author] 11 Sep, 2020 @ 3:19am 
@Thot Destroyer, you're welcome! Hope you enjoy the game, I still play it every so often!
That one Weeb 10 Sep, 2020 @ 2:35am 
Been trying to get into the game but didn't understand certain mechanics. But thanks to this guide I actually learned a few things (Mono, are kind of built for new players in a way.) Thanks for creating this amazing guide to help people like me out!
cicoles  [author] 10 May, 2020 @ 6:11pm 
@Kornstalx, thanks. SR2 is truly a great and innovative game that is underappreciated.
Kornstalx 10 May, 2020 @ 9:50am 
This guide was amazing man, thanks so much. SR2 has been a slow "click" with me for years as I get discouraged. This guide is exactly what we needed.
cicoles  [author] 8 Jan, 2020 @ 3:06am 
@bearhiderug

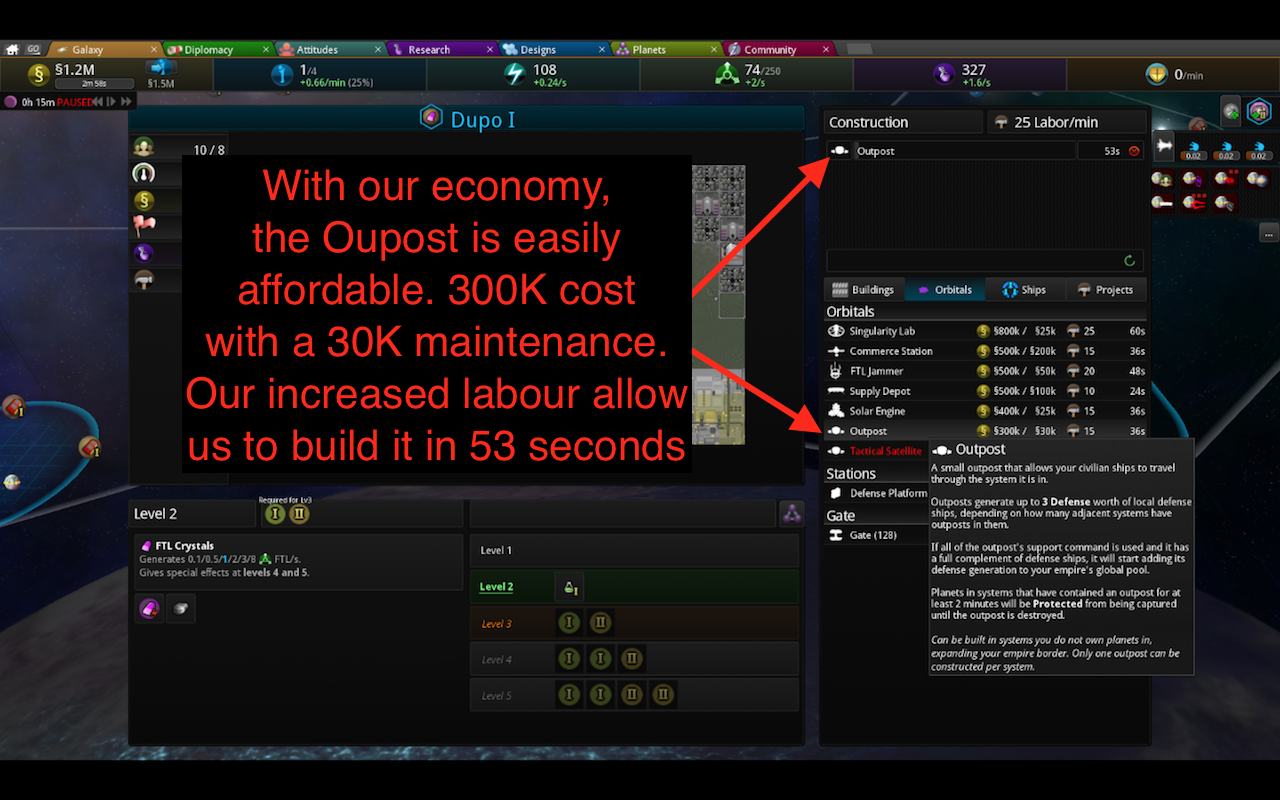
Thanks! It's a great game!
cicoles  [author] 17 Feb, 2017 @ 6:14am 
Hi Dalo, thanks for the feedback. I'll take a relook and refine some portions. The AAR seems way too long to be in Steam's guide. I actually wrote this over a period of a week for a gaming forum I visit.
Dalo Lorn 16 Feb, 2017 @ 8:11am 
- That red artifact you picked up was a part of the Revenant, a sort of 'Artifact Victory' condition. If you control all four Revenant parts, you get a really huge and powerful warship which can typically only be beaten by (borderline?) exploitative gameplay and/or some of the new DLC weapons like Particle Lances.

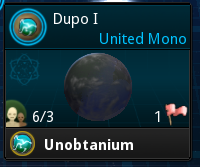
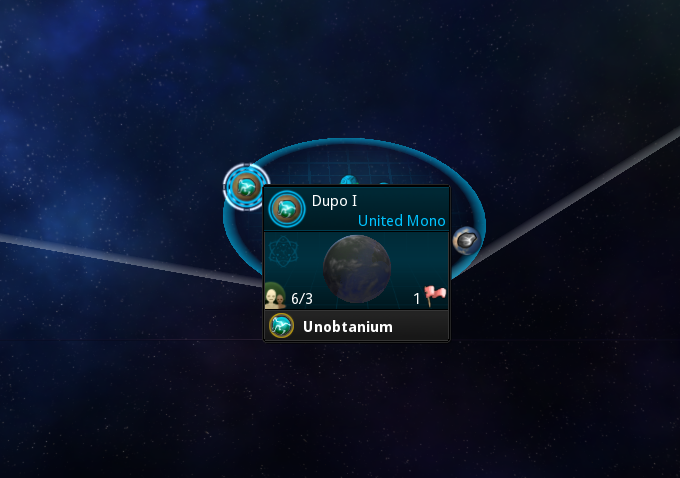
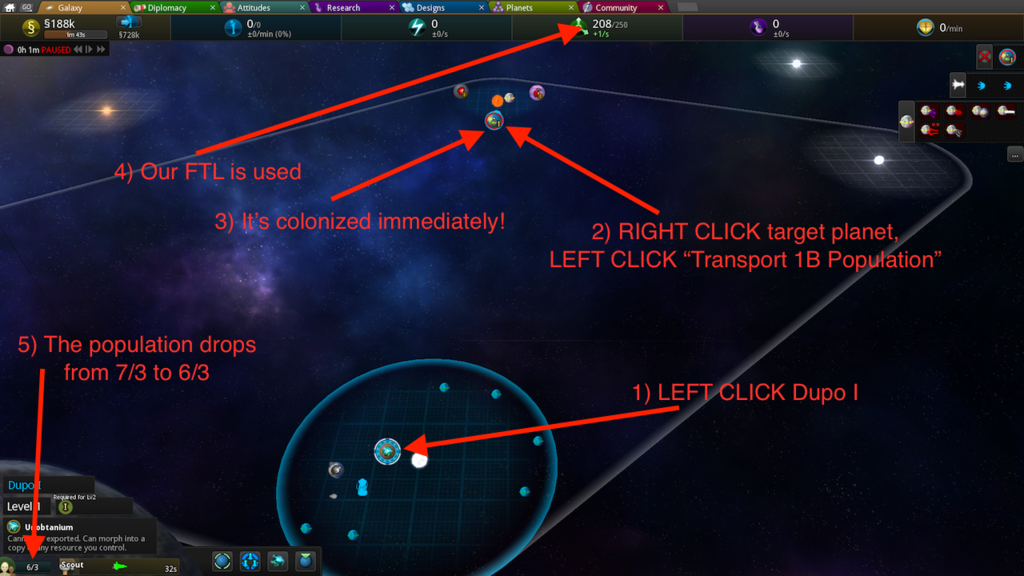
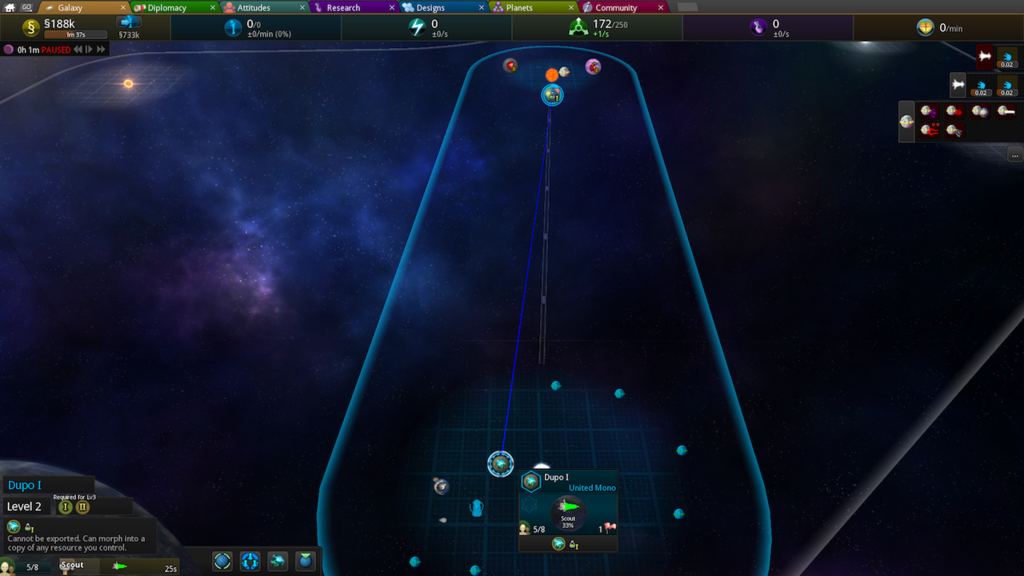
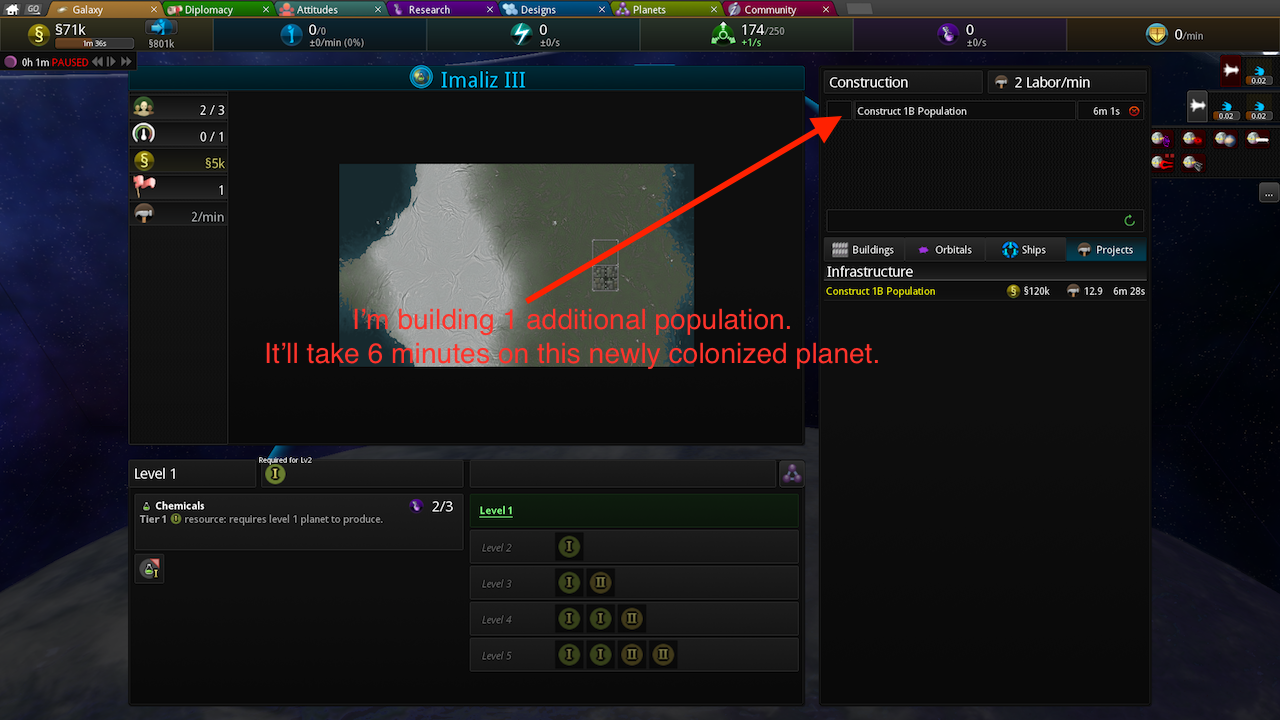
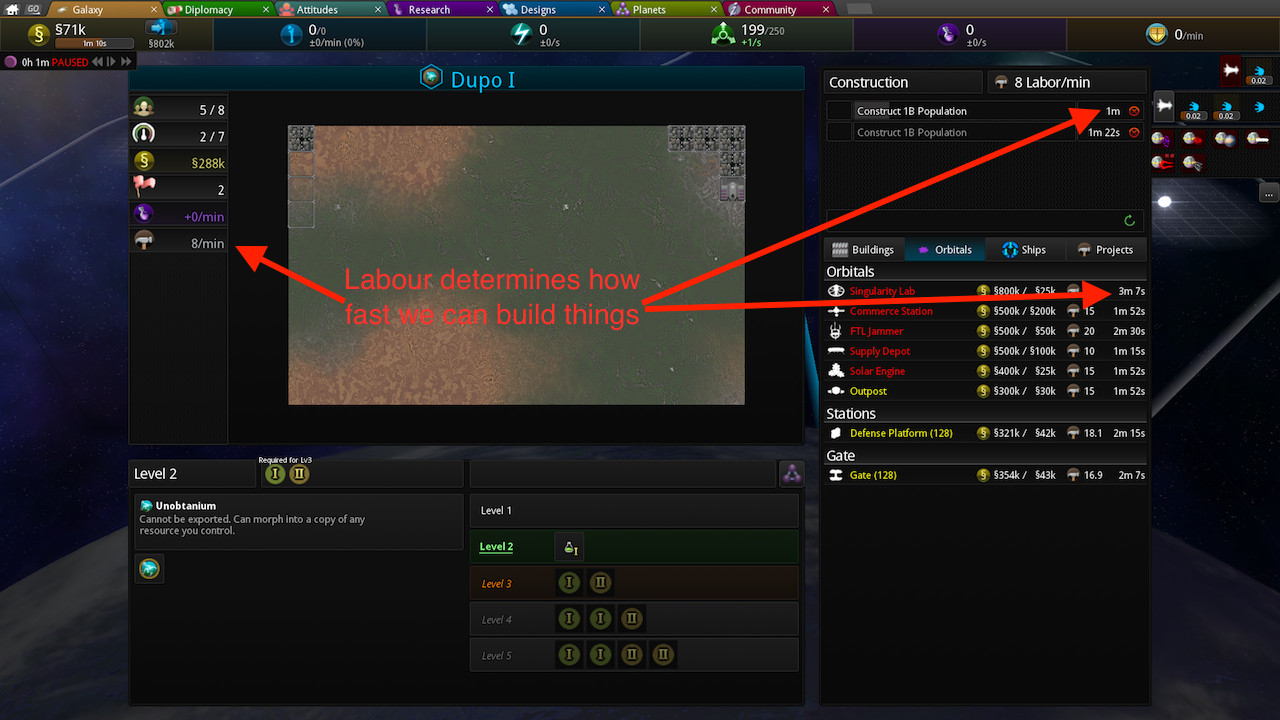
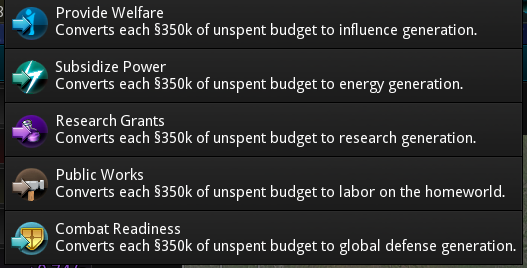
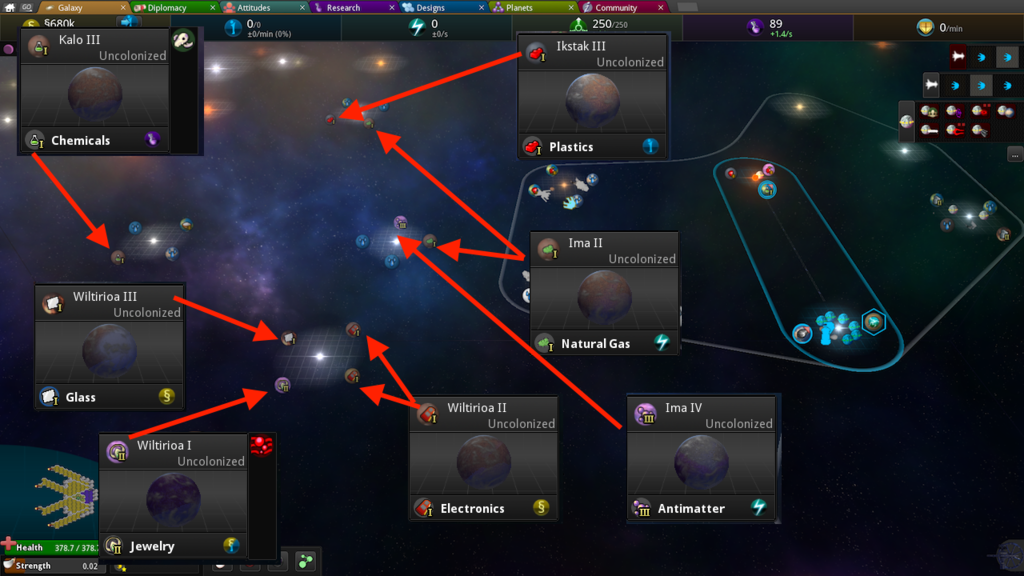
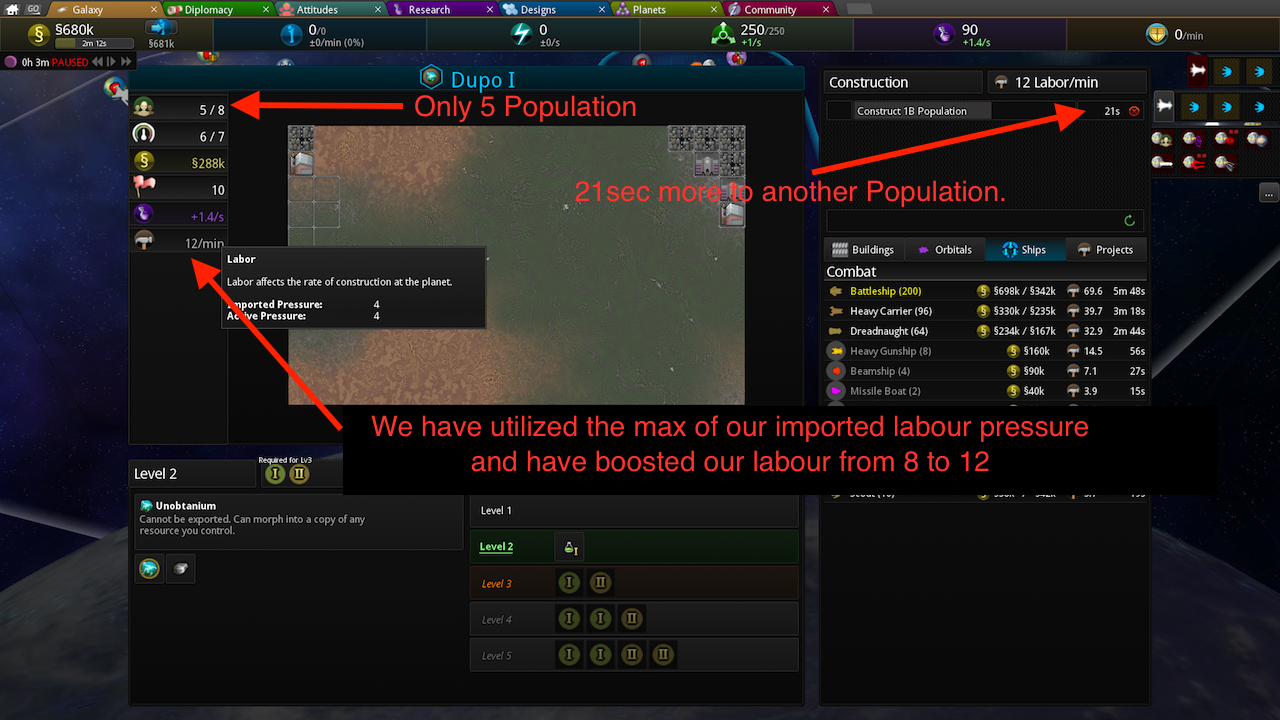
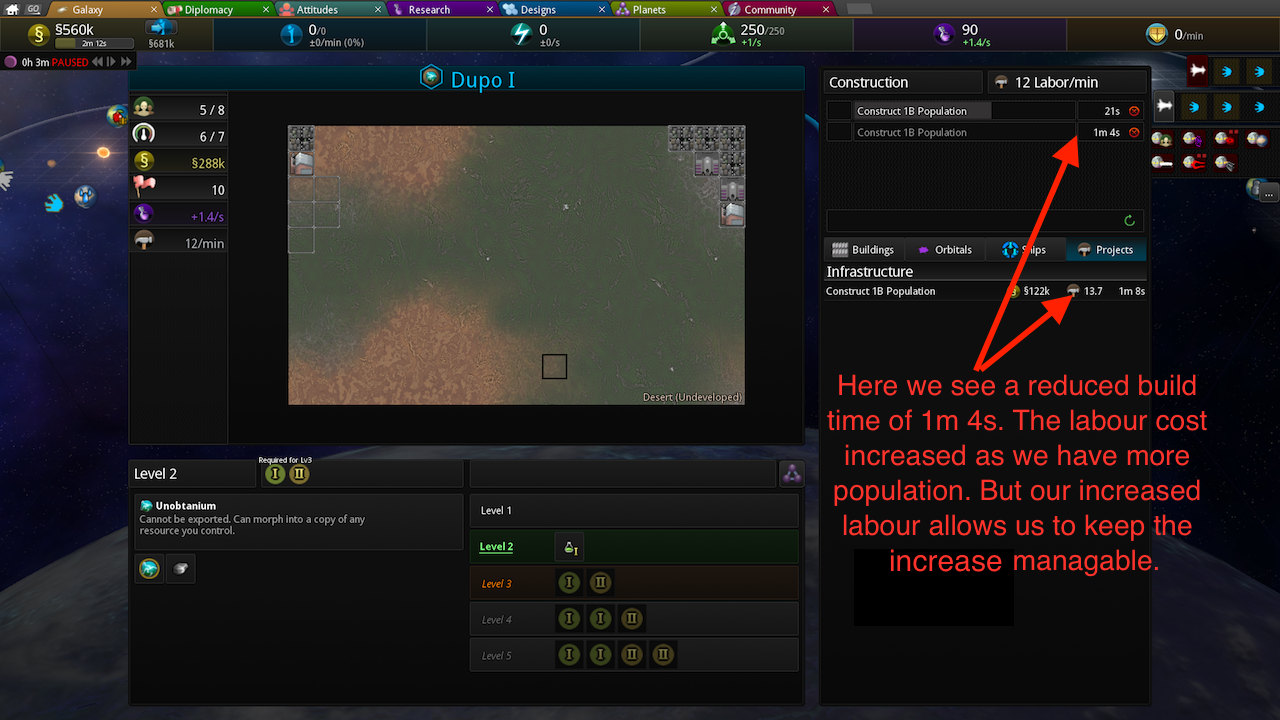
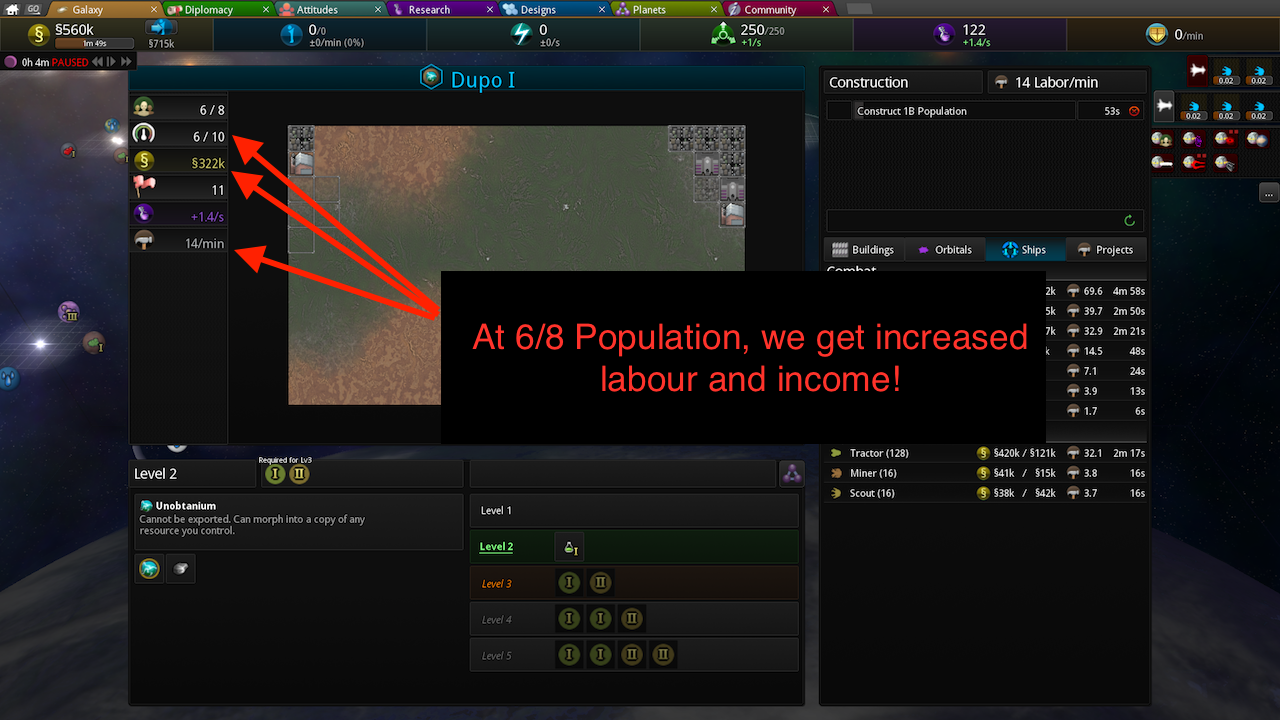
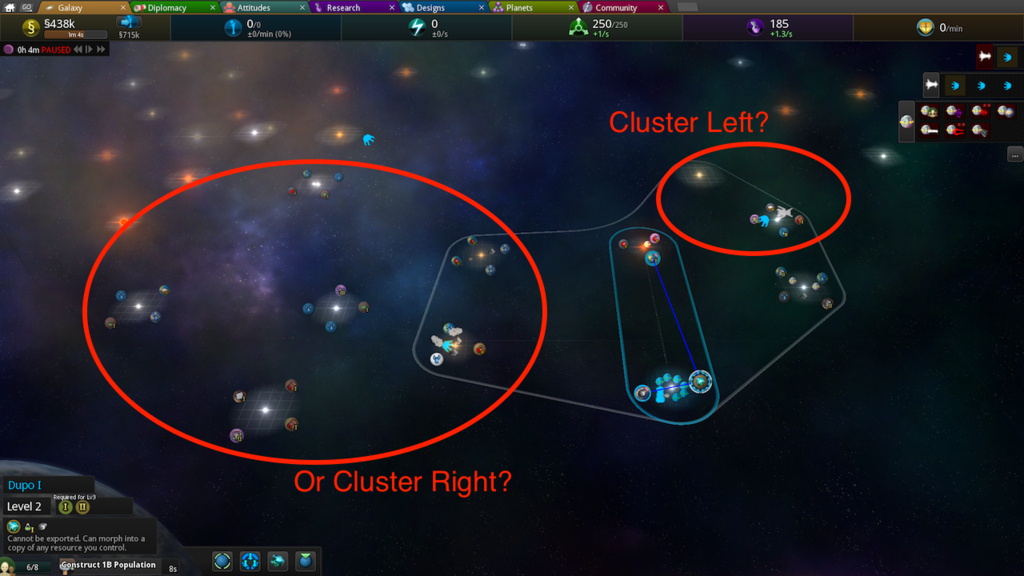
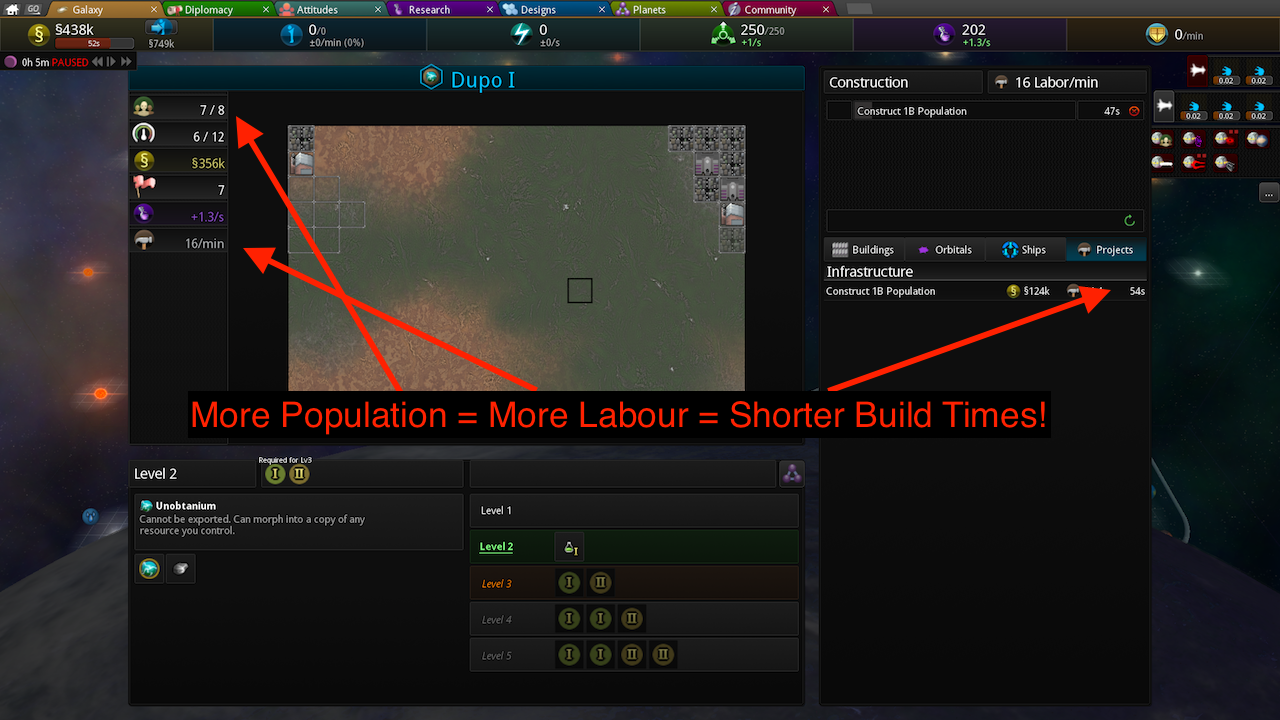
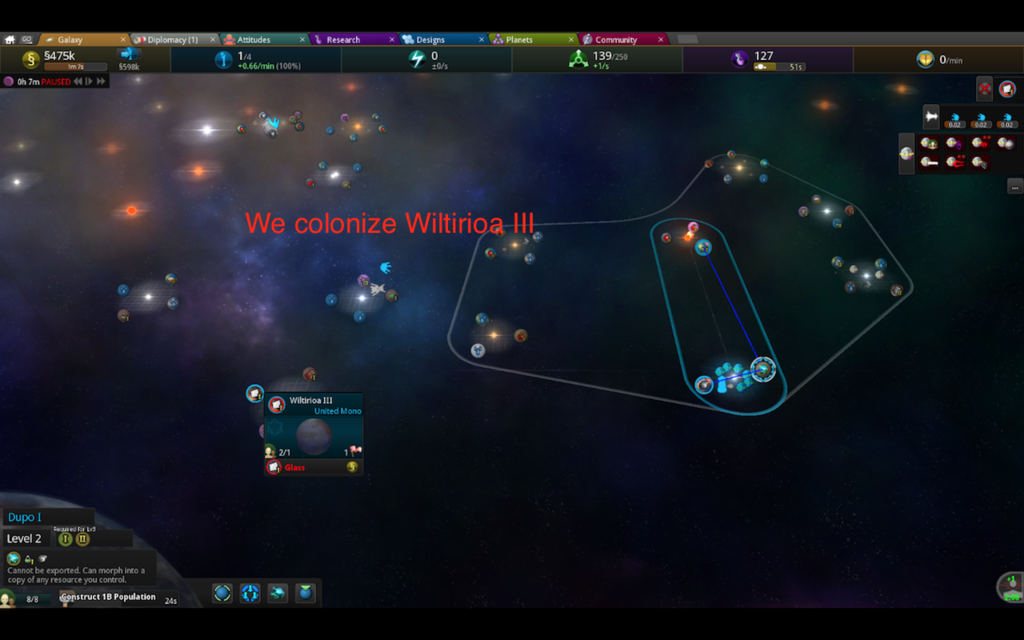
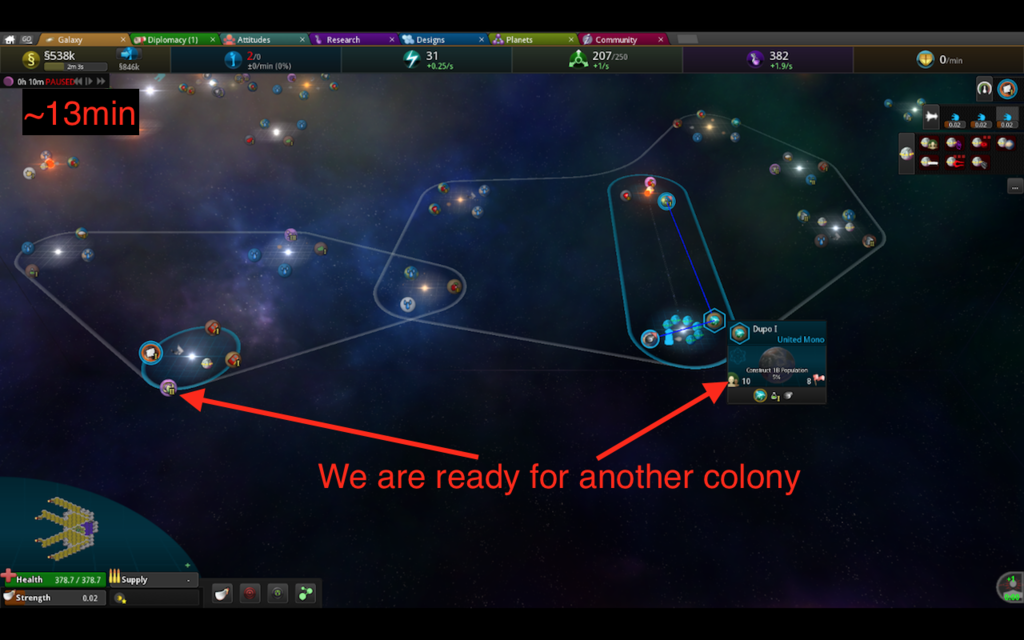
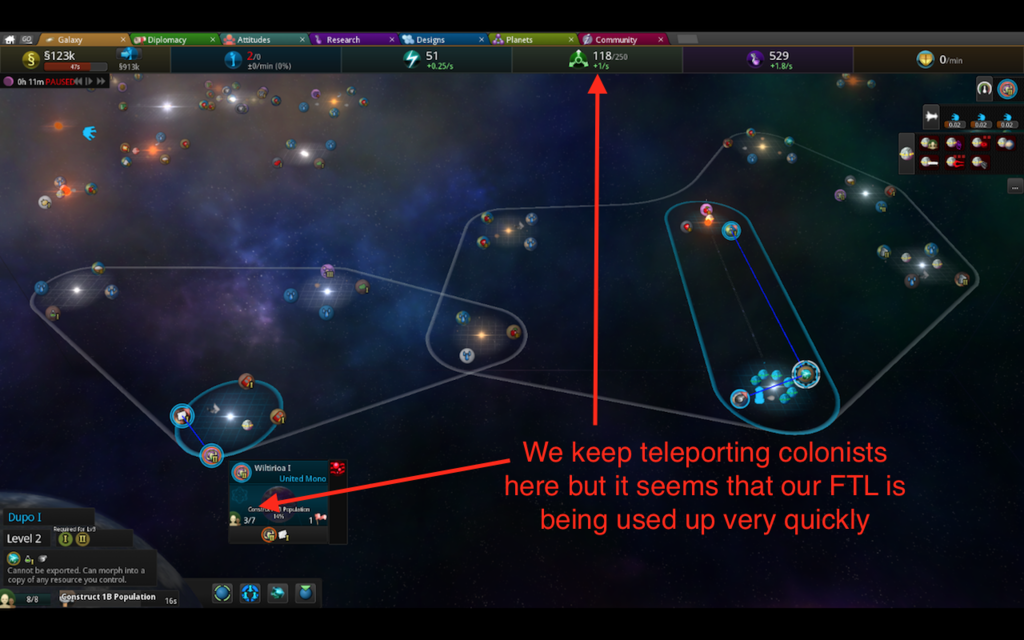
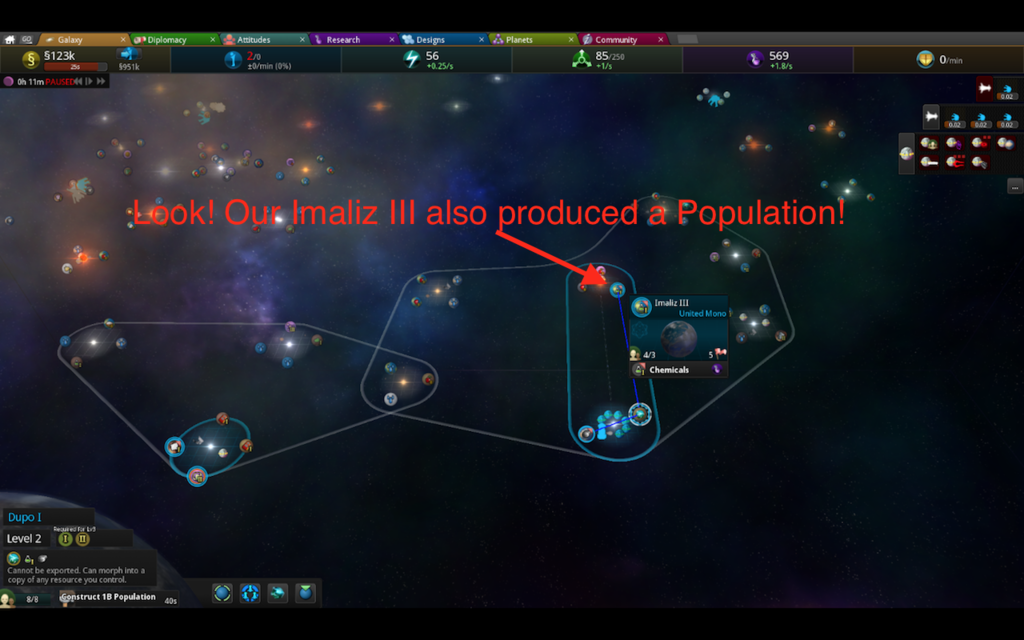
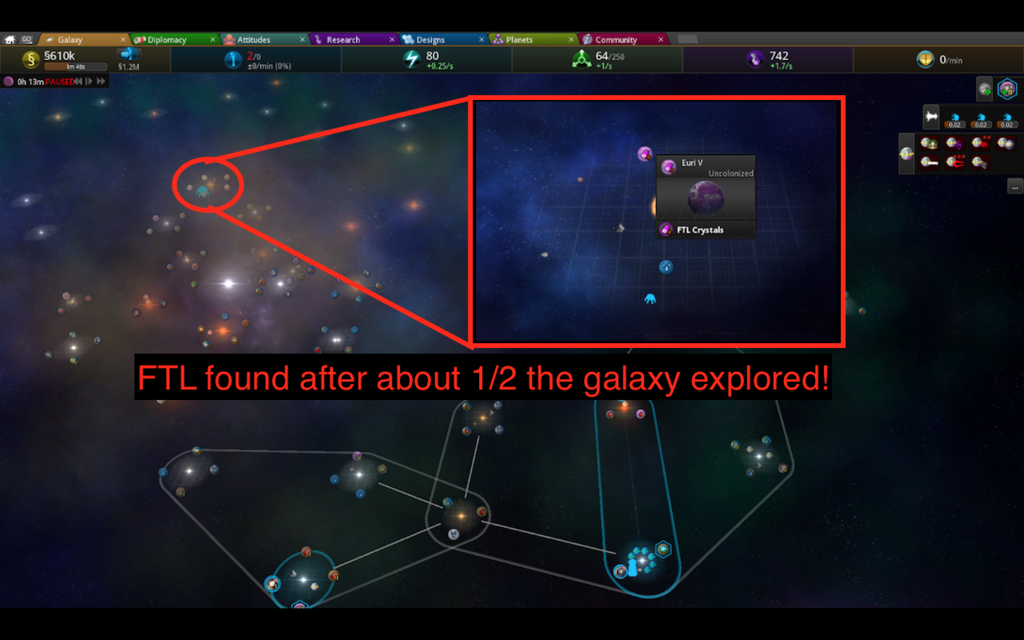
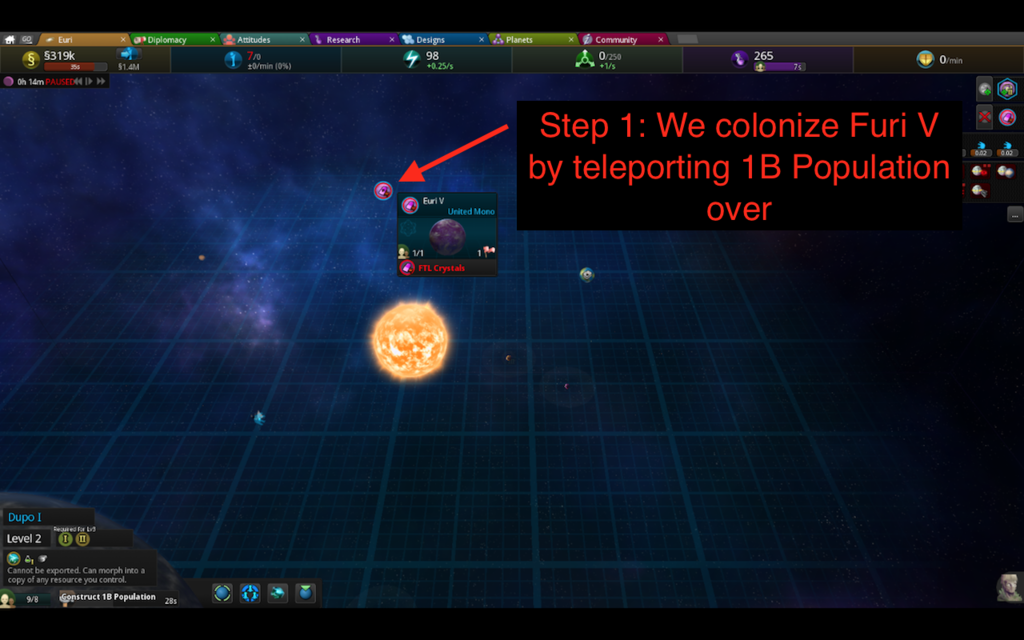
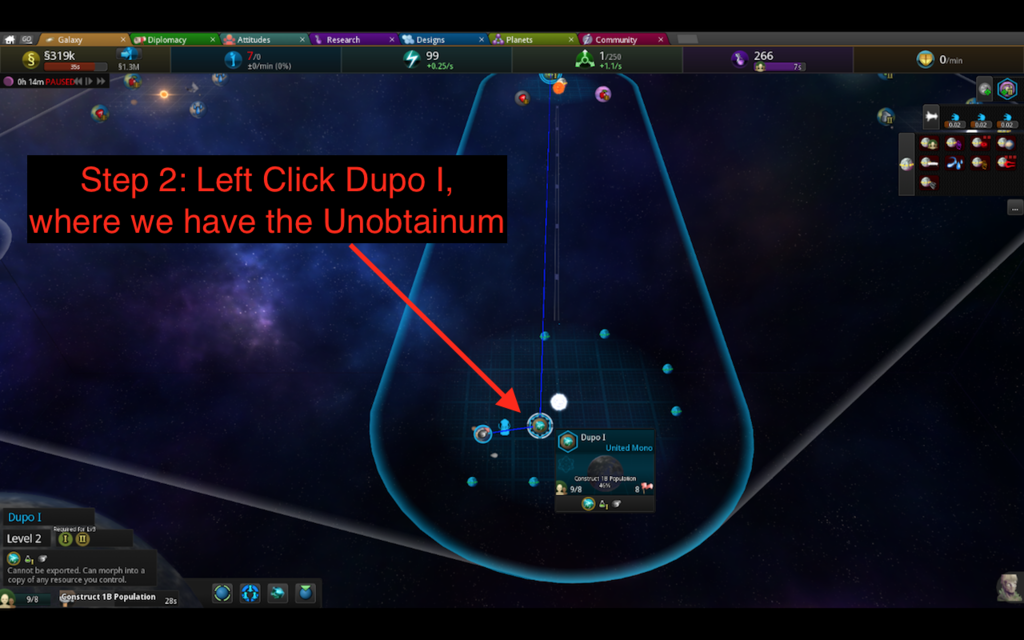
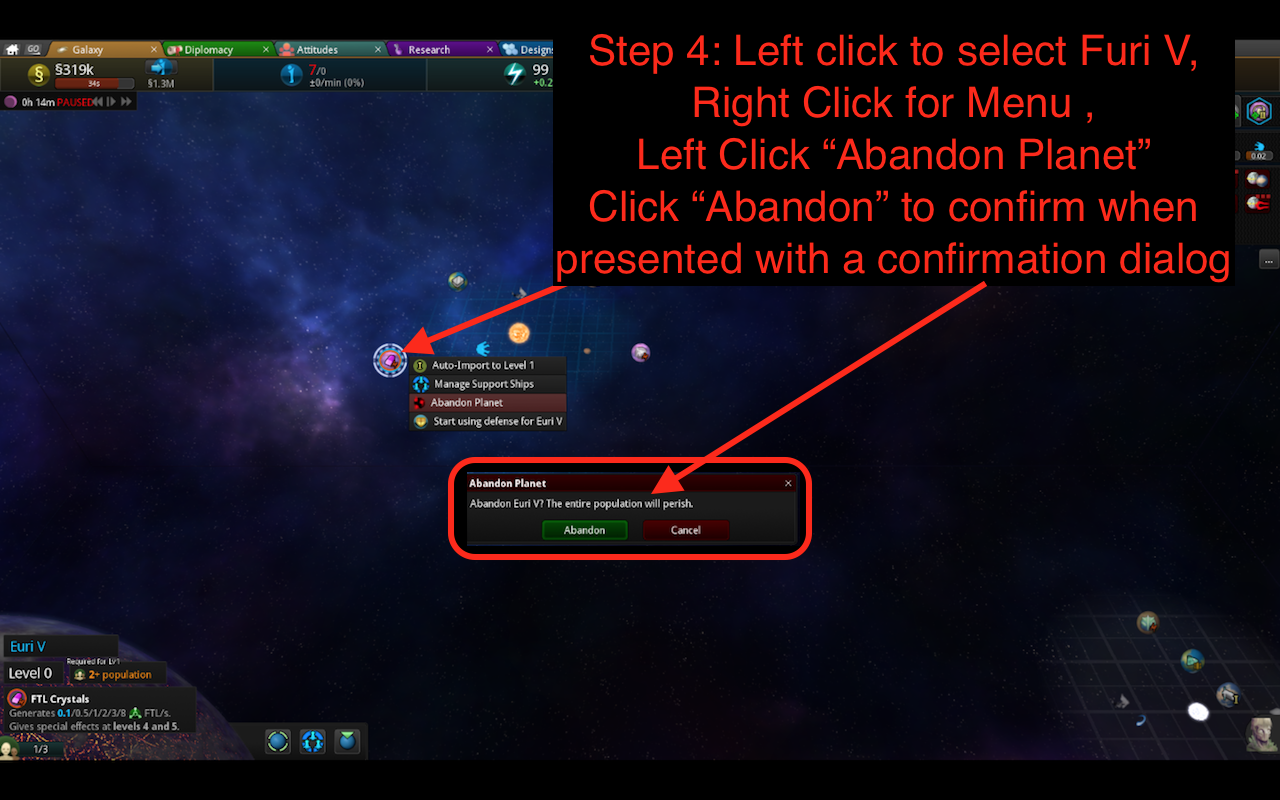
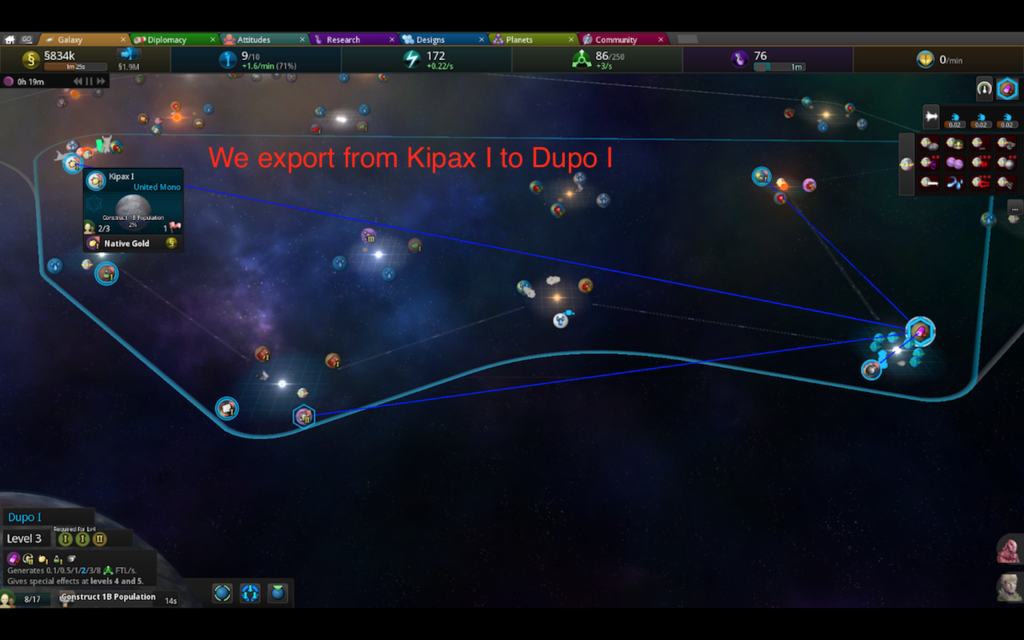
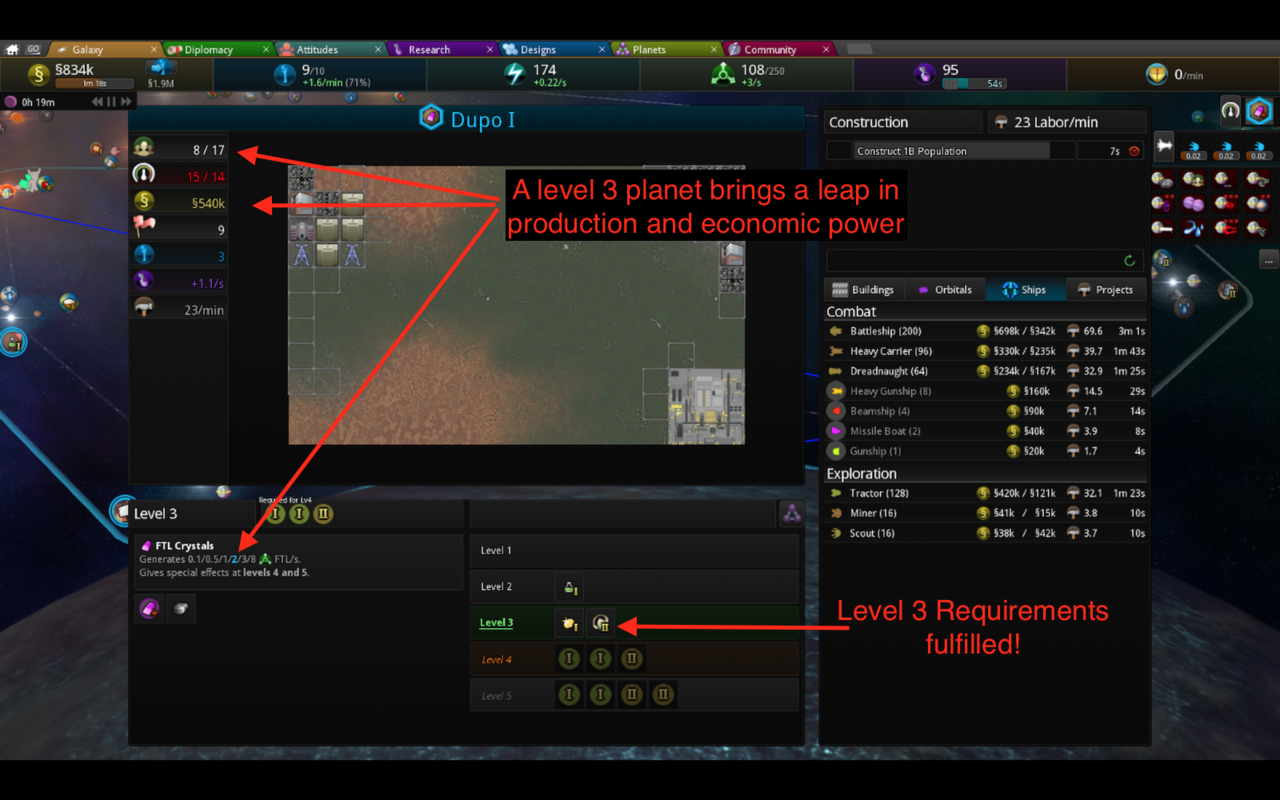
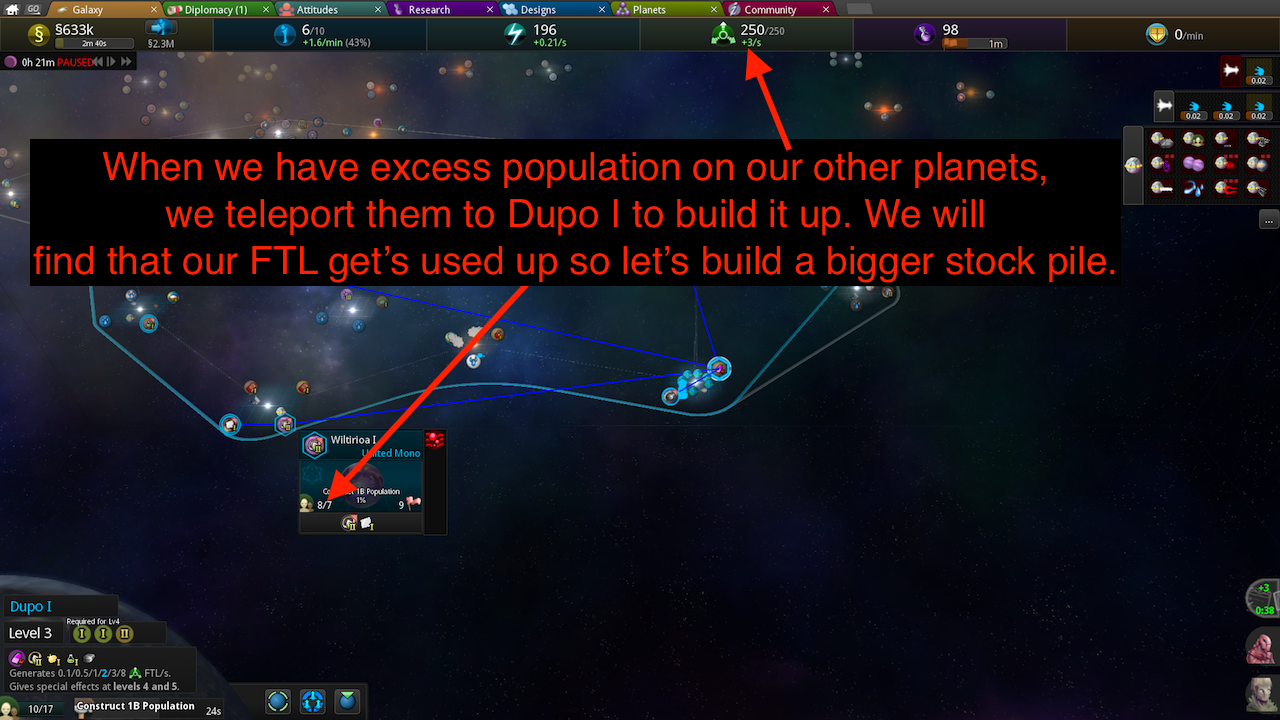
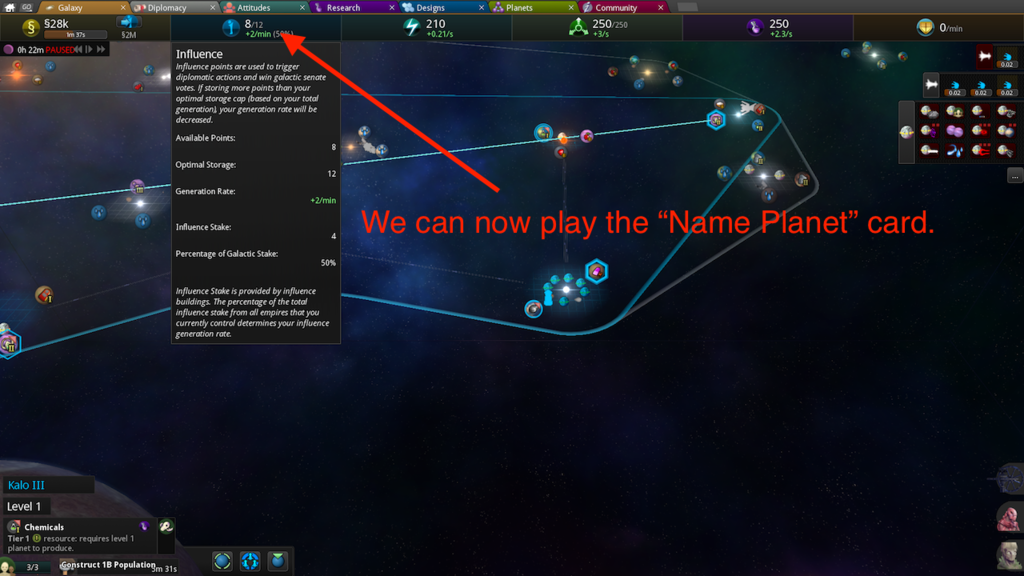
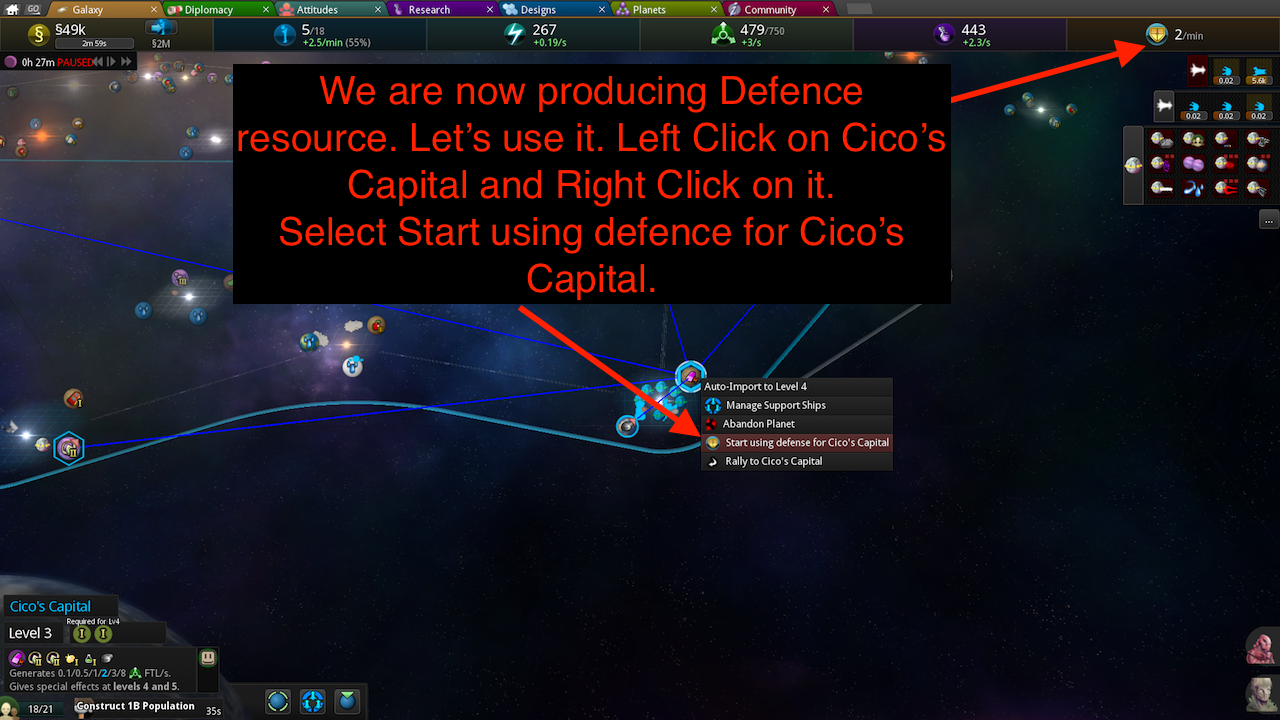
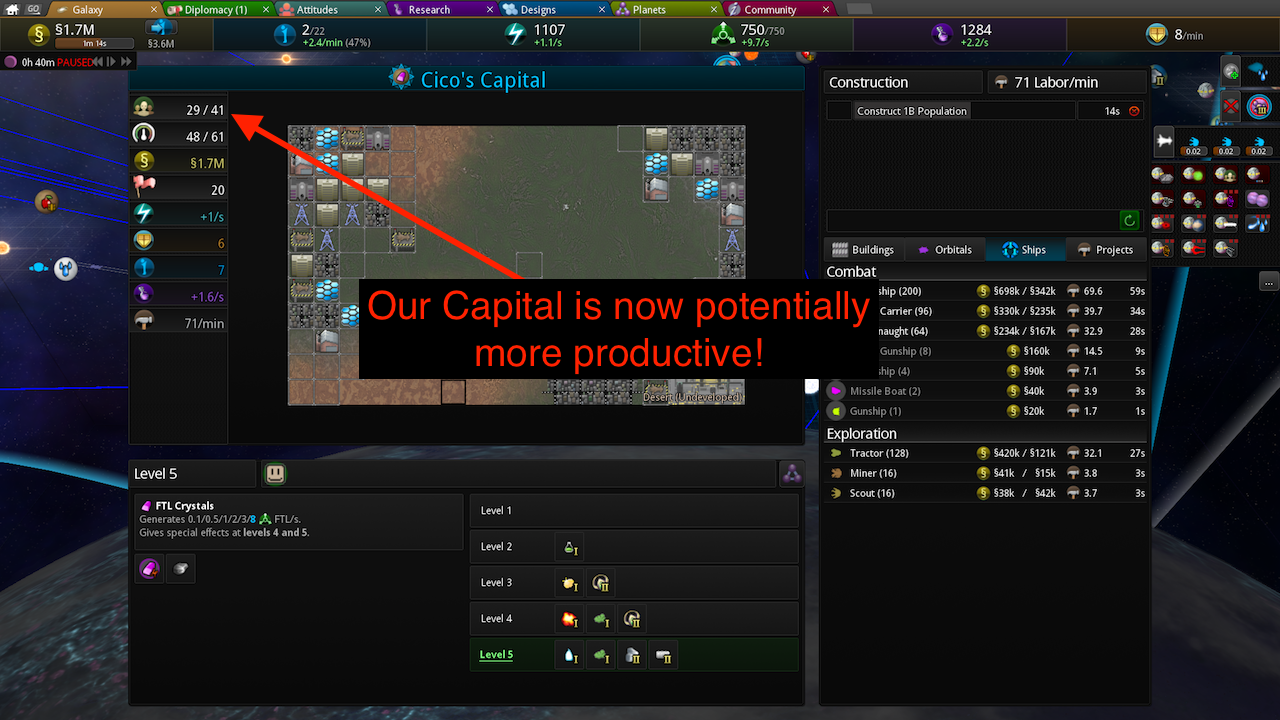
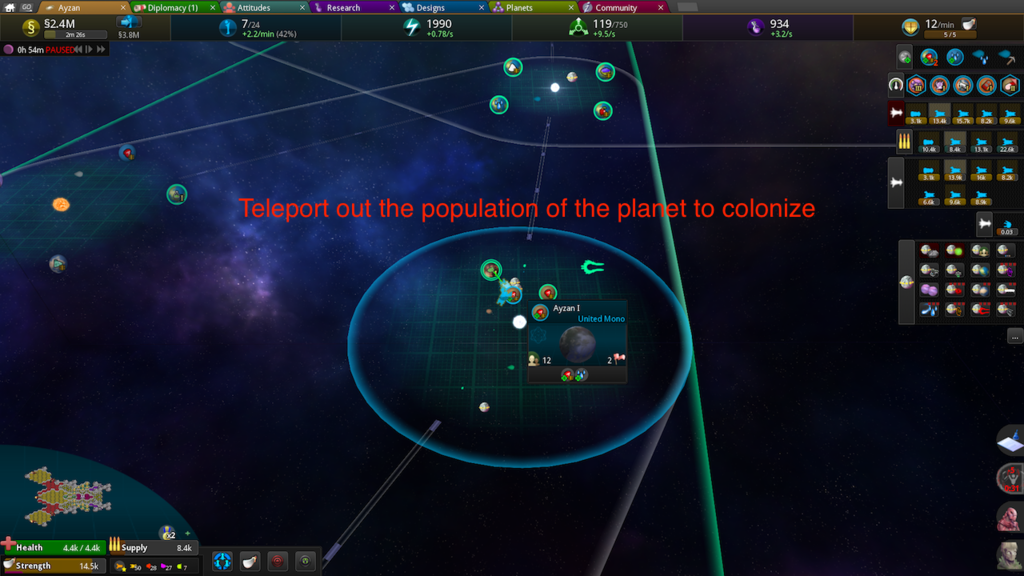
- Resource generation and planet count are completely unrelated to each other. It's just a matter of how much you already have stored (Energy), how much you've generated over the course of the game (Research), or what percentage of the galactic generation you currently control (Influence). Having more planets generating a resource is always better than having less planets generating it, so while abandoning that FTL planet was an okay idea, it wasn't for the reasons you outlined. (Also, you should have migrated your population instead of throwing it away; building population takes time, after all. :P)
Dalo Lorn 16 Feb, 2017 @ 8:11am 
There are some things throughout the guide that are factually incorrect/incomplete in one way or another, but it's a pretty nice one nonetheless.

Some of the more immediately obvious ones:
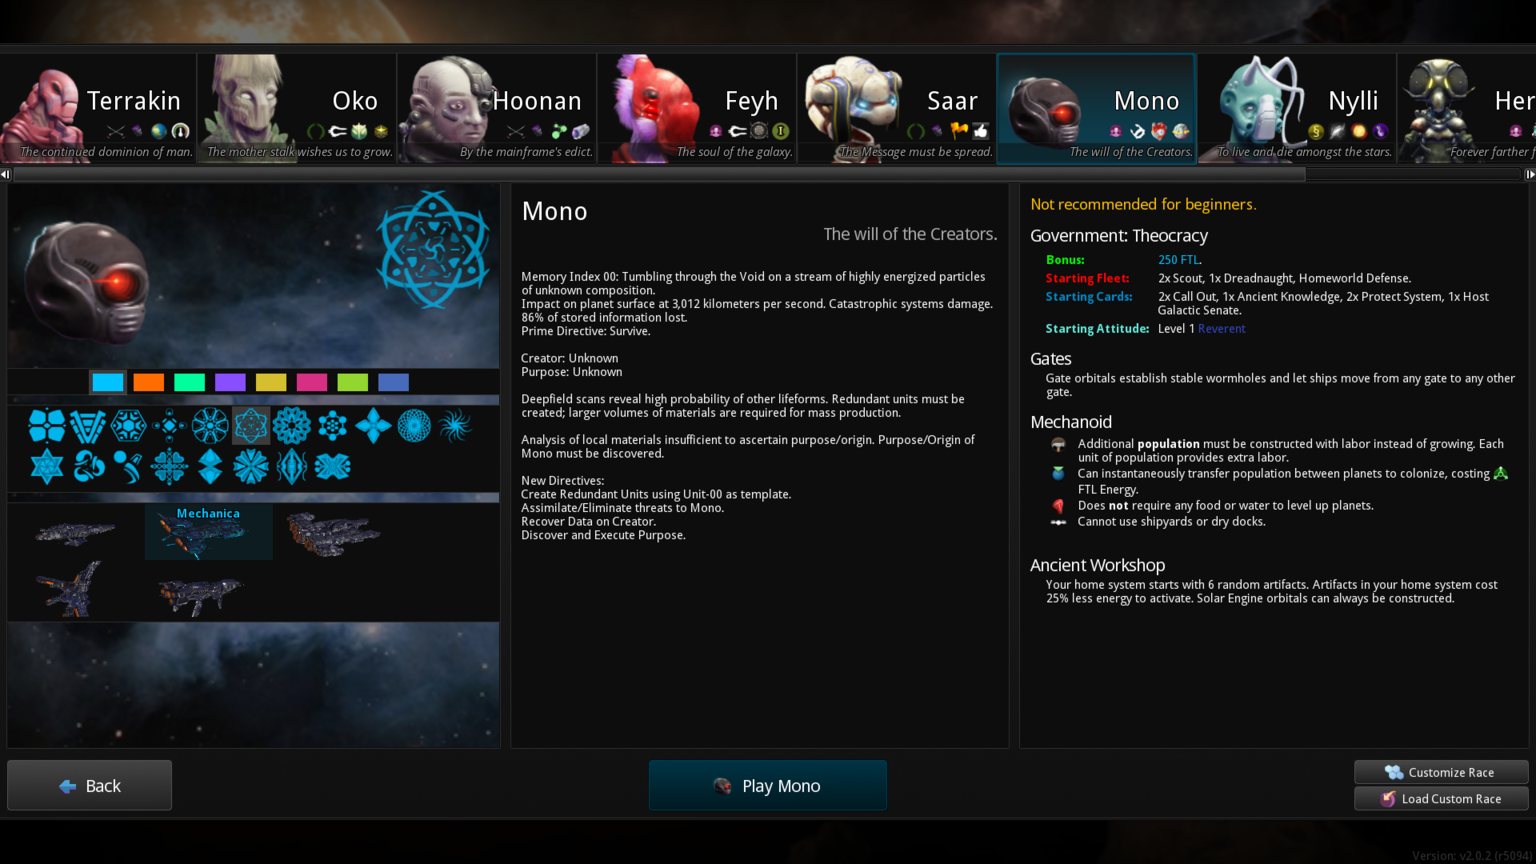
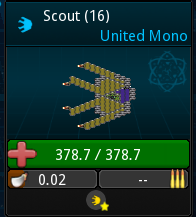
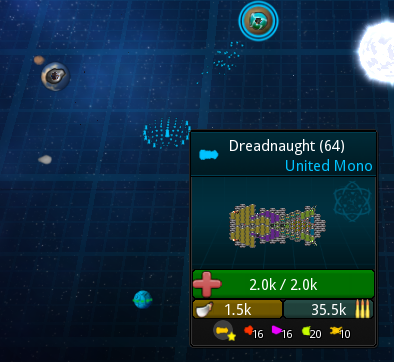
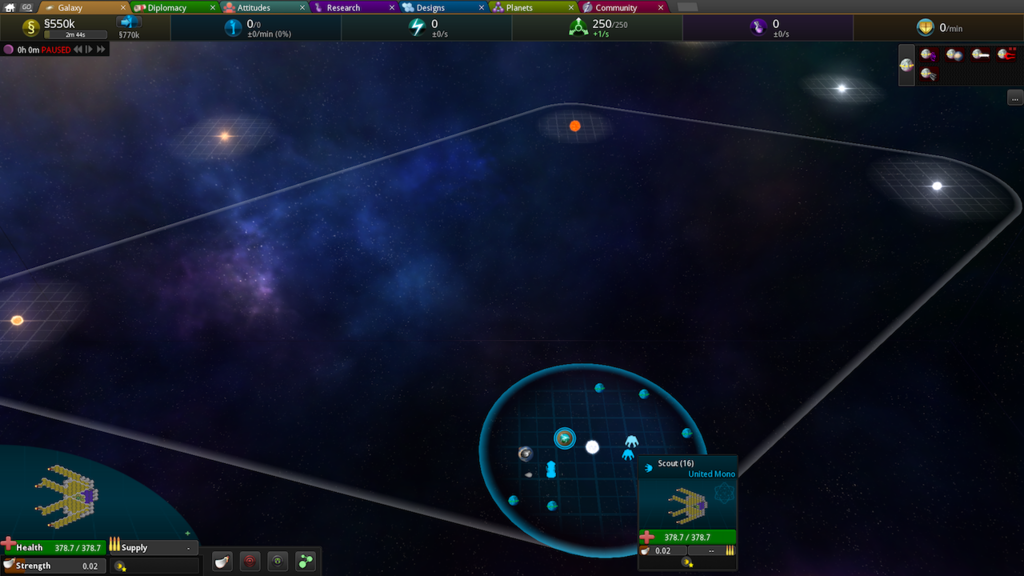
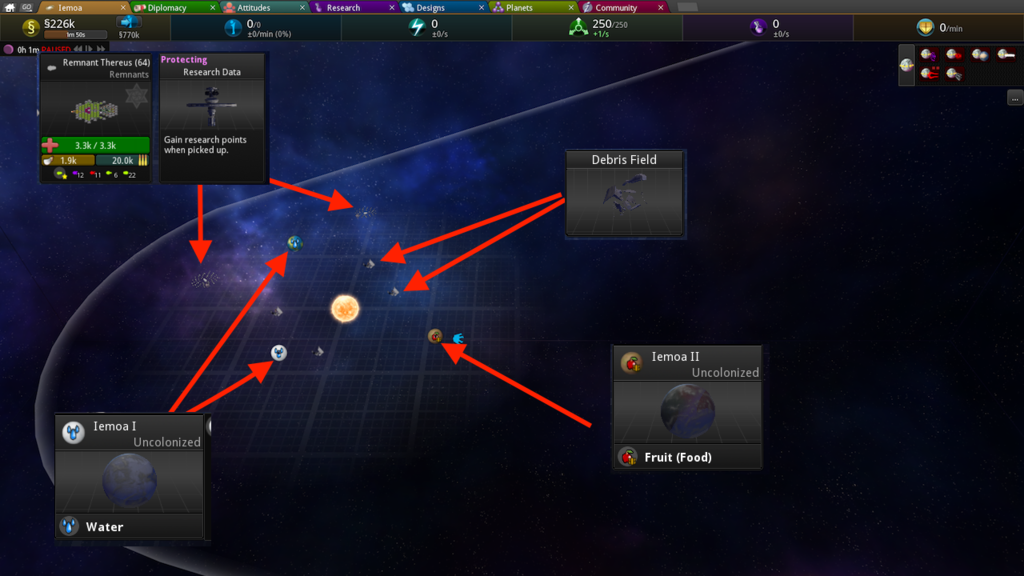
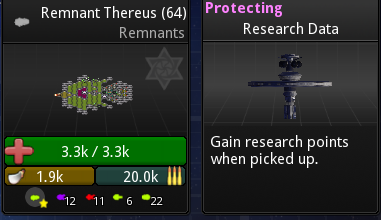
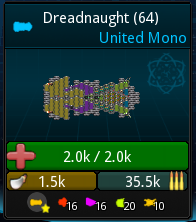
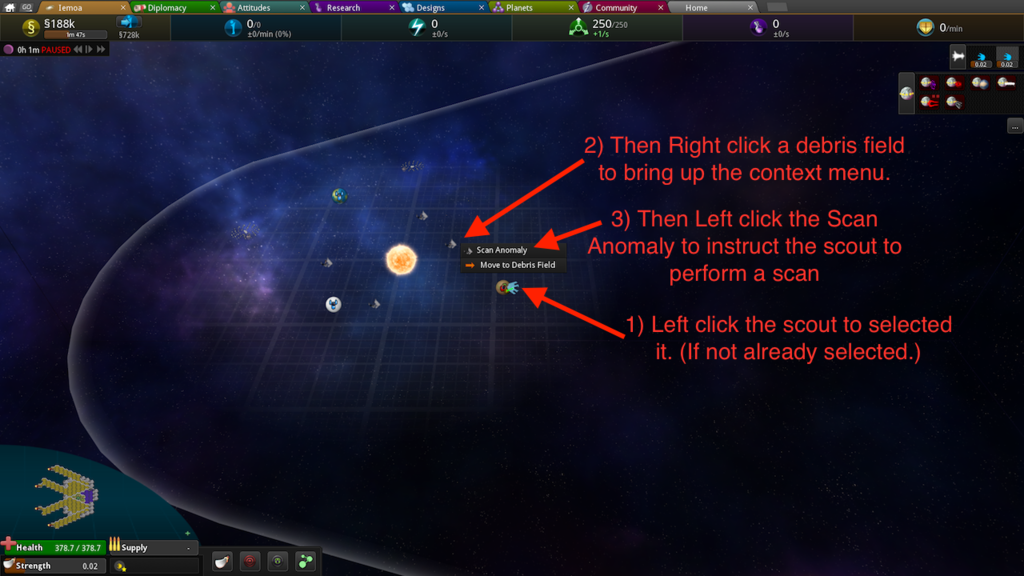
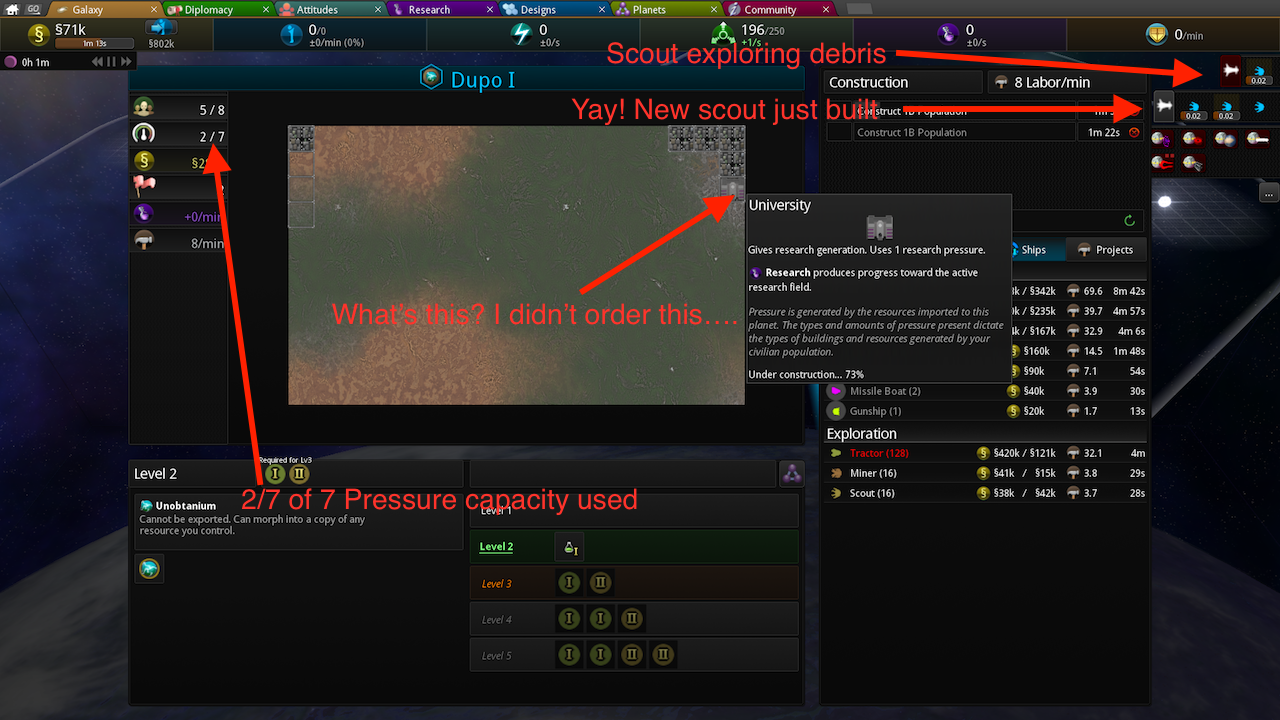
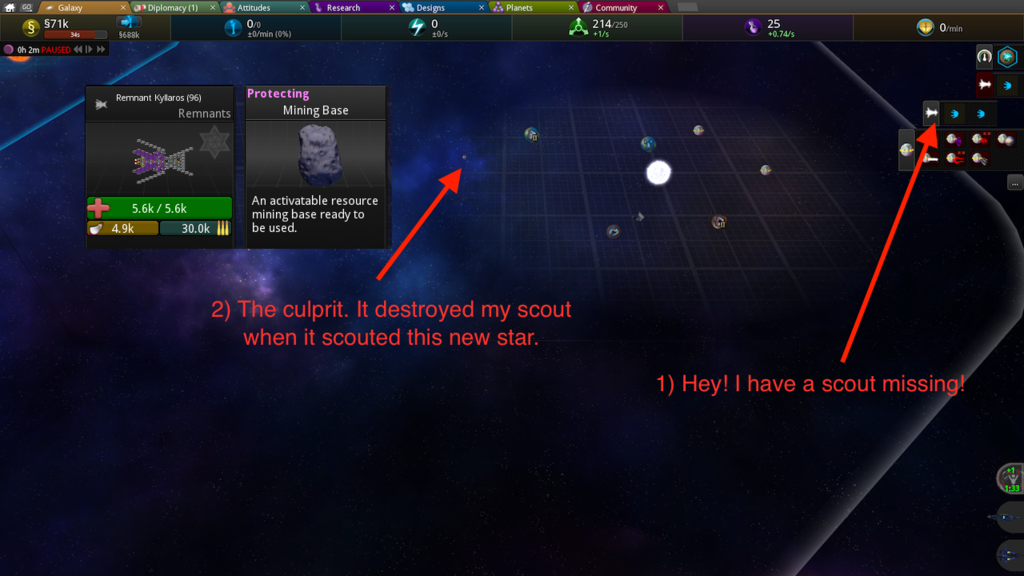
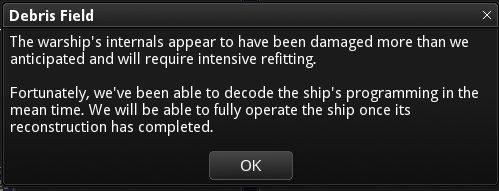
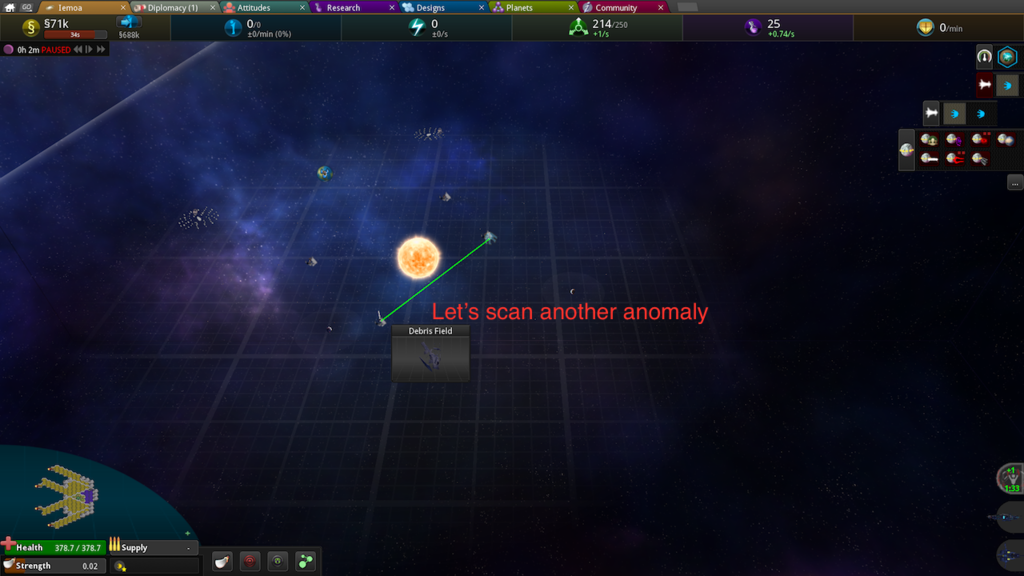
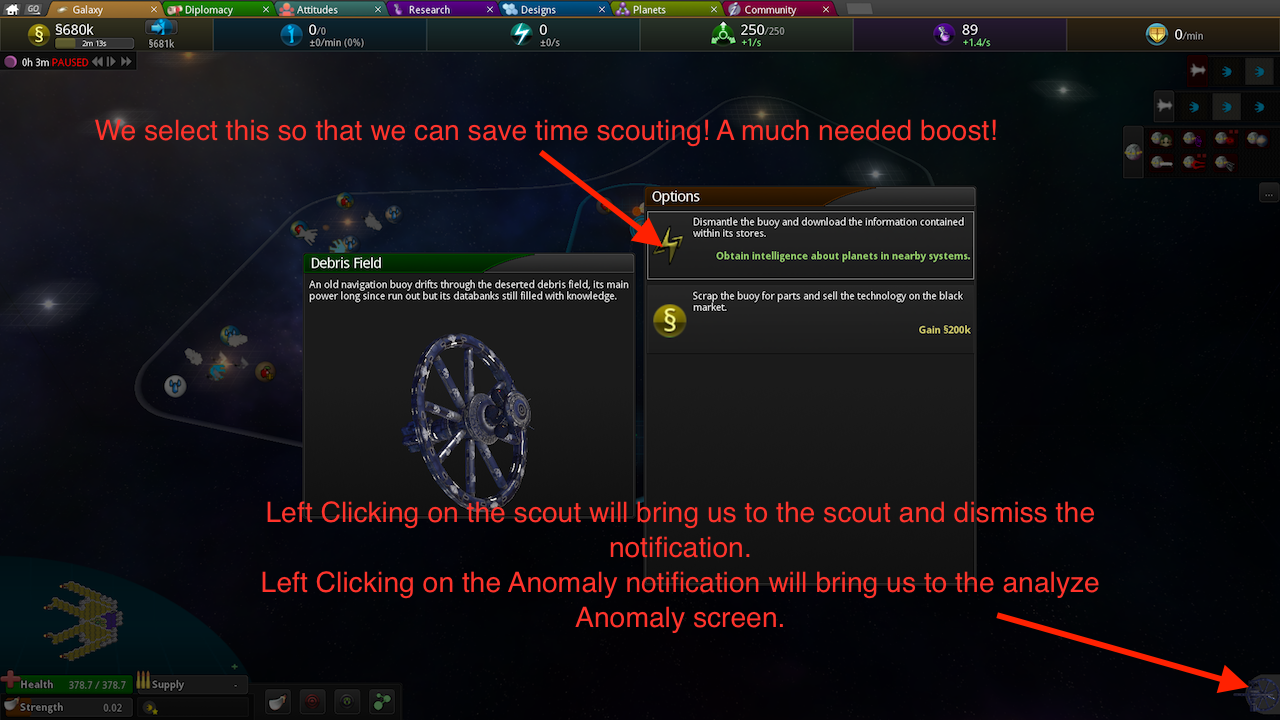
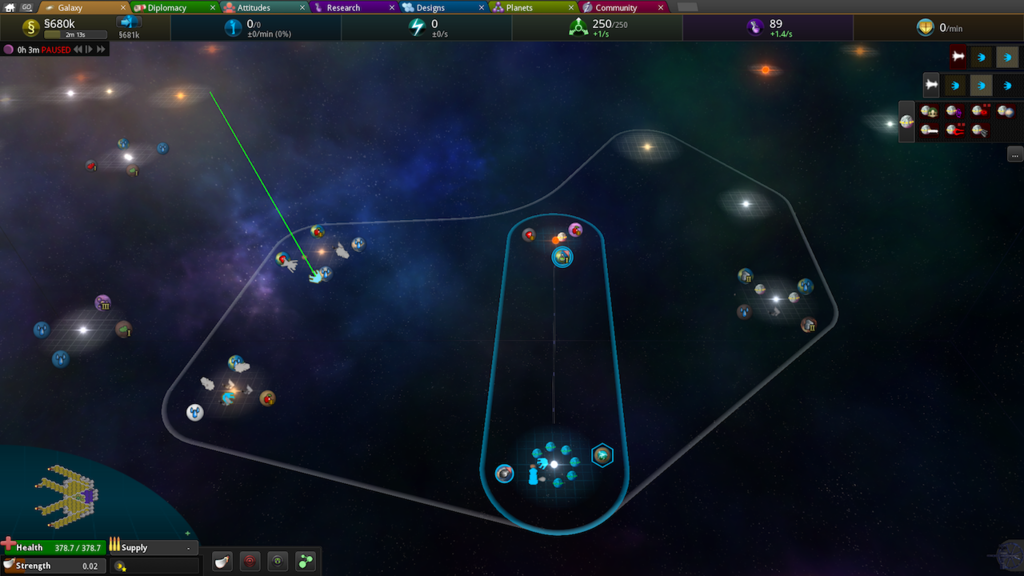
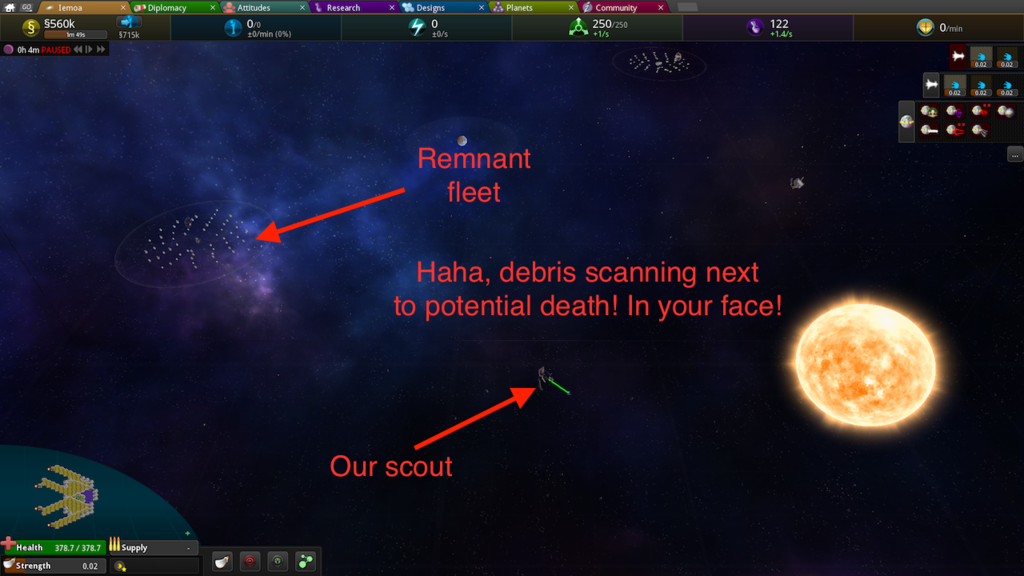
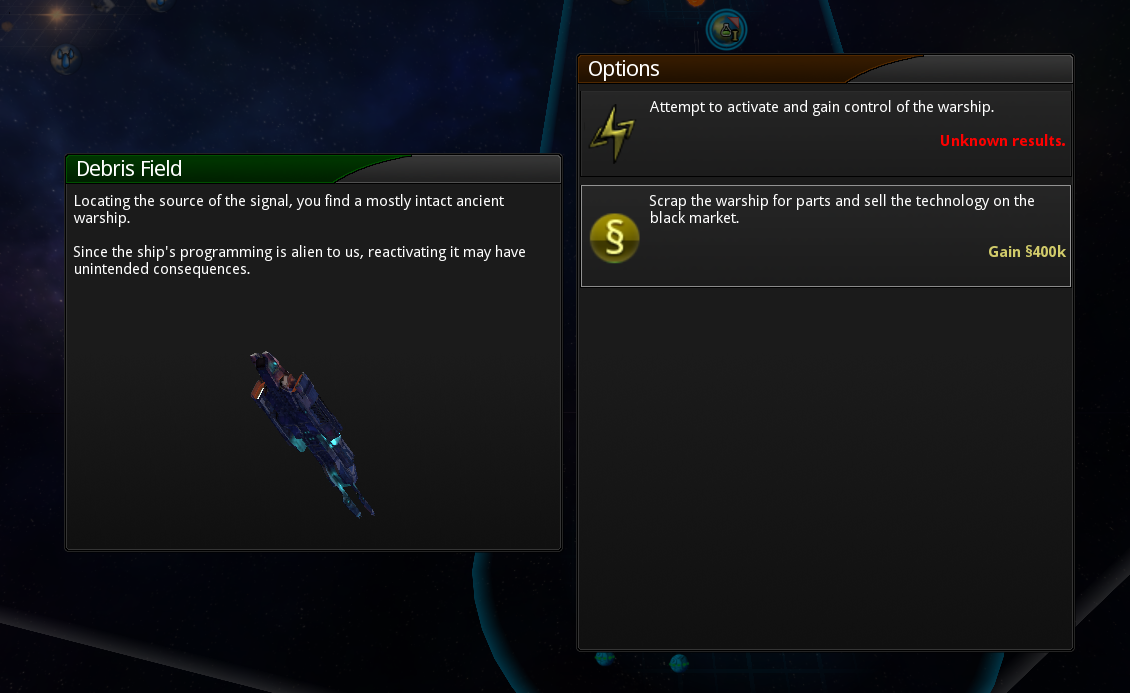
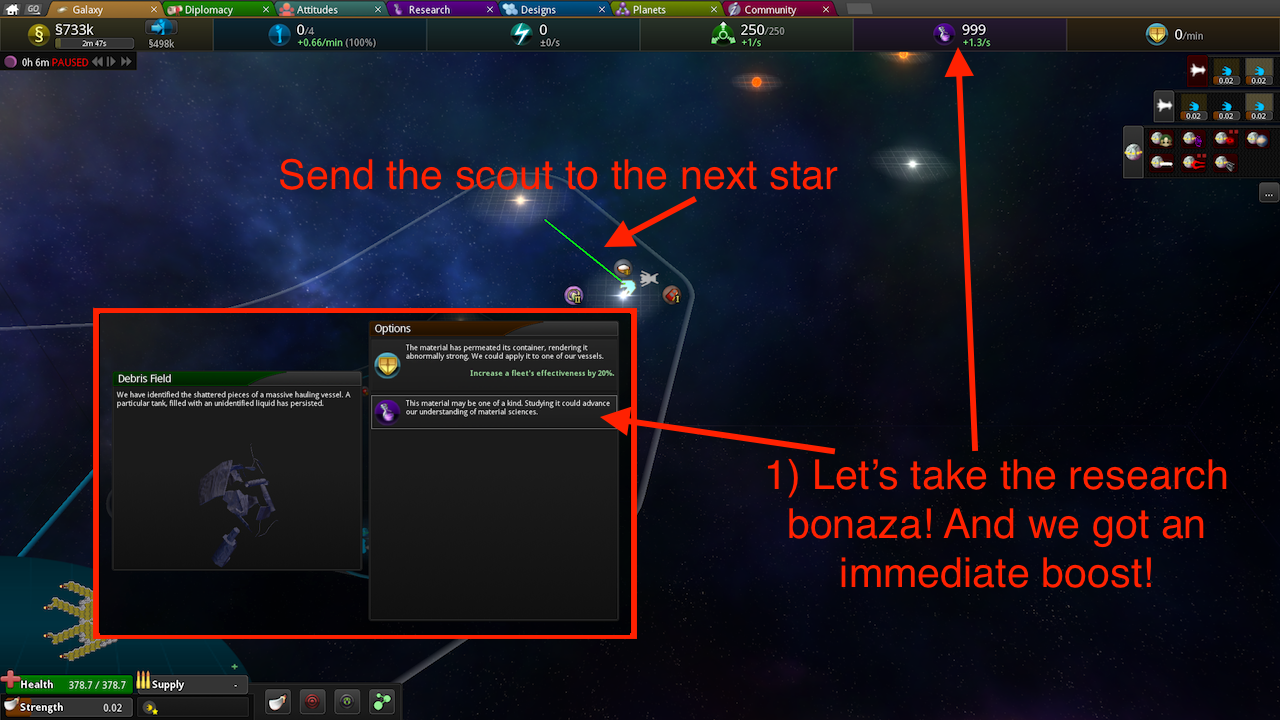
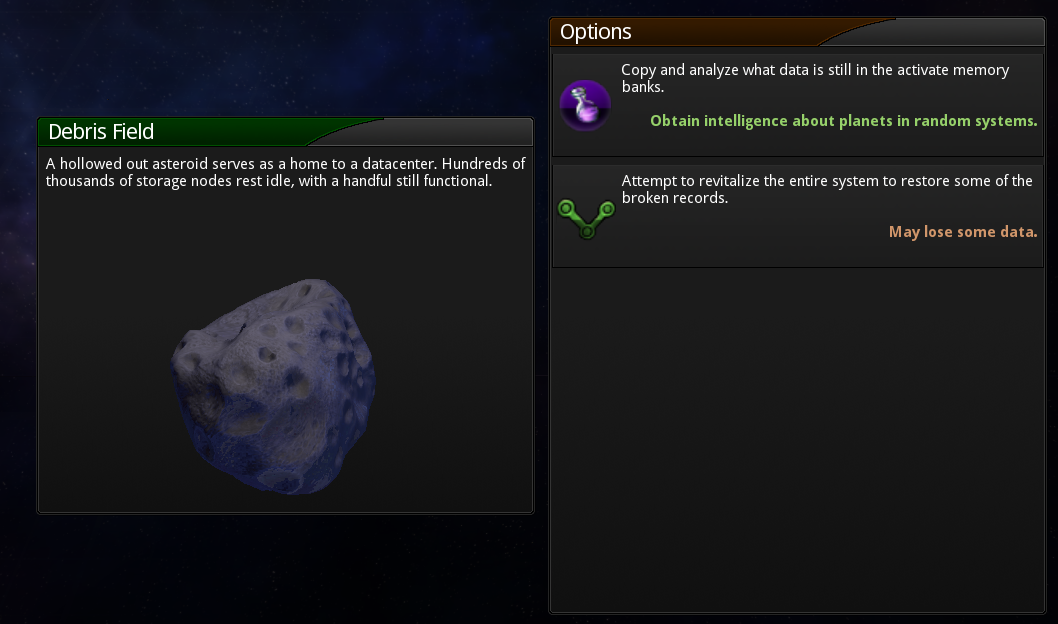
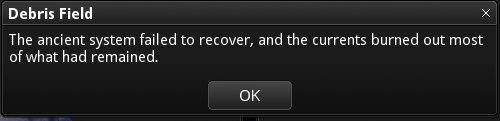
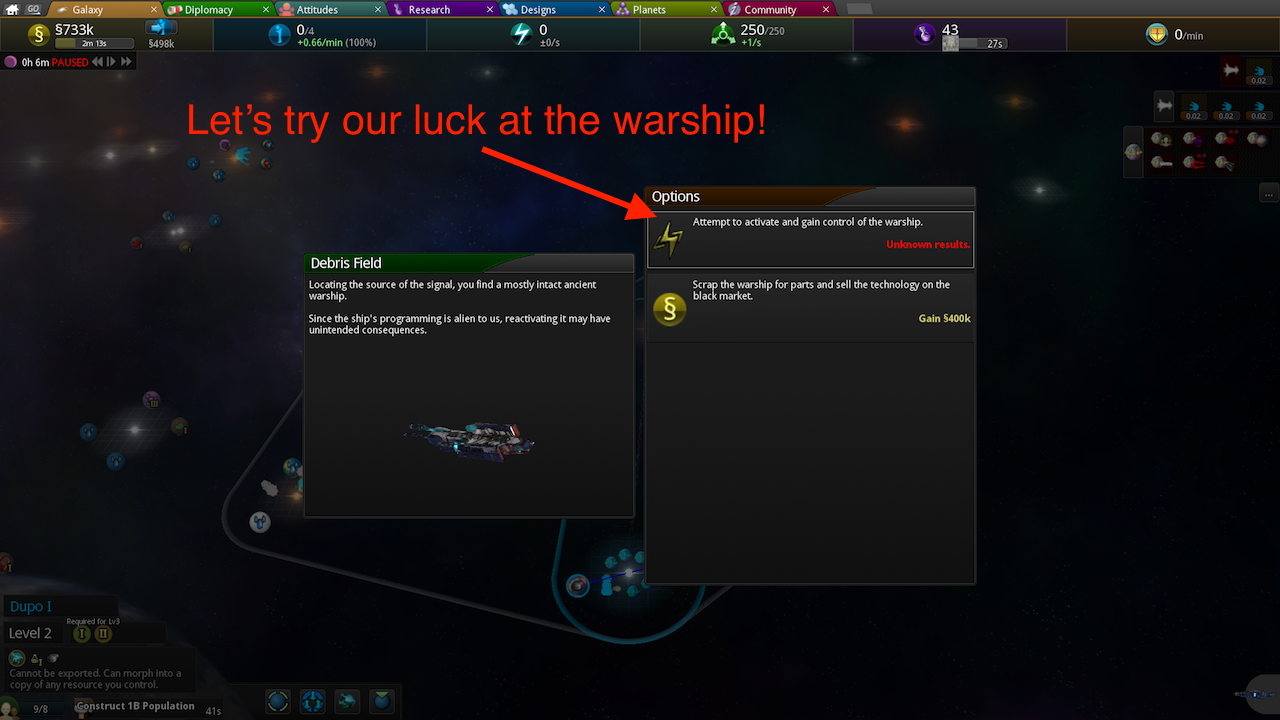
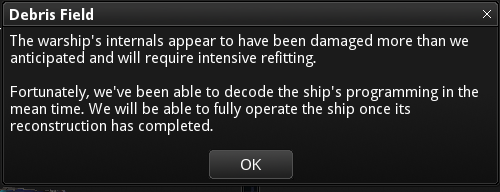
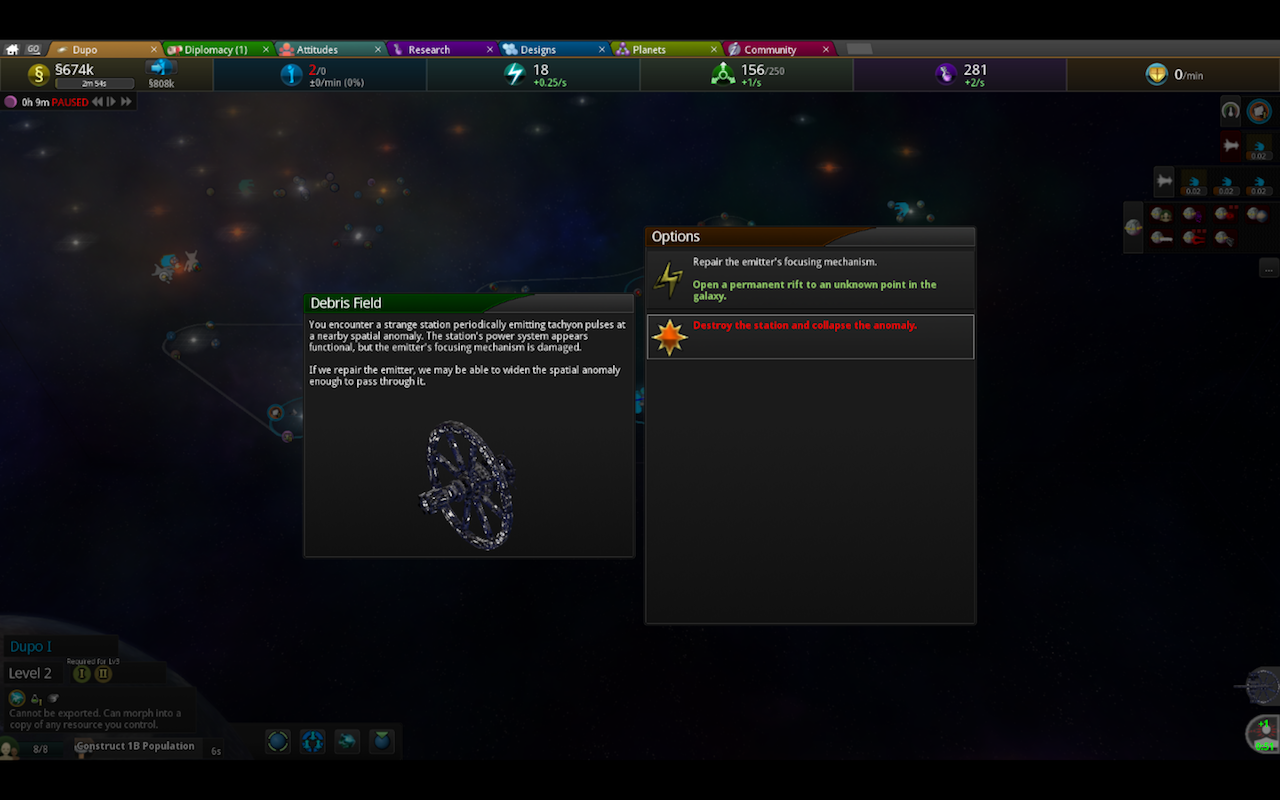
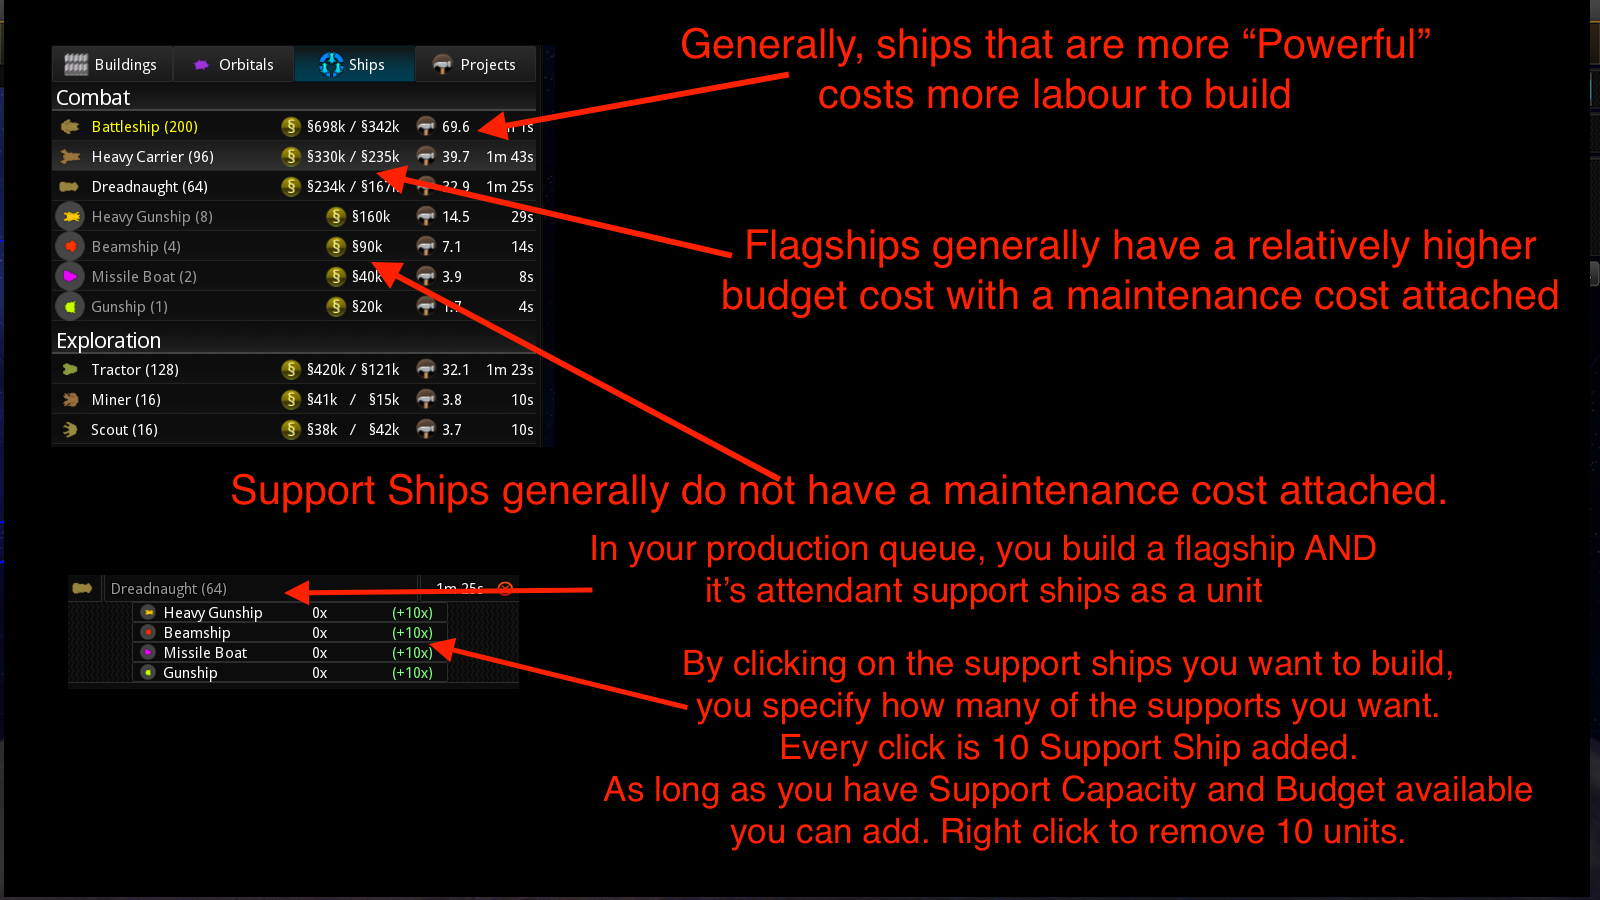
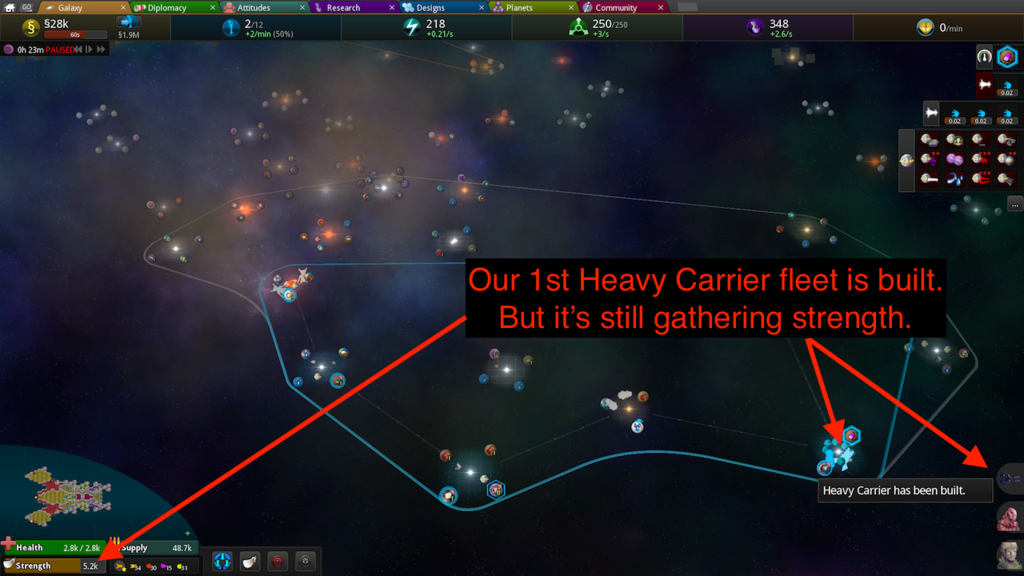
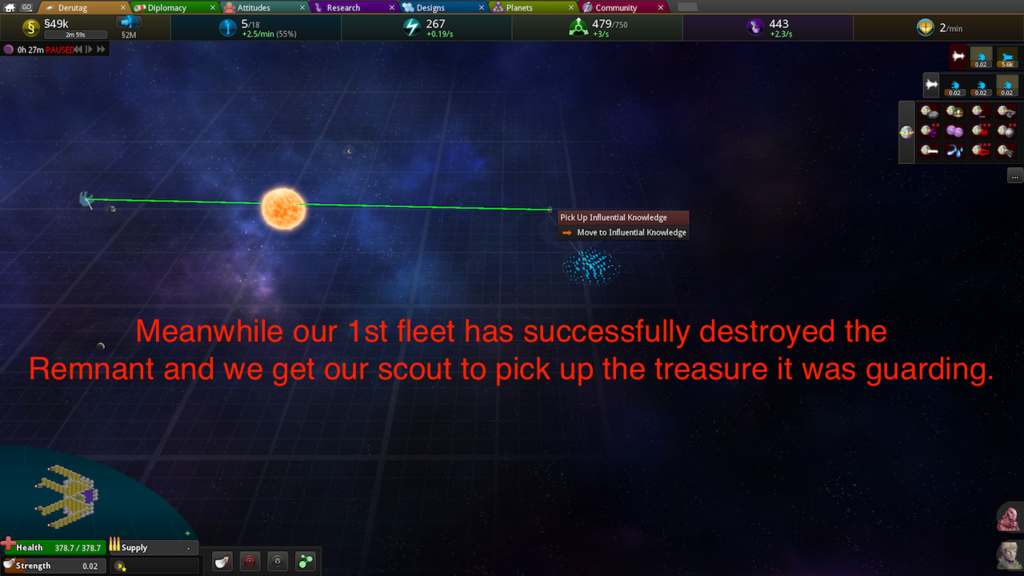
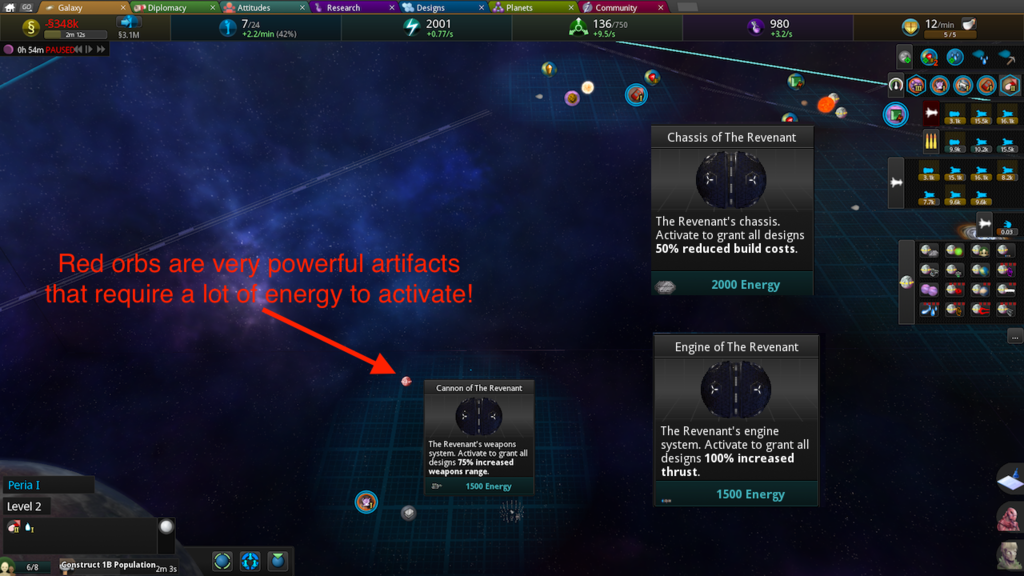
- Those debris fields you scanned, the ones with the warships? You seemed to dismiss the outcomes on both of them - they gave you drydocks containing size-512 Ixion battleships, like the ones you'll occasionally see in Remnant fleets. With a little money and Labor, you'd have unlocked a substantial contribution to your fleet with no maintenance cost. (Mind you, in higher-tier games Ixions are little more than starter ships, but that's more an issue of the skill curve allowing bigger ships than anything else.)

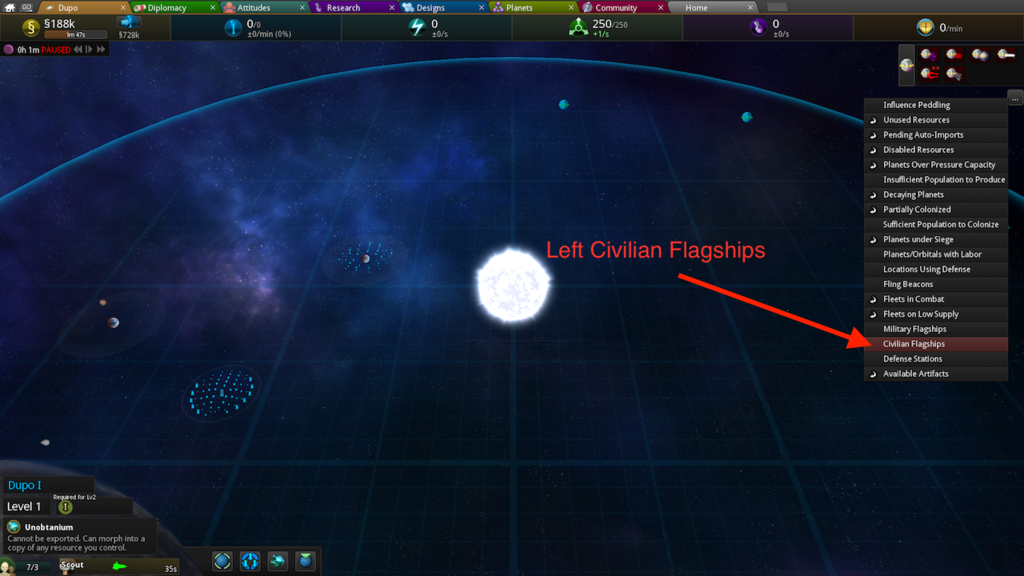
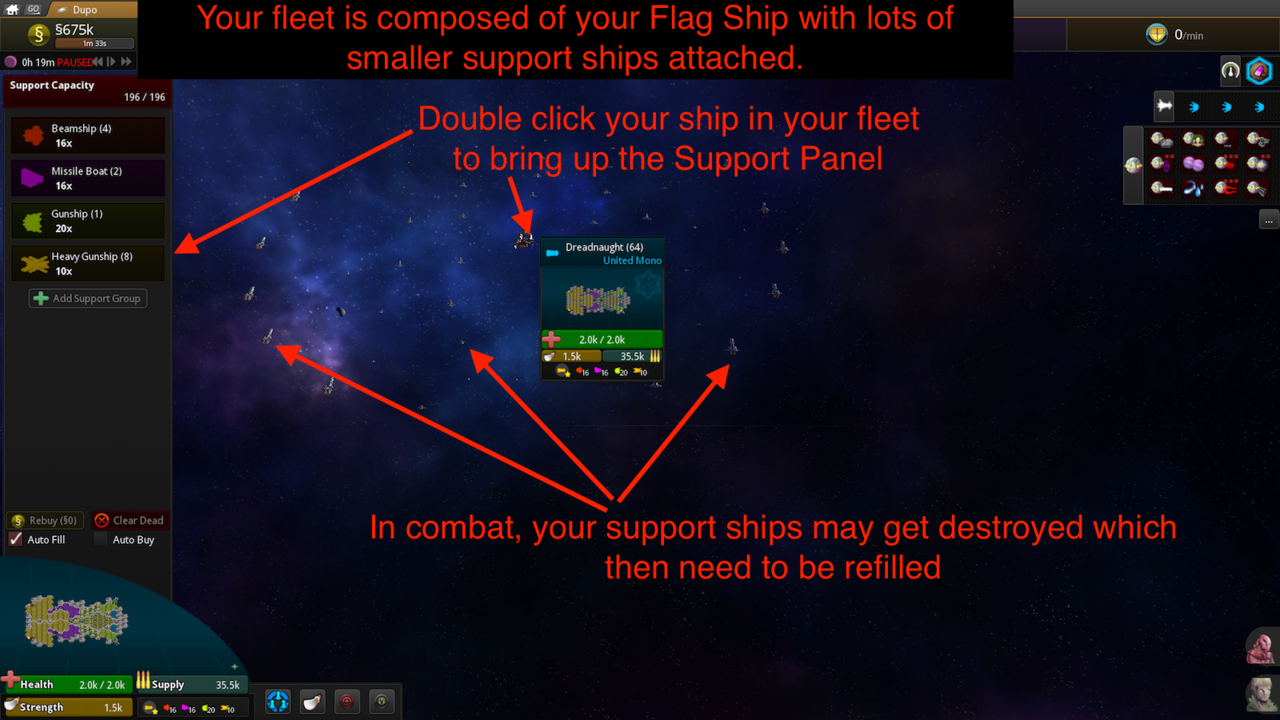
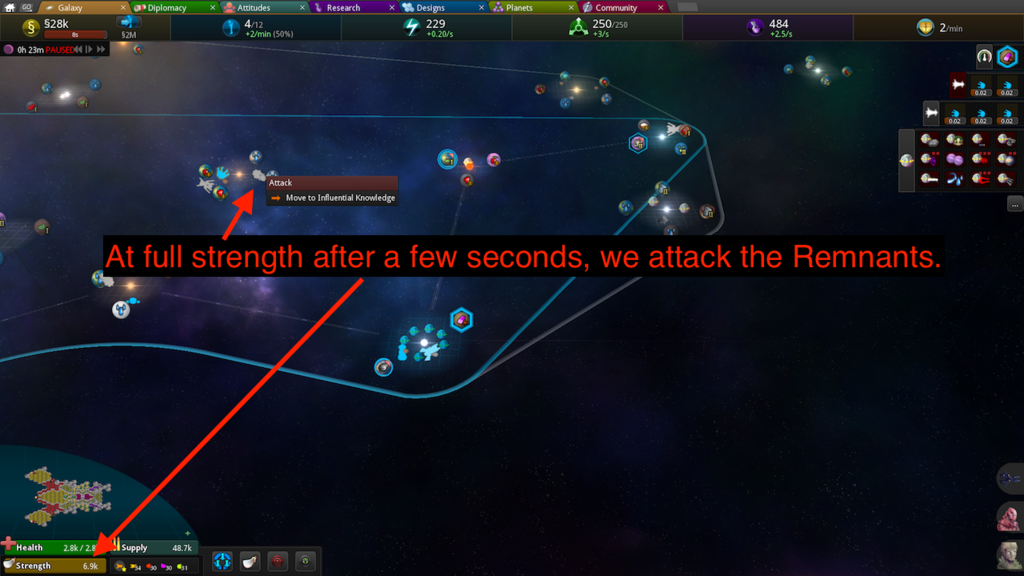
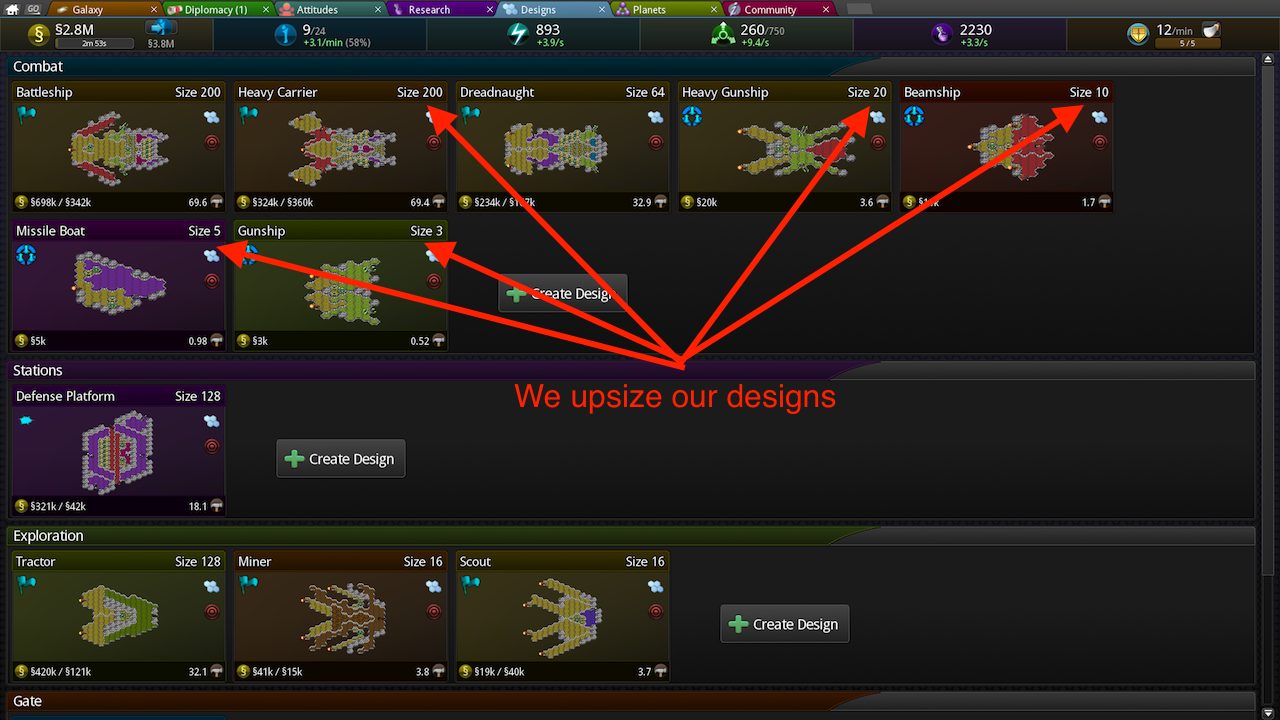
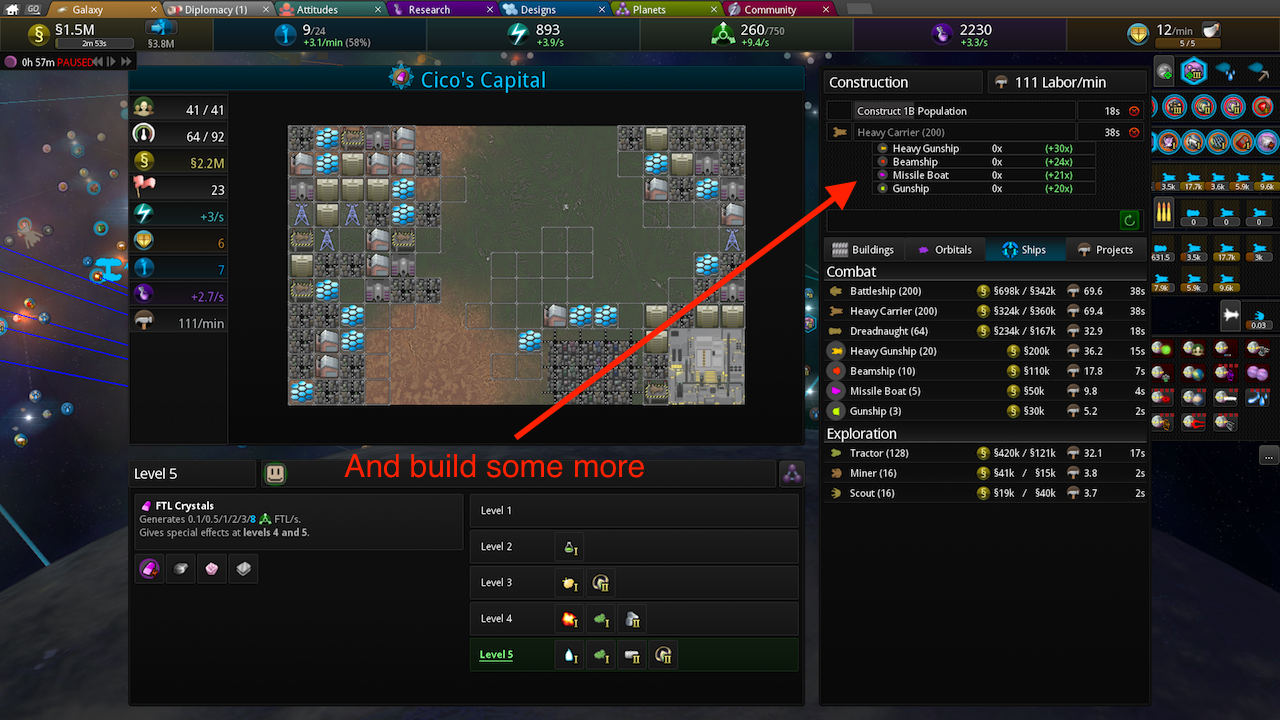
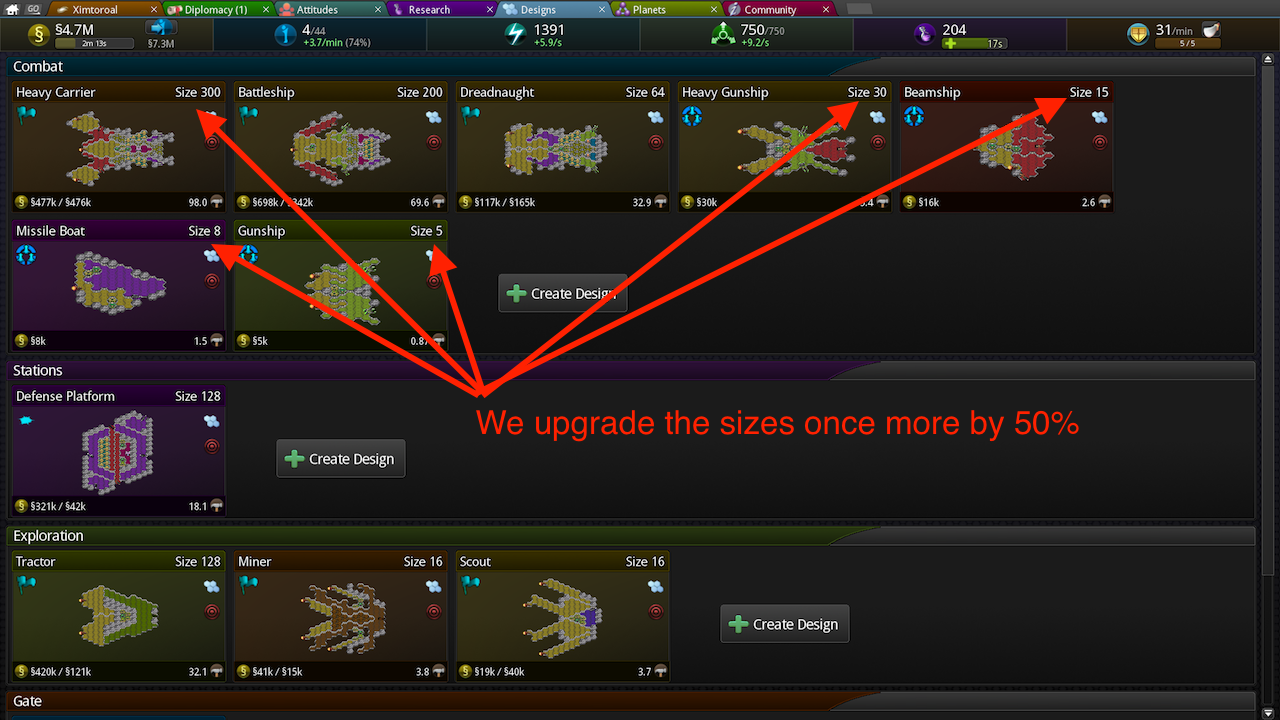
- You should probably focus on making bigger, more powerful flagships rather than groups of flagships.