Whiskerwood

Whiskerwood

Not enough ratings
Whiskerwood: Tips and Tricks for a Thriving Colony
By Matt (Hooded Horse)
A collection of practical tips, tested strategies, and community knowledge to help you build, survive, and prosper in Whiskerwood. From early survival and taxes to efficient farming, logistics, and education, this guide compiles everything players have learned about managing colonies under the watchful eyes of the Claws.
   
Award
Favorite
Favorited
Unfavorite
Early Game
Disclaimer:
This guide is a community-created collection of early-game tips and tricks. It’s not an official manual or exhaustive reference, but a compilation meant to help new players get through the early stages, understand key mechanics, and build a foundation for success.

This collection of tips and tricks, gathered from the community, is designed to help you get started and survive your first winter. It aims to guide players through their first year while offering useful information about specific mechanics.

As you learn how to make your tax payments to the Claws and secure your colony’s survival, you’ll discover many different ways to solve problems and exceptions to the recommendations here. From there, your own ingenuity will carry you forward as you explore new tactics, develop your own strategies, and take on the middle and late game at your own pace.

Starting Scenarios
At the start of a new game, you can choose one of three scenarios that change how often tax and pirate ships appear, as well as the traits of incoming Whiskers.
  • Far Frontier – The standard setting. Expect roughly two tax ships per season and one pirate ship per season. Neither appear during winter. Trait distribution is balanced.
  • Pirates – Fewer tax ships but more pirate raids. Trait distribution remains normal. This setting emphasizes defense and opportunistic trading.
  • Monarchists – More frequent tax ships with normal pirate activity. Many newcomers will have the Monarchist trait, which reduces production efficiency but lowers hiring costs.
Each scenario changes early pacing and available strategies. Far Frontier offers stability, Pirates suits risk-takers who can manage raids, and Monarchists favors economic expansion if you can handle frequent tax visits.

Growth and Management
Grow slowly and carefully. Administrative Tax rises over time and is your best indicator of stability. One new Whisker per season is enough. Be selective with newcomers. A small, efficient colony is stronger than a large one.

Keep a close eye out for Educated Whiskers or those with unique skillsets on incoming ships. Even if they have undesirable traits, they can teach others once a School is built. This helps you scale research and prepare for industrial expansion.

Educated Whiskers have higher expectations, so provide them with better housing or amenities when possible. You’ll also need at least one to staff a Research Lab, which unlocks new technologies.

Prioritize Whiskers with useful traits, such as Apprentice, so they can fill specialized roles in industry later on.

Survival and Infrastructure
You can survive for weeks without producing food using Supply Ships and Gifts. Use that time to build housing, expand land, and secure materials.

Delay or minimize industrial buildings early on. Industrial Tax builds up fast and can cripple a new colony. Focus on stability and core infrastructure first.
Taxes and Economy
How Taxes Work
Taxes in Whiskerwood come from four main sources:
  • Industrial Production Tax – Generated by industrial buildings that process goods. The more you produce, the more this tax rises.
  • Population Tax – Based on your total Whiskers. Every new arrival increases this tax.
  • Administrative Tax – A smaller background tax that slowly rises over time regardless of your actions. Often referred to as “Cat Greed,” it represents the cats’ growing demands and serves as the main pressure to keep expanding your colony.
  • Whisker Ship Travel Costs – Minor fees tied to the use of ships for trade and transport.
Together, these make up your total tax bill, shown at the Dock when the Tax Collector is due to arrive. Most of your taxes will come from Industrial Production and Population. Administrative and travel costs remain minor by comparison but will grow slowly as time passes.

Each Whisker adds a daily cost in taxes, so make sure every worker meaningfully contributes. Either through direct profit or by supporting essential production chains.

Economy and Tax Strategy
Selling wood is one of the easiest early sources of income. It gathers fast and stores efficiently. Ores are also valuable early on and can help make tax payments.

Cotton is an excellent cash crop once farming begins. It grows reliably, can be produced in large quantities, and trades for high value with the Claws or Smugglers. Investing early in farmland into cotton ensures a steady, renewable income source alongside mining profits.

Refer to the chart down below to see the value of trade goods you can use for tax payments.

Acceptable Goods for Tax Payments
Good
Value
Gold Bullion
233
Gold Ore
89
Copper Ore
21
Iron Ore
21
Cotton
21
Coal
13
Tin Ore
13
Logs
8
Rock Salt
8
Potash
8
Berries
5
Flax
5
Trinkets
3
Fish
2

Tax Payments and Efficiency
Pay 125% taxes to receive two Gifts. This is the most efficient early setup. Paying 175% is rarely worth it in the early game.

You can sell cut stone to Smugglers. Gold bullion received from Smugglers is extremely valuable for tax payments.

Taxes rise with population, industrial activity, and trade volume. Review the tax breakdown at the dock each time the tax ship arrives.

Storage and Production Management
Do not fill your warehouse capacity completely. Once mining and fishing begin, you will accumulate large amounts of low-tier materials. Build multiple warehouses and expand storage early to avoid production blocks. Walls of warehouses and a few strategically placed Triages work well.

To cap production, create a dedicated warehouse for that output and disable receivability for that item on all other warehouses. Factories will stop automatically when the target warehouse is full.

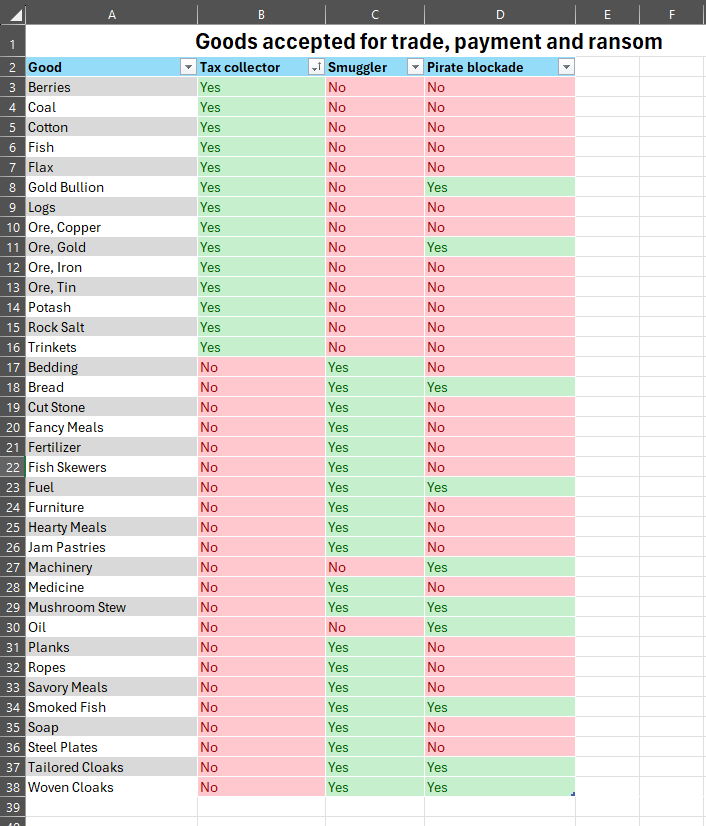
Goods Accepted by Traders (By Ritchie on Discord)
Health and Winter
Healthcare and Winter Preparation
Build a Triage and place Bonfires near housing and workplaces before winter. They prevent sickness and cold-related deaths during the cold season but are not urgent at the very start.

Heat functions like a service. Whiskers will go Seeking Heat if cold and avoid illness as long as they warm up before sleep. You do not need to heat houses directly. Place bonfires along common routes or near the Bathing Dock or Cafe so evening activities provide warmth. Water absorbs heat naturally and can help stabilize nearby temperatures.

Avoid clustering bonfires. Mild pollution is fine, but placing too many bonfires close together causes heavy pollution and sickness.

Winter Strategy
During your first winter, you may accumulate heavy debt. Max out Royalty satisfaction beforehand, then take as many supplies (food, clothes, and logs) as possible. Survive winter using these reserves.

When spring arrives, pay only 50% of taxes to recover financially, even if it lowers satisfaction. Avoid taking overpriced winter supplies; paying taxes later to rebuild favor is safer.
Building, Space, and Housing
Building & Vertical Construction
You can place stairs instantly at no cost and receive a full refund when removing them. This lets you expand vertically without waiting to construct platforms or supports first. Buildings can be placed directly on higher levels, making 3D construction fast and flexible from the start.

Build in three dimensions for efficiency and warmth. Multi-level colonies use less fuel to heat homes and workplaces. Digging underground also creates additional space for storage or mushroom farms while preserving surface farmland. However, avoid over-vertical layouts since pollution and travel inefficiency increase with height.

Housing and Approval
Immediately building stone or wood houses helps early Approval. Stone houses are cheap, durable, and a good early investment since you will mine plenty of stone.
Upgrade directly from stone houses to plank rowhouses; intermediate tiers can be skipped.

City Planning
Use Earthworks to expand buildable land near docks and central areas. This reduces wood costs and helps centralize services.
Cluster residential blocks together for shared amenities and easier heating coverage.

Public Services and Approval
Add services gradually in this order:
  1. Bathing Dock
  2. Cafe (low upkeep; worker can assist elsewhere)
  3. Decorations for small Approval boosts
These three efficiently cover all early Approval needs.

Note: Cafés have limited food stock, so build a second once your population reaches 20. Keep some distance between them to reduce travel time.
Workforce and Education
Schools are expensive conveniences. Only build one if you cannot find already educated workers. Schooled Whiskers have higher expectations and can become difficult to manage earlier than naturally educated ones.

Education and Training
An Educated Whisker is required to operate the Research Lab. They do not appear automatically. You must wait for one to arrive on a ship, then recruit them.

Once you have an Educated Whisker, build a School to train others. The Educated Whisker can teach other Whiskers their Apprentice trait, which is needed for specific jobs such as the Fishing Dock. Apprentices can later gain further education themselves if taught by another Educated Whisker.

The Gifted Teacher trait accelerates training speed inside the School. It is especially useful early when scaling up your skilled workforce.

Efficient early strategy:
Place a School early, hire one Educated Whisker as a teacher, and train three others of different guilds at once. In one or two days, you will have four Apprentices covering multiple professions, enough to staff critical buildings and begin early research.
Resources, Farming, and Expansion
Mining and Trade
You can start with mining surface copper and gold for trade income, as they’re especially useful before your first winter to help make your initial tax payments. Move mining camps as deposits deplete; relocation is instant and free. Alternatively, you can farm cotton as a cash crop.

Depending on your map seed, having several miners can boost income, especially if nearby islands can be reached with tunnels or Earthworks bridges. Mining and expansion work well together. Use Earthworks to build land bridges that connect to new deposits.

Ore is the simplest way to pay early taxes, but you can pivot away from using it for tax payments once you establish other sources of trade income. See the Taxes section above for guidance on how to do this.

For a quick example, planks become more profitable when sold to smugglers at high prices. Each log produces 40 planks’ worth of value after conversion. Since wood is renewable, logging and plank production are strong long-term trade options.

Farming and Fertility
One fertilizer boosts a single tile to 200% fertility. Save it for critical crops.

Farms built on man-made land work fine after clearing surface stone.
Mushrooms only grow in deep tunnels, at least 8 to 9 tiles from light.

Replace small terrace farms with larger, flatter fields for better yield. Rotate crops or leave fields fallow to maintain fertility.

To flatten areas for farming, keep in mind that Earthworks soil and mined soil start infertile. You can restore fertility by removing rocks and leaving the area fallow for a while, or by applying fertilizer. Make sure the tile is marked as farmland; only marked fields regain fertility passively over time. Unmarked soil will stay barren.

Nutrients and Fertilizer Limits
When you hover over a tile with the farm tool, the tooltip shows something like "Nutrients 88% / 95%". The first number is the current nutrient level, and the second is the maximum recoverable amount.

Leaving a tile fallow allows nutrients to slowly recover up to the listed maximum.

Using fertilizer temporarily raises the current amount to around 150%, beyond the normal limit, but this excess will decline again as crops consume nutrients.

Fertilizer acts as a temporary boost, best used on tiles with low maximum fertility or poor recovery. The maximum value only determines how much a tile can recover naturally, not the highest possible fertilized amount.

Nutrient supply is stored per farm building. If farmers cannot reach all fields or your farms are too far apart, some fertilizer may remain unused in those farms’ local stores.

Bridges, Earthworks and Expansion
Bridges are fastest to build but use more materials. Earthworks land bridges are slower but cheaper and ideal when stone is abundant. Tunnels are slowest but most material-efficient.
Logistics, Traits, and General Tips
Storage and Logistics
Assign each factory’s output to a dedicated warehouse. When full, production pauses automatically.

Keep warehouses close to production centers and organize them by resource type.
Use Earthworks to dump excess stone or reshape terrain when storage fills up.

Assign Whiskers specific houses near their workplaces to minimize walking.

Workforce and Training
Recruit and reroll early for Apprentice, Master, and Educated Whiskers while seals are cheap.

Provide quality housing to retain skilled workers and improve satisfaction.
Keep a few Educated Whiskers unassigned for research or emergencies.

Work Efficiency
Apprentices and Craftsmen do not speed up work when assigned to extra slots. For example, only one Apprentice is needed at a Fishing Dock; additional skilled workers in other slots provide no benefit.

Catalysts such as ropes and fishing nets can replace the need for extra Educated Whiskers or factories, reducing Industrial Tax and maintenance costs.

Guild Traits
Pay attention to guild traits. Miners carry one extra good per trip but eat more food and have lower Approval due to hard labor. Their preferred foods also require further research.

Monarchist Trait: roughly –60% production speed in industries and –3 Approval per item produced, but cheaper hiring costs from ships. Keep Monarchists out of industrial jobs.

Rebellious Trait: periodically grants small Fervor to random Whiskers for a short production boost. If it targets a Monarchist, the Monarchist loses Approval.

Rebellious Fervor
Displeasing the Claws or being attacked raises Fervor. It decreases by one point per day and will later be affected by additional events. Its function is described in the in-game tooltip.

General Tips
Keep housing, production, and storage close together to minimize walking.

Always have one miner and one builder unassigned for emergencies.

Monitor warehouse capacity to prevent production halts.

Use the game’s slower pace to review layouts and fine-tune your economy.

Each Whisker should have a clear purpose. Idle population drains your resources and raises taxes.

Combining vertical and underground layouts provides the best space efficiency while keeping walking distances short.
4 Comments
SOEN 13 Nov @ 5:42am 
Please help me! My save file with 460 rats crashes with a 'Fatal error!' whenever I click on it. Also, I only get 25 FPS at 1x speed and 6 FPS at 3x speed. Please help!
[BFD] Verga 12 Nov @ 8:21pm 
Good little starter thread. I only realized you could stack homes after watching a video.

Q. I notice around Day 15 - 20, the ships carrying whiskers are few and far between. Should I be grabbing as many as I can before then or just be patient?
Matt (Hooded Horse)  [author] 12 Nov @ 10:01am 
@SBlack - Both are true at once. Whiskers seek warmth as a service, so heated buildings like workplaces can help meet that need. Clustering and stacking structures also help retain heat across your settlement. Early on, you’ll rely on campfires until cleaner, more efficient heating options become available, so these are simply two methods to keep in mind for maintaining warmth.
SBlack 12 Nov @ 2:23am 
"You do not need to heat houses directly"
vs.
"use less fuel to heat homes and workplaces."

Which is it? Does this mean you shouldn't heat homes in the first winter for simplicity, but should do so long term?