Limbus Company

Limbus Company

230 ratings
How to solo MD Extreme with any IDs with max adversity (including hidden bosses)
By Folmore
A comprehensive guide on how to solo MD Extreme with any IDs of your choice
12
3
10
2
   
Award
Favorite
Favorited
Unfavorite
Introduction


MD Extreme can be quite daunting and challenging but with the right planning even the hardest content can be cleared with any IDs, even if said ID has quite underwhelming kit. Honestly the ID's skill kit doesn't really matter that much because to clear MD Extreme what matter the most is the EGO gifts you bring and choosing the right theme pack. With this guide, I'll try to break down on which EGO gifts you should bring, which theme packs you should choose, and unfavorable theme packs you should avoid.
Why solo when you can do it with a team?
Consistency. When running with a team, some of your sinners will definitely die on the first turn. This will risk your fusion EGO gifts that need 5+ sinners on field to activate (i.e. Lucky Pouch, Bloody Mist, etc.) become useless. On floor 10+, you will need an absurd amount of clash power in order to deal damage and it's basically game over if your sinners that need to activate those gifts are dead.
Update: seems like Project Moon realize this as well, as of 11 September 2025's patch notes, they are cooking something to alleviate this issue.
Update 2: As of 18 September 2025's update, they rework all of the fusion gifts. The gifts will retain its effect even if your IDs are dead. Objectively speaking, using team to clear MDE is easier than to solo. However if you barely have the IDs to make a decent team or lacking for backup IDs or any other reason you want to do solo run, keep reading.

The name of the game for MD Extreme is "survive turn 1". On turn 1, the enemies are still on their peak performance and you're on lowest low. Downpour + Melted Eyeball hasn't triggered yet, you still haven't crit and don't have 15 offense level from Clear Mirror Calm Water, etc. You get the idea. Meanwhile doing solo, there's no risk of deactivated EGO gifts and you definitely can survive turn 1 thanks resurrection EGO gifts like Inspector Badge and Unhatched Ember. You can start unga bunga on turn 2 onward.

Also in case you're wondering, you don't have to EGO spam up until floor 14. I personally not a fan who like to spam EGO unless all of the clashes are "Hopeless". One of the adversity on floor 14 is Brutality (plus coin power +2, minus coin power -2 for all enemies), so you won't have a lot of option to win clashes on floor 14 onward.
Choosing the solo identity

In Limbus Company, there are two type of identities. Those who have evade as their defensive skill and those who don't.

Identities with Evade
S tier, doesn't matter who. Evade is the best defensive skill, guard and counter can't even compete. Project Moon even need to make Clashable Guard and Counter just to elevate their usefulness.
The enemies have 10 skill slot while you only have 1? Just evade all of them.
Fighting against enemies with unbreakable coins? Just evade them.
Enemies like white gossypium has "Unclashable" on their attack? Just because it's unclashable doesn't mean it's undodgeable.

Identities with Guard and Counter
Now instead of praying to RNG for your identity to hit heads with their evade for a limbillion times in a row, you can face tank them like the sigma male you are. However not all guard and counter are made equal. I'll list some of notable IDs with guard/counter that came to my mind as your choice for solo:
  • Dieci Rodion : The queen of solo. Discard and limbiliion of shield
  • KK Rodion : On demand protection and free S3 from her counter
  • KoD Rodion : Free permanent 2 protection from her positive state
  • Capo Meursault : Remember, you can't staggered without your consent. Free protection from overheat
  • Zwei Gregor/Zwei Ishmael : they are zwei, stacking up defense is their gimmick
  • Harpooner Heathcliff : extra damage based on missing HP and gain 10 defense from counter
  • N Corp Meursault : The tank ID. Thicc HP, a single stagger theeshold, self heal, on demand protection

You might notice a pattern that I prioritize IDs that can generate defense level up or protection rather than pure healer like meat lantern don and K corp hong lu. That's because heal in MD is very easy to generate than protection and defense level up. It's better to overstack your defense level rather than overheal your ID. A single AoE attack with Grey Coat can fully heal you anyway.

Passive support/benched IDs

Depending on your solo ID, the benched IDs will be different. Pictured above is a general build that can work for any ID, you still need to fine tune the details yourself tho (for example, if you use Dieci Rodion, you should use Dieci Yi Sang and Dieci Meursault as her support)

I will list some notable passive for each sinners that can work on any ID.

Yi Sang
  • Wu Branch Adept - 5 defense level up and 50 HP heal if your HP drop below 50%
  • Seven - +1 clash power (need gluttony res)

Faust
  • Regret - enemies have -1 clash power if they have 3 negative status
  • LCB - 25% chance to inflict 2 offense down
  • Lob Corp - defensive skill has +2 power (need lust res)

Don Quixote
  • Shi - +10% slash damage
  • LCB - +10% pierce damage
  • Lobotomy - 4 HP when you hit enemies (only if your ID has aggro)
  • T Corp - -10% damage from enemies with tremor

Ryoshu
  • Butler - 3 poise count and 1 haste on clash win
  • Mao - 2 haste on turn end
  • Chef - 15 HP heal when enemy is killed (once per turn)

Meusault
  • LCB - -10% damage taken

Hong Lu
  • Ting Tang - +20% damage with head coins

Heathcliff
  • LCB - +10% blunt damage
  • Rabbit - +10% pierce damage

Ishmael
  • Zwei - 2 defense level up
  • Reindeer - +10% blunt damage

Rodion
  • LCB - +20% damage with head coins
  • Kurokumo - +10% slash damage
  • Dieci - 3 blunt damage up when getting hit

Sinclair
  • Zwei - 1 haste and 3 defense level up
  • Mariachi - +10% damage
  • Cinq - on evade, gain up to 5 haste

Outis
  • LCB - +30% damage to enemies below 0 SP
  • Seven- +10% damage against enemies with weak/fatal resistance (need Lunar Memory for it to trigger all the time)
  • G Corp - randomly gain 1 attack power up, 1 defense power up, or 1 protection
  • Barber - 10 HP heal when enemies are killed (2 times per turn)

Gregor
  • G Corp - heal 5 HP per clash win
  • Zwei - 3 defense level up
Starlight buffs preferences


This is my preferences for the starlight buffs, you can still maxed out all of them still gain net positive if you do floor 15 with max adversity.

Star of the Beginning ++

2 free rerolls every shop is good and the price is cheap

Cumulating Starcloud++

you'll get a lot of excess fusion only gifts due to duplicate EGO gifts, so you'll sell at least one of them every shop anyway

Interstellar Travel

additional level will only give you more refresh and the bonus clash power only work for floor 5 and below

Star-shower

level 1 is enough imo, the extra starting cost might be useful to get your desired EGO early in the shop

Binary Star-shop++

you want it maxed for the extra +40% encounter reward

Moon Star-shop++

2 free keyword refresh, 1 free tier 3 on floor 1, +25% bonus chance for mega shop. insane value for its cost

Favor of the Nebulae++

you'll need the bonus levels from it because you'll encounter enemy at level 100+

Starlight Guidance++

another insane value for its buffs. +3 speed, 2 clash power, 2 damage up, and 2 protection

Chance Comet++

you'll get a lot of free EGO gifts from this, including tier 4

Perfected Possibility

the worst one imo, very underwhelming buff for its cost
EGO search and EGO list to get
When you use the EGO search function, prioritize getting a theme exclusive gift and/or keywordless one. The priority of the choices is:

The EGO Search Pick:

  • Ashen Constellation's Blessing: always pick, no other gifts in this game has the ability to negate one of your weakness
  • Emergency Investigator Badge : even if you run a tremor ID and gonna pick TKT BokGak theme, it's better to get the badge from EGO search. the badge is keywordless so you can't fusion it and personally i dont want to risk missing revive EGO gift, there's only two of them throughout the game.
  • Sharp Needle & Thread : the third pick of EGO search. even if you managed to get the event node in Hell's Chicken theme pack, the event node only have 50% chance to give it to you, not to mention said event node is also shared with guaranteed Tango Marinade
  • Manor-shaped Music Box : only choose this as your third pick if your ID is not strong enough to solo Dregs of the Manor. Dregs of the Manor is the hardest theme pack among floor 1


Theme pack exclusive EGO gift you must/should get:

  • Bridle : ALWAYS CHOOSE LINE 2 ON FLOOR 4. for some reason, Line 2 is exclusive only to floor 4, you will need the max HP bonus otherwise your ID will only have around under 200 HP on floor 13 onward which is just about 2-3 hits. you can also get Metronome from Line 2 but it's not mandatory
  • Unhatched Embers : free revive, only obtainable from Line 3 theme pack
  • Contempt of the Gaze of Contempt : also exclusive from Line 3, nice to have but not mandatory
  • False Halo and Snake Slough : exclusive from Line 1, the damage up from False Halo stacks quite easily. Snake Slough isn't mandatory but nice to have
  • Gift Sack/Jolly Plushie: exclusive from Miracle in District 20, you might consider to get Jolly Plushie for the extra damage while you are at it but Sad Plushie is keywordless

Healing, EGO resources, and cost related EGO gifts
This goes without saying, but any EGO resources, healing, cost related are always good especially if you get them early. Hence I won't put them in any list, you are already expected to get at least some of them. Also don't forget to craft Lunar Memory.

Normal EGO gifts combination cheat sheet:
These EGO gifts will work regardless of your ID's skill sin and their main status.
For priority, I suggest to complete them as following
Tremor = Poise > Sinking > Charge > Bleed > Rupture >>>>> Burn


Attack type EGO gifts that work for #1 deployed ID
A lot of attack type (slash/blunt/pierce) EGO gifts are tied to deployment order, usually their enhanced version extend their reach, so sinners on specific deployed order can also benefit from them. Here's the list for attack type EGO gifts that work for solo however I won't list the one that boost only skill 1 and 2 (something like Cloudpattern Gourd Bottle boosts Slash type skill 1 only, because you probably already converted all skill 1 to skill 2 or 3 anyway). The tier 4 of each attack type also boost specific defensive skill which often overlook.
Mounting Trials to avoid
This section is pretty straight forward and if you do MD frequently, the choice priority between team and solo run is pretty much the same. Also, pay attention to the enemy's level up tied to those mounting trial as well.

1. Coin Power Up (a.k.a. Brutality)

unless this mounting trial is tied to something you definitely need and it's exclusive EGO gift (something like Bridle or Unhatched Embers), never ever take this mounting trial.

2. Final Power/Base Power Up

basically equivalent to Attack Power Up. this mounting trial affect one sided attack from the enemies (good luck dodging if you stack these up)

3. Clash Power Up
unlike Final Power/Base Power, this won't affect one sided attack from enemies

4. Offense Level

the most often mounting trial you'll see, just pick offense level with the least amount

5. Defense Level and Max HP

the best option. stacking Max HP meaning your EGO gift that triggered based on enemy's HP like Contract and Carmilla will be indirectly buffed as well.
How to tackle floor 11+ and their exclusive theme packs
Congratulation! The boring part is over, now you can play what you were waiting for.

From floor 11 onward, I suggest you to not pick any regular theme pack except for Long Battles. The main reason is because normal encounter is a run killer. You have zero control for clashing and the enemies keep getting more skill slot. The nodes you can get is also RNG, if you're unlucky you need to face several normal encounters. I also exclude RR5 because it's longer than other Long Battles theme pack and the bosses you may get is uncertain.

Enough yap, here the list of floors I usually do for MD Extreme.

Floor 11 and 12 is quite easy. For battles, our sanity will eventually capped at 35 SP and EGO cost is doubled but that's about it. Also I hope you have everything you need because everything in shop has double the cost.

Another tip, always heal on shop. Despite your sanity is capped at 35 SP (or 30 on higher floors), healing from shop will always bring your sanity to 45 SP, so at the very least you can still reliably roll heads for turn 1.

Who Couldn't be Bloodfiends/The Dawn of Green
The only normal encounters among the Extreme Pack. They are basically the same: normal encounters and the enemies inflict bleed, the only difference is Green Dawn is only a single wave meanwhile bloodfiends have two waves.
These packs are freebie if you bring full team, it's also doable for solo if you're willing to EGO spam, just be mindful of your resources. One of the adversity you'll get at this point is double cost for EGO activation.

N. Corp New League of Nine Littérateurs
Either you do this pack at floor 11 - 12 or you don't pick this pack at all. If you do this on later floors, Ahab and Nelly will have insane dodge and it will take forever to stagger Nelly because the enemies won't have their first stagger threshold starting from floor 13. The fraud duo is still a fraud tho

Efflorescing Greenery
Same reason as N Corp tbh, if you do this pack on floor 13+, that means you will have to face unstaggerable White Gossypium because it only have a single stagger threshold.

A Beautiful Voice
You have to either stagger/kill kromer on the first two turns or you'll have tons of bleed from her nails due to unavoidable stagger on turn 3. Do not pick this pack for floor 13 onward. The rest of the bosses are pushover tho

Impenetrable Path
This is one of the longer fight because only 4 enemies can only appear at the same time and you have to defeat 18 of them. Pretty easy fight on lower floors because the wuthering heights' enemies have SP and you can cripple them with sinking. The counter from swole petaccula isn't that scary at this point.

Line 3 - Terminus
Ambling Pearl = permanent poison.
Ardor Blossom Moth = permanent burn.
If you gonna do this pack for later floors, just make sure your heal can keep up like using gloom ID with Grey Coat.


Now (hopefully) you have cleared Floor 12, the training wheels are off. No more first stagger threshold, triple the cost for EGO activation, triple cost in shop as well, mandatory +2 coin power, SP is capped on 30, and you'll lose -5 SP and up to 30 HP every turn.

Floor 13 - S.E.A. C.R.
The crabs' AI are inherently dumb, they will attack their own if you drop their HP low enough. Don't rush on killing enemies, spread the damage evenly and let the crab attack each other or you'll get jumpscared by the big crab too early.

Floor 14 - Bridle of Infinity
It's a free floor, immortal robot is still a pretty boring fight

Floor 15 - Into a Certain Library's Book
Because you can't stagger the minions anymore, you can't play around FF's hunger gimmick. The only way to defeat the boss is brute force. Don't be surprised that you only deal around 1k damage to the boss, it has 70% damage reduction passive. This stage gets absolutely crippled by reverberation EGO gifts because majority of their skills are single coin. If your ID has great survivability (for example like Dieci Rodion, Zwei Gregor, or Molar Ishmael), you don't even need to clash with the minions, just face tank/dodge them. There's no point in engaging them because they will keep respawning and newly spawned enemies don't have the debuffs from tremor gifts combo.
Hidden bosses
Starting on floor 11, all nodes (except for shop and floor boss) will have chance to jumpscare you to fight against hidden boss. The reward if you win against them is pretty good (EX tier gift that give +8 Final Power and 1000 cost), so it's always worth it to do these hidden bosses. You can get jumpscared by multiple hidden bosses in a single run.

!!!VERY VERY IMPORTANT TIPS (READ THIS)!!!

These bosses in MDE will still retain their mandatory clashes from the story stages. For example, as pictured above, if you face against Lei Heng, he will do Tanglecleaver [快刀亂麻] and Savage Tigerslayer's Perfected Flurry of Blades [超絕猛虎殺擊亂斬]. If you outspeed them, you can do a lot of single sided attacks by clashing their mandatory attacks with your defensive skill. On that picture above, Lei Heng won't be able to cast his Savage Tigerslayer's Perfected Flurry of Blades [超絕猛虎殺擊亂斬].

Another example is against Don Quixote, he has a lot of mandatory clashes such as Desire for Blood and Moment of Bloodfeast. If you deal enough damage, he will skip casting these skills by immediately ending the turn.

Even if you can't immediately kill them/end the turn during their mandatory clashes such as if you face against April Fools Vergilius and his bus summoning skill, it's better to face tank them. Fully heal yourself with Grey Coat, do lots of one sided attacks, and clash his bus with your defensive skill.
---

Lei Heng


His fight is pretty much the same from story but you'll get turn 1 Morositas for free. His first mandatory clash with is a free win because (hopefully) you have Reverberation EGO gift that will inflict paralyze. By the time you reach he's about to use Savage Tigerslayer's Perfected Flurry of Blades [超絕猛虎殺擊亂斬], you can blitz him just like the tip I've stated above.

All in all, he is quite easy thanks to bunch of EGO gift you've been hoarding at this point. The reward you'll get from defeating him is a hat. A very strong EGO gift, especially if you use an ammo based or wrath based ID.

---

The Middle


The fact that the first wave is just fodder, making this fight the easiest among all hidden boss I've encountered so far. You don't even need to use Morositas against this boss. Simply don't rush during wave 1, wait until you get more skill slots. If you face ricardo on higher floors, pay attention at his counter. Triggering AoE attack + Grey Coat at the end of the turn should be fully heal you up again.

The reward is EGO gift that benefit blunt IDs especially Middle. You need to use all 3 Middle IDs to fully utilize this gift tho

---

April Fools Vergilius


Just pray that you don't get to fight him on higher floors. I met him on floor 15 and his dodge is 58 on tails, 70 if it's head....

This is the most technical fight compared to ricardo and lei heng because you need to pay attention to his candy and indulgence gimmick. Do not use one sided attack against him because if you trigger his clashable counter, the rest of the skill slots will gain +2 clash power up and +2 haste.

If you face him on higher floor, you'll definitely die starting from turn 1. If you only have one revive gift, be very careful onward. Starting from turn 2, use morositas, clash against his skill slot that will give him indulgence to lower his clash power, also if his dodge is still high even after morositas, just offset it with your own defensive skill. You'll need constant healing against him, because even if you win against his unbreakable coins, they still deal significant amount of damage.

The EGO gift reward is consumable self heal and damage up for your entire team.

---
OG Don Quixote


Depending on your ID, he can be the second hardest boss to deal with due to his unbreakable coins. He is pretty similar to in the story fight. You can still cheese him with dodge, including his self exploding minion and his unbreakable coins. If you use counter/guard ID, this fight will be a test of endurance whether you can outheal his damage and bleed.

His EGO gift greatly benefit for bleed IDs, now they can self heal from bleed attacks and an even bigger buff for Bloodfiends ID to generate Bloodfeast.
Useful links
Here is some useful links if you want to know the details of each EGO gifts

https://steamproxy.com/sharedfiles/filedetails/?id=3115645873

Thank you in advance for reading and good luck on your MD Extreme.
88 Comments
Folmore  [author] 27 Oct @ 2:23am 
If you dont need the music box, cost related EGO gifts are the best to get early imo, because they are either tier II or tier III

For EGO resources, they are pretty nice to have early but they are easier to get because some of them are tier I like zippo and perversion
Sinistrem 26 Oct @ 4:03am 
You survive them by being so stacked it doesn't even matter. You have no physical weaknesses or stagger thresholds due to ego gifts and you have a ton of protection, not to mention a ton of healing gifts and infinite healing if you have gloom skill 3 / gloom ego to spam. The only tricky floor is the first one since you don't have upgraded badge to cheat death nor music box to avoid stagger.

On a different note, what is the best first floor for ids like Capo Meursault or W Heath who can't be staggered without their consent? I assume music box loses its value for them.
Jacket 26 Oct @ 1:04am 
How do you survive normal encounters with this lol
Folmore  [author] 25 Oct @ 1:18am 
???

wdym, i already added the new packs on the guide lmao

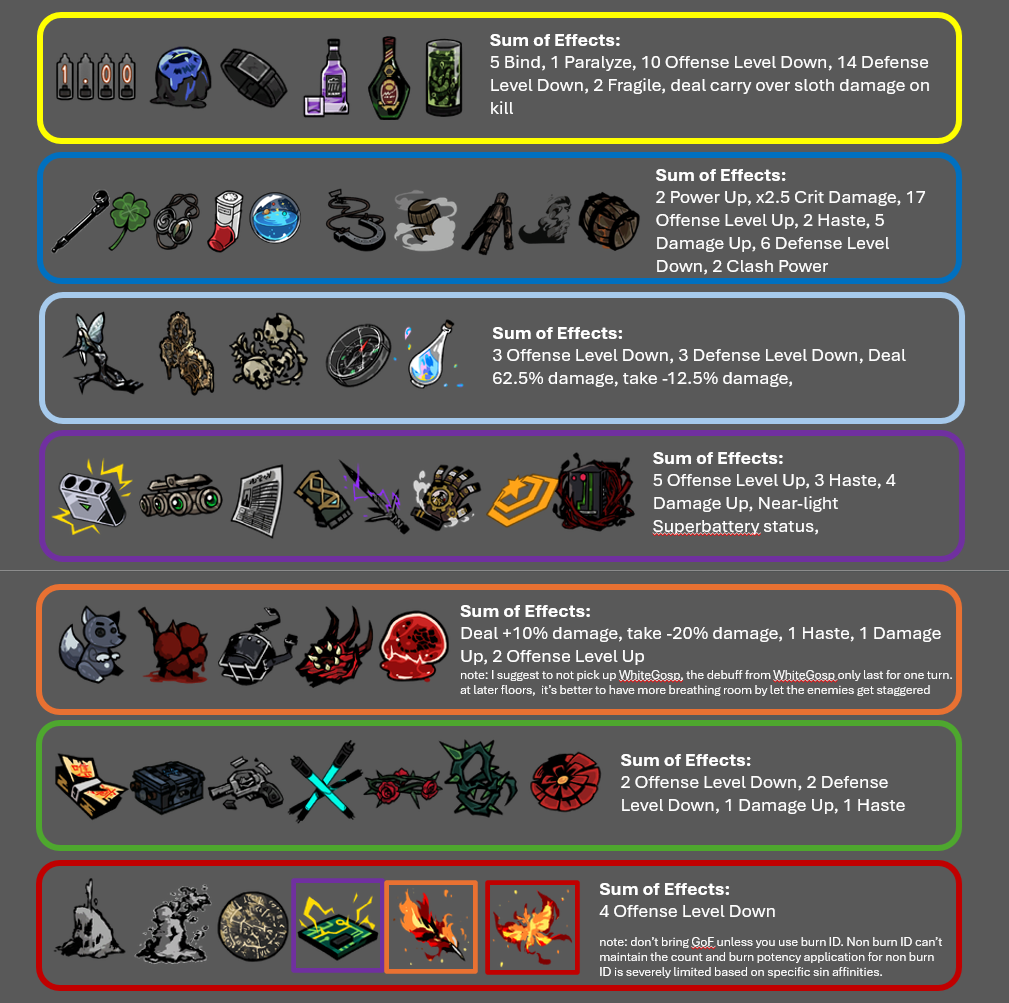
for the new EGO gifts, there's nothing to be added on the EGO gift cheat sheet combination because they have too specific condition to fulfill (like Hardblood Glaive only work for bloodfiend IDs).
Itxrra.xqzy 24 Oct @ 8:20am 
can u update this guide with the new content added plz
Gsprfdude 18 Oct @ 7:01pm 
So just to report as someone who did the FF extreme floor on 15. Having reverb and downpour does make it fairly easy compared to the chances of getting SEA crab jumpscared. The only thing to watch out for I think is that since by this point if you're taking all adversities enemies have one less stagger. The fairy enemies only have one stagger, so they can't be staggered. You can just brute force the fight easily enough, I would just caution people not to try to engage with the mechanics of the fight since you no longer can.
SquidMan123 17 Oct @ 7:45pm 
Just wanted to say thank you bc this guide really helped me out for not even soloing but rather MDE in general. Got my first MDE clear with 39 adversity thanks to this.
Folmore  [author] 16 Oct @ 7:55pm 
I've tried the new packs although all of them on lower floors

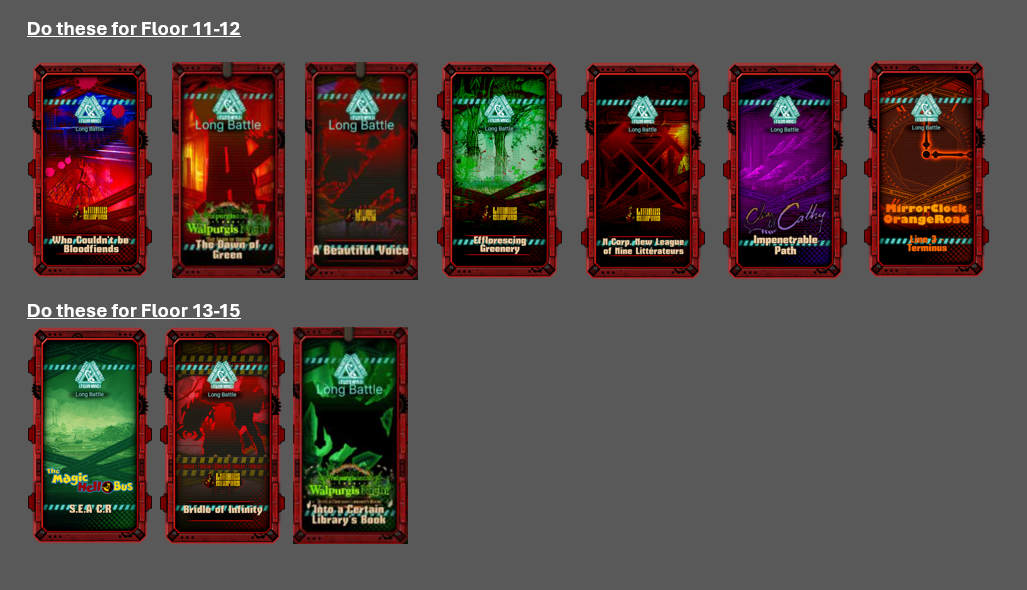
- It is as you've said, green dawn is bloodfiends pack 2.0, even the robots inflict bleed just like bloodfiends.
- For distortion pack, it is basically greenery 2.0. The first boss is the only one who is troublesome, just like white gossypium. Either you stagger/defeat her first phase in turn 2 or you'll have lots bleed from nails because unavoidable stagger on turn 3. My verdict is to not pick this pack for F13+.
- FF may replace S.E.A. C.R. for F15 because reverbation gift absolutely cripple them. Majority of the enemy's skills are single coin and there's no chance of getting jumpscared like in S.E.A. C.R.

I'll update the guide once I've tried FF pack on F15 later.
Sinistrem 16 Oct @ 12:00pm 
Okay I just did the Dawn of Green pack and it's essentially Who Couldn't be Bloodfiends 2.0 with a twist.

All enemies deal pierce damage and stack bleed, so if you have an Id resistant to pierce, have sustain or shield, *want* to have bleed, or if you got a 'remove bleed from self' gift from MOWE this pack is arguably easier than bloodfiends. I picked it on f12 with full stop Hong Lu and didn't even have to heal with gloom ego.

Another pack is Kromer - D. Dongrang - D. Heath and I was scared to pick it on f13 since I have no Idea how bad Kromer's forced stagger as a solo in extreme floors.

The final pack is fairy festival and it's a single fight boss, like Crab. It may be the quickest/easiest pack depending on how easy it is to deal with mechanics of the fight. I think you had to stagger little fairies without killing them to let the boss finish them, which may be tricky without stagger bar / without outright deleting them depending on their health.
Sinistrem 16 Oct @ 6:18am 
Thanks for info. I wonder how good/bad new extreme packs added today are.