Cartel Tycoon

Cartel Tycoon

Not enough ratings
100% Achievement Guide: Cartel Tycoon
By Endless
This is a 100% Achievement guide detailing a walkthrough to take you from 0 all the way to 100%. If you are looking for a particular Achievement or Collectable, use Ctrl+F & type it into the search bar for more direct help.

Please leave a comment if you notice any issues or have questions regarding the guide.
2
   
Award
Favorite
Favorited
Unfavorite
‎‎


Introduction:


Achievement Breakdown: (19)
Story Related: (1)
Challenges: (2)
Miscellaneous: (16)

Required Collectables: (62)
Starting Capos: (49)
Residences: (6)
Emblems: (7)
Skins: (1)


For 100% Achievements, we will need to do at least 10 runs across the 3 different game modes provided to us. By leveraging the save/load functionality, we can speed through quite a few of the achievements without suffering from the in-game repercussions of doing the required "negative" actions.

I will reference a few videos and guides throughout this document that detail optimal farm layouts and how to optimize your production chains. I will not be going over these optimizations personally in any great detail and rely on the quality of the linked resources. But I of course will explain my general strategy for accomplishing runs.

There are no DLC achievements.

Here is a great beginner-friendly video we can watch to understand how to optimize our structure placement before jumping into the game (as the game doesn't do a great job of explaining all the building functionality provided to us).
https://youtu.be/c_TAZWuCo4E?si=_NbjJZoHGM8xrAeD
*Guide contains spoilers.
Step 0: Long Term Achievements
Achievements: 3/19


The following achievements don't need to be obtained in any given game-mode. They either can or must be obtained by playing various modes.

Just keep them in mind as you continue with the rest of the guide.

The Burning Method:
I found this to be the most efficient way of getting rid of groups of characters. I will be referring back to this throughout the guide.

If you're running out of room in your cartel and need to kill off a few Lieutenants without assassinating them (which would lower everyone else's loyalty), you can move the sacrificial Lieutenants into a "throwaway" building and get another Lieutenant to set fire to it. This will destroy the structure and kill off all Lieutenants within without causing any loyalty drops.

This will however increase terror, so if that is something you're looking to avoid, sending your Lieutenants to prison is also a convenient way of getting rid of them (but they can come back to you with a vengeance + the travel times to the prison can be long).

Achievement #1:
Don't Let Mom Know You're a Druglord
Play 10 hours total between the hours of midnight and 6am.

    As the description states, the game needs to be running between the hours of midnight and 6 am. You can adjust your system clock and play normally while grinding out the other achievements.

    If you don't want to adjust your system clock, you can try leaving a custom sandbox game (with all the sliders turned to the easiest) running overnight. You shouldn't need to fight any rival Cartels or worry about terror.


    Achievement #2:
    Sense Of Style
    Have 7 Lieutenants in your cartel who are wearing cool shirts

      You need 7 Lieutenants wearing floral or checkered collared shirts.
      Kumar Betancur does NOT count towards this achievement.

      You may need to recruit rival gang leaders into your cartel.
      The following characters are guaranteed to count towards the achievement, but there may be more.
      • Armando Cruz
      • Dulce Vega
      • Carlos Gimenez Morales
      • Miguel Angel Gacha (this character is given to you during the second story mission)
      • Baltasar Pascal
      • Ivan Mario
      • Alvaro Ruiz

      Achievement #3:
      Pampered Life
      Unlock every type of residence.

        This is the most difficult achievement to get in the game and requires you to complete accomplishments in every game mode.

        I've listed all the residences below and how to acquire them but I'll also be mentioning them throughout the rest of the guide as they become unlocked:


        Party Residence
        Unlock all starting Capos.

          There are 49 Capos to unlock and some have unique requirements. Most just need you to promote the character to Capo during any of your playthroughs.

          NOTE:
          You may not be able to unlock the Capo you want depending on the mission/game mode you're in. To see if a Capo is unlockable in the current run, press ESC and use the "Global Unlocks" button in the bottom left corner of your screen.

          The game will let you know which characters can be unlocked in the current run.

          To view all starting Capos and see their requirements, go to the main menu (or press ESC if you're in a game) and use the "Global Unlocks" button on the bottom left.


          Paranoic Residence
          Finish survival mode.

            This is quite difficult. You'll need to complete the main "mission" of survival mode. I recommend reviewing the YouTube video I posted at the start of the guide to learn how to best optimize your farms. In addition, I've posted a link to another guide detailing specifically how to beat this game mode in the relevant section of the current guide.


            Collector Residence
            Hire 30 unique Lieutenants in the sandbox mode as a single cartel.

              This is an easy one that we will unlock during one of the Sandbox runs.


              Modern Residence
              Unlock all cartel emblems.

                There are 7 emblems to unlock each with a different requirement.
                I'll post when each emblem is unlocked as we go through the guide.

                To view all emblems and their requirements, go to the main menu (or press ESC if you're in a game) and use the "Global Unlocks" button on the bottom left.


                Castle Residence
                Finish "Go to ground 1" quest in "That Sinking Feeling" story.

                  We just need to complete a quest during one of the story missions. This is un-missable if you do the story.


                  Pathos Residence
                  Launder $1,000,000 dirty money into legal money in the sandbox mode as a single cartel.

                    This is one of the best houses in the game and is highly recommended to be used when playing the "Survival" mode. Feel free to skip ahead in the guide to grab this house early after finishing the Tutorial (CTRL+F and search the name to find out where it's acquired).
                    Step 1: Story Mode - Tutorial

                    1. Achievements: 12/19


                    This story mode is automatically set to the easiest difficulty and is a great place to learn the mechanics of the game and pick up the majority of the achievements.

                    ! WARNING !
                    You can get hard-locked while in the tutorial forcing you to restart. To prevent this from happening, ensure you follow along with what the game wants you to do and only do it when it asks you to do it (don't speed ahead).

                    I got hard-locked during the "war" phase of the tutorial where Tony was supposed to send guns to the city you are about to attack. Somehow, I got into a state where Tony successfully delivered the guns, and initiated the war, but wasn't counted as "in" the city. His icon was positioned off of the city and appeared to be in a support structure within the city itself (this prevents the quest from progressing later on). Due to limitations in the tutorial, they prevent you from moving your Lieutenants during this phase and I wasn't able to proceed past that point.
                    Ensure you are clicking the "city" and other structures properly, lest you accidentally click a support building within/nearby where you were clicking and send your people to the wrong location.

                    Note: You cannot unlock any starting Capo's while in the tutorial.

                    Achievement #4:
                    Our Man
                    Hire your first Lieutenant.

                      Guaranteed near the beginning of the Tutorial after your uncle joins the Cartel.


                      Achievement #5:
                      Take-Off
                      Upgrade a building to the next tier.

                        Guaranteed as part of the tutorial.
                        Just follow along with what the game wants you to do.


                        Achievement #6:
                        Hokey-Pockey
                        Pack and sell some illegal goods.

                          Guaranteed as part of the tutorial.
                          This will pop near the end of the tutorial after the "war" with a neighboring city concludes.


                          Achievement #7:
                          That was f***ing base
                          Complete the tutorial.

                            Guaranteed as part of the tutorial.

                            At this point, the "tutorial" is over but you can continue to play in this world to rack up a few more achievements. Keep expanding your empire and try to maintain good relations with other gangs to prevent random attacks.

                            Ensure you manually save the state of your game before proceeding with the rest of this section to be on the safe side.


                            Achievement #8:
                            I'm Going To Call You Kitty
                            Change a Lieutenant's nickname.

                              Select any of your Lieutenants and under their name, there should be something like "aka ___". Clicking their nickname allows you to edit it. Changing their nickname unlocks this achievement.


                              Achievement #9:
                              Bad Trip
                              Quit the game using ALT+F4.

                                Press ALT+F4 on your keyboard. Normally this would crash the program you're using but it looks like this game has overridden that behavior and will continue running.


                                Achievement #10:
                                Bite the Blow
                                Take resources from a village by force.

                                  With the village located near your residence, you can take resources from the village for "free". This will generate terror so ensure your meter is relatively low before doing this. You only need to do this once for the achievement to pop, so don't take too much unless you want terror to increase.


                                  Achievement #11:
                                  Camellos
                                  Send Lieutenants through a smuggling point with goods 100 times

                                    A smuggling point is a place where you can turn your illicit goods into dirty money.
                                      List of all smuggling points:
                                    • Aerodrome
                                    • Airport
                                    • River Pier
                                    • Seaport
                                    • Checkpoints
                                    • Guerrillas

                                    You don't have to actively work towards this and you don't need to unlock it during this run. You'll have your Lieutenants moving lots of contraband around your empire during the other missions, so it shouldn't be a major concern and can easily be acquired in other missions. As long as you occasionally make your Lieutenants deliver contraband to smuggling points, you should get this in no time.

                                    To help speed this up, ensure you are constantly recruiting more Lieutenants. The more you have, the more actions you can do!

                                    In addition, I had some Lieutenants physically stationed at the airport in Tensaca as doing so will improve the amount of product being moved through that location (you could do this with other smuggling points too, but the Tensaca airport has a large number of Lieutenant slots). I'm unsure if this contributed to the achievement, but thought I'd mention it anyway.


                                    Achievement #12:
                                    Spreading Fear
                                    Give your Lieutenants 10 assassination orders.

                                      You must have a Lieutenant with the "Silent Assassination" ability. "Lutteroth Mascaras" unlocks this ability at level 2.

                                      Before attempting this achievement, make a save. Get your Lieutenant with the "Silent Assassination" ability to kill another one of your Lieutenants. Doing this will cause trust issues with all your other Lieutenants, hence the save.

                                      After the kill, you should get a bunch of notifications about allegiance shifts from your other Lieutenants. You can either try to kill more Lieutenants, or re-load your save and do the same action over and over until the achievement pops.
                                      Step 2: Story Mode - Needs And Fears

                                      1. Achievements: 13/19
                                      2. Starting Capos: 5 (you can get more post-mission completion)
                                      3. Emblem: 2/7


                                      Take your time on this story mode. There are a few collectibles you can grab while you're here.

                                      NOTE:
                                      Avoid spam-recruiting lieutenants during this run as we want to try and get "fancy shirt" lieutenants.

                                      Oftentimes they are rival gang leaders and recruiting them requires high-ranking open slots in your cartel.
                                      Recruiting them will also let you promote them to Capo after the story missions are over so that you can unlock them as a starter Capo (for the residence).

                                      Stick to the original slice of land you're given and optimize your opium growth as much as you can. Constantly work on research to be able to upgrade the river pier and aerodromes to improve dirty money generation and ultimately, legal money generation.

                                      Achievement #13:
                                      Safe Pair of Hands
                                      Complete 50 successful deals with your Lieutenants.

                                        After the game tells you to recruit 2 lieutenants, your mysterious contact will reveal himself as "Miguel". Miguel has the "Make a Deal" ability that refreshes relatively quickly.

                                        Click Miguel's icon to find the "Make a deal" ability under the "Special Orders" list.

                                        With this coming in so early in the run, you can farm out these deals by mass trafficking opium. Keep good relations with neighboring cartels so they don't trigger any attacks. With this story mode, you should also not have any "terror" generation if you stick to your original land.

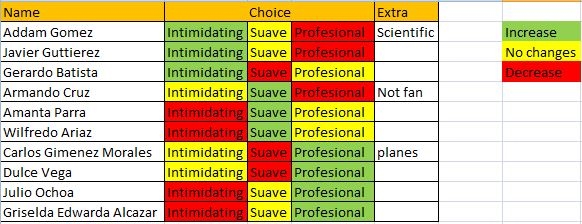
                                        To keep good relations with other cartels, ensure pick the right actions when talking to these cartel leaders by following this very useful spreadsheet created by "FrozenHell". Check out their steam guide here. We'll also be using this guide during the "Survival" run at the very end of the current guide.


                                          Eventually, you to want to recruit the rival cartel leader "Carlos Gimenez Morales" into your gang as he also has a similar opium deal to Miguel.
                                          With two dealers, you can cycle the two of them reliably to farm out the achievement.

                                          During this story, you can grab a few starting capos needed for the "Pampered Life" achievement. Just look for anyone with a fancy shirt (as described in "Step 0: Long Term Achievements").

                                          Stick to the original slice of land until you're at 100-200k legal money and can maintain 50% capacity of your residence's cash storage before continuing the story and conquering the nearby seaport (and eventually its region).

                                          That should be a good enough head start that the rest of the story will be relatively simple for you to complete.

                                          Make a save in the game after capturing the seaport.
                                          Miguel will blackmail you for 40k legal money and depending on how you handle that situation, you get 1 of 3 starter Capos.
                                          1. Give Miguel the money and complete the "Opportunity Knocks" questline to unlock "Manolo Velasco".
                                          2. Tell Miguel that he will "get what's coming to him" and kill Miguel by either sending him to fight a rival Cartel or assassinating him. Complete the "Idle Hands" questline to unlock "Roberto Montano".
                                            NOTE:
                                            When Miguel killed Caesar and then became Capo, I didn't unlock him as a starter Capo. I only got him after finishing the "Opportunity Knocks" questline (in option 1) and then manually promoting Miguel after killing off my current Capo.
                                          3. Select the same option as in the previous path except this time do NOT kill Miguel. Wait out the timer and let Miguel kill Caesar. Ignore the questline that appears from this action and kill Miguel by sending him to fight a rival Cartel or assassinating him. After recruiting a new Lieutenant to Capo, you get "The Wonders of Science" quest that you can complete to get "Wagner Castrillon" as a starting Capo.

                                          Emblem #1:
                                          Complete "Control IV" in "Needs And Fears" story and read all pages of manual.


                                            During any of those playthroughs, be sure to finish the "Control" questline initiated by talking to the Mayor of Puerto Roja. Upon completing "Control IV" and reading through all the manual pages (found in the top left corner of your screen), you should get this emblem.


                                            Emblem #2:
                                            Inherit Capot role at least once.


                                              At the end of my missions, I killed off and promoted the rest of my Cartel to unlock them as starter Capos. After everyone in the Cartel was promoted and granted as a starter Capo, I mass-killed off the crew and then hired some new folks over and over again via re-loading a safe file. I was able to get the vast majority of the starter Capos via this method.

                                              You will need to recruit rival cartel leaders and promote them to Capo as well to grab them as a starter character.

                                              Not all non-cartel leader characters will be available on this mission.
                                              Step 3: Story Mode - That Sinking Feeling

                                              1. Achievements: 14/19
                                              2. Starting Capos: 2 (you can get more after the mission is completed)
                                              3. Residences: 1/6
                                              4. Skins: 1/1


                                              This will be one of the quickest story missions taking approximately 1-2 hours to complete.

                                              NOTE:
                                              Avoid putting your Capo into any combat situation, especially regarding the CIA (if you ever reach that point).

                                              The enemies tend to target and kill the Capo regardless of how strong your team's power is in comparison to the law enforcement power.
                                              If your Capo is killed, then you need to restart from the last checkpoint.

                                              This mission can be tricky and there are a lot of automatic failure points when it comes to the achievements.
                                              Stick closely with this guide to ensure your run is easy and smooth.

                                              Upon loading in, immediately pause the game and disable all structures in your empire. You can do this quickly by CTRL+Clicking two structures to bring up the menu on the right side. There should be a square at the top left of this menu letting you select all buildings at once and from there you can turn them off.

                                              Look at what the game provides you and only turn buildings on as you need them.
                                              Also, speak with all rival Capos and start working on gaining their favor. You'll want to recruit the stronger Capos for the fights that are coming and be in the good graces for the remainder so they don't attack your empire.

                                              In this run, you want to focus on Meth and Cocaine, and later on Heroin. The first quest will ask you to transport 100+ units of Meth or Cocaine to the Los Grandes River Pier. Since the game gives you access to a Meth facility and a couple of Cocaine plants, it's easy to fulfill this request.
                                              I recommend sending Meth over to the Pier since we'll be making large amounts of Cocaine plants during this run and it's good to set up a few alternate means of money.

                                              NOTE:
                                              This quest wants the drugs in their raw form.
                                              Do not package them into other products before sending them to the Pier.

                                              Also, take a look at your Lieutenants and get rid of the ones that prefer high terror (send them to prison). We'll be keeping terror at a minimum during this run and keeping them happy won't be worth the money.

                                              After finishing this quest, you'll eventually get to "Send Them Off 1".
                                              Don't finish this quest right away.
                                              This is your chance to significantly bolster your production chains of Meth and Cocaine in the Foscani region. In addition to this, I had small Marijuana and Opium farms set up in the other regions but this wasn't necessary. You need to stockpile money, guns, and research. I recommend 100 guns in each of the 3 regions you control and approximately 1mil in cash. You can get the guns by buying them from Depots which you can build in unused cities. Be sure to keep researching your way to unlocking Heroin.

                                              Once you're ready, make a new save and complete the "Send Them Off 1" quest by giving them the money and 5 of our weakest Lieutenants. By this time, you should have been able to recruit at least one rival Capo ideally with very high power (5+).
                                              In addition to this, take a look through the recruitment menu and hire any Lieutenant with 2+ power, and fill up as much of your Cartel as you can. Thanks to our stockpile of money, we can refresh the recruitment menu a handful of times without worry (but don't go crazy, we need to hold on to as much money as we can).

                                              Station your newly recruited Lieutenants spread evenly across your empire (2-3 in each region). You'll need to wait for 14 days for your other Lieutenants to get back and during this time, you'll be attacked by every law enforcement faction in the game. Only bother defending your territory against them if they start attacking chem plants, smuggling points, or residences (as these are expensive and take a while to build). Some factions (US Military) can straight up destroy buildings which makes it annoying to rebuild.

                                              Upon the Lieutenant's return at the end of the 14 days, do not talk to Fainherz. Rebuild and recover from the attacks and get your money stockpile up and running once again. You'll need at least 400k for the upcoming mission but I recommend 700k+ just in case.

                                              Residence #1:
                                              Castle Residence
                                              Finish "Go to ground 1" quest in "That Sinking Feeling" story.

                                                When you're ready, make a new save and talk to Fainherz to accept his quest. Select the "peaceful" option where you don't attack any gangs or law enforcement for 15 days.

                                                The game will try to bait you into attacks and try to make you fail the mission but don't fall for it. constantly move your Lieutenants around to avoid fights and let the game capture/destroy parts of your empire. Be very diligent about where law enforcement is going because they may try to target locations where you have Lieutenants stationed.
                                                If your Capo or Lieutenants are in any fight, for the next 15 days, the mission will auto-fail and you will lose the "Castle Residence".

                                                Continue with the rest of the mission until you hit "The Bigger One 1". Ensure you keep researching to improve your production chain and Piers. We will need "Pier III" by the end of this mission.

                                                Upon reaching "The Bigger One 1", fulfill 80-90% of its requirements and then stop. Keep the remaining 10-20% of the money in reserve and start shutting down your entire production chain and all its buildings (especially the buildings located in the cities). Ideally, your smuggling points and residences are full of dirty money, and are not sending them out anywhere. All the buildings in your empire should be turned off. When you get to this point, move all your lieutenants to a location with lots of dirty money.

                                                Make a new save and finish the quest. The next quest, "The Bigger One 2", will freeze all your legal money and force you to use dirty money. Ensure your Lieutenants are being paid in dirty money and just leave them idling in a place where they can continue to be paid. Wait out the timer for this mission. Ideally, you shouldn't experience any terror growth.

                                                After waiting out the timer, restart your empire and finish off the mission. At the end, select "Lyova" or "Diane" to deliver the money to the Russians. Selecting either will unlock them both as starter Capos.

                                                By now, you should have a decent Heroin production chain setup and the money earned from it can help speed through the remainder of the missions as they are pretty straightforward.

                                                Achievement #14:
                                                Operation Odessa
                                                Use a submarine to transport 5,000 units of cocaine.

                                                  By this time you should have unlocked "River Pier III" and constructed a level 3 pier in your empire close to your Cocaine production chain.

                                                  Upon completion of "The Home Stretch II", you will have acquired the submarine skin. It should be enabled by default and you can confirm this by looking at your level 3 pier and seeing the submarine, but if it isn't there, quit to main menu and enable it via the "Global Unlocks" button in the bottom left.

                                                  After reloading into the game, redirect all your Cocaine to flow through the level 3 pier and wait for 5k units to be sent off.
                                                  Step 4: Story Mode - Lambs To The Slaughter

                                                  1. Starting Capos: 1
                                                  2. Emblems: 3/7


                                                  This is one of the most annoying missions to complete in the game next to "survival mode". Be ready for a lot of fighting and destruction.

                                                  NOTE:
                                                  This is a LONG mission.
                                                  - There will be 2 very hard battles
                                                  - Terror increases very quickly
                                                  - Money generation is slow/difficult

                                                  ! WARNING !
                                                  The game got very buggy for me during this mission.
                                                  I was unable to use Jesus Garza to deconstruct any of my buildings and had to recruit a new Lieutenant who had the "burn" ability to destroy unnecessary structures.

                                                  I assume this was due to the number of structures on the map so to possibly avoid this from happening during your run, destroy any unused structures.

                                                  Starting Objective: The objective is to capture all 5 "special" buildings on the map.
                                                  Followup Objective: Upon capturing the 5 buildings, the questline will have a fairly lengthy set of quests mainly revolving around a character called "Gil" that we need to recruit into our cartel.

                                                  All "Special" Buildings:
                                                  • Airport
                                                  • Prison
                                                  • Military Base
                                                  • Guerillas
                                                  • Indigenous Territory

                                                  Here is an excellent video describing the different structures and how best to utilize them:
                                                  https://youtu.be/XuNcieCfP7Y?si=jv6KcLpjWR3CVcyd

                                                  As before, pause the game immediately upon loading in.
                                                  We're given a massive empire to manage, and most of it isn't functional or efficient. Leaving the game running will cause your supply chain to stall, and you'll lose all your money.

                                                  After pausing the game, I do a quick one-over with all the rival cartel leaders to start getting in their good graces and then disable every farm/warehouse/etc. You'll want to recruit most (if not all) rival cartel leaders into your cartel to reduce competition/attacks. You can always send them to prison if you don't want to keep them. Also, go to all the special buildings and grab their questlines. Lastly, take a look at your cartel. You're given a few troublesome Lieutenants that desire lots of terror. This is really bad early game and I ended up tossing them in prison once their satisfaction level fell because I didn't want to constantly increase their salary. Conserve your money as best you can during this mission. Although they have nice "power", we can easily compensate for this loss with weapons (obtained via the Military base or the Guerillas later on) and the recruitment of rival cartel Capos.

                                                  As for starting the production chain, I like starting in the bottom left region, re-enabling small sections at a time. The scenario sets you up with a lot of Marijuana plants in this region that you can leverage to set up a significantly improved production chain.

                                                  The seaport will often search your goods for illicit material and if any are discovered, the terror will rise. Keep an eye on it and if the authorities start searching your goods, immediately turn the seaport off and rely on aerodromes to send out your drugs. Relying on 2 aerodromes and the seaport (when it was safe) was more than enough for my run and at its peak, this region was producing hundreds of packaged Marijuana and Heroin.

                                                  Once your Marijuana operation is producing at optimal levels, switch to the opposite side of the map where the game gives you a starting Cocaine production chain. Do the same thing here and optimize as best you can. The river pier alone is more than enough to sustain even the largest cocaine production chain in this region. Remember to package your drugs into other produce so you can sell more at once.

                                                  Use the tricks you've learned up until now to optimize the production chain (review the video I posted at the beginning if you need help).

                                                  Assuming you were eventually able to capture the 5 special buildings in the game and maybe even a few rival Capos, you get to start the actual mission and will soon be able to hire "Gil Gilmar".
                                                  Initially, Gil is pretty weak but will quickly become the strongest Lieutenant in your cartel through the course of the storyline. He is also the unlockable character you can snag near the end of this run.

                                                  During this storyline you will need to fight off a CIA raid and also the US Military which are rather difficult fights if you aren't prepared for it.

                                                  CIA / US Military attack preparation list:
                                                  Pre-Attack:
                                                  - Max out the Military base buffs & research all Residence "Power" nodes.
                                                  - Stockpile weapons from Guerillas and keep terror low (get ~150 weapons and store them in your highest tier Residence building).
                                                  - Promote all Lieutenats that gain Power buffs and fill any gaps in your Cartel.
                                                  - Keep a stockpile of 200k cash so that you can recover quickly post-attack.

                                                  Right Before Initiating Attack:
                                                  - Save the game in a new slot.
                                                  - Move all Lieutenants to the Military base to get buff and then back to your residence, be sure to buy all the guns in the base and take them with you, which will instantly and dramatically raise terror.
                                                  - Get one or two Lieutenants to start attacking enemy buildings to continue to raise terror until the CIA/ US Military attack.
                                                  - Hunker down in your Residence and wait for the attack. CIA attacks will have a massive red circle in the area they are targeting.

                                                  - Lure the CIA to your residence while luring the US Military to a city you control. The US Military bugged out for me during my runs and refused to attack my residences (but had no issues with attacking cities, smuggling points, or farms/plants).

                                                  Post-Attack:
                                                  - Save the game in a new slot (assuming you didn't lose too much during the fights).

                                                  ----------- The following information is a more detailed version of the checklist above ------------
                                                  This is the best way I could come up with to counter the chaos that happens during these fights.
                                                  Keep the Military in your pocket with a steady supply of Opium to their base. I captured the region in which the Military base is located so I could build 3 opium farms right outside it for easy delivery (once the 3 Military tiers are secured, you only really need 1 or 2 farms to sustain the Opium flow).

                                                  Not only does this let us purchase weapons from them but it will also prevent them from attacking our Cartel during the CIA/US Military fights. We can also send our Lieutenants there before the attacks to buff their power for 2 days.

                                                  Be sure to research all the Residence "power" skills in preparation for the attacks.

                                                  The CIA has a minimum power of 50 and will target a building where at least one of our Lieutenants is located. We can use this to bait them to attack one of our residences in which all our Lieutenants and weapons will be stationed.

                                                  Keep stocking up on guns from the Guerillas as their terror increase is low. Avoid buying guns from the Military as this dramatically increases terror. We will leverage this to intentionally raise terror and trigger a CIA/US Military attack. It doesn't cause enough terror alone, so be sure to get Lieutenants to attack random enemy-controlled buildings.

                                                  The CIA attack is no joke and is a little unpredictable due to the AI. As a result, make a save right before the attack and one after (assuming you successfully defeated them).

                                                  Continue with the game and do the same preparation efforts for the US Military attack.
                                                  -------------------------------------------------------------------------------------------------------

                                                  After you get to the "Detain IV" quest where you need to surrender Gil; you can choose to save Gil by fighting the police attack on the residence. This unlocks Gil as a starting character.

                                                  Emblem #3:
                                                  Complete "Lambs To The Slaughter" quest line.


                                                    The rest of the quest is fairly simple and at the end, you get the emblem.
                                                    Step 5: Sandbox Mode

                                                    1. Achievements: 18/19
                                                    2. Residences: 4/6
                                                    2. Emblems: 6/7


                                                    NOTE:
                                                    You cannot get any emblems or residences while in a "custom" sandbox game (other than "Hand"). At least 3 runs will be needed to get all emblems and achievements.

                                                    We will begin by launching a custom sandbox game. Using the "Advanced Settings" option in the upper left corner of the "Cartel Customization" window, change as many values as you'd like to make this an easy run. Reduce terror to zero, give yourself tons of starting cash, etc.

                                                    Sandbox Mode Settings
                                                    • Advanced Settings: Ensure the preset says "Custom".
                                                    • Global Goal: N/A.
                                                    • Capo: Doesn't matter.
                                                    • Starting Region: "Molino" or "Rogandes"

                                                    Achievement #15:
                                                    Architect of Fortunes
                                                    Launch the game with custom settings in Sandbox mode.

                                                      Launching the game with "Custom" settings unlocks this achievement. You should get it upon (or right before) loading in.


                                                      Emblem #4:
                                                      Play "Sandbox" mode with custom settings.


                                                        If you launch the game with "Custom" settings, you'll also get this emblem.


                                                        Achievement #16:
                                                        Spread
                                                        Sell every drug via all checkpoints.

                                                          There are 2 checkpoints in the game, one located in the North-West section of the map and another in the North-East section.

                                                          Ideally, you selected one of the top two regions as your starting location, which should reduce travel times.

                                                          You need to produce at least one of every type of drug and sell them at both of these locations.
                                                          These are all the drugs in the game:
                                                          • Opium
                                                          • Meth
                                                          • Cocaine
                                                          • Heroine
                                                          • Marijuana

                                                          Use your massive amount of starting cash to build the farms you need and sell at least one product unit at each checkpoint. Don't worry about packing it in with vegetables, the bare minimum will be sufficient.

                                                          Once the achievement pops, it's time to start another sandbox run.
                                                          Return to the main menu and use the following settings.

                                                          Sandbox Mode Settings
                                                          • Advanced Settings: Use the "Easy" preset.
                                                          • Global Goal: Research
                                                          • Capo: Arvin Mosquera. Make sure he has the kidnap and robbery perks which help ease the burden of capturing nearby cities. If you don't have this character, return to the end of "Step 2" or select your favorite capo.
                                                          • Starting Region: Pick any "Easy" region that you're comfortable with.

                                                          We're going for 3 emblem/residence requirements during this run.
                                                          • Complete "research" global goal. This needs you to research everything in the tech tree and also conquer the entire map.
                                                          • Launder 1 million dirty money into legal money.
                                                          • Hire 30 Lieutenants as a single Cartel.

                                                          Since this run is set on easy, it's essentially a simplified version of the 2nd story mission. While you're here, keep an eye out for any rival Cartel leaders you haven't unlocked yet and the same goes for normal recruitable Lieutenants.

                                                          This is business as usual; optimize your farms, get money, and start researching the tech tree as quickly as you can as it'll take a while to finish the whole thing.
                                                          Remember to pack your product in with other produce (vegetables, coffee, etc) as you can greatly increase the amount of dirty money you can generate.

                                                          Once you have some decent money generation, immediately start unlocking the research tree as this will be the biggest time sink for the run.


                                                          Achievement #17:
                                                          Didn't Miss A Single One
                                                          Accept every expiring event from your Lieutenants over 6 months of in-game time.

                                                            Just be diligent in accepting every mission that your Lieutenants give you and you'll eventually get this achievement once the time requirement is met.
                                                            Lieutenant missions are hard to miss, as a giant phone + Lieutenant icon appears in the bottom right corner of the screen. Click it, listen to what they have to say, and accept the mission.

                                                            You don't need to successfully complete the missions, simply accepting them is enough.
                                                            Since it takes so long to research the tech tree, you should be able to grab this achievement pretty easily. Just be diligent in accepting your Lieutenant's missions.
                                                            You can see the current date in the top-left corner of the game window.


                                                            Residence #2:
                                                            Pathos Residence
                                                            Launder $1,000,000 dirty money into legal money in the sandbox mode as a single Cartel.

                                                              Waiting out the research timer should give you more than enough time to launder the 1 million dirty money.


                                                              Emblem #5:
                                                              Complete "Research" global goal in "Sandbox" mode.


                                                                After grabbing the final node in the research tree, this emblem should pop.


                                                                Residence #3:
                                                                Collector Residence
                                                                Hire 30 unique Lieutenants in the sandbox mode as a single Cartel.

                                                                  Once you've secured the two objectives, make a save and start killing off your Cartel with the burning method. Keep recruiting more members until the third objective (hire 30 Lieutenants) pops.
                                                                  Check the "Global Unlocks" if you think you got it.


                                                                  Residence #4:
                                                                  Party Residence
                                                                  Unlock all starting Capos.

                                                                    If you've been diligent with grabbing any Capos you haven't acquired yet during your runs, you should have grabbed all (or almost all) of them at this point.

                                                                    Now onto the last sandbox run!

                                                                    Sandbox Mode Settings
                                                                    • Advanced Settings: "Hard" preset.
                                                                    • Global Goal: Reinforcement
                                                                    • Capo: Any female Capo will do. I selected "Diane" as she has access to quite a few nice buffs.
                                                                    • Starting Region: Pick any "Easy" region that you're comfortable with.

                                                                    Players have noted that this achievement could be bugged. Ensure you save before conquering the final region just in case.


                                                                    Achievement #18:
                                                                    Iron Lady
                                                                    Play Sandbox mode on Hard with a female Capo and take over every region without changing Capos.

                                                                      Even though this is on "Hard" mode, I found this run to be much easier than "Lambs To The Slaughter". Use what you've learned so far and conquer the map but this time with any female starter Capo. Avoid raising terror and befriend as many of the rival Capos as quickly as you can.

                                                                      Although you can't manually save the game, you can quit to the main menu and return to make an auto-generated save file.

                                                                      This run shouldn't take you too long.


                                                                      Emblem #6:
                                                                      Complete "Reinforcement" global goal in "Sandbox" mode.


                                                                        You should unlock this emblem at the same time as getting the previous achievement.
                                                                        Step 6: Survival Mode

                                                                        1. Achievements: 19/19
                                                                        2. Residences: 6/6
                                                                        3. Emblems: 7/7


                                                                        This is going to be the hardest mode in the game where we are constantly losing greater sums of money. If you fail to pay, then you lose the mission.

                                                                        The TLDR here is to race towards higher-paying drugs like Cocaine and Cannabis and skip over Opium if you can help it.

                                                                        I've found an excellent guide here detailing how to beat this mission:
                                                                        https://steamproxy.com/sharedfiles/filedetails/?id=2862484948

                                                                        Achievement #19:
                                                                        Follow the Money
                                                                        Earn $1,000,000 of dirty money selling dried cannibis in Survival mode.

                                                                          If you've been following along in the guide linked above, you should have been able to create a decent Cannabis farm. If you're able to outlast the constant money demands, this achievement should pop in time.


                                                                          Residence #5:
                                                                          Paranoic Residence
                                                                          Finish survival mode.

                                                                            Upon beating the mode, you should grab this residence.


                                                                            Emblem #7:
                                                                            Play the game for at least 50 hours.


                                                                              You should have been able to snag almost every other achievement/collectible up to this point. If you're here early then you can leave your game running in some "stable" state. The time only counts if you're in the middle of a run so if you have an old save file where you conquered the whole map, then you can turn off all your buildings, kill off your lieutenants, and just leave the game idle but "playing".


                                                                              Residence #6:
                                                                              Modern Residence
                                                                              Unlock all cartel emblems.

                                                                                If you've been following the guide, then this is your last residence and upon receiving it, you'll unlock the final achievement "Pampered Life".
                                                                                Conclusion:
                                                                                Congratulations on your 100% completion!

                                                                                As this is my first guide, I welcome any feedback on how to improve it. Please leave any questions or concerns in the comments below. Thanks!

                                                                                If you found this guide helpful, please leave a rating!


                                                                                4 Comments
                                                                                Endless  [author] 3 Jan @ 6:45pm 
                                                                                Thanks for the comments Dodi!

                                                                                For the issues you're experiencing with Lambs To The Slaughter, I unfortunately don't recall the exact situation for how I unlocked Gil. I believe there was a new questline that opens up after you defend Gil during the attack, and upon completing that, you get Gil.

                                                                                But if the achievement isn't popping for you, I assume the game is bugged.
                                                                                I personally experienced quite a few bugs throughout my playthrough as well forcing me to reload to a past save and re-play certain events.

                                                                                I recommend trying the story mission once again and make quite a few saves just in case.

                                                                                Unfortunately we can't expect these bugs to be fixed as the studio behind the game has been shut down :(
                                                                                Dodi 3 Jan @ 3:00am 
                                                                                Great guide. Thank you very much for all the work and putting this together. It helped me extremely much. In some places, however, it no longer seems to be entirely up to date. So when slaughtering the lambs, Gil is not unlocked when you deliver him. You have to save him. Unfortunately there seems to be a bug. Therefore, Gil cannot currently be unlocked.
                                                                                Endless  [author] 17 Dec, 2024 @ 4:38pm 
                                                                                Thanks Cynic! Means a lot :D
                                                                                Cynic 0055 17 Dec, 2024 @ 4:34pm 
                                                                                Great job on the guide, Endless! It seems like you've really done your due diligence on it & have covered all the aspects. Dang though, quite the commitment for 19 Achievements; I definitely respect the dedication! Hope to see more of your work! :broflex: :cool_seagull: