HELLDIVERS™ 2

HELLDIVERS™ 2

61 ratings
Explosive Weapons Analysis - R-36 Eruptor + more
By Gaming Existence
In this guide I analyse the data from tests on the: The R-36 Eruptor; CB-9 Exploding Crossbow; Plas-1 Scorcher; SG-8P Punisher Plasma; Jar-5 Dominator; GP-31 Grenade Pistol; Grenade Launcher; Impact Grenade and Thermite Grenade. I do this against various bug enemies.
5
2
2
   
Award
Favorite
Favorited
Unfavorite
Intro
Welcome to my guide! A major note/warning is that this guide has primarily been created as a visual reference for images and charts shown in the video it is associated with. If you are here after watching the video I hope you find this useful. If you have not seen the video I hope you still find some value from this guide.

If you prefer to watch rather than read, or would like to see the tests in live action, there is a fully animated and voiced video version below:

Weapon Info + Hive Guard Tests
The Hive Guard has Medium Armour on its head and front legs. The penetration value from data mining suggests it has a value of three.

The health values are guesses on my behalf from crunching the data over many different weapon tests. They are approximate because other factors such as Durability Damage, Explosive Damage and others can change the outcomes.


The Eruptor appears to act very much like a mini-Autocannon. Wiping out patrols at medium to long ranges, whilst also providing the ability to close Bug Holes and Bot Factories.

Against a Hive Guard it’s two shots to kill it. And that’s whether you shoot through the head armour or direct side hits. Utilising its large AOE, a one-shot ground kill is possible. Presumably killing all the legs with that one hit.


The Exploding Crossbow works similar to the Eruptor but at short to medium ranges. It has a smaller AOE, but a faster fire rate and reload, for more of a run and gun style. Annoyingly though, it can’t close bug holes or open metal doors.

It takes three headshots to kill the Hive Guard. Direct side hits to the body only require two shots, exactly the same as the Eruptor.

Unlike the Eruptor though, the Explosive Crossbow requires more shots when utilising its smaller AOE splash damage. There is also the potential that the 420 damage has some kind of split. This would be between the direct damage the bolt deals and the explosive AOE damage.


The Dominator is in the explosive category, but it does not behave like the other explosive weapons. It deals no AOE splash damage and also misses out on other benefits that I’m going to explore later on.


I have kept it in these tests as its recently had a damage buff and it can provide a baseline comparison to the other explosive weapons.

The Dominator can get a two-shot head kill if you are willing to wait for it to bleed out after the green explosion happens. Shooting at the side is exactly the same with two shots to bring it down. This is one better than pre-buff version.


The Scorcher has recently had its damage numbers jump from 100 to 200. This seems to be a correction only, the tests conducted before this change are exactly the same as after.


The patch notes also perhaps back up the theory that explosive weapons have a split between the direct damage and the explosive AOE that triggers.


The Scorcher gets a five-shot head kill, but there is no green explosion which normally happens when killing the head, also the deflection symbol is being shown.

I’m guessing this is not really a head kill but instead the AOE splash damage is killing the main part of the body. This guess is backed up somewhat with my ground splash damage test. It also takes five shots to bring it down.


Direct hits to the side though will kill the target in four shots, one less than shooting directly at the head or that AOE splash damage from the ground.

The Punisher has had the same treatment as the Scorcher, going from 100 damage to now 250 being displayed. And once again not impacting any of the tests done before this change.


The Punisher needs four shots to the head with the deflection symbol showing. Four AOE ground shots can also kill the Hive Guard. But when shooting at the side with direct hits its only three shots that are needed.


The Grenade Launcher requires two shots to kill the target, no matter if they are direct hits or splash damage.


And the same goes for the Impact Grenade, two of them are required whether you get direct hits or that splash damage.


The Grenade Pistol is a bit more of a utility item, handy for those builds that can’t deal with bug holes or metal doors.


That being said, I have tested it to get data. And It can one shot the back of a Hive Guard. It will be two shots to the armour sections and be aware of that AOE splash damage for friendly fire.


Brood Commander Tests
The Brood Commander has Light armour over the head and its entire body. The head is the quickest way to bring it down, even if removed it can still summon additional bugs and even call in a Bug Breech though.


The Eruptor gets a two-shot head kill, with a fair amount of overkill on that second shot. The side or main part of the body is just two hits to bring it down, that is just 760 Damage. And just like with the Hive Guard, it is possible to get a one-shot ground kill. 380 damage and no need to worry about its headless actions.


The Explosive crossbow requires three headshots to remove it. The body consumes nearly an entire magazine with four shots to bring it down.


The Dominator can get a really quick two-shot head kill. This is exactly the same as the pre-buff version.

Where there is a difference is when shooting at the body. Five shots now and only 1,500 damage required, as opposed to eight shots before the buff.


The Scorcher takes seven headshots to remove it from the Brood Commander, five more shots required than the Dominator.

Shooting at the body is seven shots also. Shooting the ground with that AOE damage will take eight shots. Once again matching the Hive Guard test where it requires one additional splash damage shot to kill, compared to those direct hits.


The Punisher takes five shots to kill the Brood Commander and can’t seem to knock the head off. Direct hits or ground splash damage will bring it down in five shots.


The Grenade Launcher needs three shots to head or the side to kill the Brood Commander. And the Impact Grenade can do this with just two grenades required. This is with either direct hits or ground splash damage.

The Grenade Pistol also requires two shots to kill it, this is whether it is shooting the head, or the side parts of the body.


In this chart lower is better, damage dealt is in pink with amount of shots fired in blue. It displays just how well the Eruptor can perform with the potential for that one shot kill on the Brood Commander.

At the other end, the Punisher Plasma and the Scorcher struggle or can’t remove the head of the Brood Commander, and because of this they pay the price with increased shots and damage to kill.


Stalker Tests
The Stalker has sections of light armour in the central area above the head and across the back of the body. The head has relatively little health but unfortunately that is combined with a very small hit box.


The Eruptor can take two shots to kill the Stalker when shooting at this side central area. Striking anywhere near the centre of the target can kill it in one shot though. Potentially that AOE damage hitting the head area for the kill. I found it was quite consistent at achieving this.

An even easier kill is a ground splash hit, killing the target still in one shot, but potentially with an easier firing angle.


The Explosive Crossbow requires two shots to central area even with a direct head hit. With the side or central area requiring three shots to bring it down.


The Dominator kills the Stalker with one direct headshot. The side will take five shots at 1,500 damage. It was seven needed before.


The Scorcher can get a two-shot head kill. Much more likely is quite an easy five shot body kill and 1,000 damage dealt.


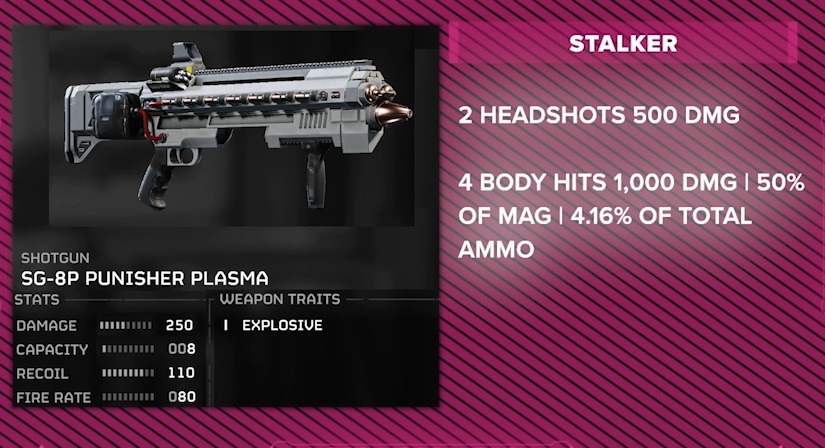
The Punisher can also get a two-shot head kill. The body shot though is more likely, four hits required and 1000 damage also.


The Grenade Launcher can a get three shot kill with direct hits or with splash damage. At range this becomes a lot harder, potentially increasing the amount of shots required.

The Impact Grenade gets a two-shot kill with direct hits or splash damage.

The Grenade Pistol can achieve a one shot kill when hitting that head directly. Again, more likely though is the two-shot body kill.


The Eruptor being able to get a pretty consistent one shot kill, puts it way ahead of the other weapons on this chart.

This also starts to highlight that the Eruptor and Exploding Crossbow might at first seem similar, but the data shows they behave very differently.


Nursing Spewer Tests
The nursing Spewer body receives -90% dmg from non-explosive weapons, will be delved into deeper very soon.

The side is also a durable body part, meaning the hidden Durability Damage stat on weapons is also included, more on that in the description.


I found the Eruptor to be inconsistent against the head of the Nursing Spewer, often taking only one shot to kill them, other times two are needed though.

The side sacs are in a similar position, sometimes only one shot is required and others two. For the sides I think it must be due to the position of the that AOE splash damage. What I did find consistently killed them in one shot was hitting the top just above the head.


The Exploding Crossbow requires two headshots to kill the Nursing Spewer. When shooting at the side sacs it takes three shots.

I also tried copying the Eruptor with shooting at the top of the Nursing Spewer. Doing this is not as efficient and requires an additional fourth shot.


The Dominator can now get a one-shot head kill. But this can be impacted presumably by the angled armour mechanic, as sometimes it will need two shots. I found it was about fifty fifty whether it was one shot or two shots to bring it down.

When shooting at the side, it is now only seven shots and 2,100 damage required. Before the buff it was 14 shots and 2,800 damage. It is probably that the Durability Damage has also been increased with that 100 damage boost, likely to something like 90 now would match my data range for other weapons.


The Scorcher requires, six head shots to kill the Nursing Spewer. When shooting at the side it is only five shots and 1,000 damage to kill it.


The Punisher only needs three shots kill, no matter where they hit, head, side, or ground. 750 damage to kill the Nursing Spewer.


The Grenade Launcher requires two shots, no matter where you hit the Nursing Spewer. The Impact Grenade gets a one shot kill, and when grouped up killing multiples with one chuck of that grenade.

The Grenade Pistol only needs one shot to the head to kill the Nursing Spewer. It will require two side shots though to bring it down.


This Tweet from the CEO explains the Power of Explosive weapons, dealing 100% damage to certain parts of the bugs, whereas other guns will receive a 90% damage reduction.


Looking at the numbers here a version of this can be seen.


The Scorcher only needing 1,000 damage for a side kill on the Nursing Spewer. And the Dominator taking 2,100 damage.

Comparing the two AR-23’s that Durability Damage can be seen coming into effect also. 4,620 required on the base version but the 23P only needing 2,025 damage. The difference being made up with that hidden Durability damage stat.

Unfortunately, I don’t know how Durability Damage is impacted by the damage reduction, or even if the data mining is correct with the values that I have here.

It is pretty clear that explosive weapons perform much better against the sides of the Spewers, and the Dominator despite being in the explosive category is not gaining those benefits.


Bile Spewer Tests
The Bile Spewer has medium armour on its head and across its back. The legs have light armour, and the very small mouth can be shot for full damage. The green belly is also a durable body part and impacted by that Durability Damage on weapons.


The Eruptor takes three headshots when hitting the armour of the Bile Spewer. The white hit marker showing for 50% damage being dealt on that direct hit.

When shooting at the sides it’s just two shots to bring it down. I had some success with one shot ground kills. Unfortunately, this is not consistent, with it still requiring two shots at certain points.


The Explosive Crossbow takes four headshots to kill the Bile Spewer. In some tests though it took many more shots to kill it, with the white hit marker here showing for half damage.I could not identify why this happens. The majority of the time it will be four shots.

The side takes three shots to kill, one more than the Eruptor. This along with the Nursing tests, heavily suggests the Explosive Crossbow is impacted more by that 90% damage reduction. Therefore potentially, a larger portion of that 420 damage, is not explosive damage.


The Dominator, much like the Nursing Spewer with those angled armoured hits, requires two to three shots to the head.

Once again I found this was about fifty fifty when shooting it. Shots to the side are exactly the same as the Nursing test, seven shots needed to bring it down, whereas before it was 14.


The Scorcher with only Light Armour penetration takes 15 headshots to kill the Bile Spewer. The deflection symbol appearing for presumably no direct damage, only the AOE splash damage. The side though is the same as the Nursing Spewer, five shots to kill it and 1,000 damage.


The Punisher has a similar story, five deflecting headshots for a kill. But only four required to the side or even at the ground to kill it.


The Bile Spewer has a small health boost compared to the Nursing Spewer. The Grenade Launcher is impacted by that needing three shots now instead of two. The Impact Grenade remains only needing one direct hit, or a splash hit to kill the target.

The Grenade pistol requires two shots to kill the Bile Spewer, seemingly no matter of where you hit the target.


Charger Tests
The Charger has Heavy Armour over the majority of its body and legs. The back area has no armour but takes 90% less damage from non-Explosive weapons. Destroying any leg will kill the Charger, and there is a bug to help achieve this and that will be examined very shortly.


The Eruptor can remove the back of the Charger with four direct hits to fleshy area. 1,520 damage. A two-shot kill is possible when hitting the leg joints on the front or back legs. Using a Stun Grenade can make this technique quite reliable.


A one-shot kill is also possible when hitting this joint, but it’s not consistent.


The Charger has bug when running, abusing this can get quite easy one-shot kills when shooting one of the legs. It won’t always work but I would estimate it does about 40% of the time.

The Exploding Crossbow requires five shots to the back to remove it. One more than the Eruptor. A splash damage kill can be achieved in six shots, but this clip is with a very compliant Charger.

On average when you have to shoot the ground, it will be seven shots not six. I couldn’t replicate the Eruptor leg tests with the Crossbow, and so shooting at the back seems to the most efficient way to kill them, with five shots and 2,100 damage.


The Dominator can achieve this with just ten shots and 3,000 damage. Before the buff it was over one magazine, 18 shots and 3,600 damage.

This variance of 600 damage, I think backs up my theory about the Durability Damage being increased, likely to 90 or 100.


The Scorcher can get a pretty quick eight shots and 1,600 damage to remove the back of the Charger.

It can also get a splash damage kill. The best I achieved though was 16 shots, with presumably this very small AOE area. The eight direct hits to the back being far more efficient.


The Punisher can get a six shot back kill on a Charger, two ahead of the Scorcher. And with a much larger AOE area, it only requires eight shots with that splash damage to remove the back of the charger.

Two more than the six required with direct hits, but opening up some different firing angles to also give you options on how to kill it.


The Scorcher and the Punisher can get four shot leg kills when utilising the Charing bug.

This only works if the Charger is running at full speed. If it isn’t moving or walking slowly, that Heavy Armour will kick in and deflect the shots.

The Grenade Pistol brings the Charger down with three shots and 1800 damage. A large percentage of the total ammo available to it.


In my previous video I said the Grenade Launcher is inconsistent against the Charger, with it getting anywhere between two and eight shots to the back to kill it.

When testing shots to the leg, I also found a similar situation. I managed to get multiple tests where only two shots were required to kill the legs.

And yet others where three or even four shots were needed. Plus, other additional tests where either no damage or very little damage was dealt at all. This all seems to all depend on where the shots are placed, and presumable whether this leg bug triggers or not.

The Impact Grenade tests were very similar. Two shot leg kills on the front and the back are possible. You can throw grenades directly at the leg and strip the armour there. This is easier said than done, especially when it’s moving.

And once again this could be the leg bug assisting here, rather than the Impact Grenade actually stripping the armour.

It’s far easier and more consistent to simply throw the grenades at the back area, utilising the ground splash damage.


The Thermite Grenade is a bit all over the place, sometimes it won’t stick to the target which is really annoying.

To set a target on fire two at minimum are required, there seems to be sweet spot for keeping them on fire longer though, and that is three grenades.

And if you manage to get all of those in the same location, it will kill the Charger. But this is easier said then done!

All in all, I found the Thermite Grenade really quite inconsistent, and I elected to only do limited testing as I feel it’s going to get a lot of tweaks going forward.
Bile Titans
The Bile Titan has Heavy Armour over its body apart from the belly section. The belly accounts for about 50% of the Titans health pool, being able to remove it quickly is extremely beneficial.


The Eruptor can remove the entire belly with just two central shots.

The Explosive Crossbow requires four shots in this test. Depending on where the hits land, it can take five or more.

The Dominator takes six shots for each section of the belly for a total of 12 shots. Showing that the Titan belly likely does take reduced damage from non-explosive weapons.

The Scorcher can remove each section with four shots for a total of eight shots.

The Punisher can strip each section with just three shots, but this much harder to achieve as you need to get much closer to the Titan.

The Grenade Launcher can get a three-shot strip for the entire belly of the Titan.

The Grenade Pistol takes one shot per belly section for a total of two.

The Impact grenade unfortunately needs two hits per belly section, that’s a total of four grenades.

Potentially two direct hits right to the middle of the belly would strip both sides. I got fed up trying to achieve this in game and just left it with this test though.
Final Thoughts
I hope this visual reference guide was of use to you. As a reminder the video with all the live tests is below:

17 Comments
NinjaSloth 3 May, 2024 @ 6:45am 
There was no damage dropoff vs the mech or several other enemies tested which means it is likely only hitting for around 90 durability. It does seem clear the Railgun is never getting near 120 durability damage even at near full charge. Not sure if that is due to how they scaled it (where you need to be AT 100% - which is not possible - for most of the damage) a bug or w/e.
Exhillious 2 May, 2024 @ 8:41am 
Most likely when you were testing the Railgun, you were hitting for 60 durable damage worth. That or you missed a shot or two. Damage falloff can also be applied here, as Railgun shows evidence of really harsh damage falloff.
NinjaSloth 2 May, 2024 @ 8:29am 
If AMR has 135~, 4 shots to kill a gunship would be 406-540 prior to any multiplication, Railgun at 100-120~ shouldn't take 7 shots (601-700~ minimum?)

And for the titan, with 1:10 resistance and (very likely) durability damage multipliers, you can basically ignore the primary damage due to how small a component it will be to the total. (excluding explosive damage). That is all I was saying.
Exhillious 1 May, 2024 @ 8:33pm 
Flamer has a unique interaction with Chargers which is most likely based on a bug. Because the armor can break you can damage the flesh underneath it since it's a really low AV, if I had to guess just due to the way the projectile is handled. Bile Titan might have this on the sides of its armor, but just due to placement it wouldn't be reasonable to hit and definitely not to kill since it has easily over 6x the health.
Exhillious 1 May, 2024 @ 8:33pm 
That's not what I said. Hybrid enemies take both durable and base damage, Bile Titan is a hybrid enemy. It just also has the ballistic resistance on the armor, which durable damage just so happens to bypass. Railgun doesn't have angled AP loss. Also the charge level is a staged thing, so it goes from 60 to what is assumed to be 120 after the 6 AP threshold (this is based on datamined code which doesn't actually show the value, but is assumed based on damage dealt). After the change there isn't much of a reason to go for a high charge outside of Railgun's cleave.

For the mech again no clue. However for the Gunship I know for sure it doesn't have ballistic resistance. It's just a durability damage enemy, so the higher the durable damage the better (AC, Laser Cannon, explosive primaries, etc.). AMR has 135 durable.
NinjaSloth 1 May, 2024 @ 7:02pm 
So in the case of the titan, the head is essentially only taking durability damage due to the 1:10 explosive resistance, and likely the railgun is losing some durability damage due to angled AP and/or just not being able to hit a full 120 durability (cause you explode at 100%)

If the torso of the mech takes almost exclusively durability damage due to the 1:10 and railgun is closer to 100 at 95%~ charge the 6 shots would be 301-360 impact and 501-600 vs the 38 shots of Lib pen 171 impact and 556-570 durability... it would have to be exclusively taking durability damage.

Same thing could be true of the Gunship if it takes nothing (or close to it) but durability damage, assuming the AMR has 45% (200)~ durability damage. Or possibly a bit less if railgun is only getting to 100~ durability at 95% damage.

If Flamer can't damage enemies with heavy armor how does it rip of the head of a charger? While the legs could be explained via the walked bug, I was unaware the head could lose armor.
Exhillious 1 May, 2024 @ 6:31pm 
After some quick testing, a Railgun with 6500 base damage + 650 durable hits the same Breakpoints as the base rockets. So for hybrid enemies that happen to have an explosive vulnerability, durable damage ignores this.
Exhillious 1 May, 2024 @ 6:04pm 
As for rockets vs. Railgun against Bile Titan, it could be a few things. Most likely is that rockets are tagged as explosive entirely, specifically as to make them the leading Bile Titan killer. Alternatively, durable damage isn't affected by the 1:10 rule. It'd also be 600+(120*x) vs. 650+(650*x) instead of just durable damage being compared, as Bile Titans are hybrid enemies.
Exhillious 1 May, 2024 @ 6:04pm 
AMR has higher durable damage than Railgun, not sure where you got the notion that it didn't. As for the mech testing I have little to no clue, I never tested that. If I had to guess Railgun and MG don't hit the breakpoint to damage it. If what you say is true then it might be something where weapons that have durable at 10% of base don't damage, but weapons with higher durable do damage it (Lib Pen, AMR, and HMG all have higher durable damage).

For the Hulk AMR 2 shotting and Railgun 1 shotting, that's because the AMR is 4 AP and the Railgun is 5. They both do more than enough to 1 shot but AMR eats a 50% damage decrease. Then for Titans, Flamer is 3 AP with 4 AP fire so it isn't damaging it unless you light the torso on fire.
NinjaSloth 1 May, 2024 @ 5:10pm 
If that is the case why does it take the railgun 7~ shots to take out the engine on a Gundrone, while it only takes 4 for the AMR? (same thing with Patriot Mech Chest where it takes almost no damage from railgun and the MG support weapon, but "full" damage from Liberator pen/AMR/HMG) I don't believe the AMR has a higher durability damage than the railgun at high charge (specially since it takes 2 hits to kill a hulk through the face plate, and railgun only one)
Titans appear to be essentially immune to flame thrower, and the head takes 16-17 shots at high charge from a railgun as well.

Since titan has way too much armor the explosion damage on Rockets (eats/RR/Quasar) the 1:10 damage resistance shouldn't be a factor, and railgun has supposedly higher AP so that shouldn't matter either. you shouldn't ever get higher than a 1/6~ (if railgun has 120~ durability damage, vs rockets 650~) ratio if the numbers you have are accurate, and 2/16 is significantly higher than that.