Ion Fury

Ion Fury

89 ratings
Aftershock - Secrets in Images and Text
By Emi
Blue line = progression path
Red line = secret
5
5
   
Award
Favorite
Favorited
Unfavorite
Episode 1 - Rock Bottom
==================
E1M1 - Wasted Potential
1/7
180 at the start of the level. Plant on the right hides a button which makes vent on the same wall open-able.
2/7
Interact with the "accessories" wall in the Cloakroom.
3/7
In the waste disposal area there's this raised part with a pipe going through it. Jump onto it and then climb the right side.
4/7
In the exact same place but on the opposite side. Vent under the pipe can be opened.
5/7
A multi-step one. When you were swimming through "brown water" you might've noticed a suspicious door. It opens together with the "level progression" door when you power up generator.
Hit the generator, run into the dive room, into the water and into the hole, up and into the open door. Above water line a button. It opens the door into beer storage, in between dive room and generator room.
6/7
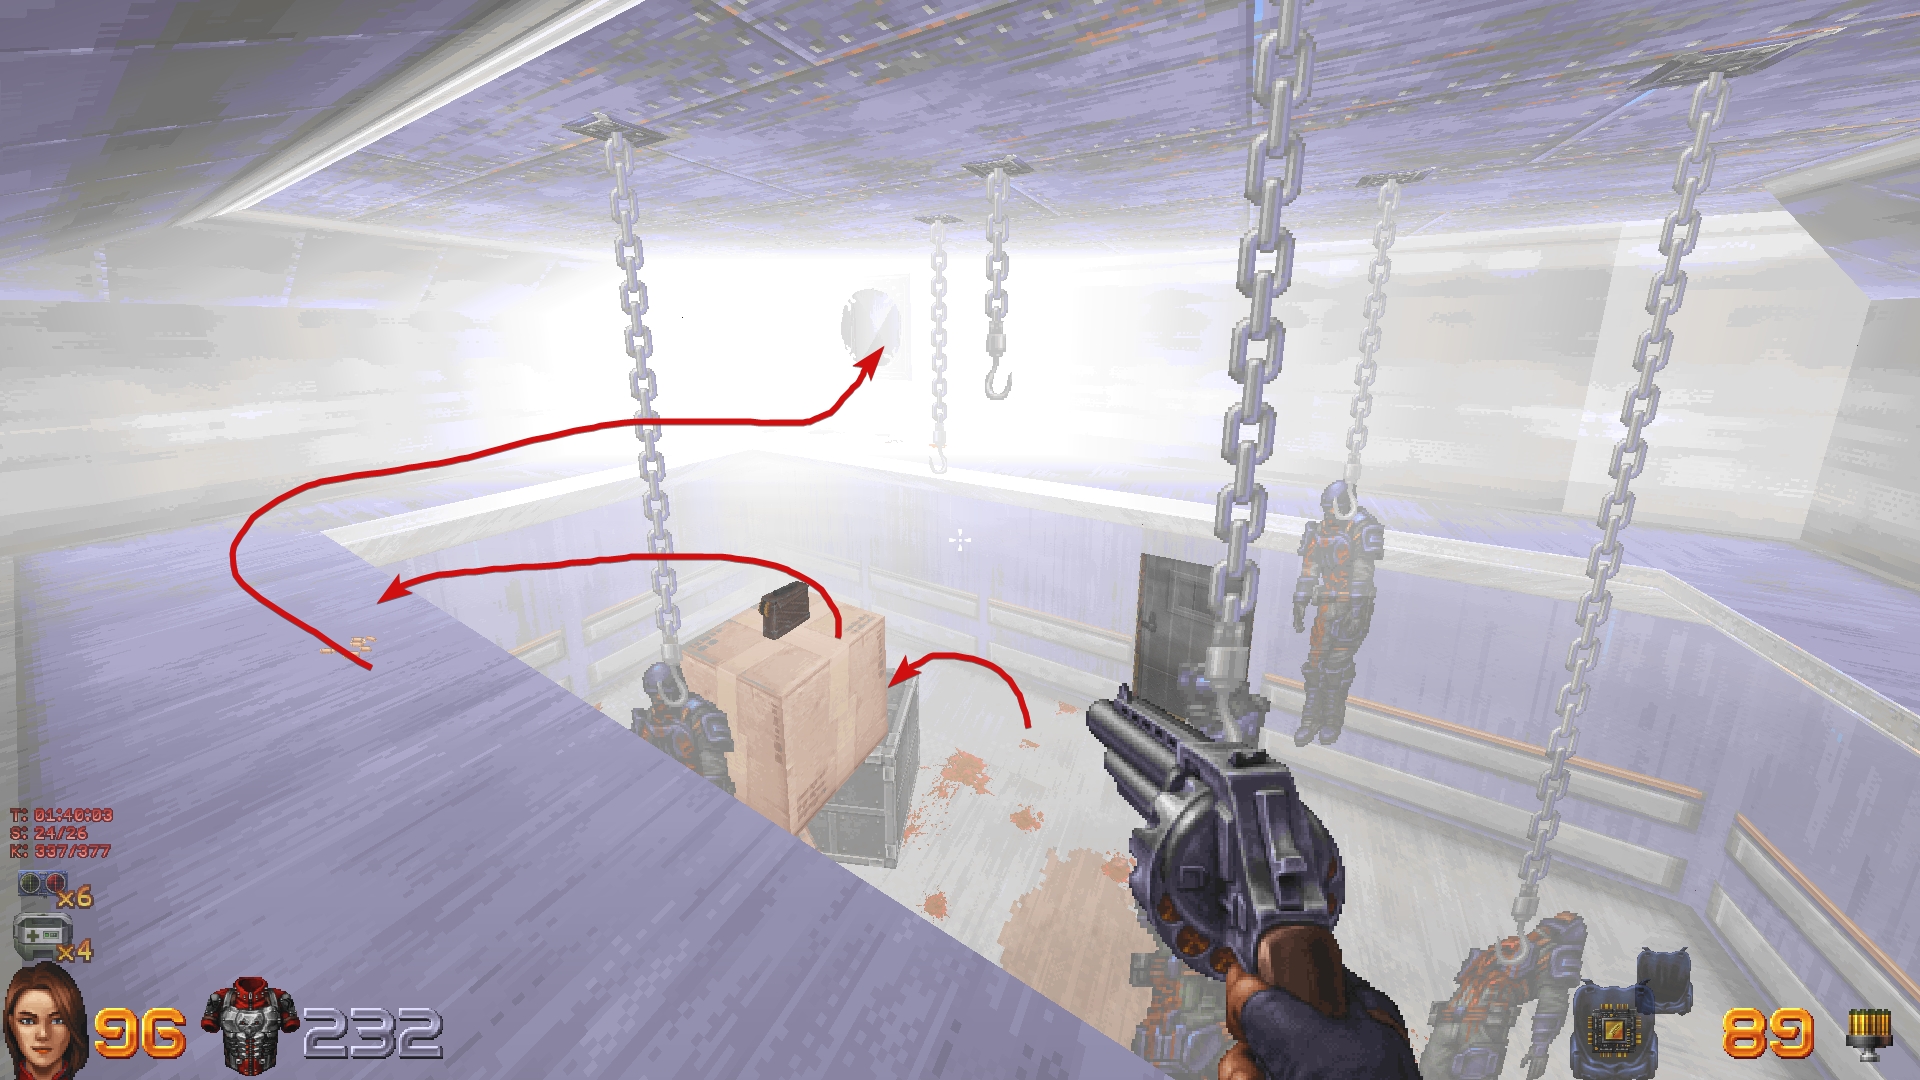
In the room behind the generator-openable-door there's a destructible fan up on a wall next to some boxes.
7/7
Down the slope right next to the level exit there's a destructible wall.
==================
E1M2 - Urban Removal
1/7
In the first open area there's an inconspicuous broken ledge on the right side. Climb up and follow the path to the wall. Don't jump down just yet.
2/7
Next one is a certified Neo D.C. classic - jumping a bunch of small objects with crazy fast movement and slippery physics.
Track back to the broken ledge. Hop the fence. On the left is a generator, which is a surprise tool that will help us later. Activate it and check the edge of the roof. There's a cable crossing the gap. Use it to cross yourself. Check the building on your left - there's a bunch of ACs hanging in a rather obvious pattern.
3/7
Next to the building up for demolition. Jump onto the fence, then onto the sign and then from there strafe jump around the wall in front of you. Then check the big door behind the centipede.
4/7
After you enter the red key building. Get onto the elevated area in the middle.
A crate of bombs next to a giant fan you say? Well, who wouldn't want to chuck bombs into it until it explodes! Then proceed down and to the lit read area on the left.
5/7
There's a crane behind the fence next to the triple generator.
Hop the generator, then the fence (mind the drop). Find some goodies and another surprise generator.
6/7
After committing house market manipulation instead of going into the hole, use the newly made ramp to reach the ledge that goes around the building. Both right and left there are goodies at the end but you are interested in the left side.
Reach bundle of cables that goes from the ledge to the opposite side roof. Cross the gap, take right and from the ledge leap on the sloped EXIT gate. Climb up, notice an AC on the wall. Use it to climb higher.
Up top take a moment to appreciate the mural on the wall.
7/7
In the half-constructed building that you half-unconstructed.
At the top level (that you can reach), right before the booth with the button, there's this random unfinished stair that lets you reach higher level of metal beams. Use the beams to reach a ladder around the corner. Finally - the final generator.
Also - bonus on the beam across.
8/7
And now that every generator has been powered we can finalize the secret hunting in this level.
This one is fun and you might want to try and figure it out yourself.
But how? Well, if you were paying any attention you might've noticed that all 3 generators have something in common. It's rather out of place and hard to not notice at least once. One might call it a CLUE. Here, I'll give you a second.

And where else you might've seen something like this? It's somewhat early in the level and right in your way and face.
Anyway: the answer is - it's on the crane right behind the blue key gate. Clue is one side and on the other is a small switch.
==================
E1M3 - Five Finger Discount
1/12
Very early in the level. Climb up to the catwalks. Skip the window and go straight for the corner, around it onto the bridge. Check on the wall on the other side of it, there's an AC. Get back but using window indent underneath.
2/12
If you still have that chair from first level and you don't know if you should swap it for temp invulnerability then you could use it right here. Pop it next to windows where 2 crossbowmen were and jump in.
Or, you know - just use the soda machine inside the adjacent room.
3/12
Right after you get fired and go outside for a breather. On the stairs right in front of you is a subtle indent in the wall. Armor shards mark the path. Probably take out the turrets first.
4/12
Right around the from the previous secret there's a destructible window.
5/12
There's a vent next to wrecked Humvees and the Wtf poster.
6/12
I hope you haven't listened to the dumb idea of using the chair in secret 2 cause now comes THE REAL time to use it.
Across the parking lot there's a wall with a fence atop. And obviously - a broken section.
Drop nuvachair underneath it, use baton to make it float about midway up, use a shopping cart to quickly hop on the chair and then INSTANTLY onto the ledge.
Or just get in like a normal person using vertical sliding doors in the BUILD store.
7/12
In the middle of the parking garage there's a vent shaft (accessible from both levels). At the bottom of it a secret and a way to more goodies.
Bonus: as it's right after this secret - after elevator a bunch of Killbots come out of the toilets. In the womens toilet you can find this.
It kinda sucks. Get it? Cause vampires. They suck blood. But no - it really does IMO.
8/12
In the Garden Court. Swim under the escalator.
9/12
In the kitchen of the Grease Stranglers totally not suspicious off-color crate and a piece of wall above it.
10/12
Next one is in the "Active Shooter". Gotta beat the gun reng for it.
11/12
In the back of "Food and Stuff" there's a freezer. Under the ceiling a vent entrance. Take first left, then right and follow the path minding right hand side, eventually there will be another turn with a goodie in it. But mind the jump - you have to crouch.
12/12
In the rafters of garden court there's a rather obvious off-color wall.
==================
Episode 2 - Suburbia Under Siege
==================
E2M1 - Joyride - 0/0
==================
E2M2 - Costive Canal
1/12
Very early into the level there's a bike recall station on the right side of the canal. Behind it some trees are covering indent in the ground.
2/12
Up in the rafters above...Heskels office? In the Stan's previously owned vessels? Whatever.
In the back of the rafters on the right side there's a wooden wall. One panel is off-texture and opens up.
3/12
Rundown building opposite to the Stan's counts as a secret. Can be entered through a window at the end of the bridge, next to the sideways car. "Cola" ad in the back opens when used.
4/12
This whole fenced off area right before the aforementioned rundown building is apparently secret. Can be accessed through sewers with entrances underwater and next to the sideways car next to the rundown building. Or by parking the bike next to the hole in the wall on the bridge and jumping across.
5/12
To paraphrase a quote: "If developer wanted me to not use this train cart as a ramp he would not have placed it in a way that makes it usable as a ramp". Jump the cart into the poster in front. Don't boost if you don't want to fly right through.
6/12
Pass through second red brick train bridge. Dead end on the right has a suspicious broken ledge with a shack nearby. Park the the bike by the shack, jump onto the roof and to the ledge you go.
Bonus: not secret but the opposite to this ledge the other one can be climbed too and has some pucks.
7/12
In the same area, in between two exits into the previous part, there are some metal sheets covering a hole in the ground. Blast em away. After a rather long crawl you'd think the area you reached is the secret but we aren't done yet - use the radio to uncover the actual secret.
8/12
Right before the river of sludge under the "welcome to outer DC" sign. Dismount from the bike and go left side. Onto the box from which you take the ladder. Then turn around and noticed that previous bridge has a bunch of small platforms placed in convenient way allowing to cross to the other side.
9/12
After taking a big leap you'll enter a parking-lot-ish looking area. Clear it out and climb the left side platforms. There's a hole in the chain-link fence. Crawl through, through boxes and you'd think that's the secret but no - it's in the back, behind more boxes.
10/12
Going upstairs you'll encounter an inconspicuous table turned into cover. Checking the other side reveals a button that turns what now a down ramp into an up ramp. But we are not done yet again - the panel on the left opens when interacted with.
11/12
After clearing out the newly refilled with enemies garage-like area check the opposite side from the offices. Near the blown out dead end there's an illusionary poster with a vent leading to a rather controversial shipment.
12/12
Right before level end. Door on the right leads to a destructible wall.
13/12
Right after last secret. Enter the purple tunnel and instantly turn left. A door. Behind - pipes. Jump down the one that goes down. Turn right. A button. Press and out you go. We are back at the beginning of the level (jumping down the pipe again will bring you back to the end). To the rundown building. One of the apartments is now open...the one with a spooky number...
===================
E2M3 - Marina Massacre
1/9
First secret is very early. Get onto the dry land and cross the bridge to the other side. Follow the building back to the tunnel. Gate is locked but there's a weak point in the dead end.
2/9
Pass the bridge. Underneath the giant "W4S" sign there's a broken ledge. And underneath that, in the water, there's a hole in the wall, covered by fake rocks.
3/9
Check the first boat you see getting out of the baseball field. The green pipe is hollow.
4/9
In the dam gate control building thing. Ride the elevator to the second floor and then send it down. Doesn't that look like a nice platform that you could maybe use to get even higher? Get it, flip the switch, climb into the rafters. Fan hole also leads into the next secret.
5/9
On the second floor. Next to the toilet there's a bit of an interactable brick wall. (Another one in the toilet but that's just a quick exit).
6/9
In the control room. Orange panel right by the entrance can be opened using computer next to it.
7/9
On the second floor of the demolition exhibition simply jump into broken windows next to the elevator, into the room where crosbowman was.
8/9
After riding demolished building you'll end up in this tight space with an out of order elevator and a single apartment door. Door that is locked but has a doorbell. Which won't get the door open but a...window? Ring the bell, wait till you hear a shotgunner aggro callout and go outside and around the corner. Mind the shotgunner.
9/9
Last one is after you flood the area. Get down into the water. In front is the building with a skull. On left is a bridge you can pass under and find a floating platform and a floating box. Swim under and into the box.
==================
E2M4 - Wipeout - 0/0
==================
Episode 3 - Appalachian Assault
===================
E3M1 - Not From These Parts
1/13
A twist on a classic "secret behind a waterfall" - secret UNDER a waterfall. At the start turn to the waterfall opposite to the obvious destructible wall and dive underneath it.
2/12
Next - break the wall and follow the river to its' end. On the left side of the waterfall is a narrow cliff edge. (on the right there's a non-secret mega armor)
3/12
Next one right behind the yellow card door. Impossible to miss.
Bonus: in the graveyard all of the headstones are destructible by explosions. Including the grave of some infamous gunslinger... (most headstones contain minor stuff like shards, but there are a couple of pucks and some special shotgun ammo)
4/12
Inside the chapel there's a rather obvious off-shade bit of wall. Touch the face on the front of the altar.
5/12
There's a living fence separating area with houses from the river. Use [missing/i] house to hop over or walk around and check in the corner up stream.
Bonus: weird that it's not secret - there's a dart board on the side wall of 405. Dart is in the corner between rock wall and little brick fence. Score a bullseye for a medkit.
6/12
Bookshelf on the 1st floor of 405 has a secret behind it.
7/12
When wraiths bust the 2nd floor of 405 enter the only bedroom that is open, get out onto the roof and strafe jump into the window of the locked room.
Rotten Underbelly -> Not From These Parts 8/12
Take the red key door. It will bring you into a mini-level inside a level with 2 extra secrets.
First one is nearby when you hear "Now I know where they burry the bodies". Take the left into the water room. Wall on the right from the radar pickup is destructible.
Rotten Underbelly - 1/2
After you flip the first red switch follow the corridor till the locked golden gate. There's a lava pool nearby. Secret is in the crawl-hole in the lava.
Rotten Underbelly - 2/2
In the colored doors labyrinth. There are a blue and a red doors right in front of each other. Behind the red door is a differently colored wall section. Presumably, it's open when red door is closed and the blue door inside that corridor is open so you have to enter it from the other side of the corridor. The actual secret is a bit deeper, behind some destructible walls.
9/12
Outside the Morning Wood mill. On the side of the ramp that lead in/out of the building there's a weak point.
10/12
Same place. From the ramp you can jump the fence, then sloped wall next to the door, from there up to the slope above. There are goodies behind the wall and in the vent but they are but a distraction - for the actual secret you have to tightrope walk across some electrical cables to the enclosed area nearby. Or just hop the gap.
11/12
In the last building, after mini-boss fight. Go through the office and stop at the bottom of the stairs. Painting there covers a destructible wall.
12/12
Last one is painting themed as well - painting at the top floor covers a vent access.
===================
E3M2 - The Dishonorable
1/8
Right as you exit the East Rail (first building of the level) there's this weird store in front of you with a moving curtain in a window. Behind it seemingly nothing except further part of the inner curtain is illusionary.
2/8
In the lobby of the Wild Goose Lodge. Check the fireplace, in the back, up and to the right is a secret.
3/8
In the back of the lodge. Next to the kitchen there's a storage/freezer. Clear it out and shoot the "no smoking" sign. One of the shelves will lower revealing a secret.
4/8
Past the house and the backyard you are back into the open streets. In front of the courthouse is a rock with a rock on top of that rock. Jump on the rock and it will act as a pressure rock, lowering part of the rock in the rock formation allowing you to get inside of the aforementioned rock formation
5/8
In the courthouse. Bookshelf behind the stairs down slides when used. And yet again it's not the secret just yet. Follow the path and end up in a room full of more bookshelves with one obviously standing out. And what do you know - the broken clock is quite right in this situation. (Use or shoot the clock above the door)
6/8
That Nuvachair you just found? FINALLY a good use for it. Walk out of the last secret room onto the roof and go around the corner. There's a gap in front of you. It CAN be cleared with just some good old strafe jumping but it's pretty tight. If you are having troubles or don't care just drop the chair onto the ledge and it will make clearing the jump way easier.
7/8
On the second floor of the police station there's a destructible wall (I presume, as when I made it up there it was already broken) right by the stairs on the right hand side.
8/8
For the last secret you need to get outside behind the building, which is an area fenced off.
There are a few ways - after you turn the power on, a vent opens up on the 2nd floor of the police station, after you finish your business in the central room of the courthouse the side room has windows you can pass through, vent in the holding cells. Or you can just jump of the courthouse roof. Either way, on the side of the police station there are scaffolding allowing access to the roof. Secret is behind a vent.
9/8
Now to the mega secret.
In the holding cells you can open all but the 2nd cell. It is however accessible through vents.
Climb into the vents in any of the open cells, make your way into the 2nd cell, stand back and shoot the broken TV. Proceed outside, fastest way is through the same vents and then hopping the fence behind courthouse using boxes.
Next, proceed into the tunnel near the courthouse. You might've explored it earlier, found minigun and door that is locked. If you shot the TV it's locked no more.
And yet again just entering the area is not the secret. If you can't figure it out: There's a gleam in the dog house next to the middle house. Interact with it and the door now can be opened.
==================
Episode 4 -
===================
E4M1 - Warm Reception
1/7
By the right side of the bridge on the other side of the river you can find a sewer entrance. Through the pipe, then dive in and under the fence, up the ladder. That wasn't a secret, just a way into the compound, but one that brings you RIGHT TO the 1st secret. It's in the shipping container in front of you when you emerge from underground.
2/7
In the generator room, next to the boiler, there's a brown pipe in the corner. It's open on the back side.
3/7
After passing through gate B, around a corner there's a vent that leads into the control room before the gate.
4/7
In the second floor office, on the right side (looking from windows), there's a work place that clearly belongs to some geek. On the screen of his computer is some menacing image. Interact with the computer.
5/7
Down the stairs from the security booth there's a janitor closet. Cabinet in the back has no Narnia on the other side but it's still something.
6/7
Behind the blue key door. Atop a stack of crates one box is open.
7/7
Right on the other side of the aforementioned crate pile there's a way into a side room. Inside a mutant will burst out of the wall but more importantly there's a crawlspace in the pile of crates in the far right corner. Alternatively if you skipped that way, if you exit control room through the giant exit gate, same monster will burst out on that side and open a path to the secret.
==================
E4M2 - Like a B in Heat
1/6
First secret will hurt. It's in the very first pool of lava, you gotta get into that hole in the wall.
2/6
Right as you enter the green lit room after catwalks there's a window with some weed on the left. Out of it you can see a small cave on the opposite wall, with some block conveniently hanging in between.
3/6
In the room with a giant WAREHOUSE sign and a bunch of exits. Right underneath the sign is a broken server that slides out of the way when interacted with.
4/6
Next enter the mens room. Things of note there - some off-color wall section and a red condom dispenser, which usually is blue. 1+1 = use the dispenser and run into the open wall. (also same dispenser opens bit of a wall in the middle stall)
5/6
Behind the door that opens after you flip a switch. At the end of catwalks there's an orange panel that opens when used.
6/6
In the Big Ass Fan room, on the opposite side from the ladder, there's a painfully obvious interactable bit of the wall.
7/6
Just follow the path behind that panel from the previous secret. Entering the hole is a secret but it's nothing but the lead up to the mega secret.
==================
E4M3 - Eruption Disruption
1/4
In the Heskel's "throne room" (how pretentious can you get?), behind the projection screen there's an open "maintenance hatch" (it's a hole) in the floor.
2/4
Behind yellow key door. In the round room marked "service access" there's a vent on a wall. Get in and take the left turn.
3/4
In the open area after the control room there's a random island-rock in the middle of the lava lake with a weird door on it. Can be jumped onto from above or strafe-jumped from the spinning rock next to it. Getting out is trickier - either come prepared in a hazardous environments suit or be prepared to make a very tight jump from the door frame back to the spinning rock.
4/4
In the suspiciously-looking-like-an-arena room there's a H marked blast door on other side...that can be simply walked around though a hole in the left wall.
===================
Finito.
8 Comments
-[Badger]- 3 Jan @ 6:57pm 
E1M3 6/12 can be accessed w/o the chair from the Build megastore.
niktosha 2 May, 2024 @ 8:42am 
5/7
more easy way: open the door what opens with generator with button from backside of it and jump to the water without power up generator.
And just
Go into the hole, up and into the open door. Above water line a button. It opens the door into beer storage, in between dive room and generator room.
The Fifth Horseman 21 Nov, 2023 @ 9:45am 
E2M2 8/12 - that one you can just park the bike in the gap next to the secret, there's sloped part on the right that can be scaled if you jump and crouch
Emi  [author] 1 Nov, 2023 @ 11:18am 
Whoopsie, the upload lag be damned. Fixed. Thanks.
TotalRetard 1 Nov, 2023 @ 10:59am 
The first two screenshots in e3m1 are still the same
Mirthful みどり 31 Oct, 2023 @ 6:27pm 
You don't need the chair for secret 6 of E1M3. You can climbe the sliding doors in the "Build" store like stairs to find a vent that leads to the secret.
Emi  [author] 18 Oct, 2023 @ 10:46am 
Thank you. Yeah, fixed E3M1, was just a missclick due to how uploading images works. Photomode idea sounds great. IMO not super necessary for secrets but I wanted to take a pic for the each individual level and add it to the title, as there're no splash/loading screen arts for them.
And map thing would be great but think about the fact it would almost double the number of images in this guide - it's already A LOT for a single web page as is. And it will kill the formating - I was trying to make this as neat as possible, one image per secret unless just simply impossible, so you I could keep them full size and you don't have to open individual screenshots. If there are 2 pics per every secret then you'd have to click on each one every time.
Zhnigo 17 Oct, 2023 @ 8:13pm 
10/10, thanks for your work

some comments:
- in e3m1, the first two screenshots are the same
- you can use photo mode (default backspace) to take screenshots without hud, and to move the camera to positions you can't reach on foot
- if you want to go an extra mile, include the secret's positions on the map

cheers!