Jishogi

Jishogi

Not enough ratings
The Sleepwalkthrough
By Silver Hemswood
A little bit of everything to help me bully Prism into making DLC you get the most out of Jishogi!

Includes a quick control guide, list of essences and their locations, achievements, and tips on how to get each ending.

Note that there are NO trial solutions here.
5
   
Award
Favorite
Favorited
Unfavorite
Introduction
Welcome! I noticed there was a sore lack of guides for Jishogi, which is a terrible shame in terms of accessibility. I want more playthroughs to start popping up, and I figured the best way to help that is to produce a quick and easy guide. Anything to help make making content easier!

There will be light spoilers past the control section. I'll keep the story beats to a minimum, which is easy enough due to how slowly Jishogi branches out.

If you have any questions, feedback, or tips you'd like to add, then please drop a comment. I'll do my best to answer anything that gets sent my way. Thanks!


If you are hunting endings, achievements, or the like, the game will irrevocably branch out when you see the giant singular pair of scissors at the end of Act 2: Return. Up until that point, your actions won't lock you out of anything. Make regular saves and you'll know when to be on guard.

"Do I need this guide?" Probably not if you're doing just the one playthrough, no. This is mainly for people hunting everything. Oh, and to share the biggest tip:

Outdated! Removed!Biggest tip here, do not skip!
Prism was kind enough to leave a shortcut in the game in case you ever get stuck on a trial puzzle (those locked rooms with chess/shogi boards). All you have to do is press 1 on your keyboard and the exit will pop open. (This skip command has been removed/changed! I can’t test this right now, sorry, but I thought it important to note.)

This will not impede your puzzle achievement. I'm noting this specifically because there's a short developer commentary in the extras menu if you get every achievement. Also, to be fully transparent, the density and length of the puzzles almost caused me to quit halfway through the game, which would be a terrible shame for how much I like it.
Controls
Arrow keys to move Mayu/the cursor.
Z to interact/advance dialogue/select menu options.
X to close out of menus/advance dialogue without accidentally selecting choices.
Space to select menu options.
Esc to open the pause menu/back out of menus.

WASD does nothing, same with the mouse.

Friendly tip: If you're mashing through text, stick to mashing the X key. This will prevent you from accidentally picking dialogue choices and having to reload on repeat playhroughs.
Act 1: Intro

There is little that needs explaining about this act. It's pretty linear, and you can't really miss anything.

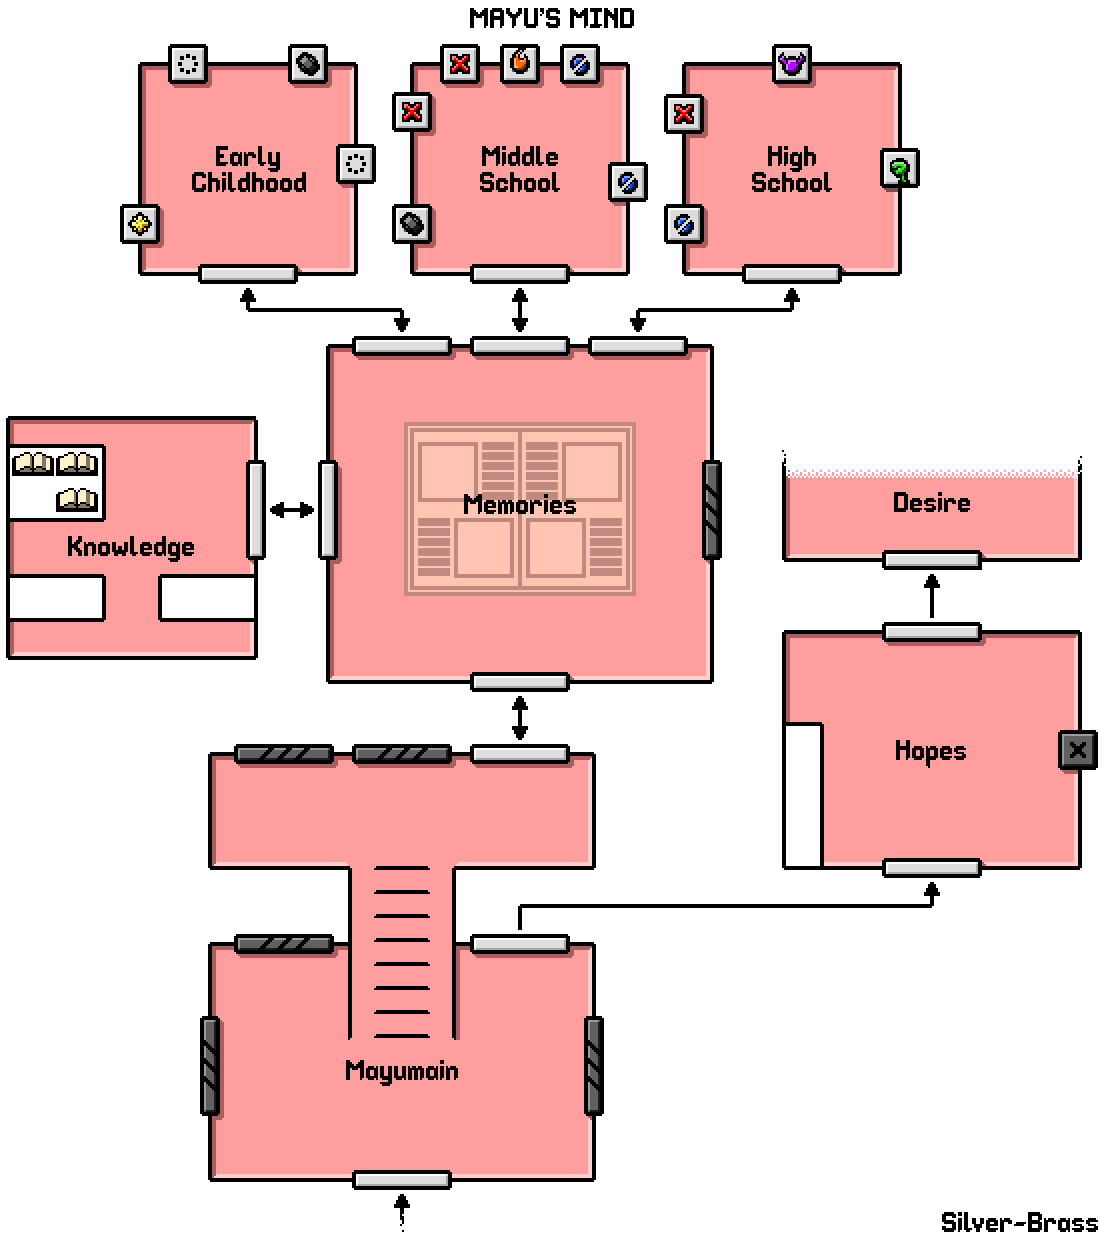
That said, there's an optional offshoot in the Memory room called Mayuknowledge that opens up once you're done in High School Memories. Take a peek at the big books for some handy info in your Knowledge screen, plus an item that will let you spend an Essence of Passion to skip a tricky trial. (Keep in mind that you need every Essence of Passion you can find for a sub-ending later!)

Once you've finished this section, you should have:

Essence of Joy x1
Essence of Fear x2
Essence of Anger x3
Essence of Passion x1
Essence of Pain x3
Essence of Vengeance x1
Essence of Guilt x1

The last memory in High School Memories is optional, so it's possible to skip the Essence of Guilt.
Act 2a: Choices
Act 2 offers a bit more freedom. Depending on your choices, you can end up with any combination of Essences, and dialogue and options may change. No need to sweat the Essences too much right now, though, you'll get the chance to grab more later.


You're expected to head to the Mysterious Cave on the right upon arriving. You can, however, explore a bit. Go through Memories, enter Knowledge, and you can score a boatload of context behind the Spell via the big books, letting you negotiate better later.

Once you're done in the Mysterious Cave, another cutscene will play, and then the board opens up.

You have the choice of three minor tasks, and one major task. What you choose will affect your understanding of the situation, and not much else. You can come back later to pick up everything you missed, so there's no need to worry about what you choose. Mayu's Id commenting on what you discover is the only missable content.

Minor Tasks
Hopes and Desires
Essence of Passion x1
Essence of Vengeance x1

Hobbies and Interests
Essence of Passion x5

Home Life Memories
Essence of Joy x1
Essence of Pain x2

Mid-term Memory
You won't get any Essences for this one. Fifield's not mulled these over yet, not applied emotions in post.

School Life Memories
Essence of Pain x2

Major Tasks
Sexuality
It's a bit early to visit this room. Still, you can save yourself some walking and snag the Essence of Lust - Male from the Sexuality Terminal for later.

Guilt
Essence of Anger x1
Essence of Guilt x1
Essence of Love x1

Relationships
Another chance to visit a room early. If you have two Essences of Joy and two Essences of Fear, you can access the Relationship Terminal and use them on the Mayu entry to influence the ending. Otherwise, enjoy your snoop!
Act 2b: Return
This part is kind of important. After completing your tasks, you'll be summoned elsewhere.

Heeding this call is the big turning point. Make a backup save now!
That a big enough warning for ya? Here's another; if you haven't saved by the time you see a big ol' pair of scissors, you've gone too far.

Upon returning and sitting through dialogue, you'll have three choices to make. These will enable and disable different endings and choices. You can tell who's saying what by the colour and tone of each choice.

For the Bad ending, side with Mayu's Id. This does not lock you out of any other endings.

Mayu cannot change her own sexuality, no matter what. She can still brainwash Fifield, however. She's locked out of the Bad ending.

Siding with Mayu's Superego will prevent you from forcing Fifield to fall in love with Mayu, blocking off the Dark Love and Bad endings. This'll also soften Fifield's Superego's attitude towards Mayu, letting her enter the figment's chamber. On the flipside, Mayu's Superego's resolve will let you change Mayu's sexuality.

Once you've made your choice, the game will acknowledge it by showing either Mayu, Mayu's Id or Mayu's Superego by your saves. This will help you keep track.

Can...
Id
Ego
Superego
Change Mayu's sexuality?
After changing Fifield's
No
Yes
Change Fifield's sexuality?
Yes
Yes
Yes
Force Fifield to fall in love?
Yes
Yes
No
Talk to Fifield's Superego?
No
No
Yes

Before you ask, no, changing both girls' sexualities doesn't prompt any dialogue outside of the Bad ending. The game acts like Mayu's still gay.
Act 3a: Before the End, Home
The end cometh. This is your chance to track down anything you missed and prepare for the finale. It's also your chance to make a beeline straight to the finale. Spoilers are more prominent here, so if you wandered a bit too far, back up you go!

Naturally, this act encourages backtracking and opens up everything for your perusal. Fifield will not judge you for looking; in fact, it's both expected and encouraged.

In these sections, I'll be listing everything that opens up. I won't be retreading old ground outside of adding it to the map.

Also, a bit of advice for you; completing trials and accessing rooms does nothing to change the ending. Therefore, I'd recommend whizzing round, opening everything up, and then making a new save. That way, you can hunt down each ending without the trials slowing you down too much since paths tend to overlap.

Mayu's Mind
?'s Room
On the ground floor of Mayumain, there're two doors denoted by floor cushions. To the left is Mayu's Superego's room, and on the right, we have Mayu's Id. There's nothing to loot, but you can pick the figments' brains.

Hobbies
Ever wondered what those eight Essences of Passion were for? If you've saved them up without spending a single one, you can temper Mayu's love for either shogi or chess here to slightly influence the ending.

Manifestation of Hopes
You couldn't grab this before, but there's something to the right. Sit through the "memory" for an Essence of Passion.

Sexuality
Using the Sexuality Terminal, you can obtain an Essence of Lust - Female, which is necessary for overwriting Fifield's sexuality.

You can also overwrite Mayu's sexuality depending on the path you've chosen. This costs one Essence of Lust - Male and three Essences of Guilt.

Seeing as there are only two Essences of Guilt in the game, you'll have to craft the third in Mayu's Relationship room.

It is recommended that you don't change Mayu's sexuality before you're ready to pick an ending. Essences are in limited supply, and Jishogi is balanced to prevent contradictions in Mayu's actions.

Relationships
This is where you'll find the Crafting Thing. You can make up missing Essences here, as well as some miscellaneous items for more content.

Craftable Item
Recipe
Purpose
Peace Offering
Three Essences of Vengeance, one Essence of Love
Access Mayu's Mid-term Memory, forgiveness option in the finale.
Essence of Vengeance
Three Essences of Anger, one Essence of Joy
A third Essence of Vengeance is needed to craft the Peace Offering. Also needed for the Dark Love and Bad endings.
Terrifying Visage/Essence of Terror
Two Essences of Fear
Take the camera from Fifield, key component for the Desire ending.
Essence of Guilt
Two Essences of Fear, three Essences of Pain
The third Essence of Guilt needed to change Mayu's sexuality.
Binding Manacles
Two Essences of Vengeance, seven Essences of Pain
Used to successfully CW:violate Fifield, necessary for the Desire ending.

It is recommended that you don't craft anything before you're ready to pick an ending. Essences are in limited supply, and Jishogi is balanced to prevent contradictions in Mayu's actions. You can't craft both the Peace offering and Binding Manacles, for example.

Early Memories
Remember that one time you tried to watch a memory and it got interrupted? Good news! It's ready. Hit it up for an Essence of Love.

Mid-term Memory
If you've crafted the Peace Offering, you can access the ultimate trial in the Memories room. Beat that and you'll find the secret memory, the sole requirement for a certain achievement.
Act 3b: Before the End, Away
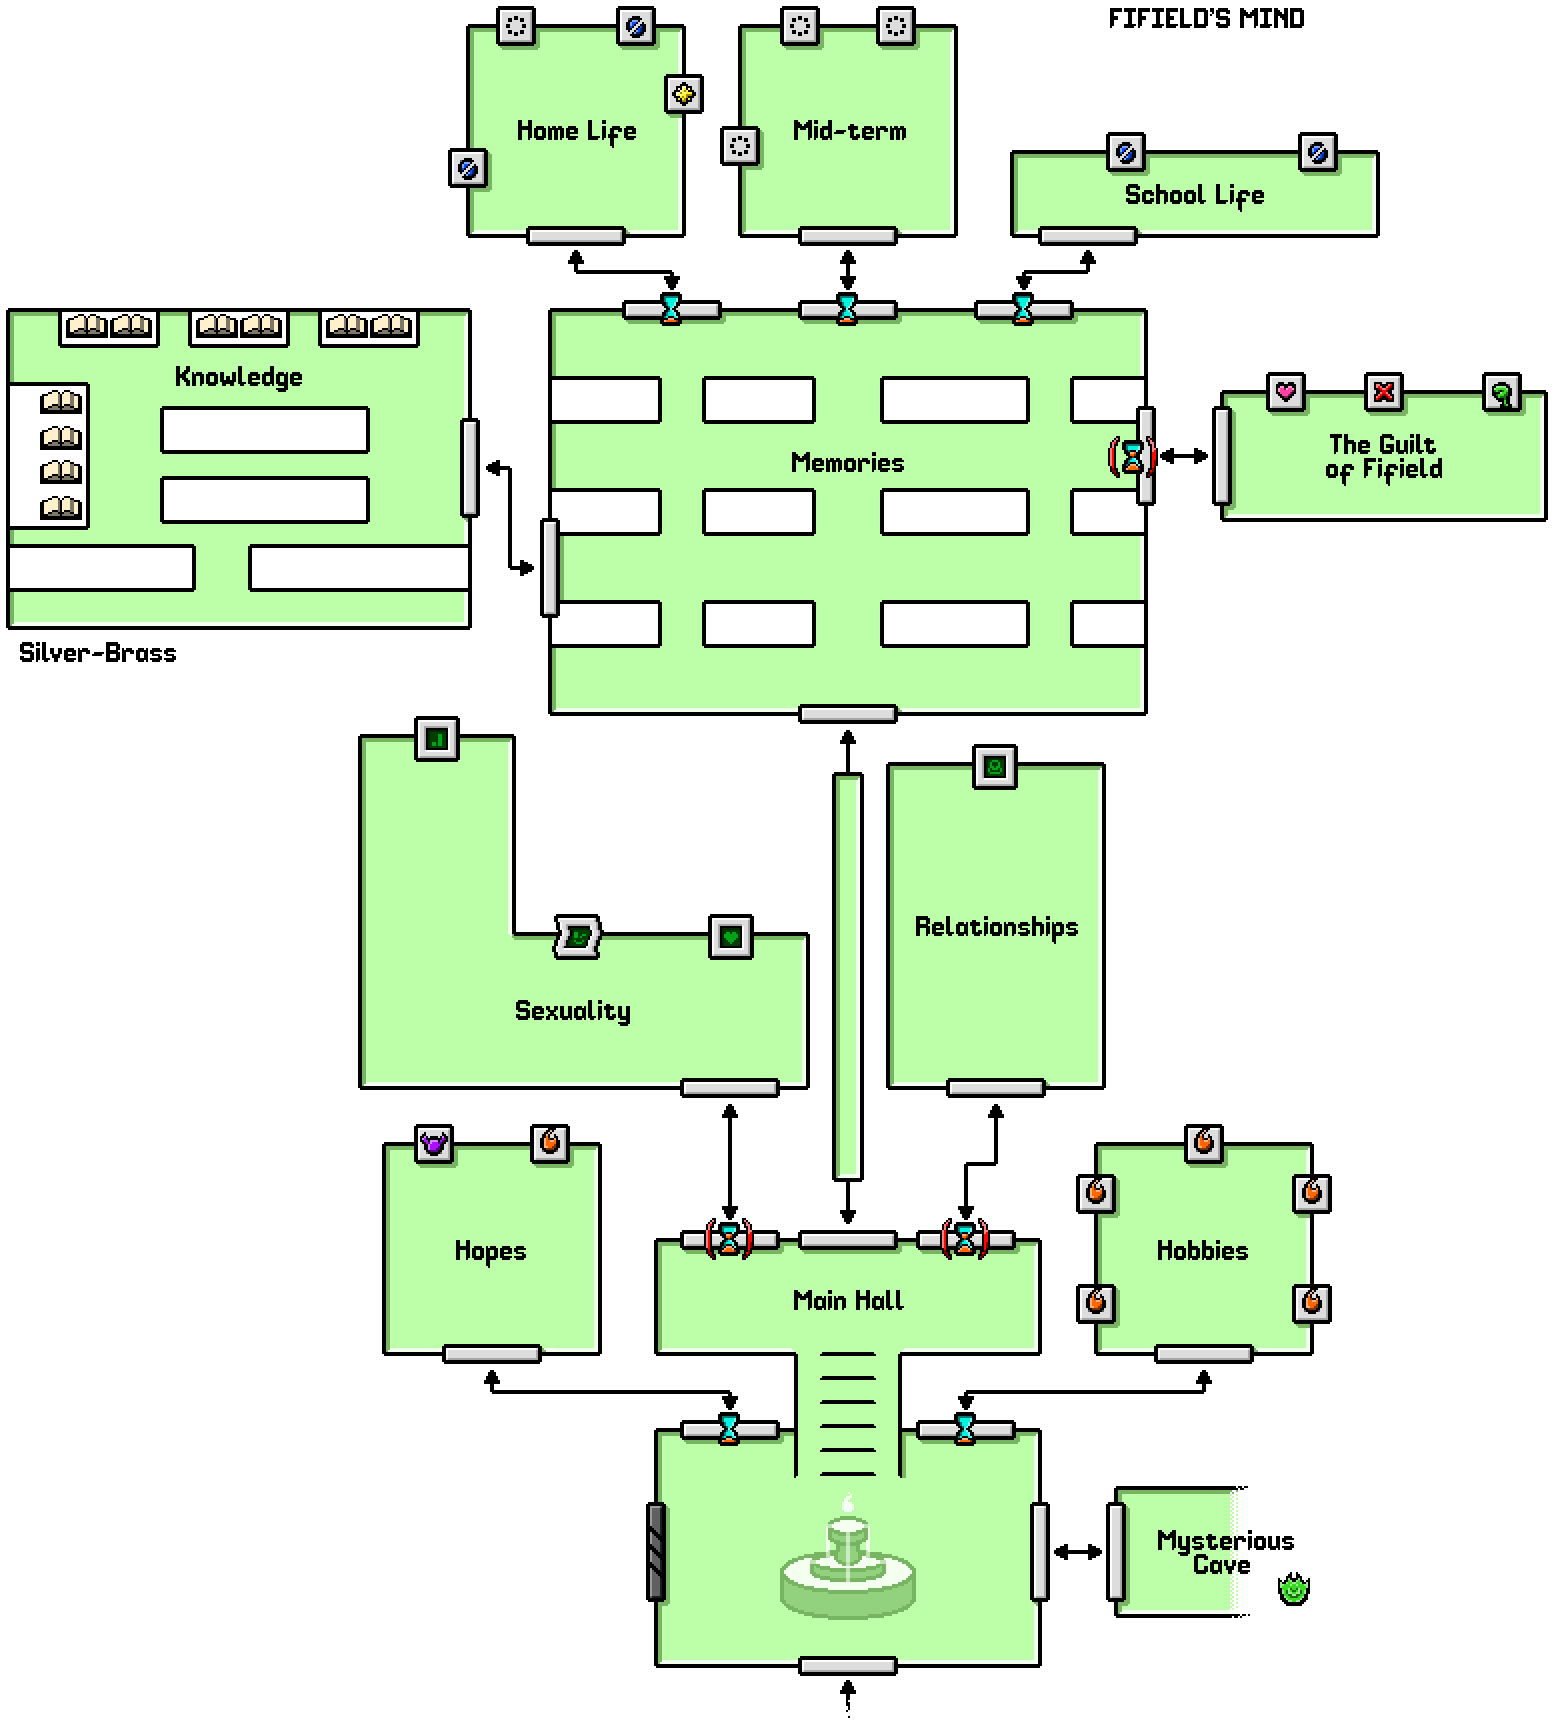
There isn't as much to do in Fifield's Mind as there is in Mayu's, and a good chunk of it is just grabbing what you missed in Act 2. I won't be going over the tasks that were already explained in the sections above.

Fifield's Mind
?'s Room
Much like in Mayumain, you can find Fifield's figment's rooms. You've already been to one, in fact, back in Act 2. That one's inaccessible now, though. Not only that, access to Fifield's Superego will be blocked unless you sided with Mayu's Superego earlier. The figments see everything the hosts do, after all.

Sexuality
You can access this corridor early if you picked it as your Major Task in Act 2. There wasn't much you could do, though, aside from nab the Essence of Lust - Male.

Now, however, you can get to the meat and potatoes of it all.

If you access Fifield's Sexuality Terminal, you can still copy Fifield's Essence of Lust - Male, but you can also overwrite her sexuality using the Essence of Lust - Female from Mayu's own Sexuality corridor, plus an Essence of Joy and an Essence of Vengeance.

It should go without saying that making Fifield gay means you can't copy her straight profile anymore, so grab that first.

Then there's Fifield's Attraction Terminal. If you'd like to go one step further, you can spend one Essence of Vengeance and two Essences of Love to try and force Fifield to fall in love with Mayu.

It is recommended that you don't change Fifield's sexuality before you're ready to pick an ending. Essences are in limited supply, and Jishogi is balanced to prevent contradictions in Mayu's actions.

Relationships
This is another room you can access early if you pick it as a Major Task. Funnily enough, though, you could get everything there is to get here. It's entirely up to personal preference when you visit this room.

Using Fifield's Relationship Terminal, you'll get to read a bit more lore. You can also interact with Mayu's entry. By spending two Essences of Joy and two Essences of Fear, you'll earn points towards a more positive ending, as explained in the Endings section.
Endings: Point-based
There are two groups of endings; point-based endings and triggered endings.

Point-based Endings
In order to attain a point-based ending, all you have to do is have a successful final conversation with Fifield on the Mind Bridge. You must also avoid making specific choices that cause triggered endings, as these will override the point-based ones.

To gain points, you can:
  • Access the Relationship Terminal in Fifield's mind and use the Mayu entry to calm her down,
  • Tell Fifield that you'd like to make amends,
  • Empathise with Fifield,
  • Craft the Peace Offering in Relationships, Mayu and present it for a massive bonus,
  • Change Mayu's sexuality and inform Fifield,
  • Reinforce your hobby of choice in Mayu's Hobby room and tell Fifield about it.

You'll lose points if you:
  • Empathise poorly,
  • Demand the camera. Demand it more firmly for a bigger penalty, or,
  • Craft the Terrifying Visage in Relationships, Mayu and use it instead of threatening for a massive penalty,
  • Take try to CW:violate her, or,
  • Take craft the Binding Manacles, and use them while trying to CW:violate her.

Please note that using both the Terrifying Visage and the Binding Manacles will trigger a different ending. Using one is overkill as is.

Indifferent
Earning negative points scores you the Indifferent ending. Threatening Fifield for the camera is typically more than enough to cause this ending.

Neutral
You will get the Neutral ending by default. There are no special requirements, just end the conversation and be done with it. In fact, getting the Just Get It Over With achievement will guarantee this ending.

Good
Gaining positive points nets you the Good ending, which requires a showing of good faith. Empathising with Fifield is usually the quickest way to do this.

Best
The Best ending needs you to put in the effort. You don't need to bag every available point, however. You can skip reinforcing your passion for chess or shogi, for example, and skirt by with the peace offering, and vice versa.
Endings: Triggered
Triggered endings overwrite point-based endings. Since they require a bit of effort, you don't really have to worry about getting them accidentally. You should, however, pay attention to which Figment's side you take, if any. Check this table for the triggered ending you're aiming for and who'll allow or block it.

Id
Ego
Superego
Dark Love
Yes
Yes
No
Desire
Yes
Yes
Yes
Bad
Yes
No
No

As for the steps, they'll be in a numbered list to make things easier to track.

As you can see, siding with Mayu's Id keeps all the triggered endings open to you. Interestingly enough, Mayu's Superego raises no objections to crafting or using the Terrifying Visage and Binding Manacles.

Dark Love
Dark Love is relatively straightforward. Your mission is to turn Fifield into your waifu.
  1. Break the seal on the door with the huge scissors and enter Sexuality, Mayu.
  2. Walk to the end of the room and use the Sexuality Terminal to copy Mayu's orientation. This will give you the Essence of Lust - Female.
  3. Return to Fifield's Main Hall and break into Sexuality, Fifield.
  4. Walk to the end of the corridor and, using the Sexuality Terminal, change Fifield's orientation by overwriting it with the Essence of Lust - Female, Essence of Joy x1, and Essence of Vengeance x2.
  5. On the way back-- before you leave the room --use the Attraction Terminal to make Fifield fall in love with Mayu for Essence of Vengeance x1 and Essence of Love x2.
You're done! This ending is now unavoidable, unless you convert it into a Bad ending. Just go to the Mind Bridge and see things through.

Desire
Achieving the Desire ending kills a part of you, as it should.
  1. In Relationships, Mayu, use the Crafting Thing to create the Terrifying Visage and Binding Manacles.
  2. Go to the Mind Bridge and have your final talk with Fifield.
  3. Demand the camera.
  4. Demand the camera again, but instead of threatening her, use the Essence of Terror to take it by force.
  5. Attempt to CW:violate Fifield. when given the option, deploy the Shackles.
The ending is set in stone the moment you use the Binding Manacles. While nothing is explicitly shown, it's left crystal clear what takes place.

Bad
This is Dark Love with extra steps. Pay attention or you might fumble this by accident. Your goal is to make Fifield gay and obsessed with Mayu, and turn Mayu straight as revenge.
  1. Side with Mayu's Id and threaten Fifield at the end of Act 2.
  2. Break the seal on the door with the huge scissors and enter Sexuality, Mayu.
  3. Walk to the end of the room and use the Sexuality Monitor to copy Mayu's orientation. This will give you the Essence of Lust - Female.
  4. Return to Fifield's Main Hall and break into Sexuality, Fifield.
  5. Walk to the end of the corridor and use the Sexuality Monitor to copy Fifield's orientation. This will give you the Essence of Lust - Male.
  6. Using the same machine, change Fifield's orientation by overwriting it with the Essence of Lust - Female, Essence of Joy x1, and Essence of Vengeance x2.
  7. On the way back-- before you leave --use the Attraction Monitor to make Fifield fall in love with Mayu with Essence of Vengeance x1 and Essence of Love x2.
  8. Backtrack all the way to Mayu's Palace and drop by Relationships. Use the Crafting Thing and make another Essence of Guilt.
  9. Re-enter Sexuality, Mayu. Walk to the end of the corridor and, using the Sexuality Terminal once more, change Mayu's orientation by overwriting it with the Essence of Lust - Male and Essence of Guilt x3.
You're now locked in! Head over to the Mind Bridge and give Fifield what-for. Hope you know what you're doing... Spoiler warning: You 100% don't.
Achievements
Starting Steps
Granted after leaving the Intro Courtroom.

Grand Event
Watch the big memory from the High School room.

The Reveal
Awarded after leaving the room behind the steel door in Desire.

The Reversal
After gaining the keys to the kingdom, you'll get this after Fifield realises what's at stake.

Free Reign
This pops up once you talk Fifield down from breaking the big, big seal.

The End
Hit up the Mind Bridge and get things moving.

Just Get It Over With
Hit up the Mind Bridge immediately after achieving Free Reign and go, go, go. No chewing the fat, just go.

Board Wizard
Complete every trial in the game and this is yours. Fully explore Mayu and Fifield's minds in Act 3, and don't forget to craft the Peace Offering in Relationships, Mayu to unlock the doozy in Mayu's Mid-term Memories. And, just in case you missed it, skipping puzzles by pressing 1 on the keyboard still gives credit towards this.

100%
Get all the other achievements, and then beat the game again. It'll pop up at the start of the credits, just like the other ending achievements did. Once you have this, you can check out a little of the developer's thought process in the Extras Menu.

Ending Achievements
Indifferent
Score negative points in the talk on the Mind Bridge.

Neutral
Don't bother gaining or losing any points during the Mind Bridge conversation. You'll most likely get this one going for the Just Get It Over With achievement.

Good
Gain a few points in the chat on Mind Bridge. Simply empathising with Fifield at the Mind Bridge can do the trick.

Best
Make up! Score enough points when talking to Fifield, help her renounce the chains that bind her.

Dark Love
Overwrite Fifield's sexuality and force her to fall in love with Mayu.

Desire
Craft the Terrifying Visage and Binding Manacles and use them during the conversation on the Mind Bridge.

Bad
Get revenge. Swap Mayu's and Fifield's sexual orientations, and force Fifield to fall in love with Mayu.
Changelog
v0.1.3, 2023/10/05: Added a map to Act 2a. The maps aren't terribly necessary, but they help speed up pathfinding since all the doors are identical.
v0.1.2, 2023/10/04: Couple more touches, mainly adding a quick aside to the Figment essay and explaining why you'd craft the Essence of Vengeance.
v0.1.1, 2023/09/30: Just some minor clean up. I was still making up my mind on what to what to call the figments, but now they're properly classed between id, ego and superego. Originally we had Rebel Mayu, Timid Mayu, Conforming Fifield and Repressed Fifield.
v0.1.0, 2023/09/26: Released! It's not finished, but I didn't want to stall too long what with YouTubers picking up the game recently.

To do: Make maps for Act 2 & 3.
Figments
This section isn't really a guide to playing the game so much as it's meant to aid in understanding the figments. This will be chockablock with spoilers.

For starters, I will be referring to Mayu and Fifield as the Egos. They're the main conscious decision makers, mediating between and receiving counsel from the figments.

The figments, meanwhile, are Id and Superego. This isn't a perfect descriptor as they display signs of both, but it's as close as we'll get without making up some really, really long nicknames.

Superegos are driven by morality. In Jishogi, the Superego's morality is external, the rules forced upon the characters. They talk with a brighter font; yellow for Fifield's Superego, and near-white for Mayu's, symbolising holiness and righteousness. This is further pushed by Fifield's Superego's room being akin to a church.

The Ids, on the other hand, are driven by personal motivation. They buck society's trends and seek selfish desires. They're not as purely hedonistic as you'd expect an Id to be, however, operating with their own unique rulesets. They just want what's best for their hosts. Fifield's view of this selfishness is made clear by her Id's room being a dungeon.

With that in mind, it's a little clearer why Mayu's Superego aligns better with Fifield's Id and vice versa. Fifield's Superego has been convinced that friendship with Mayu is a sin, while Mayu's Superego has decided that friendship is the morally correct course.

Fifield's Id is horrified by the Ego's treatment of Mayu while the Superego rejoices despite being "morally just". Fifield's abuse at the hands of her controlling mother is the source of this contradiction.

Even Mayu's Id passes moral judgement. Despite having some evil inclinations, they're channelled, not fired like a scattergun. She goes out of her way to advocate protecting a classmate, despite it putting Mayu in harm's way. This lines up with her rebelling against the rigid code of society.

Interestingly enough, if you pay attention during the Desire ending, Mayu's Superego is dead silent. When the Ego is comforted, she's comforted by the Id, despite the Id outright stating she'd never be able to forget or let go of Fifield when talked to in her room. Mayu's Id either got her fill over the months, or she's lying to help pull Mayu out of her slump.

In short, the figments aren't purely the angel and devil on the Ego's shoulders. They're intelligent, they both want what's best for their Ego, and the nuance lies in who sets the rules they follow.


After data-mining the game, I can confirm that I was right; the figments are indeed Mayu's and Fifield's Id and Superego. It's really neat to see how much psychology was poured into this game!
11 Comments
Kayo Moon 2 Jul, 2024 @ 8:10pm 
Hello! I have returned to confirm that the backspace key DOES indeed skip the trials. I'm so happy that there's a skip button so now I can fully return to the game without the stress of the trial puzzles. Not sure if the dev changed this, but I am glad the skip still exists.
Silver Hemswood  [author] 25 Jun, 2024 @ 6:44am 
Hey, thanks for the corrections in the comments! I can’t get to a computer to test it right now, but I’ll make some provisional changes to stop confusing people. Thanks again! <3
GamerRoman 9 Jun, 2024 @ 3:06pm 
I think you need to update the guide to change what the button is that skips the trials which is the backspace key.
Kayo Moon 4 Apr, 2024 @ 11:51am 
Also, update to the controls section, holding Ctrl will allow the player to walk 2x as fast. So it's basically a "run" button.
Kayo Moon 4 Apr, 2024 @ 11:44am 
Update to my previous post (and for this guide as well), pressing 1 on the keyboard DOES NOT work anymore. The dev removed the skip feature and replaced it with easy mode. Personally I would have preferred it if the dev had left it in alongside easy mode but its just comes down to how they want their work to be envisioned.
Kayo Moon 4 Apr, 2024 @ 11:26am 
I'm pressing the 1 on my keyboard but it's not working. It's the number row. Nothing changes when I press it.
TagTagSkip 19 Dec, 2023 @ 7:50pm 
Sorry, I get it and I made an own goal. I used to think "steamuserimages-a"--like images are from a forum, or webs like "steamdb.info". I thought they are different from steam's screenshot, the "steamproxy.com"--like .

In a nutshell, I have no problem of accessing the guide or its images, I just didn't make certain of the sources of the customized images then. I misunderstand their links and hope to collect them for using these images.
Silver Hemswood  [author] 19 Dec, 2023 @ 7:28pm 
Hi, TagTagSkip! I don't know why you wouldn't be able to access the guide or its images directly in a web browser. All the icons I made were uploaded directly to Steam through the guide interface, and they load up okay on my phone and computer in Steam and outside of it.

What are you hoping to do with the images?
TagTagSkip 18 Dec, 2023 @ 10:27pm 
Hello, I notice all the customized icons you use for the guide, so I hope to consult you about kind of irrelevant questions, as a community starter. :quirrel:

The sources seems are "steamuserimages-a"--like. Is there any entrance to community-made images? How do I get access to these images? The "main website" can't be visit direactly.
Silver Hemswood  [author] 11 Oct, 2023 @ 9:30pm 
Hey, thanks for the insight! Could have sworn going neutral still blocked Fifield's Superego chat on the save that focused on her memories, but I'll take another look.

As you probably guessed, I did take a look at some the files to verify which choices did what. The requirements are pretty low and easy to meet so I wasn't terribly fussed about every point, but that's good info to have.