Rolling Line

Rolling Line

Not enough ratings
Train AI an unofficial guide
By stuuky
A further explanation of Rolling Lines AI system
   
Award
Favorite
Favorited
Unfavorite
Train AI an unofficial guide
Introduction
The AI system in Rolling line can feel very limited, even simple merging tracks will eventually cause a collision between trains. Frustrating, I know. However, fret naught for I have found some solutions to urgent problems, and some more frivolous applications of Rolling Line’s AI system.

Before continuing with this guide I assume you are familiar with the basic functions (and limitations) of the AI system in Rolling Line (RL). I also recommend Reading AI the official guide by Franks before continuing. You can see this as an expansion on the groundwork laid out there.

https://steamproxy.com/sharedfiles/filedetails/?id=2753143585
Basic priciples of advanced AI
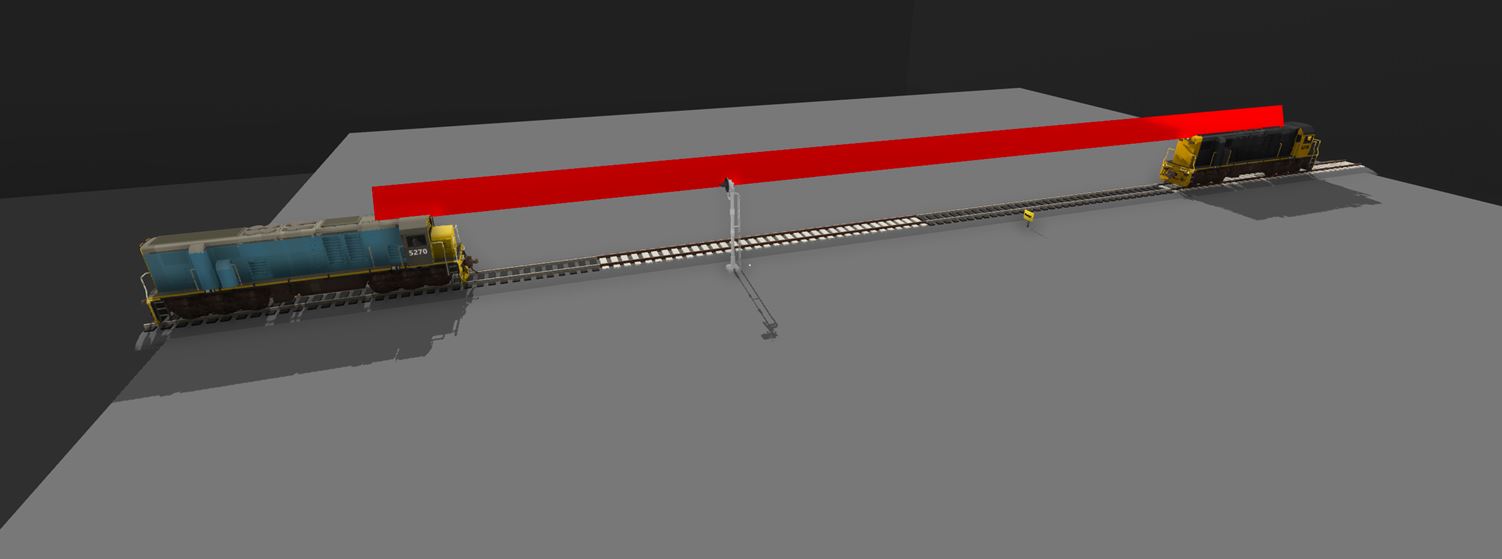
Almost everything you are about to read rests on the simple -first- principle: (reverse viewing) with a signal and reverse sign a train can scan a piece of track without driving over it. That might sound quite confusing so let me explain with an image.
As you can see the blue locomotive can’t continue driving forwards because the signal blocks it.
When the track is unobstructed the loc will continue. However, it encounters a reverse sign and it starts moving backwards. Thus, it never arrives on the position of the black locomotive. What you just saw is a very important principal. The blue loc scanned a piece of track however in never drove there.


The second principle is very simple. But I felt I had to just say it again because I will be using it a lot and won’t explain it any further. This is that a train can drive over a switch which is pointing in the wrong direction.
This train is moving over a switch that is pointing to the other track.
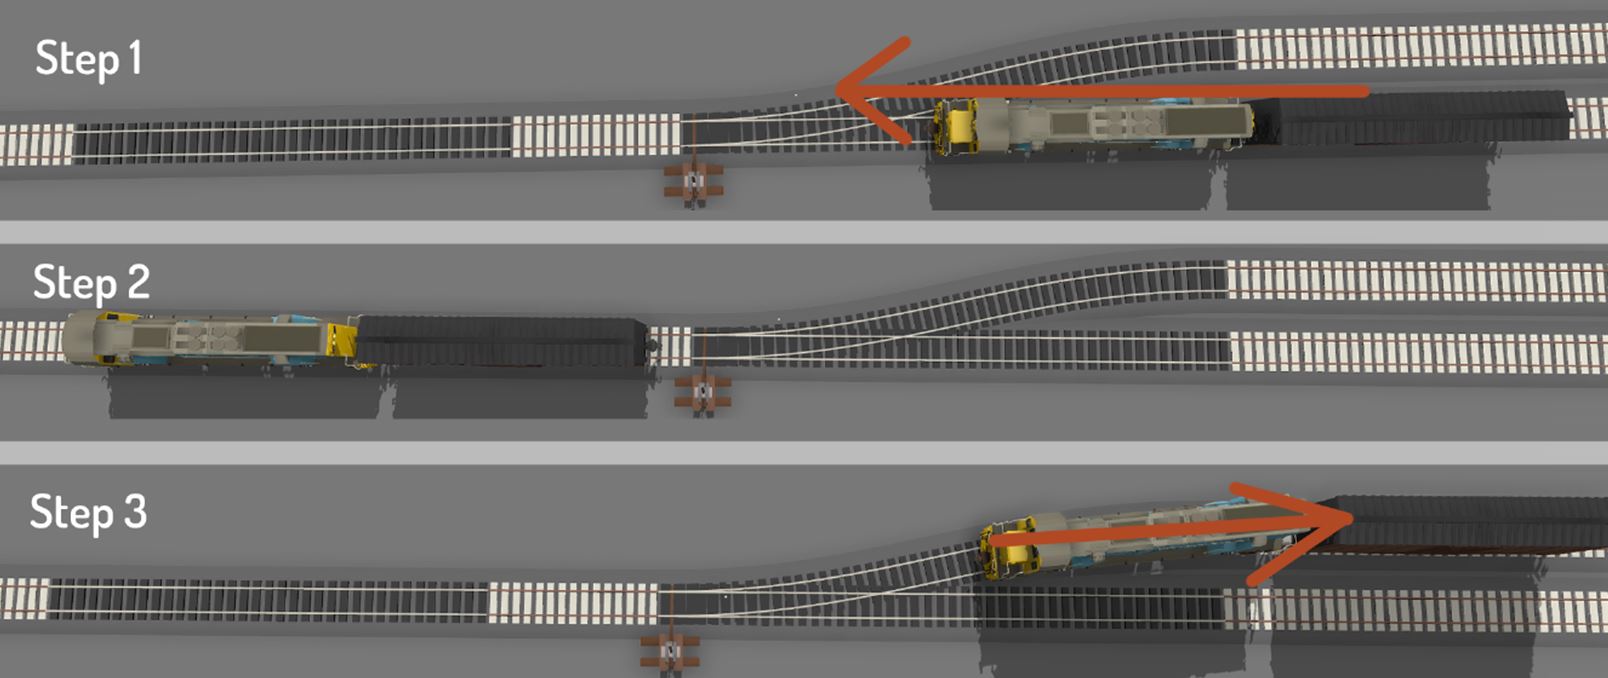
With this you can make a terminus station or just make a train drive the other direction without a large loop. All without ever having to flip a switch.
The second principle in three simple steps. This can be easily automated by putting down a revers sign. (just make sure the train has fully cleared the switch when starting to reverse, unless you want multi-track drifting, if you do want that I have written about that further in the guide)
The second and first principle go hand in hand as you can use this to have a train scan a piece of track and then move to a different track then where it started. Very useful.


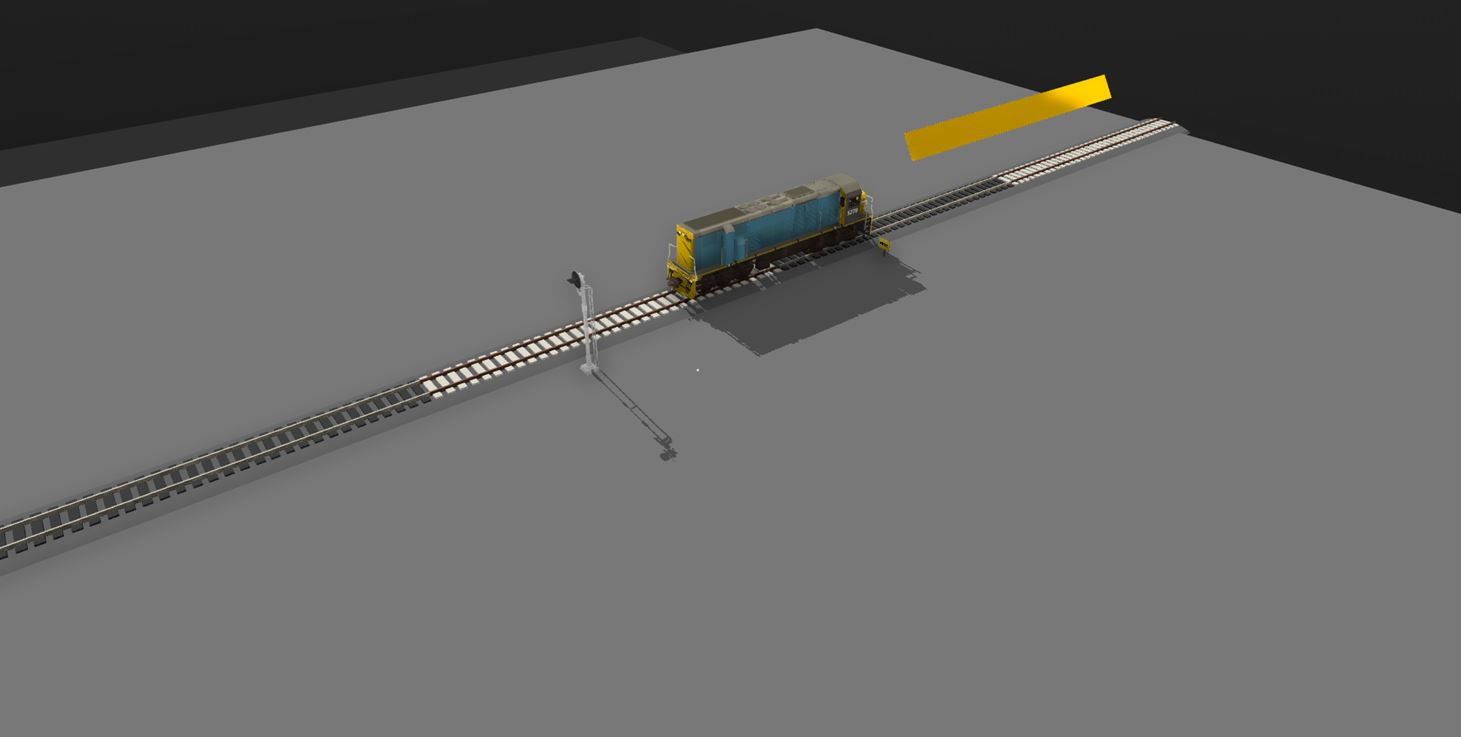
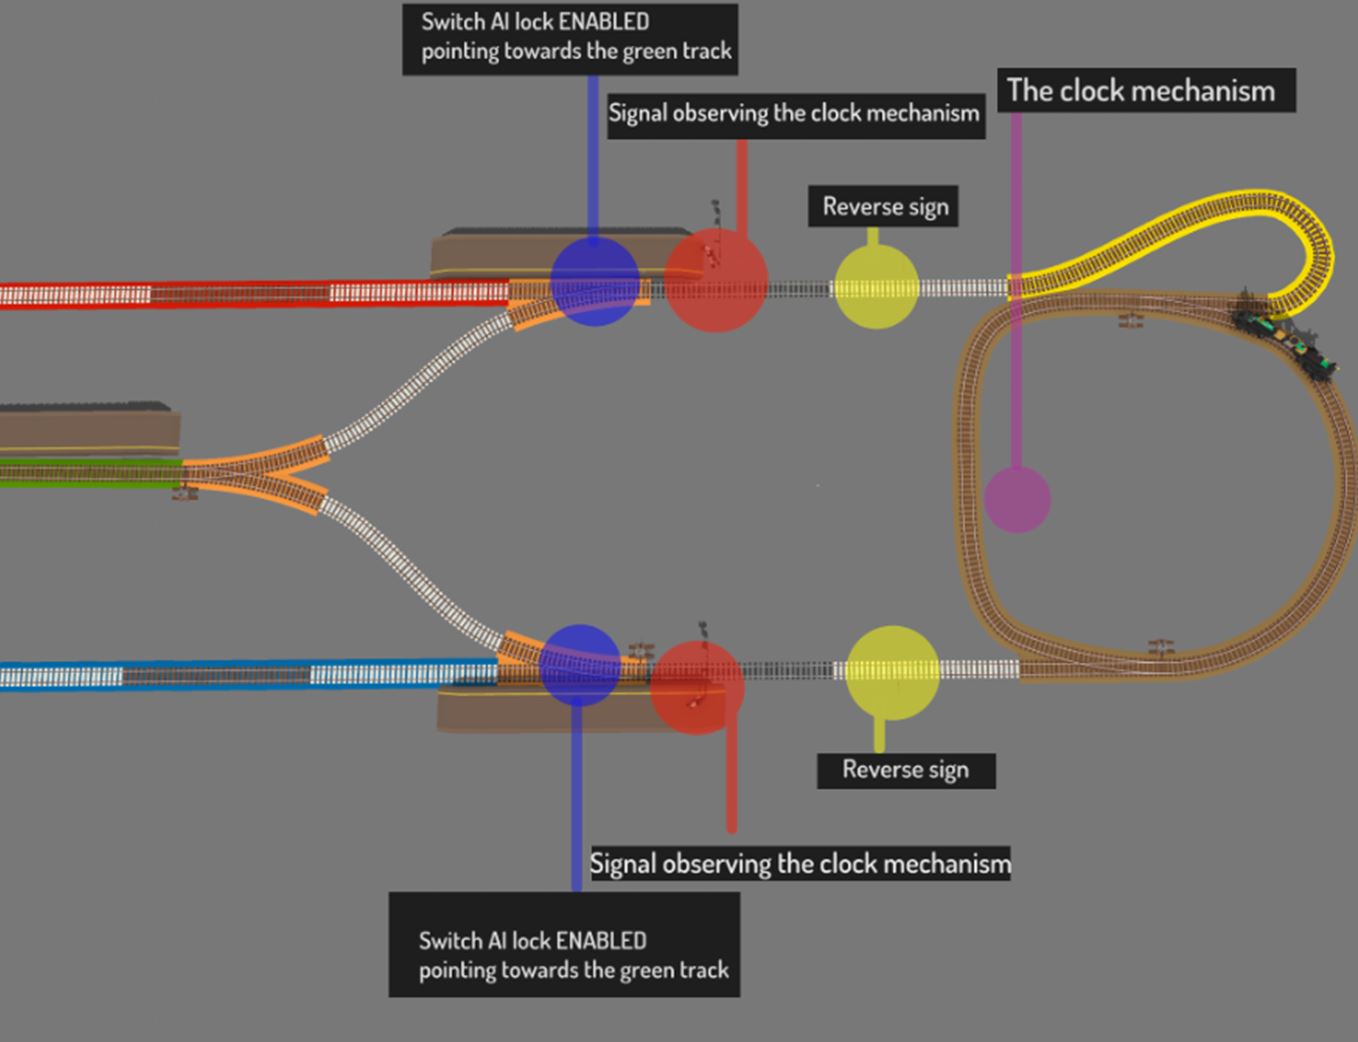
The third principle is that of the clock mechanism, this can be derived from the first principle. As you have red above a piece of track can be scanned by a train that never drives there. The clock makes full use of that fact.
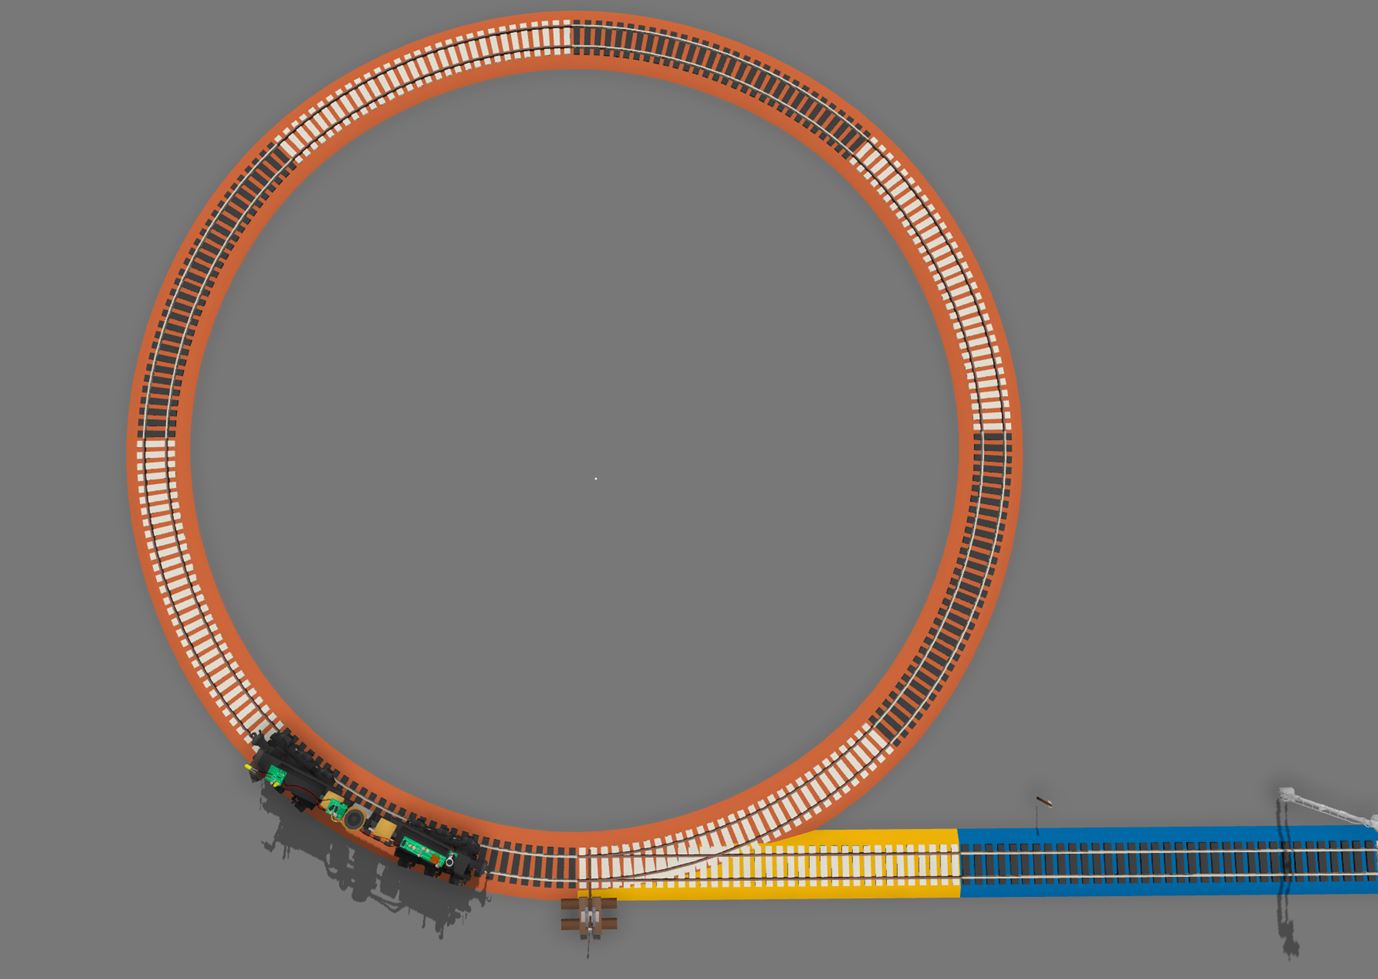
On the orange track there is a loc that drives forever in a circle.
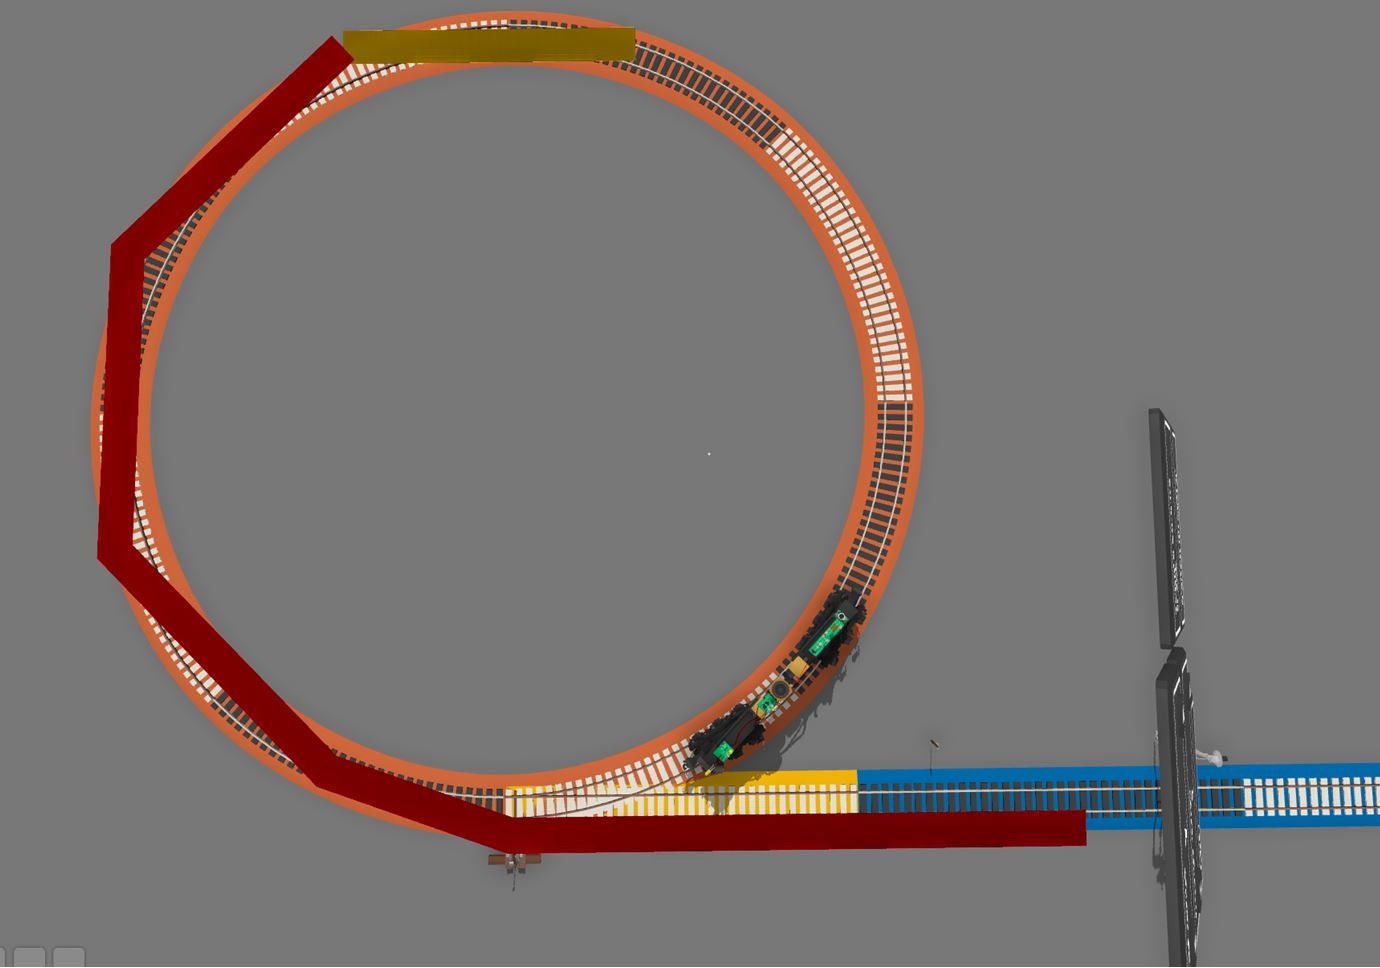
The signal on the blue track can however not always see the loc on the orange track. Because of that a train on blue will sometimes be blocked by the loc on the orange track, until it is out of view again. Then the train on the blue track drives forward because of that it encounters a reverse signal further down the blue track.
That is the clock system in a nutshell. As you can see it is a way to make a train wait until it has a window of time to reverse out of the clock.
A clock can have several tracks observing it, just make sure that the red ranges overlap a bit to prevent two trains having the ability to move out of the system at the same time. That can happen when a train arrives at the end of its time slot and the next one is already waiting to move.


The fourth principle I would like to explain, I won’t be using it a lot but it is still very interesting. That is the principle of the signal deceiver. This has everything to do with how Rolling Line handles collisions between trains. Trains can collide on their main mesh (body) and on the coupling. There is no collision detection on the wheels. So if you would make a mod of a piece of rolling stock without a body and with the coupling very far out, a train can drive over it without any problems. Signals however don’t care that the coupling is very far out and that the wagon has no body, it still detects a train blocking the track. With this information I present to you, dear reader: the Signal deceiver, available on the workshop right now!
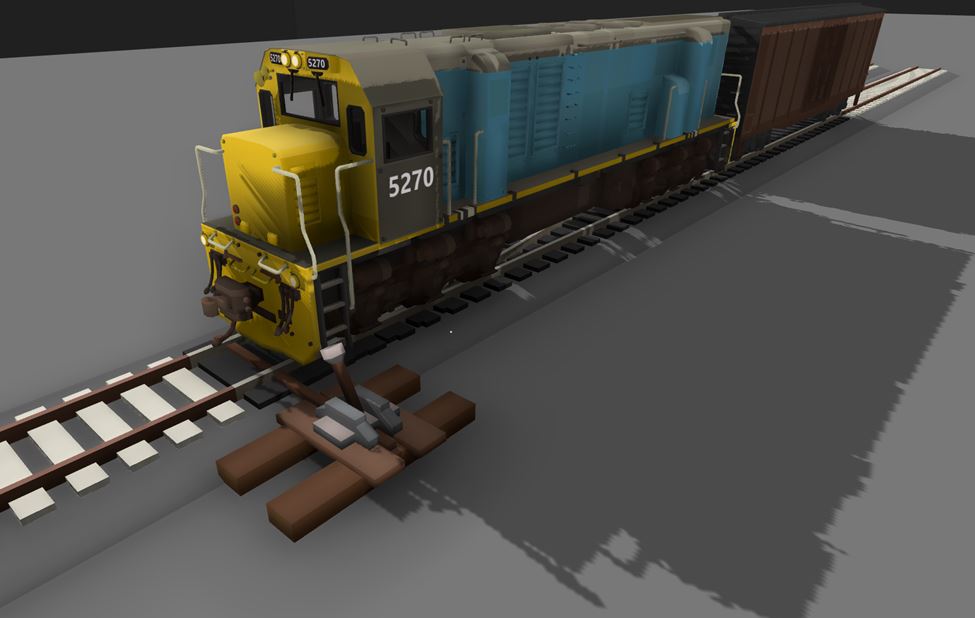
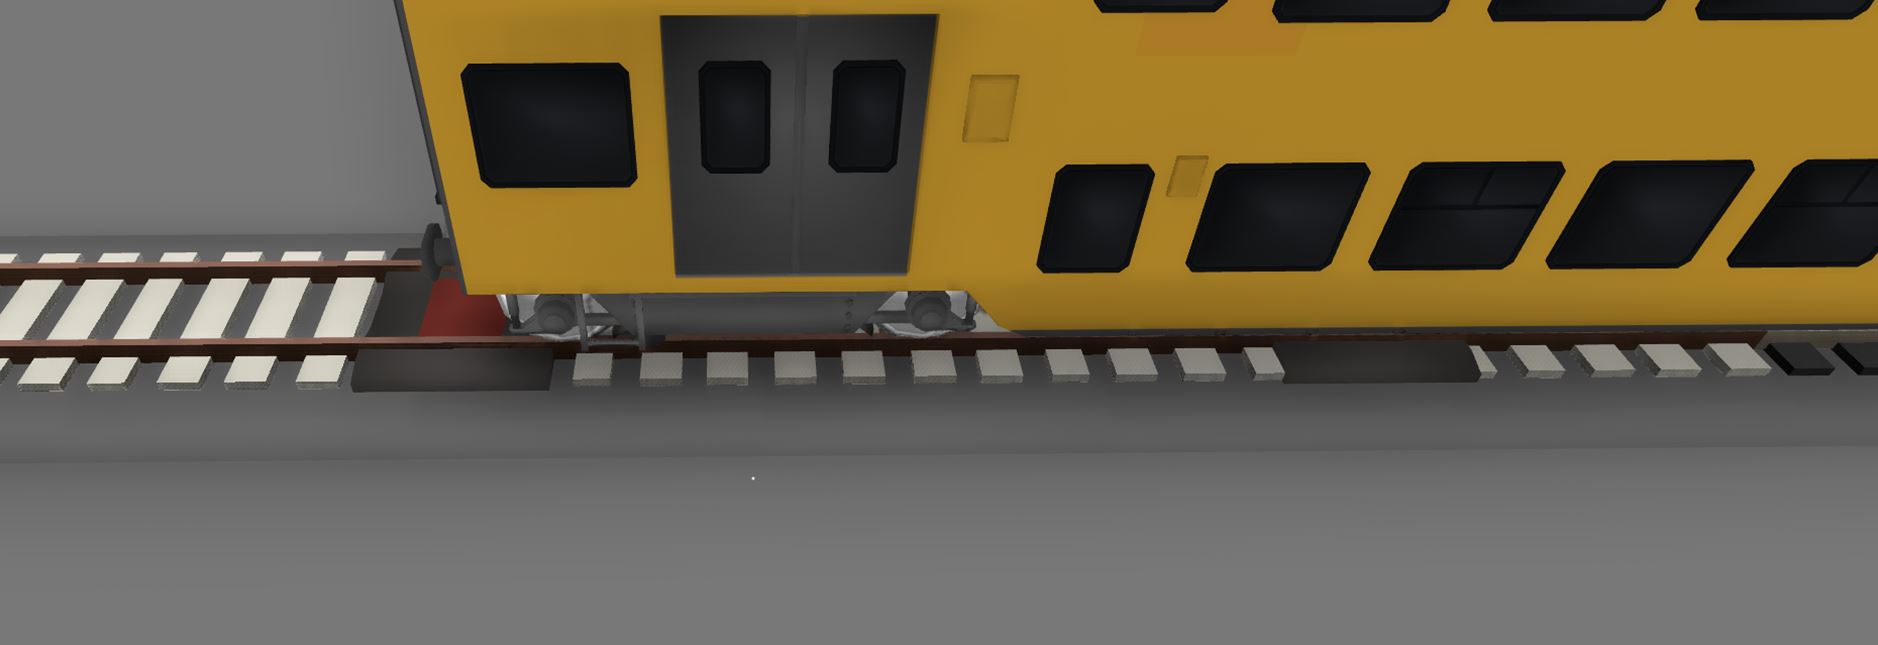
This is an image of one (single) signal deceiver. The bogies (wheel bits) have been made to look like a track add on.
As you can see this coach is running over the deceiver without either of them derailing.
Just please note that the signal deceiver I have made the coupling is far out, but not way off beyond the horizon.
So just make sure that there is no track below the coupling because remember: it is the only part that a train can crash into.
A Signal only looks at the deceiver not the coupling. So it can be used to manipulate what is viewed as a safe track to drive over.
This is an example of safe track work with the signal deceiver.

shameless self promotion, this is the link to the signal deceiver on the workshop:
https://steamproxy.com/sharedfiles/filedetails/?id=2983422654
Short note on colors
As you may have seen I paint the ballast and the sleepers. Let me explain why.
I paint the sleepers so that you can easily see where track segments end (really helpful when working with AI)
I paint the ballast to understand what track serves which function and to be able to refer to a specific track when explaining the system. I can point at stuff on my own monitor but I can’t use my fingers to point at stuff on your monitor. I try to keep a consistent system of colors especially when it comes to the colors I use most.
- Red: input track that has priority or is the catalyst
- Blue: input track that doesn’t have priority/only input track
- Green: output track
- Yellow: track that is not meant to be traversed by a train, it’s just there for the signals.
All other colors can have different meanings.

From now on I will also no longer be saying the yellow track or the blue track. I will be referring to the (painted) tracks by their colors.
The cool stuff: track merging
Now that we are done with the boring basics we can put these principles to use to do some cool stuff. The first thing I would like to explain is track merging. There are lots of ways of doing this actually. Let me first explain some ways you can do this with the reverse viewing principle. With this you get what I like to call a head on merging system. Because the trains on red a blue are moving in opposite directions you get a head on merge.
This is the simplest track merging setup. It’s reliable but not yet very fashionable.
Here a train can only move from blue to green if red is unoccupied. If a train is on red it can move to green if there is not already something on green.


A simple fix for the aesthetic shortcoming is the setup above (same signal setup). At least the red and blue tracks are running parallel.


This is basically the same setup as before (again) however instead of having the red a blue tracks ending up head on this system uses a reversing maneuver to create a more realistic looking way of converging tracks.


Okay now that we have head on merging covered lets talk about another form or track merging with the clock mechanism. In my explanation of the clock mechanism I only used one track looking at the clock however this can be as many as you like. Just remember to have the red ranges overlapping on the clock. Otherwise, the trains can get to close and crash on the green track.
The clock mechanism works well with track merging because it creates time frames in which trains are allowed to continue. And when a train arrives outside of that time frame it will stop to wait for the clock.
Here trains on red and blue will wait for their turn (as dictated by the clock) to move to green.


The final way of track merging is with the signal deceiver. With this you can merge tracks that are running parallel to each other without the trains having to reverse.
A train on blue can only go to green if there is no train on red. A train on red can only go to green if there is no train on green. Also, because there is a short time between when a train on blue has passed the signal scanning red and coming on green this system is more stable if red is very long so that a train coming in on red will have to still go quite a way before merging, giving the train departing from blue enough time to reach green. Before a train on red arrives at its signal scanning green.
Logic gates
Computers work on the principle of logic gates. Logic gates come in several types. They react differently on the input given to them if they are of a different type. In rolling line logic gates can be recreated. Please note I have not recreated every type of logic gate I have made only made 3.


Signal Inverter (not a logic gate type)
If there is a train on red then a train can move from blue to green.
The signal inverter is built around a sort of clock mechanism. A loc moves back and forward on purple, between the reverse signs. When there is a train on red the signal on purple will block the back and forwarding and the loc flips the switch on purple. The loc moves to orange. The signal on blue can’t see a train on purple anymore thus it allows the train on blue to move towards green.


Multi track detection (NOR gate)
A train on blue can only move to green if there is not a single train on red. The gray marked tracks coming out of red are tracks that trains can use to access red.


One track can be used (NAND gate)
A train can only move from blue to green if either red is unoccupied or there is one train on red.
Simple yard operations
The AI system can of course also be used for maneuvers such as changing the position of the locomotive or to make a one ended yard. Bellow I will demonstrate how I have made these systems.


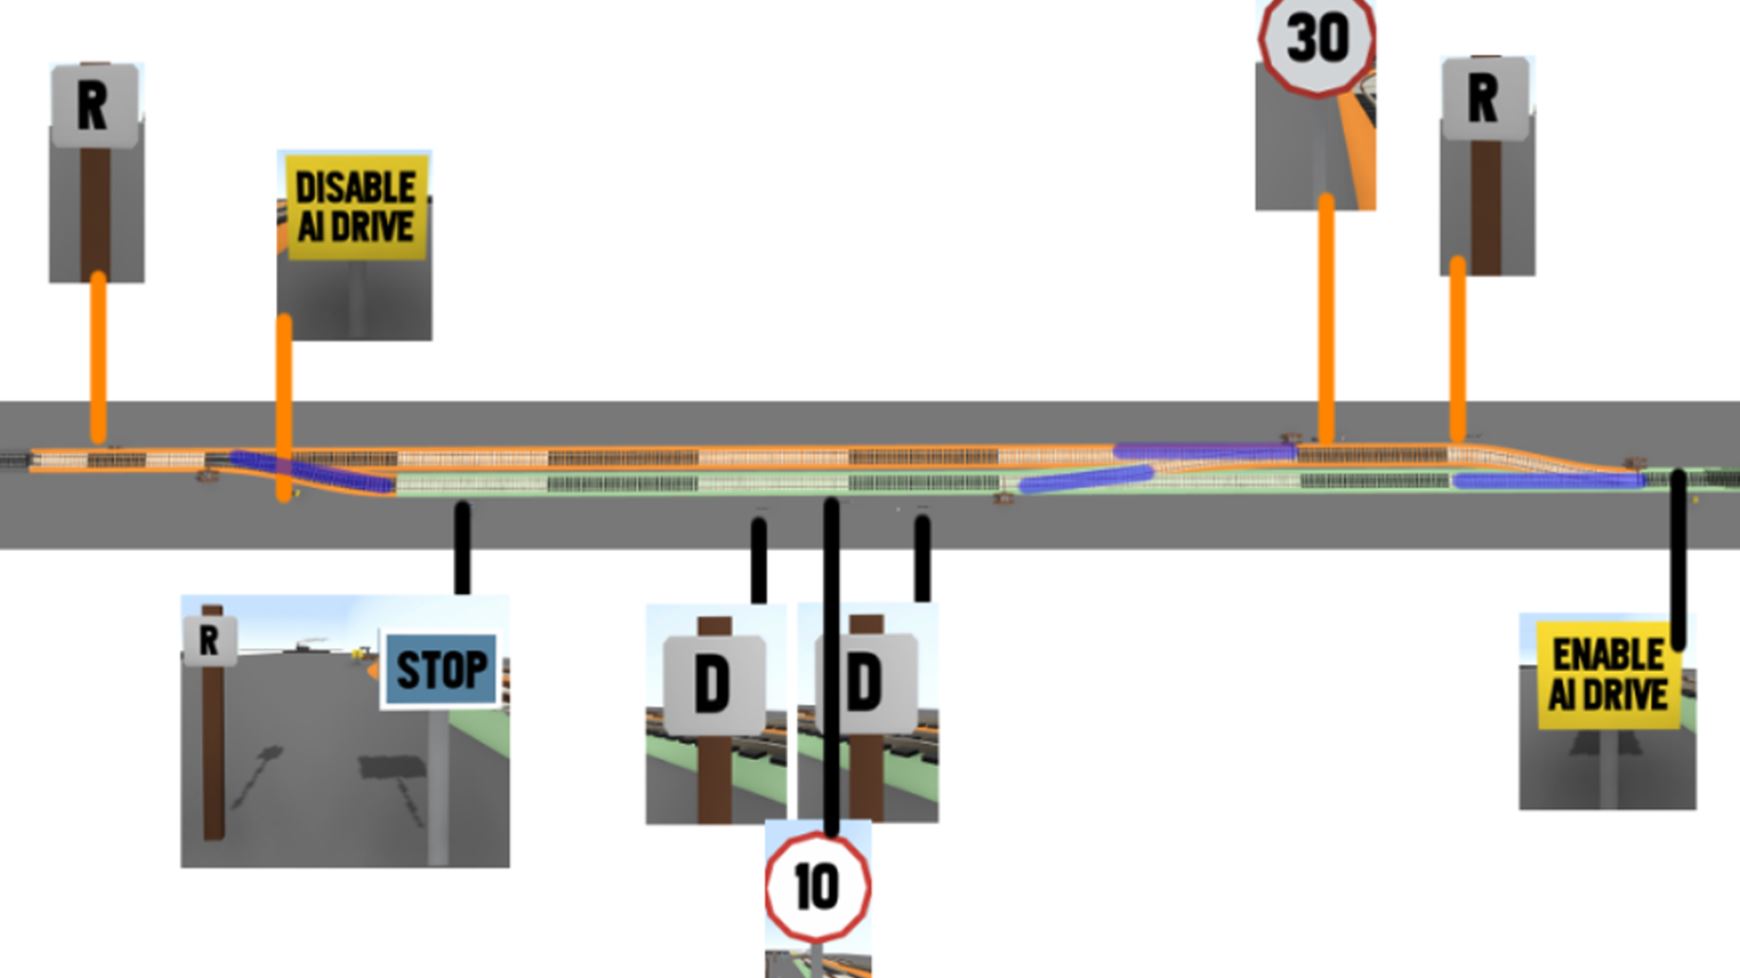
A system to move the locomotive from the back of the train to the front of the train.
Here a train comes in from the right side. It takes the first switch and stays on the green track. It arrives at the reverse sign (with an optional stop sign). When starting to move in the other direction the one directional decouple signs kick into action and the locomotive moves on its own to the reverse sign on the right of orange. It moves all the way to the left of orange where it reverses again. Then it takes the switch to the green track and the AI gets disabled to prevent the loc/train interacting with the signs on green. Then the loc couples and pushes the train out of the system.


But what about the other way round? What if you want the locomotive to pull the train when coming in to the system. Well then you would get this::
Here a train comes in from the right with the locomotive on the front. The AI gets disabled and the train drives over purple. Decouple signs can be configured in such a way that they will also decouple trains with AI disabled. The loc continues over the left switch AI gets enabled and the loc reverses over the orange track back to the start. There it encounters another reverse sign. Now the loc will move backwards and couple to the wagons. Then it encounters a reverse sign and it is on its way to leave the system.


Now it’s time for some yards where trains wait for a short bit. I’m sorry but I'm not covering shunting operations in yards with dedicated shunt locs. Though I do believe it is possible.

Double ended one way waiting yard
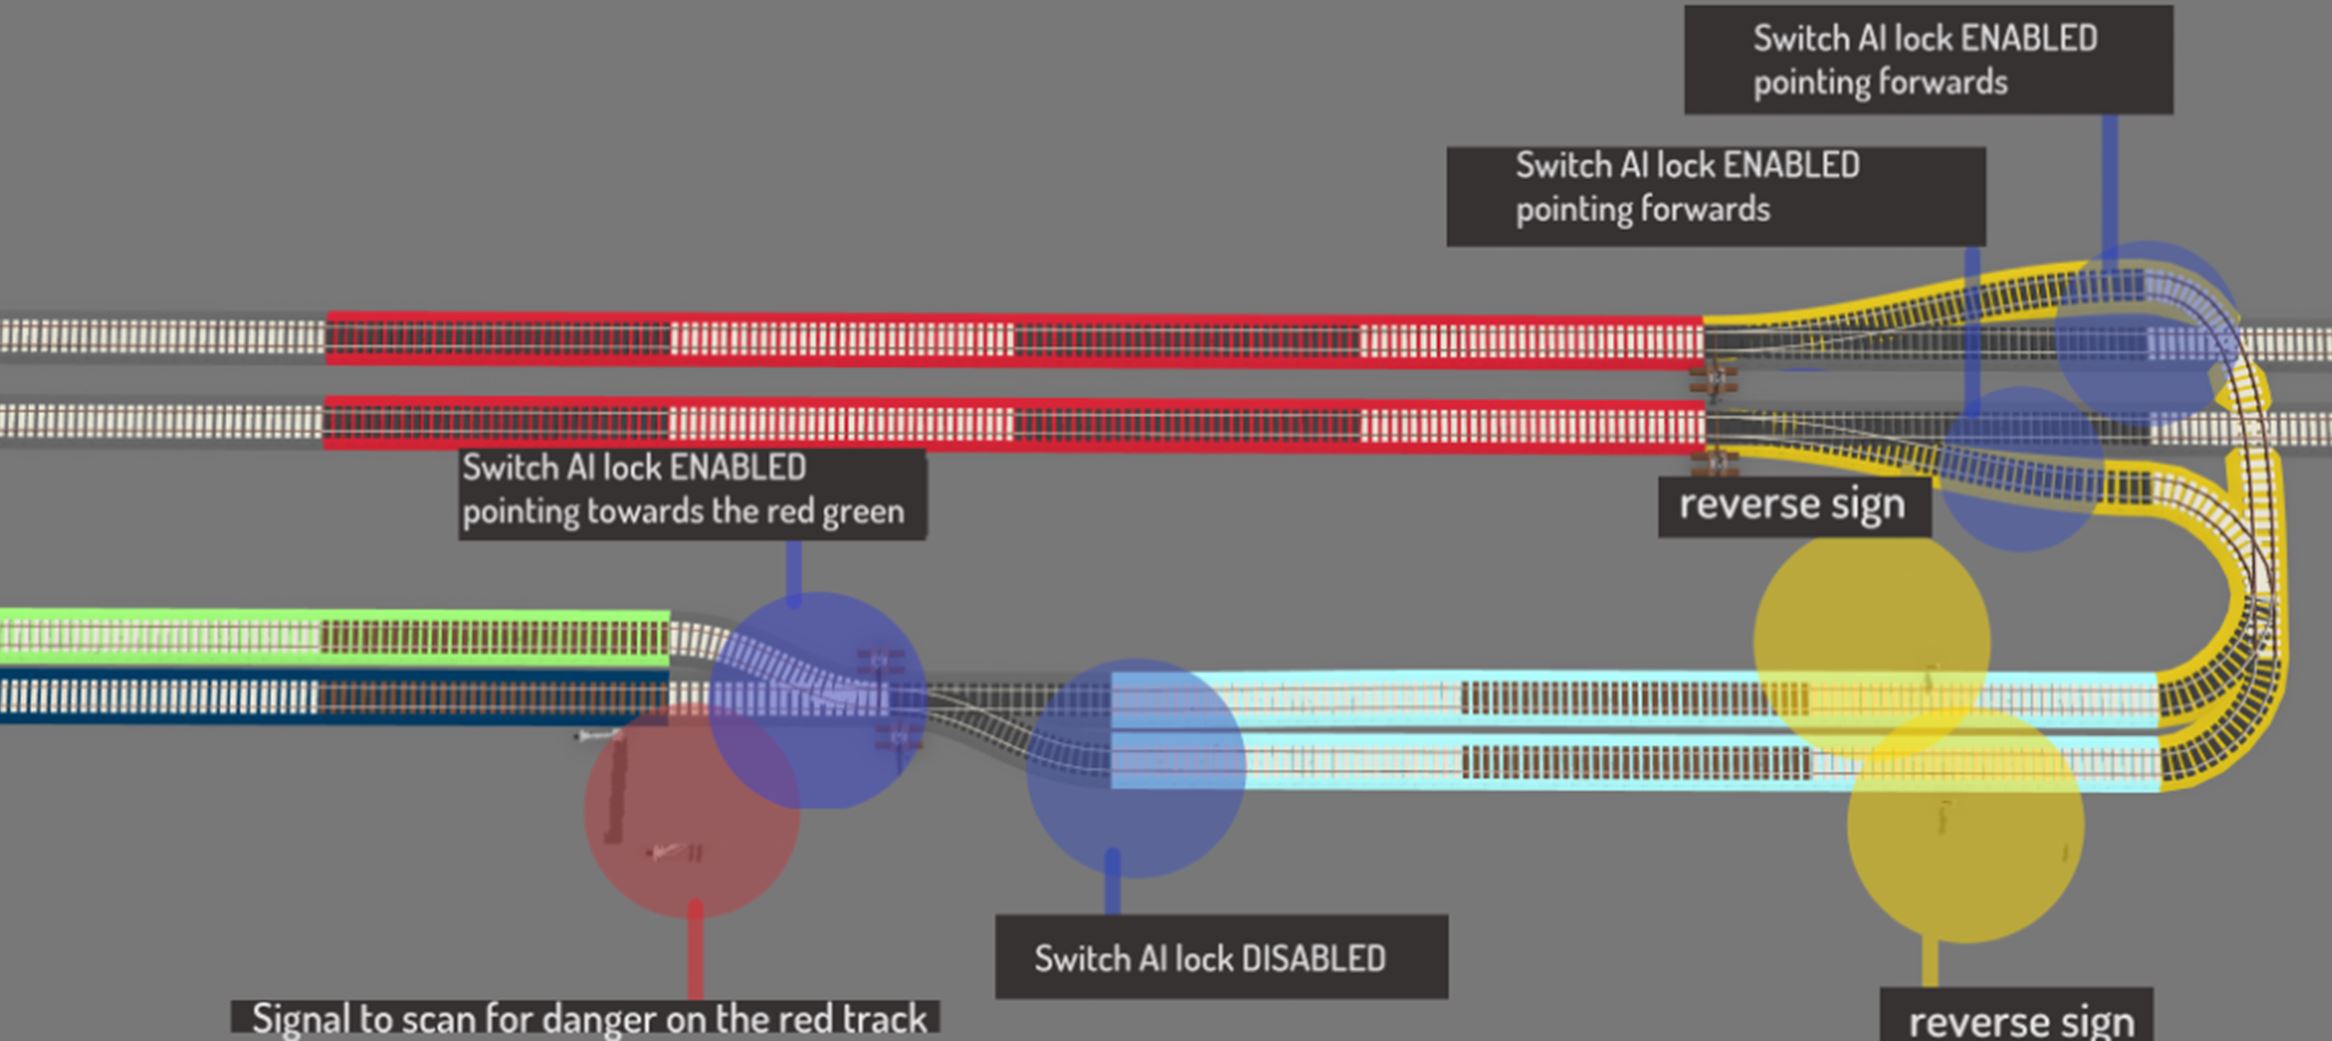
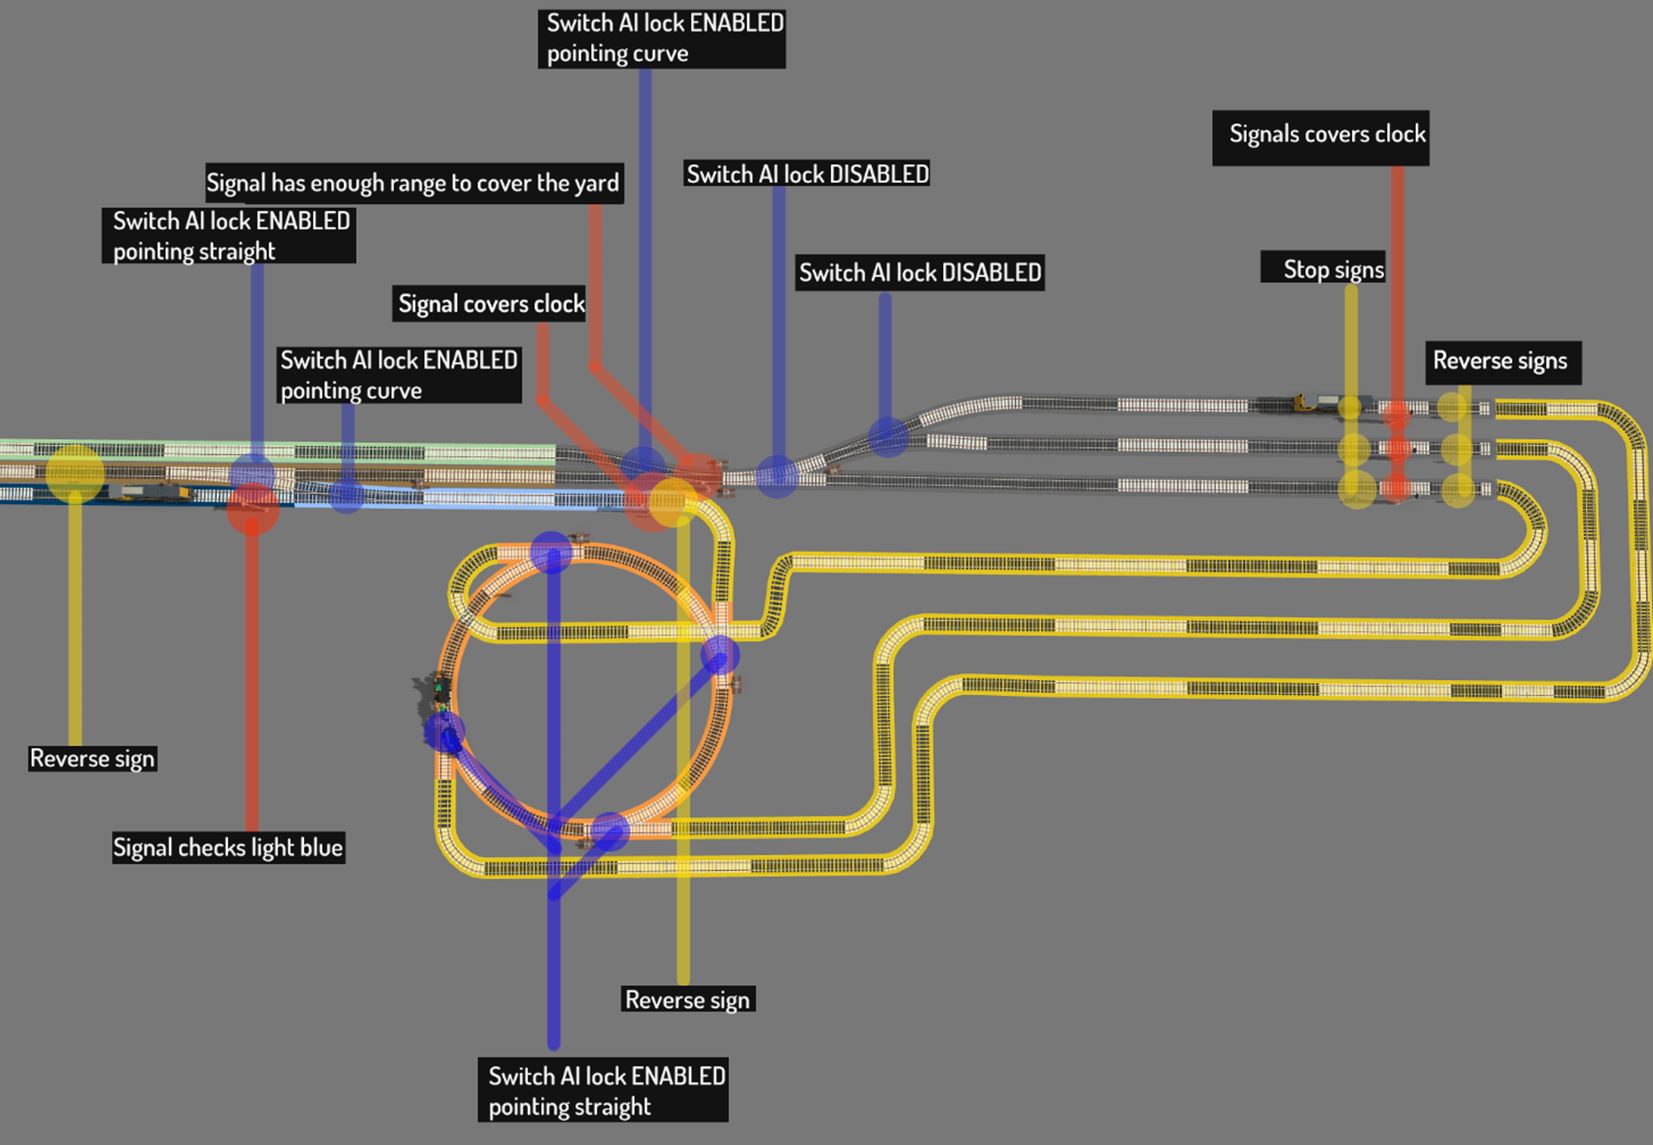
Trains come in from blue. The signal has enough range to reach the other end of the yard. When a train is on blue it will start flicking the switches on the left side of the yard until it finds an available track to drive onto. When on the track it reaches a stop sign, it will wait for a bit then the train will start moving and leave the yard on green.
This yard works because two trains can’t enter the yard at the same time thus if the stop signs all force the trains to wait the same amount of time two trains can never leave the yard at the same time.


Single ended one way waiting yard
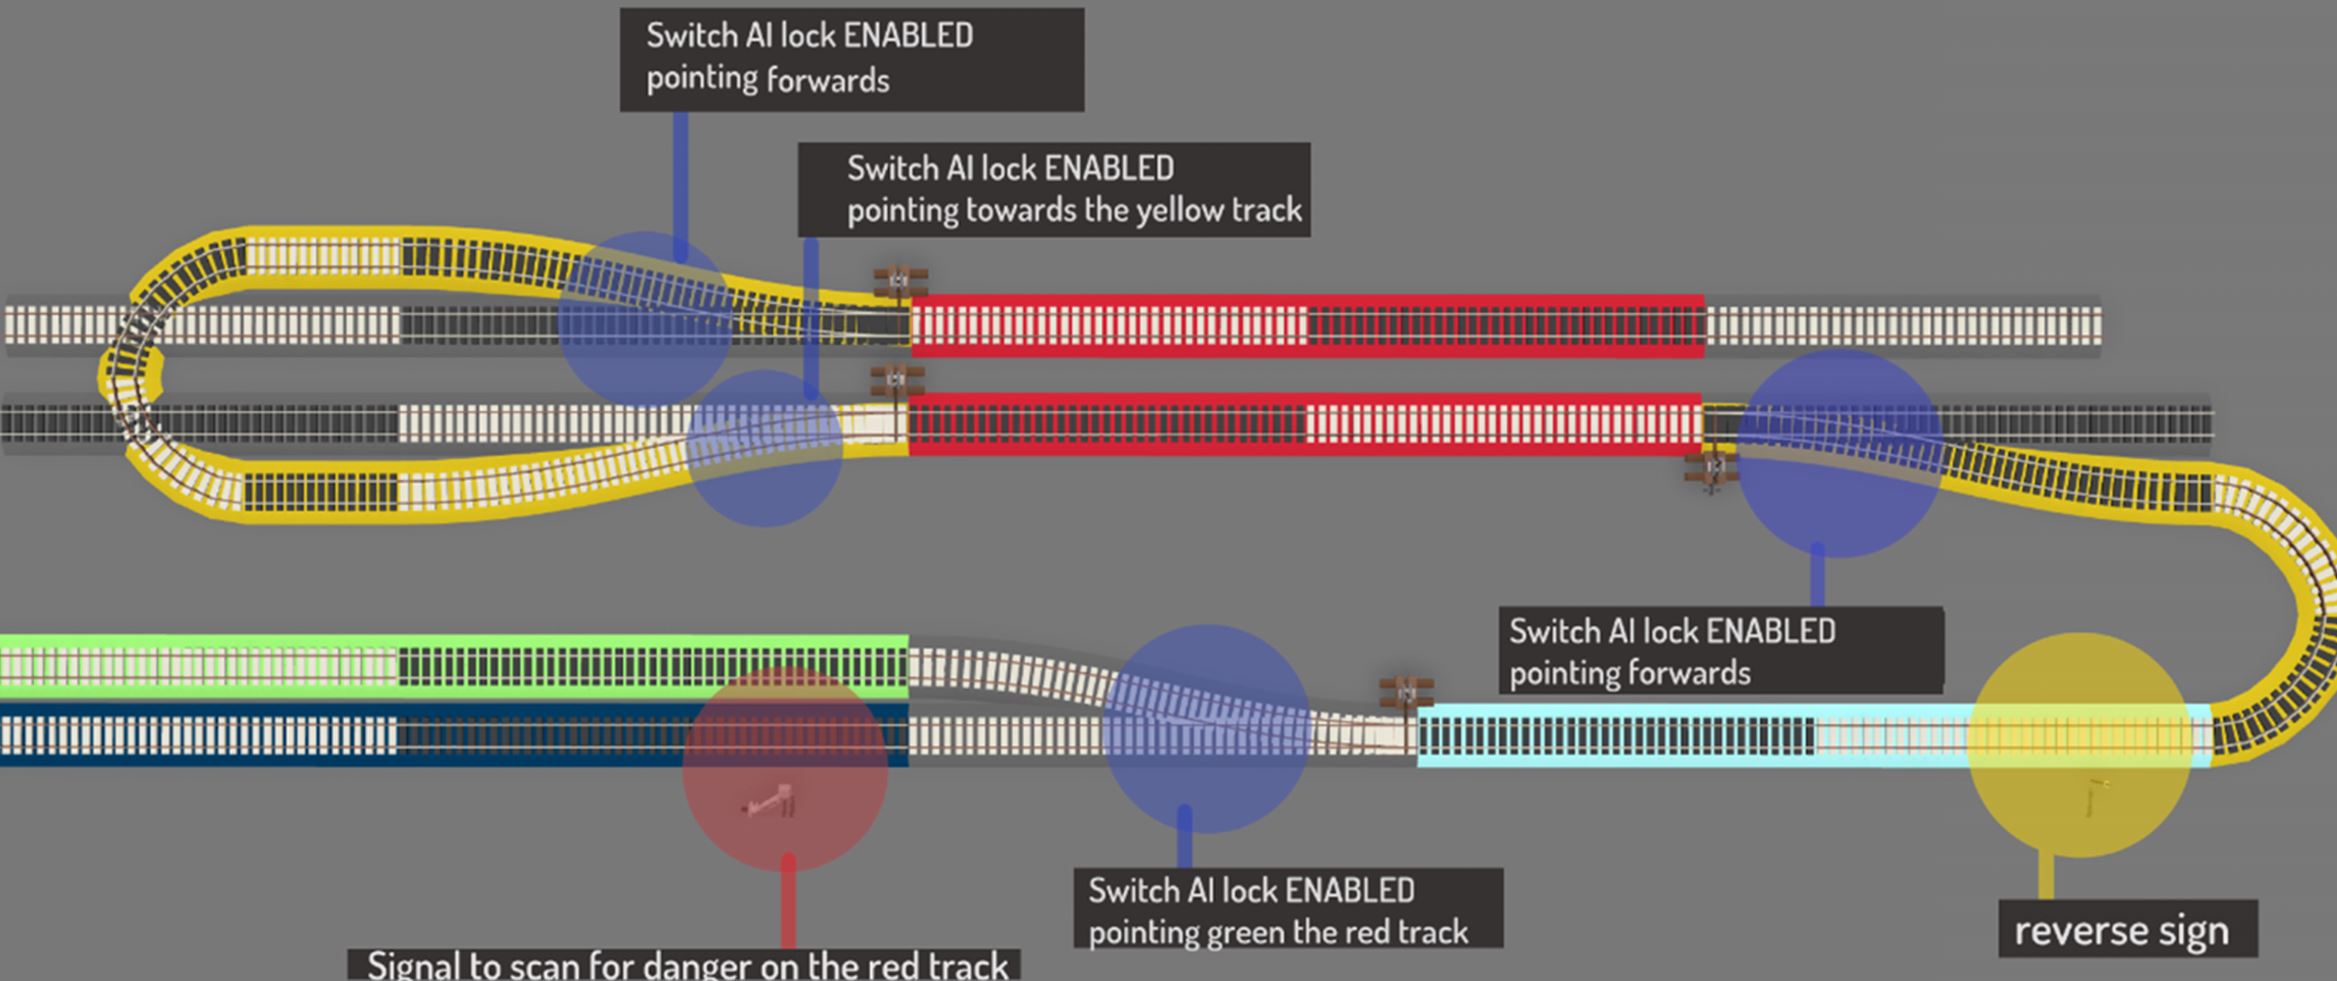
This yard looks a lot more complex than it is. Really it is just a clock mechanism with 4 tracks observing the clock. Let me walk you through the motions a train makes on it journey from dark blue to green. The signal on dark blue checks if light blue is clear (safety first!) on light blue a signal observes the clock when the correct time window arrives it drives forward and meets the reverse sign. Then it backs up into brown. Where the train meets another reverse sign. The train is now moving to gray. There a signal makes sure the train drives into an empty part of the yard. Once it has found a safe track it will move there and there it encounters a stop sign, after waiting the desired time it meets a signal that observes the clock mechanism. Once the time window has opened the train will move forward and it meets the reverse sign. Finally, the train starts reversing out of the yard and moves to the green track.
The advantage of this system is that, because of the clock mechanism, the stop times on the signs can vary.
(PS) a collision in this yard is possible if you build the setup from the image. A train backing up from light blue can crash into a train on brown (waiting for a free track in the yard) to prevent this place down an extra signal observing brown on light blue.
Other systems
Multi track drifting
One of the most important findings during the making of this guide was the automation of multi track drifting.
Here is the setup for that. The loc in the bottom left gets blocked by the signal which is observing the deceivers. The train tries to get green light by flipping the switch forever but can’t because it is always blocked by the deceivers. When another train drives over the switch is will be split up and start multi track drifting. Because Rolling Line doesn’t want a train to be split up it will only allow a switch to be flipped if there is no train on the switch. This setup gets around that by making the switch very short. Because of that the game has a hard time registering that there is a train driving over the switch. Thus, it will start multi track drifting.
(PS) this setup will cause deformation of the train because the top track is longer than the bottom track the bogies on the top track will be further backwards when the tracks merge again. That is because the bogies would have to travel further.
(PS) both the multi track drifiting setup and the setup to pick a random track have a small issue. The locomotives responsible for flipping the switches get disabled when loading in to a map. Just re-enable AI to solve that problem.


Picking a random track
As you can see this is basically the same setup as used with multi track drifting however the switch is much longer which means that the game does understand that a train is driving over the switch and because of that the switch keeps on pointing the same direction as the train moves over it.

Clock observing mechanism with deceiver
The big benefit with using the deceiver to in a clock observer is that a train doesn’t need to make an awkward reverse maneuver.
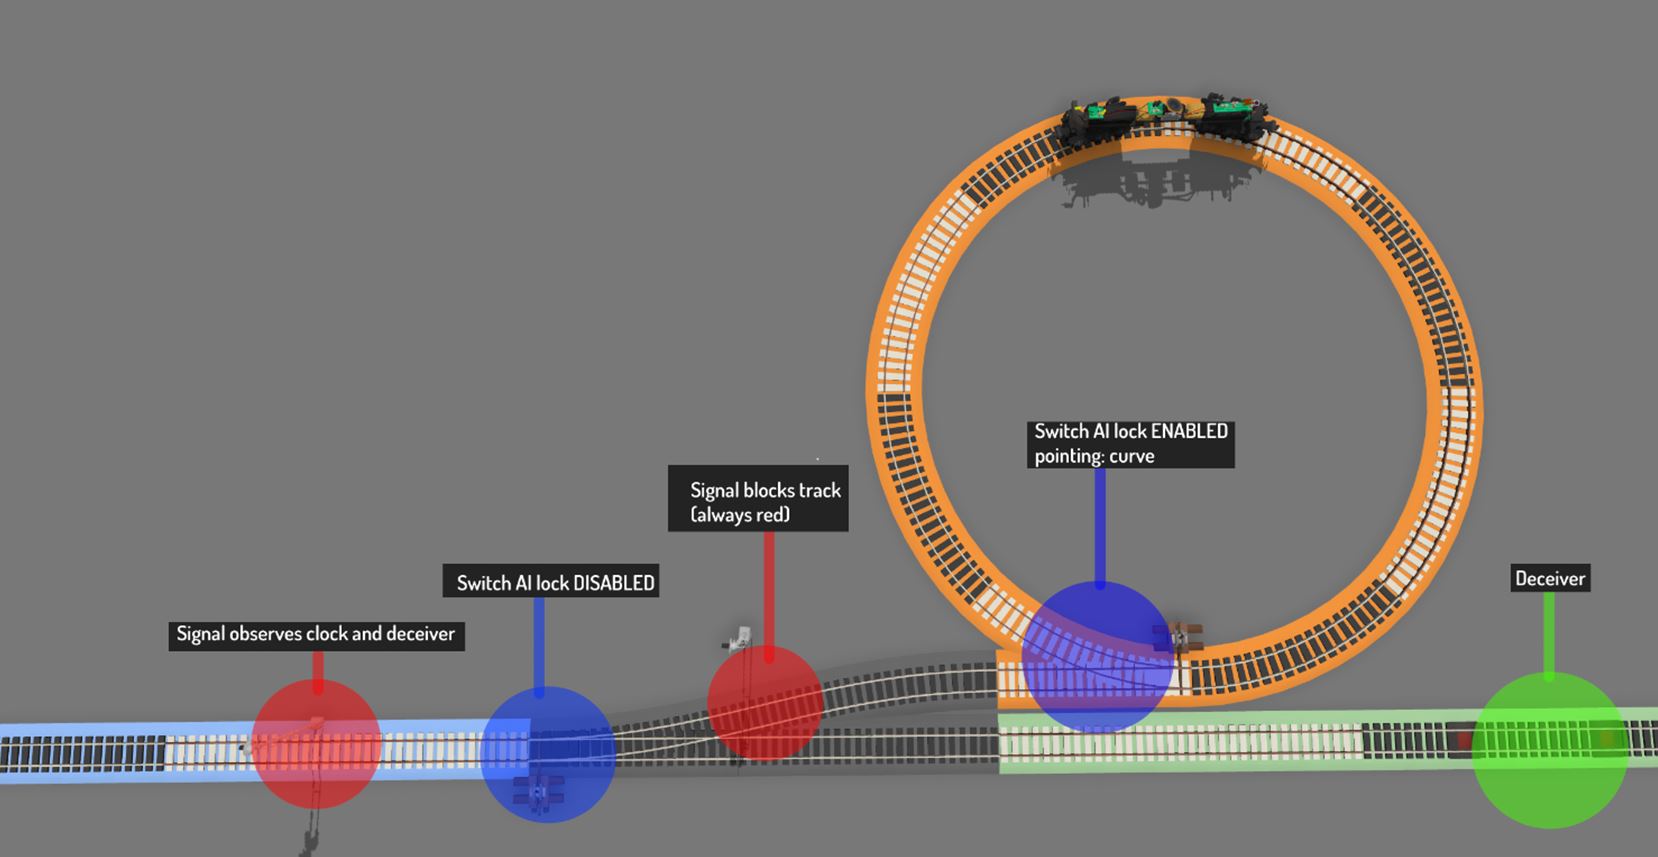
A train comes in on blue. The signal there can be blocked by the deceiver or the clock depending on the way the switch is pointing. The signal will always block when viewing the deceiver however when viewing the clock in the correct time window the signal will allow the train to move forwards. A signal on the top track of the switch prevents the train from moving onto the clock. This signal views the entire clock and thus always gives a red signal. The train will thus flip the switch to green and move there.


Linear draining inventory system
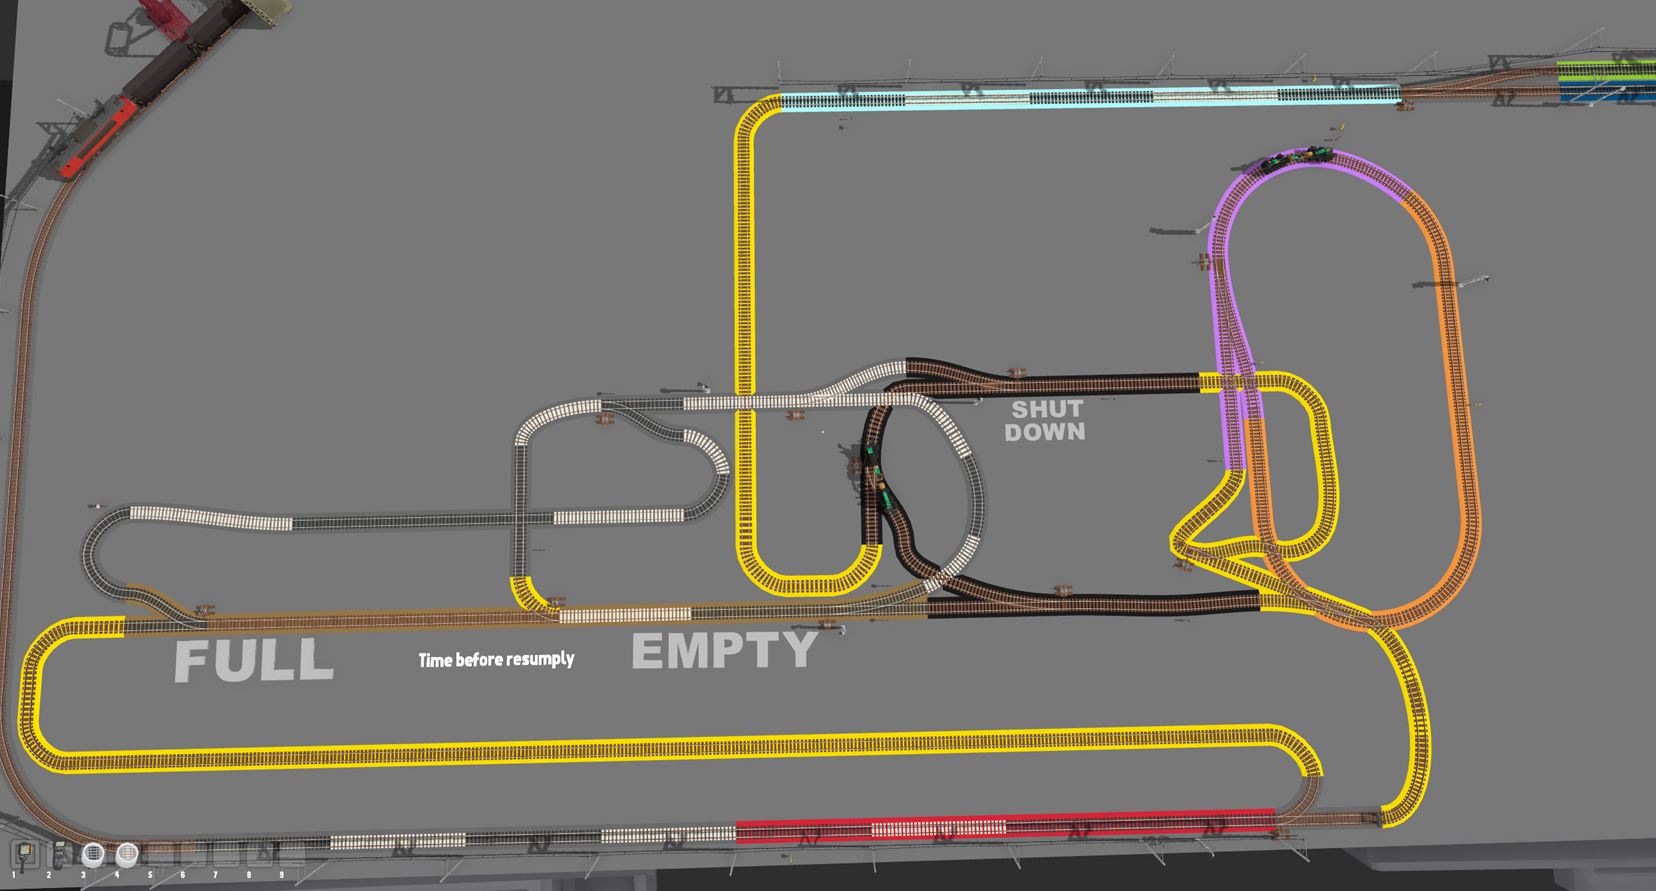
A system to simulate the draining of resources factories experience when producing. Trains can only move from blue to green if there is no loc on the black track. A train on black can be avoided with a timely resupplying in the form of a train on red. A bar from FULL to EMPTY shows how many resources (time) you have left before a resupply will be accepted by the factory. When the bar dips below EMPTY the loc on the bar will move to the black track. It will only move away from black when a resupply arrives.
This system is so complex I won’t describe how to build it, I just want to show that you can make some truly mind boggelingly complex stuff with the AI system.
Thank you for reading
And with this last machine I conclude the guide. I hope you have seen something useful for your layouts and I hope to have peaked your interest for AI in Rolling Line at least a little.

I would also like to remind you that I am a mere human, if you have copied a system and it causes a crash or other maulfunction, please don't get angry at me. I have done my best to make all the systems work the best they could. However there is still always always a chance that I overlooked a problem.

If you are interestend in any of the systems and want to see them in action or if you have got no idea how anything you just red worked you may be interested in the map I have made. There you can see all the systems in action.
https://steamproxy.com/sharedfiles/filedetails/?id=2984876167
5 Comments
stuuky  [author] 19 Sep, 2023 @ 12:55am 
I think I do. After the switch has been flipped all incomming trains will see the track ahead (the passing loop) a safe track to run over. Because of that they won't flip the switch back. You could try to fix that with the new AI features.
For example you could place a train detector and hook it up to a remote trigger activator that will toggel the switch. So that once a train flips the switch to go over a passing loop the detector will cause the switch to flip back.
OutbackCatgirl (kot) 12 Sep, 2023 @ 12:50am 
Say, i've noticed that on a single linetrack with station and passing loop, if the station (stop and wait, 60 seconds) is occupied, ai trains will (correctly!) path to the passing loop. But afterwards, all subsequent trains bypass the station until the switch is manually toggled back. Any clue what might be causing that behaviour?
stuuky  [author] 17 Aug, 2023 @ 9:26am 
I should also mention that the developer of Rolling Line is curently working on an update that will, among other things, make significant aditions to the AI system. If my understanding of the new features is correct it should allow for simpeler solutions.
stuuky  [author] 17 Aug, 2023 @ 9:24am 
indeed, the train scans the other input track because it seeks to find an unobstructed signal. Another signal futher down the track ensures the train does not drive to the other input track.
2TallTyler 17 Aug, 2023 @ 7:21am 
This is really clever. I've been investigating/looking for a way to handle merges for a long time without avail. It seems to rely on a behavior that isn't really explicitly explained in either the official guide or this one. Can you confirm whether my understanding is correct?

When a train approaches a switch with a signal just beyond, where has started braking for the signal, it tries to switch tracks to find a track without a red signal. This is how we look back on the other input track, without ever allowing the train to follow that connection track. Is that correct?