Alien Swarm: Reactive Drop

Alien Swarm: Reactive Drop

28 ratings
Battle-Tested Achievement Guide
By Jurttu
A list of ways to shove yourself off this mortal coil for an achievement!
   
Award
Favorite
Favorited
Unfavorite
Introduction
Apparently, quite a few people are having trouble figuring out 25 different ways to kick the bucket in this game for the Battle-Tested achievement. So let me give back to the community by telling you how to end your existence! No, really, it's a "HOW 2 DIE" guide that's actually useful...

I've started with the more obvious ones, in case you want to check these in order.

You may notice that there are more than 25 ways listed here (64 to be exact). Some are currently unconfirmed, but this list is more or less incomplete - if you know of a way to bite the dust that you can confirm to count towards the achievement, let me know. Anyway, with so many methods to choose from you have some room to be picky.

I STRONGLY recommend you try these by yourself instead of a public game. Unless, of course, you like pissing off your teammates and/or public humiliation. I won't judge (much)!

All methods specified in this guide are based on personal testing and information from SteamDB: https://steamdb.info/app/563560/stats/

Special thanks to Ben Lubar from the ASRD dev team for pointing me to that!


Also thanks to the RD team for considering this snark-filled guide worthy of a medal! I think that's the greatest endorsement this guide could ever get.

Note that this guide is intended to point out possible causes of death that are available in official content. Non-official (Workshop) campaigns may feature some "generic" damage types that resemble/are functionally identical to methods described in this guide, but will nonetheless count towards the achievement. These are not listed in this guide.
Section A: Aliens
This section lists various ways to get killed by the Swarm.

A1. Get killed by a drone

Pretty self-explanatory, really. If you need to find a drone, you probably won't have to look very far.

A2. Get stung by a Buzzer one too many times

Buzzers are those flying little buggers (pun most definitely intended), and they don't do much damage by themselves. As such, you'll likely need to kill all of the tougher aliens in the vicinity so that they won't "steal" the kill (that's you).

A3. Get Shieldbugged

Shieldbugs are big, tough, and more than capable of stomping you into the dirt by themselves. Odds are you have been already killed by one already, but if you're not sure, just walk up to one and don't resist. One is guaranteed to spawn in Jacob's Rest - Deima Surface Bridge, but they can be found in most campaigns as well.

A4. Get blown up by a Boomer projectile

Boomers are the three-legged, yellowish creatures that inflate their pouch when sufficiently annoyed. When it does, give it a few seconds to reach full size and then kill it - this ensures that the maximum amount of projectiles is spawned when it dies. Then just try to catch as many as you can; for best results, kill the Boomer in a narrow corridor.

A5. Fail to roll under Ranger projectile

Rangers are another alien type that appears very frequently. This is very straight-forward; instead of rolling out of the way like a sensible person, try to catch as many of the green spit projectiles as possible. You may wish to kill other aliens in the vicinity beforehand, if possible.

A6. Attempt to catch a Mortarbug projectile

Mortarbugs are not very common, but getting killed by them is fairly easy. I recommend Jacob's Rest - Timor Station for this: at one point, you must activate a console to turn a rotating bridge. A Mortarbug spawns on a inaccessible walkway to the north (on Normal and above): you can let it do its thing, as there should be very few other aliens to deal with.

A7. Succumb to parasitic infestation

This is another one you most likely already have. If you're not sure, load up Jacob's Rest - SynTek Residential and go find an egg, wait for it to hatch and meet your new companion. Your time together will be brief, though.

A8. Die due to contact with biomass

This is a little less obvious than the ones before. While not particularly damaging, touching biomass can indeed kill you. When you find some, deal with any nearby space bugs and go give it a hug!

A9. Get Xenomites all over yourself

Xenomites are the small aliens that Harvesters release, although they do spawn by themselves on occassion. However, Xenomites do not deal that much damage and die as they burst all over your face, so you'll likely need to find a Harvester - it comes with an endless supply of them.

A10. Get kicked out of the way by a Boomer

Before they inflate, Boomers are able to attack you by sweeping kick with one of their legs. You'll want to find an uninflated one and then stay right next to it. You may need to eliminate some other aliens as you stand there, as they rarely come alone.

A11. Die due to contact with Harvester

Like biomass, Harvesters have corrosive skin. Dying of skin contact with one is pretty hard, though, as they prefer to get away from you while laying down Xenomites. I honestly don't recommend going for this if you can help it.

A12. Die due to contact with Mortarbug

Ditto. Find a Mortarbug and get a little too close to comfort, all while you avoid the projectiles and keep the smaller bugs off your back.

A13. Get whacked by a crossover creature, the Antlion Guard

These repurposed assets visitors from another universe only appear in a handful of maps, such as Paranoia - Hostile Places and Accident 32 - Lab Ruins. It is an above-average opponent (depending on difficulty and level), so getting killed by one shouldn't be too difficult. They come in two flavors: normal "Guard" (reddish brown) and "Guardian" (glowing green). These are two separate NPC types, so you can do this with both variants and they'll count towards the achievement twice.

The Guard has two attacks: shove and charge. Once you've found a creature matching the above description, deal with any other nearby swarm (if possible) and then get close to it. It should perform an "uppercut" of sorts and send you flying. Repeat until you have been thoroughly tenderized.

A14. Get rammed by an Antlion Guard

Same as above, with one key difference: instead of getting close to it, let it come to you. When you're not too close, the guard(ian) will charge towards you. This attack will also knock you down, so it's important to make sure other bugs won't get you and that you have enough space to get up and put some distance between yourself and the big guy. If you get stuck, it's likely that it'll just run up to you and finish you off with a shove attack. As such, being at low health before attempting this might make this easier.

A15. Get spat on by the Queen

There are two Alien Queens in vanilla maps: one in Research 7 - Jericho Mines and another in the IAF Academy. This one is only possible in Jericho Mines: you first need to progress through the mission until you open a large gate to the north, then run to the south into a room with the laser. Once the Queen catches up with you, it will periodically spit green acid at you. Drones will trickle in during this part, so you need to deal with them as you're trying to get corroded.

A16. Get close and personal with the Queen's tentacles

This one is only possible in the IAF Academy. One of the zones involves fighting the Queen, but instead of that, you must stay out of her reach while fending off Drones and Buzzers. She will periodically attack you with tentacles that come out of the ground, so hold your position and wait...you weirdo.

A17. Get whacked by the Queen

Also possible only in the IAF Academy. Same place as the previous one, only now you need to get close the Queen and let her beat you to submission.

A18. Die due to contact with an parasite egg (unconfirmed)

Due to the fact that the first thing you do when you see an parasite egg is to put a lot of bullets into it, not many know that it also has corrosive skin. In theory, this should work just like with every other creature with deadly touch - only that the eggs tend to hatch when you get close. You might want to already be at low health before you attempt this, since you may not otherwise have enough time before the egg pops. But hey, if that happens, you can do #7 instead!
Section B: Weapons
Whether by accident or sheer stupidity, there are also a couple of ways to use your weapons against yourself.

B1. Blow yourself up with a rifle grenade

Splash damage: the #1 cause of death in video games involving explosives! This one is easy to do due to the assault rifle being always available, so just walk to a wall, aim at it and pop goes the marine!

B2. Blow yourself up with the grenade launcher

Let's face it: sometimes you end up being collateral damage yourself. So why not save the trouble and get it out of the way right now? Just aim at somewhere/something dangerously close to you and go wild.

B3. Blow yourself up with rockets

Blast off into the afterlife by hugging a wall and using either the Hornet Barrage (level 6 required) or the Smart Bomb (level 26 required). Remember to look towards the wall to ensure you catch every rocket.

B4. Attempt to fumigate yourself

There are right ways to deal with a parasite infestation, there are wrong ways, and then there's the special kind of stupid described here. You'll need to unlock gas grenades by reaching level 32, but once that's taken care of, just throw one of these suckers at your feet and watch as both parasites and life all leave your body for good! Definitely don't do this in a public game, because you will lose all credibility as a medic in the process.

B5. Blow yourself up with a laser trip mine

The ML30 Laser Trip Mines are often overlooked due to their lack of level requirement, but they can be quite potent if used right. What you're going to do with them is the exact opposite of that: place them on a vertical surface by facing it and pressing the off-hand equipment key, get as close as you can and wait. Because you cannot trigger the mines yourself, you'll have to wait for aliens to do that for you.

Not to be confused with the mines in Lana's Bridge!

B6. Self-cremate with an incendiary mine (unconfirmed)

A smart person would not stand in a wall of fire...unless it was for an achievement, right?

You'll need to play as an officer (Sarge or Jaeger) and be at least level 16 to choose the mines in question (alternatively, you can find a box of them in Area 9800 - Landing Area; find them just south of the bridge). After that just plop one or more of them down, wait for an alien to trigger them and walk into the fire.

B7. Step on a Vindicator grenade

This sounds far easier than it actually is. While highly effective against the swarm when used right, it is far less effective against marines due to much of its power coming from the afterburn damage - which will not happen to marines. As such, you need to be at very low health before attempting this.
Section C: Level Specific (pt. 1)
Much like how Europeans go to Switzerland for euthanasia and Americans knock on stranger's doors, you too can find an exotic place to end your existence!

Disclaimer: This list is based on information from SteamDB and testing. Some "generic" damage types are shared between various environmental hazards - for example, falling into a different pit doesn't count more than once.

This list is incomplete; there are some other "unique" hazards in various levels which are not listed here. In these cases I don't either know where exactly they point to, or haven't been able to confirm that they are actually doable. I will update the guide if I figure those out, but you should have plenty to work with by now.

C1. Fall into a toxic pit (Jacob's Rest - Cargo Elevator)(unconfirmed)

On your way to the elevator you'll come across a small, dark pit with green fumes rising out of it. Normally you'd shoot the barrel to the east to make the metal plate fall on it, but instead of that you're going to jump right in!

C2. Walk into a shredder (Jacob's Rest - Sewer Junction B5)

This is pretty straightforward: there are three spinning shredders near the end of the level. A sensible person would shoot the barrel near the control console to stop them, but since sensibility has nothing to do with this achievement...You get the point. Just get within touching distance of them and wait.


C3. Get nuked (Jacob's Rest - Timor Station)

Another fairly straightforward one: once you've triggered the countdown, just stay put instead of rushing to the landing pad. Defend yourself against any space bugs that may show up, and in about two minutes you'll go up in a giant nuclear fireball.

C4. Step on a landmine (Lana's Escape - Lana's Bridge)

Landmines - the polar opposite of foot fetish! The minefield covers a large area at the start of Lana's Bridge, and there are more than enough mines for you to blow yourself to hell. Of course, the mines are buried - you can periodically see red lights blink briefly under the snow, indicating a prime place for a tap dance. The closer you are to the explosion, the more damage it deals to you. If locating mines is too much effort, just go running around the indicated area like an headless chicken.

The explosions are handled by an entity called env_explosion; some other ways to die that utilize this entity will not increase the achievement counter more than once (exceptions are listed below).


C5. Get caught in a giant sewage mixer (Lana's Escape - Lana's Sewer)

What's with the sewers and large spinning things of death? Doesn't matter - what does is that this map offers another way to be treated like s**t...literally!

Once you reach the spinning blades, just wait in their path. Easy peasy.


C6. Get crushed by pistons (Lana's Escape - Lana's Complex)

Why are there large pistons in a vent system, you ask? Because reasons.

Normally you'd shoot a barrel on their other side to stop them, but not this time! Just step in to become a large red smudge on the floor/ceiling.

C7. Get nuked again (Lana's Escape - Lana's Complex)

Anything involving massive explosions is worth a repeat, right? This one is pretty much identical to the Timor Station version; once you have started the countdown, keep yourself alive until the bomb goes off. Use the waiting time to contemplate the meaning of existence...or ponder what color does a smurf turn if you strangle it. Up to you.

C8. Die in a fan-cy way (Research 7 - Research 7)

Once you've progressed far enough into the mission, you'll come across a large, spinning fan blade to the north. There are three buttons you need to press to overload it - press the one behind a large pipe first, then the two others located close to the fan. Once you've pressed the third button, run up to the fan and wait. The explosion deals rather little damage, though, so you'll need to be at very low health in order to die from the explosion.

C9. Die in a mining accident (Research 7 - Illyn Forest)

A cave-in blocks your path at the start of the level, and can be cleared with the explosives found just south of it. Before you place the explosives, make sure you're at half health or less - the explosion probably won't kill you otherwise. Once that's done, press your use key next to the rocks and kiss the explosive pack (and your ass) goodbye!

C10. Try to swim in lava (Research 7 - Jericho)

Trust me, it'll be fine! I'm sure everyone who is telling you not to swim in lava is just trying to hoard all that sweet magma to themselves. So go ahead and take a dip, that'll show 'em!

C11. Step into a generator energy beam (Tears for Tarnor - Abandoned Maintenance Tunnels)

This one requires a little bit of walking. You'll have to progress fairly far into the mission to reach the generator. Switch it on and wait a few seconds until the machine comes to life, and you'll see an energy beam block the walkway you just crossed. Instead of going around it like a smart person, walk right into it! Instant results guaranteed.


C12. Get run over by a burning forklift (Accident 32 - Lab Ruins)

This map features not one, not two, but four unique ways to die! I've listed them in order, from closest to farthest. Check the map below for exact locations.

The first one involves a special kind of OSHA violation - namely getting run over by a speeding forklift that is also on fire and isn't driven by anyone. From the start of the level, just run left until you get hit. Maybe next time you'll look both ways before crossing.

C13. Get possessed by a weird-ass gem (Accident 32 - Lab Ruins)

Directly north of the forklift, in a large crater, is a big green crystal. Touch it to get possessed and turn against your teammates - they'll be sure to love it.

There is also a gas stream to the east of the crystal, near a chainlink gate. Dying from it also counts as getting possessed (doing both yields no additional progress towards the achievement).

I don't know if getting killed by a possessed marine counts. Let me know if you can confirm it.

C14. Get crushed between moving walls (Accident 32 - Lab Ruins)

While the exact purpose of an in-floor, handrailless garbage compactor remains a mystery, it nonetheless offers you a way to get flattened in the name of achievements. Just find a rectangular hole in the floor just northeast of the crystal crater, jump in and wait for the flattening.

C15. Get run over by a train (Accident 32 - Lab Ruins)

At the end of the level you must call a train to take you to safety. Joke's on them, you're going to use it to take you out for good! Once you've called the train, just run to the tracks and keep the space bugs away until you successfully become an easily preventable traffic casualty.


C16. Get nuked once more (Nam Humanum - Groundwork Labs)

Yup, you get to do this for the third time! Like usual, start the countdown and wait for the obvious result.

While waiting, read up on a guy who survived not one, but two nuclear detonations: https://en.wikipedia.org/wiki/Tsutomu_Yamaguchi . Maybe by the time you're done with this guide you'll have learned to do the same...
Section C: Level Specific (pt. 2)
C17. Try to swim in lava, again (IAF Marine Academy)

Did it work out in Jericho Mine? No? Never fear, perhaps they teach that in the IAF Marine Academy! In order to access the area with it, you'll need to complete all of the other areas at least once (by surviving long enough to escape via teleporter). Once you reach the location in question, just jump in.

C18. Get blown up along with a bridge (Area 9800 - Wastelands)

Your first objective will be to open a gate leading onto a bridge. Unfortunately, once you step through, a shieldbug will set off some explosive barrels - this destroys the shieldbug, the bridge, and anyone unlucky enough to be on it. So, what you need to do after opening the gate is run as far as onto the bridge before it goes up in smoke.

C19. Stand on a spinning fan blade (BioGen Corporation - Invisible Threat)

Ever wanted to know how it would feel to be inside a blender? Now you can!

Near the end of the level, you'll have to press a button several times to speed up a fan (and then hack it twice to make it explode). Instead of that, you should stand on it - they say that the resulting Marine Smoothie is to die for.

Check the image below for locations.

C20. Jump into a BIG fan (unconfirmed) (BioGen Corporation - Invisible Threat)

If you looked at the small fan from the previous paragraph and thought "what a pathetic piece of ventilation equipment", you can dry your tears - there's a bigger and badder fan just ahead from the previous one! Just drop down onto the enormous fan to make sure the colonists will never get rid of the smell in their vents.

A word of warning: there are parasites inside the ventilation ducts, so proceed with caution!


C21. See if you're immune to neurotoxin (Tilarus 5 - SynTek Hospital)

Spoiler: you're not. Once you've turned on the neurotoxin delivery system, don't run for the teleportation platform; instead, run back inside the hospital to see why you can't stay inside a building when it's being fumigated for bugs.
Section D: Friendly Fire
Here's a reason to forgive your teammate for putting you full of bullet holes: they are (inadvertently) helping you get this achievement! Note that I cannot 100% guarantee which weapons count towards each unique death (see the details for each method).

Also note that you should not attempt any of these by trying to get your teammate to kill you by accident. Nobody likes people who run into their line of fire, so either politely ask them to help you or play the game as normal: you will most likely become a victim of accidental friendly fire sooner or later. Having hardcore friendly fire on will certainly help here. Just remember to keep track of how you've died!

All of these methods were deduced from SteamDB API data.

D1. Get shot with a bullet-based weapon

In this context, "bullet-based" presumably means anything that fires a single conventional bullet at a time (such as assault rifles, marksman rifle, autogun, etc.). Odds are that you'll end up getting shot by a bloodthirsty Special Weapons with a Minigun (source: I play SW most of the time).

D2. Get a faceful of buckshot

As the name implies, this one calls for a shotgun. These include the Vindicator (always available, Officer only), the Pump-Action Shotgun (level 3), the Devastator (level 29, Special Weapons only) and the 22A4-2 Combat Rifle (level 30) alt-fire.

D3. Pretend you're a tree

Why? Because you need to get killed with a chainsaw for this, duh. The chainsaw is available at level 23 onward, but you can also find one in Jacob's Rest - Rydberg Reactor (room with welded door to the west) and Jacob's Rest - Sewer Junction B5 (next to an ammo stash south of the tunnel you need to collapse).

D4. Get burned alive by a flamethrower

Someone once said that it's always the ♥♥♥♥♥♥♥ with the flamethrower killing teammates. That may not be the case, except now when it's precisely the case. Mmm, smells like chicken.

D5. Get blasted with a grenade launcher

Yup, you can use the grenade launcher twice for the achievement by getting blown up by someone else along with yourself. Just convince your accomplice to drop a whole lot of boom on your head and you're good to go.

D6. Have someone blow up an explosive red barrel next to you

Like the previous one, this one can also be done twice: by yourself and with help. You'll probably need more than one barrel for this, so plan accordingly.

Check method E2 for details (in "Other").

D6. Have someone blow up an explosive yellow barrel next to you

Same as above, but different color! Check method E3 (in "Other" chapter) for details.

D7. Get rail(gunn)ed

Despite being a single-projectile weapon that fires a physical bullet, the Rail Rifle counts separately towards this achievement. It's available at level 7, but it can also be found in Tears for Tarnor - Abandoned Maintenance Tunnels.

D8. Attempt LASIK eye surgery with a Mining Laser

Since the Mining Laser can not be selected on briefing like most other items, you'll need to find one during a mission. Only a couple of missions have them, and I recommend Jacob's Rest - Timor Station for this. The first laser can be found fairly early into the mission, and the bugs shouldn't bother you too much while you're busy getting a hole burned into you.

Section E: Other
This section includes everything that doesn't fit into any of the previous categories. None of these are technically level specific, but many of them require a level feature. Check each description for recommended levels.

E1. Fall to your death

While Reactive Drop does not have fall damage in technical sense, you can still walk off a high place and leave a crater below. There are too many locations to list here, so I'll just give a few examples:

  • Jacob's Rest - Cargo Elevator: The icy cliff west of the ammo and medkits
  • Accident 32 - Research Center: The part with the wide metal walkways and obnoxious blur
  • Tears for Tarnor - Insertion Point: In the caves near the start

E2. Blow yourself up with an explosive red barrel

In Half-Life 2, the Civil Protection officers made a habit of standing right next to highly explosive barrels. Follow their example by finding some, getting close and then shooting them! You may need to do this twice, since one barrel may not be enough to kill you.

You can find these barrels just about everywhere, but I recommend Jacob's Rest - Sewer Junction B5 for this.

E3. Blow yourself up with an explosive yellow barrel

Technically, this includes any exploding physics prop that isn't a red or green barrel, but I'm using the barrels here as example since they're easiest to find and pack a mean punch. This works just like with the red barrels - you'll just need to find some first. A good place for that is Jacob's Rest - SynTek Residential, where you can find two; one near each fire on the way to the vents. You may need to use both barrels: a single barrel will not kill you outright if you're above half health (this "health gate" mechanic prevents instant deaths due to stray bullets).

E4. Irradiate yourself with a green barrel

Radiation poisoning - the ultimate gruesome way to go! Instead of superpowers, you will get hair loss, nonstop vomiting and fever, and then you'll probably die from having your own innards fall out of your arse. Fortunately it's a hell of a lot cleaner and faster in video games than real life, so you don't need to wait 2-3 weeks for death.

Green barrels are much rarer than red explosive ones, but you can reliably find one in Jacob's Rest - Sewer Junction B5.

E5. Go die in a fire

Fire is great for cooking meat, fish, vegetables and careless marines. In this case, you need to roast yourself in an "environmental" fire. Here are a few examples:

  • Jacob's Rest - Rydberg Reactor
  • Jacob's Rest - SynTek Residential
  • Tears for Tarnor - Abandoned Maintenance Tunnels
  • Nam Humanum - Platform XVII

E6. Get flattened by a falling door (unconfirmed)

You may have already gotten unlucky at some point: you just happened to be underneath a sealed door that space bugs beat down, and you got squashed. If not, there is a good place to do that in Jacob's Rest - Landing Bay. The door just before the finish line is welded, and the aliens will start pounding on it once the hack has been started. Just position yourself in front of it while keeping the aliens on your side away, and wait for gravity to do its thing.

E7. Die in a sentry explosion

You may not have known it before, but sentries can be destroyed by aliens. When that happens, they sentry explodes, dealing a modest amount of damage to nearby marines. Dying from this is difficult to achieve, as you need to be at fairly low health already and then lure the bugs into attacking the sentry while keeping them off yourself. You might want to try something else on this list instead.

E8. Get crushed by a physics prop (unconfirmed)

This one is also very difficult to pull off. Due to the fact that your ability to manipulate the various physics objects found in the game is limited to shooting or kicking them, you'll either have to be extremely unlucky or manage to put yourself somewhere you really shouldn't be. I honestly can't think of a reliable way to pull this off.

E9. Use the console to off yourself

They say that sticks and stones may break your bones, but words will never hurt you. Prepare to be corrected: by typing "asw_suicide" (without quotes) into the console, you will drop dead on the spot. Think of it as a keyboard-induced aneurysm!

Closing
Hopefully this guide helped you get the achievement! As stated several times before, let me know of any additional methods and/or details you can confirm.
11 Comments
法克*尤尔*马泽尔 30 Mar, 2024 @ 9:38pm 
npc related causes, such as headcrab and zombie, mighr be possible in some challenges and custom maps. the official infection challenge has zombies, i think.
Jurttu  [author] 26 Mar, 2024 @ 12:43pm 
The rest are mostly assets that are not used in "official" maps (such as Half-Life 2 NPCs) or are leftovers from legacy HL2 game mechanics (for example, "RUN_OVER" is not possible due to the fact that ASRD does not have drivable vehicles). I also don't know how many of the HL2 NPCs are actually usable in AS, so I'm going to leave them out for now.

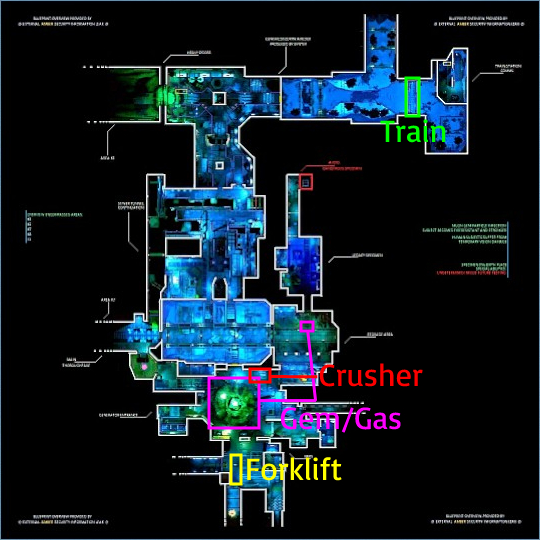
That being said, some of the missed causes are ASRD specific but somewhat obscure - for example, BioGen Corporation campaign has "elevator" listed as a cause of death, but to my understanding it is not possible to get crushed by it as the shaft is inaccessible until it arrives.

There are also some that I admittedly missed (such as the SynTek Hospital Toxin). I'll add them at some point when I have the time to do so!
法克*尤尔*马泽尔 26 Mar, 2024 @ 10:48am 
The full list in source code has 100+ causes of death. Seems you missed some.
Jurttu  [author] 24 Mar, 2024 @ 1:30pm 
That seems to be the same list as in SteamDB, but I appreciate the effort nonetheless!
法克*尤尔*马泽尔 24 Mar, 2024 @ 12:17pm 
you can find the full list in the github
repo

https://github.com/ReactiveDrop/reactivedrop_public_src/blob/5452c1974823c0076c686ccb3aa421d04e8352aa/src/game/shared/swarm/rd_cause_of_death.h

a partial list here

DEATHCAUSE_UNKNOWN,
DEATHCAUSE_DM_SELF,
DEATHCAUSE_DM_PLAYER,
DEATHCAUSE_DM_BOT,
DEATHCAUSE_DM_OTHER,
DEATHCAUSE_PHYSICS,
DEATHCAUSE_FALLING,
DEATHCAUSE_TRIGGER,
DEATHCAUSE_COUNTDOWN,
DEATHCAUSE_COMMAND,
DEATHCAUSE_FF_WHILE_INFESTED,
DEATHCAUSE_INFESTATION,
DEATHCAUSE_MARINE_MELEE,
DEATHCAUSE_MARINE_BUCKSHOT,
DEATHCAUSE_MARINE_BULLET,
DEATHCAUSE_CHAINSAW,
DEATHCAUSE_ZAPPED,
DEATHCAUSE_SENTRY_PLACED,
DEATHCAUSE_SENTRY_MAPPER,
DEATHCAUSE_SENTRY_EXPLOSION,
DEATHCAUSE_DOOR,
DEATHCAUSE_EXPLOSIVE_BARREL_SELF,
Jurttu  [author] 24 Mar, 2024 @ 4:57am 
Alright, thanks for confirming that!
legomanas 24 Mar, 2024 @ 4:07am 
hornet barrage does infact count towards the avhievement
法克*尤尔*马泽尔 11 Nov, 2023 @ 2:00am 
You can check the source code. There is a struct containing all death reasons.
CryptEarth 4 Nov, 2023 @ 9:19pm 
"dumb ways to die ... so many dumb ways to die" *sing
Tita 18 Aug, 2023 @ 4:24pm 
lmao