Urbek City Builder

Urbek City Builder

107 ratings
Urbek City Builder General Gameplay Guide
By eightroomsofelixir
A comprehensive guide for Urbek City Builder, including tips, tricks, layouts, strategies, how to progress your city, how to win a Path, and much more.
4
2
7
2
2
   
Award
Favorite
Favorited
Unfavorite
Foreword
This guide will cover the basics and strategies of the game.
The guide has five main parts: General Tips, Housing, Layout, Policies, Career Path, and Misc.
  • If you are new to the game, I suggest reading from the beginning to the end.
  • If you are relatively familiar with the game, and want to check out better strategies to beat a map, check the General Tips and Career Path sections.
  • If you are relatively familiar with the game, and want to plan your city better, check the Layout sections.
  • Other sections would have important info as well.

Good luck with the city building!
General Tips: Food and Work


The Food-Work Cycle
Resource management is one of the basic mechanics of this city builder. Essentially, the player should maintain a healthy balance between Food and Work (i.e., labor force).
Beware of your Food and Work numbers on the upper right UI. At the very beginning of the game, you will have more Work (about 2000) than Foods (about 200). Build Fields first, then Housings, then repeat this cycle.

Overall, when you have much more Foods than Works, build Housings to generate more Works; when you have much more Works than Foods, build Farming-related buildings to generate more Foods. This Food-Work Cycle is the very engine that pushes your city forward.
Always keep a decent surplus of both Food and Work to deal with the development needs.

Producing Food
There are four different ways for generating Foods: Farming, Fishing, Orchard, and Research Center. Different maps may vary (for instance, on Desert Maps the Center Pivot Irrigation will largely replace farms), yet they all fit into these four categories.
More efficient buildings and building upgrades for each category will be unlocked gradually during your playthrough.

Farming
  • Farming Becomes available from the very beginning of the game, being the most basic method for Food generation. On the other hand, it occupies a lot of space and needs heavy planning.
  • Upgrades: Field - Farm House - Grain Silo - Modern Grain Silo - Farm Shed - Food Plant.
Fishing
  • Reaching 1050 Population allows the players to place Docks, which will turn nearby waterfront Housings into Food-producing Fishermen's Houses. They provide a large amount of Foods with a very small space footprint, yet require natural bodies of water to work.
  • Upgrades: Dock - Fishermen's House.
Orchard
  • Reaching 7000 Population unlocks Orchard. It requires less space, although it needs more Skilled Work and should be free of Pollution. The Research Center route is also locked behind this route, asking players to develop extensive Orchards.
  • Upgrades: Orchard - Fruit Processor.
Research Center
  • Research Center unlocks after having 5 Fruit Processors and 33000 Population, and needs additional Offices in its proximity. It unlocks VERY late in the game (you can already win the game after reaching 33000 Pop.), and consumes a LOT of resources, while being the most effective route of producing Foods - 9000 Foods in a two-square space or 21000 Foods in a four-square space.
  • You won't really need it for most of the playthroughs, but it will be very helpful if you need to reach 35,000+ population and have already run out of space for other Food-producing methods.
  • Upgrades: (Faculty of Botany) - Food Research Center - Advanced Food Research Center.

Producing Work, or Upgrading Housing


Work (i.e., labor force) production is very straightforward: Build more Housing and provide more services. Gradually you will have a huge labor force to play with.
There are three levels of Works, Unskilled, Skilled, and High-Skilled. Different buildings and services require different types of Works.
Housing will automatically upgrade/level up when served by more and more services; higher-level Housings will provide both lower- and higher-level Works. It would be better to try to upgrade most of the Housings in your city to the Downtown level (see below Housing guides for more details).

Note that Schools do not generate Work by themselves. Instead, they increase the maximum amount of Works you can accumulate.
General Tips: Energy, Coal, and Iron


Energy and Coal
Beginning from the early game, nearly all buildings in the city require Energy (electricity, purple symbol) to operate.
In the early game, the city's Energy mostly comes from Wood; in the mid-game, Coal; and eventually, Nuclear Power. For most of the playthrough, your city will be powered by Coal Plants and Heavy Coal Plants.
In the early and mid-game, the most efficient way to produce Coal is to surround a Coal Mine with Housing. All street-facing Housings within a 5-square radius of the Coal Mine will turn into Coal Miner's Houses and eventually 3-Story Coal Miner's Houses. In the late game, you can replace them with Deep Coal Mines.

Iron and Steel
Two important buildings required for leveling up Housing to the Downtown level, the School and Bus Stop, need Iron (blue symbol) and Steel (grey symbol). Iron plus Steelworks equals Steel.
Factories, one of the primary sources of Science in the late game, also require 1 Steel per sq. if the Science-producing Policy is selected.
Like Coal, the most efficient way to produce Iron is to surround an Iron Mine with Housing. In the game, you can also replace them with Deep/Open Pit Iron Mines.
General Tips: The Parking Lot Trap


Reaching 5500 Population unlocks Downtown Houses, which means your existing highest level Housings at the time, Wealthy Suburb Houses, will be upgraded to much better Downtown Houses if there are High School and Repair Shop nearby.
However, 5500 Population also unlocks Parking Lots. Downtown Houses require 4 Connectivity, if there isn't enough Connectivity nearby, Housings will be replaced by Parking Lots to satisfy that demand.

This means your city will suddenly have a severe Work shortage, as Parking Lots (understandably) don't provide Works. If left undisrupted, your city will fall into a Work shortage deadlock in which you can't build anything to reverse the situation due to lack of Work.
The only way to prevent the Parking Lot from spawning is to build Bus Stops, which will provide the 4 Connectivity and force Parking Lots to upgrade back to Housing. Bus Stops require Steel.

In short, be prepared for the Parking Lot Trap by building Steelworks and having a Steel income when your city reaches about 5000 Population, and began to build Bus Stops on every other street.
General Tips: Food Consumption


Beginning from the mid-game, upgrading the city's Housing will usually result in a sudden, massive increase in Food consumption, as higher level Housings consume more Food.
Try to maintain a Food surplus of at least 2000-3000 in the mid- to late game, acting as a buffer for Food consumption spikes.

12-Story Building, one of the highest-level Housings, consumes a staggering 200 Food (most of the Housings consume less than 100 Food) to produce 60 H. Skilled Works. The building is essentially trading Food with H. Skilled. However, you cannot turn H. Skilled into more Food until very late game through Research Centers; for most of the game, this building is a waste of Food. I would suggest actively preventing 12-Stories from spawning by lowering the Healthcare number below 3 in the city, or building Banks as they can't spawn near Banks as well.

Another primary source of Food consumption is the Iron/Coal Miner's Houses; they trade Food with Iron and Coal. You can replace them with Deep Coal/Iron Mines - which do not cost any Food - if you are in dire need of Food.
Housing: Downtown
Downtown and 2-Storey Downtown Houses

With the below requirements fulfilled near your Housings, you will get Downtown-type Houses:
  • 15 Residents in a 4 sq. radius - This means "density," or large street blocks full of Houses.
  • 1 Food services in a 10 sq. radius - This means Food Market or Fish Market.
  • 1 Tools in a 10 sq. radius - This means Repair Shop or Hardware Shop.
  • 5 Education in a 10 sq. radius - This means High School.
  • 5 Leisure in a 5 sq. radius - This means Bar and/or Cabaret.
  • 1 Healthcare in a 10 sq. radius - This means a Clinic.
  • 4 Connectivity in a 5 sq. radius - This means Bus Stop.
  • 0 Pollution in a 5 sq. radius - This means at least 5 tiles away from an Industrial building.
Downtown Houses will produce most of the city's Skilled and H. Skilled Works. Additionally, all the various neighborhoods, as well as high-level Housings, need to be upgraded from the Downtown 2-Story Houses. In short, it would be better to have at least 1/2 of the urban area in your city dedicated to Downtown Houses.

High-Level Downtown Houses

With better connectivity services (Metro) and Retail services, Downtown Housings could be further upgraded to higher-level buildings. These high-level buildings fall into two types, Residential and Mixed.
  • Mixed Buildings require Banks nearby, while require very little Healthcare. Residential Buildings dislike Banking in their proximity, and require much better Healthcare. Both also require Retail.
  • Mixed Building can provide Retail, Tools, and Food Services by themselves. Once you build up an area full of Mixed Buildings, Food Markets, and Hardware Shops are no longer necessary in nearby street blocks.

The highest level of Residential Buildings is the 12-Story Building. It produces the largest amount of H. Skilled Works (20 Unskilled, 40 Skilled, and 60 H. Skilled Works) of all Housings, while also costing a lot of Food (200 Food).
Downtown Houses will eventually upgrade to 12-Story Buildings if there is Hospital and enough Leisure nearby.

The highest level of Mixed Buildings is the 8-Story Mixed Office-Commercial, and it produces the most variety of stuff (30 Unskilled, 27 Skilled, and 35 H. Skilled, while also providing Retails, Tools, and Food Services) with relatively less Food (120 Food).
Downtown Houses will eventually upgrade to 8-Story Mixed if there are Banks and Metro Stations nearby, with an Airport and Airport Runway in the city.
It is also the only Housing categorized as an Office, essential for placing the Research Center for late-game Foods. Recommend having at least one dedicated area full of 8-Story Mixed in your city.

Note: The models of all the Downtown and higher level Housings are either 1×1, 1×2, or 2×2.
Housing: Downtown Variants
Downtown Houses can also upgrade to two variants: Artist Neighborhood and Night Life Neighborhood.


Artist Neighborhood
Downtown 2-Storey Houses will turn into these by having Bookstores, Libraries, and 1 Sculpture nearby.
Compared to normal Downtown Houses, they provide more (13) Happiness and 2 extra Cultures per sq.


Night Life Neighborhood
Downtown 2-Storey Houses will turn into these by having Leisure Buildings and 1 Cool Park nearby.
Compared to normal Downtown Housings, they provide more (13) Happiness and 2 extra Night Lifes per sq.
However, they also consume Goods; hence the upgrading cost of Night Life Nbhd. is much higher than Artist Nbhd.

Strategy Note: Both Artist and Night Life Neighborhoods can withstand Pollution, even though Downtown Houses can't bear Pollution.
You can build up an area to the Downtown level, turn it into Artist Neighborhoods, and then grow Industries in its proximity, rather than having a 5-sq. buffer zone between your residential and industrial area.
Housing: Shanty Town/Social Building

Shanty Town - Blocks
When there is Pollution (usually from Industries) near Housings, they will turn into Shanty Town (slums) with very low Happiness.
Clusters of Shanty Town will generate Rebel houses, the earliest source of Self-Organization in the game.
Enough Self-Organization will unlock buildings such as Anarchist Bar (higher Night Life), Self-Managed Bookstore (higher Leisure), and eventually Anarchist Commune (higher Happiness residential).
Shanty Town will also upgrade into Blocks if provided with Food Services, which will house more Population with a very good Food consumption ratio while still having very low Happiness (credit to @cablemonkey for pointing out its usefulness).


Social Buildings
Reaching 8000 Population unlocks Social Buildings (social housing). Unlike regular Housing, Social Buildings can withstand Pollution and house a much larger Population (one Social Building has 192 residents; the UI only shows 48).
Moreover, Social Building is the only Housing that doesn't have a density requirement. They can fill the edge of your city's urban areas when only basic Wooden Huts appear there due to a lack of neighbors, and also trigger nearby Houses to upgrade by providing high-density neighbors.


High-Level Social Buildings
Poor Social Buildings can be upgraded into Medium and Comfortable Social Buildings, if provided with Education, Food Services, Healthcare, and Leisure.
The Comfortable Social Building has a standard Happiness value (10 Hap.) and can still withstand Pollution, very important for Path of Leisure victory (see below sections).
Housing: Happiness Housings
Two routes of Housing upgrades have much more Happiness than others, although they have specific requirements.


Villa - Mansion
Villa is unlocked from the very early game; Mansion is unlocked after reaching 10 Happiness and 6500 Population.
Basic Housings (Wooden Huts) will be upgraded into those Green Areas (Parks) nearby. In addition, Villa requires no other Housing in a 4-sq. radius, and Mansion requires no other Housing in a 1-sq. radius.
Both Villa and Mansion provide the highest Happiness in the game (13-14 Hap.), at the cost of being very low-density and offering less Skilled Works.


Poor Suburbs - Religious Neighborhood
Reaching 2200 Population unlocks Poor Suburbs, and basic Housings with a 1 Sq. condominium nearby will turn into Poor Suburbs. It is a cheaper way to get more Unskilled Works (14 Unskilled while costing 10 Food) in the early game. On the other hand, Poor Suburbs can only upgrade to Religious Neighborhoods.
With a Police Station (unlocked with 6 Faith and 8000 Population) and Chapels/Churches nearby, Poor Suburbs will turn into Religious Neighborhood. Religious Neighborhood also provides much more Happiness (14 Hap. compared to 10-12) than standard Houses.

Layout: Downtown
This should be the most common urban layout throughout the city. Plopping down corresponding service buildings will upgrade all Housings to the types you want, whether high-level residential, high-level mixed, or Downtown variants.

This layout is based on the coverage of High School; every Housing within the area will fall under the High School's and the Clinic's coverage.

An example of the layout with a developed Downtown:
Layout: Farming and Orchard
Two generic farming layouts. Different maps have different terrain realities and different ways of Food production, while the general logic behind the layouts remained the same.

Farming


Orchard - credit to the better layout by @Aydaylin


An example of the farming layout:
Layout: Industrial Zone
The Pollution layout.
Certain Industrial buildings require residents nearby, thus this layout includes Housings. In addition, some Industrial buildings (such as Coal Plant and Steelworks) can be upgraded to better versions when there are Warehouses and residents nearby.


The layout in practice, with Coal and Iron Miner's Houses acting as nearby residents - these two types of Houses can withstand Pollution, while having good density.
Layout: Mansion
Repeat this layout and get high Happiness en masse.


You can also do interesting stuffs with Mansions like below:
Policies

Placing the three policy buildings - Neighborhood Council, City Council, and City Hall - will unlock the ability to pick and change Policies. Higher-level policy buildings will also unlock lower level Policies, so you don't need to build all three.
Almost all Policies have an upside and a downside.
Choosing Policies based on your needs. If you are on the Path of Production or Wealth, then trade Happiness for Food or Energy; if you are on the Path of Leisure, then trade Food or Unskilled Labor for Happiness. Never trade Science until very late in the game, though, as most of the time, you will be lacking Science.

Notable Policies
Watermill technicians, Lumberjack house technicians - Nice way to increase Energy production in early and early-mid game. Best for all victories.
Pay miners in tokens - Decent increase in Iron/Coal production if you don't care about Happiness.
Festivals - Raise Happiness with minimal cost.
Industry R&D - Important source for mid- to late game Sciences. Best for pursuing the Path of Productivity.
Neighbourhood life - This Policy doesn't have a downside if you don't rely on Supermarkets and Malls. Raise decent Happiness, best for pursuing the Path of Leisure.
Eating insects - Good for late-game Food production if you don't care about Happiness.

Career Path, or How to Beat the Map
You can "win" every map by completing achievements of one of the three Career Paths: Path of Wealth, Path of Productivity, and Path of Leisure.
After completing all eight achievements of a Path, your city will be scored for this playthrough.

NOTE 1: Once you finished the initial requirements of a particular Path, your playthrough will be locked in this Path, and you can't choose other Paths. Plan carefully at the beginning of the game!
NOTE 2: Upgraded version of a building cannot fulfill the requirements. For instance, if a requirement calls for Grain Silos, having Modern Grain Slios don't count towards it.

Path of Wealth

Path Requirements:
  1. Villa ×4
  2. Wealthy Village House ×60
  3. Wealthy Suburb House ×80
  4. Modern 2-Storey House ×40
  5. Mansion ×3
  6. Mixed Commercial-Residential ×10;
    5-Storey Residential ×10
  7. 5-Storey Mixed Commercial-Residential ×10;
    Bank ×5
  8. 8-Storey Mixed Office-Commercial x30
This is the easiest Path to achieve. All the requirements can be met naturally when developing your Downtown to a higher level.
The only notable obstacle is the prerequisite for the final requirement (8-Storey Mixed) - the Airport - which means reaching 33000 Population. Grow your city to 33000 Population and you will win this Path.

Path of Leisure

Path Requirements:
  1. Green Areas ×20
  2. Sports ×20;
    Multisport Court ×3;
    Village Bar ×3;
    Village Bar 2-Storey ×3
  3. Green Areas ×40;
    Chapel ×10;
    Church ×5;
    Floral Park ×3
  4. Bookshop ×5;
    2-Storey Bookshop ×10;
    Library ×10
  5. Artist Neighborhood ×15;
    Religious Neighborhood ×15;
    Happiness ×11
  6. Night Life Neighborhood ×15;
    Happiness ×12;
    Population ×12000
  7. Comfortable Social Building ×15;
    University ×2;
    Happiness ×13
  8. Green 5-Storey Residential ×50;
    Museum ×3;
    Happiness ×14
This is the medium-level difficulty Path. Most of the requirements are fairly easy to meet, just that you need to go out of your way to build a variety of buildings (who would normally build 10 Chapels or 3 Museums?).
On the other hand, Happiness is not that hard to raise, if you can carefully upgrade/replace your low-Happiness Houses to higher Happiness variants, and further employ Happiness-raising Policies. Religious Neighborhoods will be your best friend.

Path of Productivity

Path Requirements:
  1. Work production ×500
    Wood production ×90
    Energy production ×50
  2. Food production ×1000
    Wood production ×200
    Energy production ×300
    Grain Silo ×5
  3. Work production ×1500
    Skilled Work production ×200
    Modern Grain Silo ×5
    Sawmill ×1
  4. Energy production ×4000
    Skilled Work production ×500
    High-Skilled Work production ×500
  5. Steel Production ×100
    High-Skilled Work production ×1500
    Goods production ×200
    Factory ×15
  6. Orchard ×100
    Food production ×30000
    Poor Social Building ×10
  7. Population ×25000
    Energy production ×8000
    Solar Plant ×20
    Wind Turbine ×10
    Biomass production ×60
  8. Population ×50000
    Science production ×300
Even though the game's tutorial guides you to complete this Path, this is actually the hardest Path. The requirements ask the player to produce a variety of stuff, which further requires lots of Energy, Population, and/or Sciences.
Most importantly, the final requirement calls for 50000 Population, a massive Population number that needs tons of Foods to achieve; the focus of your playthrough after 33000 Population will be entirely dedicated to raising more and more Foods.
In addition, this Path is very Science Heavy, and Science is always hard to come by. The Industry R&D policy plus Factories will be your best friend.
Misc: Two Hotkey Tricks

O: The copy button.
G: This is essentially a search button. Select a building and press G, all same buildings in your city will be highlighted.

Misc: The Regional Features Update
On July 18, 2023, the devs pushed forward a new update that added regional bonuses and buildings into the base game. Now when starting a map, you can choose from 8 possible regions with unique perks.

Latin America
  • Unique building: Street Food. Provides 1 Food Service and 1 Leisure, acts as a Road piece.
  • Farms produce +20% of Food.
  • Soccer Fields produce ×2 Leisure and Sports.
A decent choice if your city relies on Farms as the main source of Food.

North America
  • Unique building: Gas Station. Provides 1 Connectivity, 1 Tool, and 1 Food Service.
  • Parking Lots now produce 1 Leisure.
  • University produces ×2 Science, from 30 Science to 60 Science.

Western Europe
  • Unique building: Castle. Produce 15 Culture and 15 Leisure. Libraries now produce ×3 Leisure and Culture.
  • 10% more Population.
  • Wind Turbine produce ×3 Production.

Eastern Europe
  • Unique building: Advanced Social Housing. A new upgrade for the Social Building, produces 60 L. Skilled, 20 Skilled, and 18 H. Skilled Works. Has 13 Happiness.
  • Iron production ×2
  • Steel production ×2
A decent choice if you are pursuing the Path of Leisure and need higher Happiness, or simply having the Population rely on Social Housing in general.

Western/Central Africa
  • Unique building: Faculty of Linguistics. Produce 30 Culture and 50 Science.
  • Wood production +20%
  • Warehouses do not produce Pollution.
Might be helpful for Path of Productivity.

Eastern/South Africa
  • Unique building: Traditional Market. Replaces Supermarket. Requires fewer resources, and produces an extra 1 Leisure and 1 Culture.
  • Neighborhood Council produces 2 Leisure.
  • Solar Panels ×3 Energy.

Middle East
  • Unique building: Bazaar. Replaces Minimarket. Does not consume Food.
  • Energy +20%
  • Research Centers produce ×2 Food.
A fantastic choice if your city is pursuing the Path of Productivity and needs a ton of Food to feed the population.

Asia
  • Unique building: Skyscraper. Consumes 4000 L. Skilled Works, 4000 Skilled Works, and 120 Science, to produce 10000 H. Skilled Works. Production of H. Skilled Works in the city +10%.
  • Building cost of basic Houses -50%
  • Goods Factory also produces an extra 200 Food and 200 Wood.
Has a very powerful unique building, however, it is also extremely late-game. Building the thing is a great challenge on its own.
18 Comments
Guuytss 27 Jul @ 9:27am 
Thanks!
firematt422 20 May @ 6:55pm 
Does anyone know of a resource that shows all buildings and the requirements and influence areas?
Mizohican 16 May @ 8:20pm 
@Poker - ahhh understood. Thanks!
Poker 16 May @ 5:04am 
https://steamproxy.com/id/Mizohican

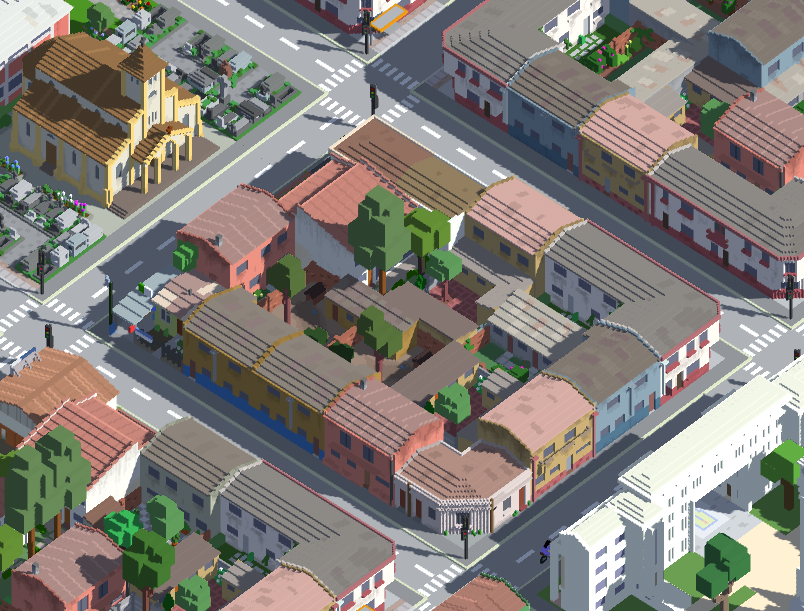
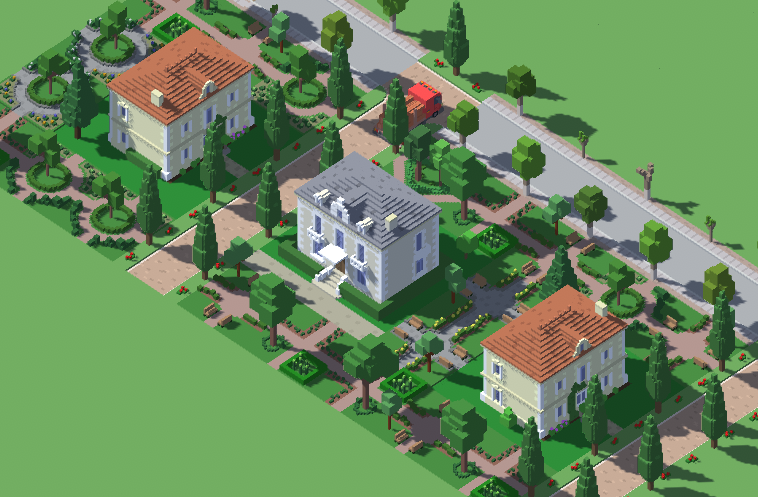
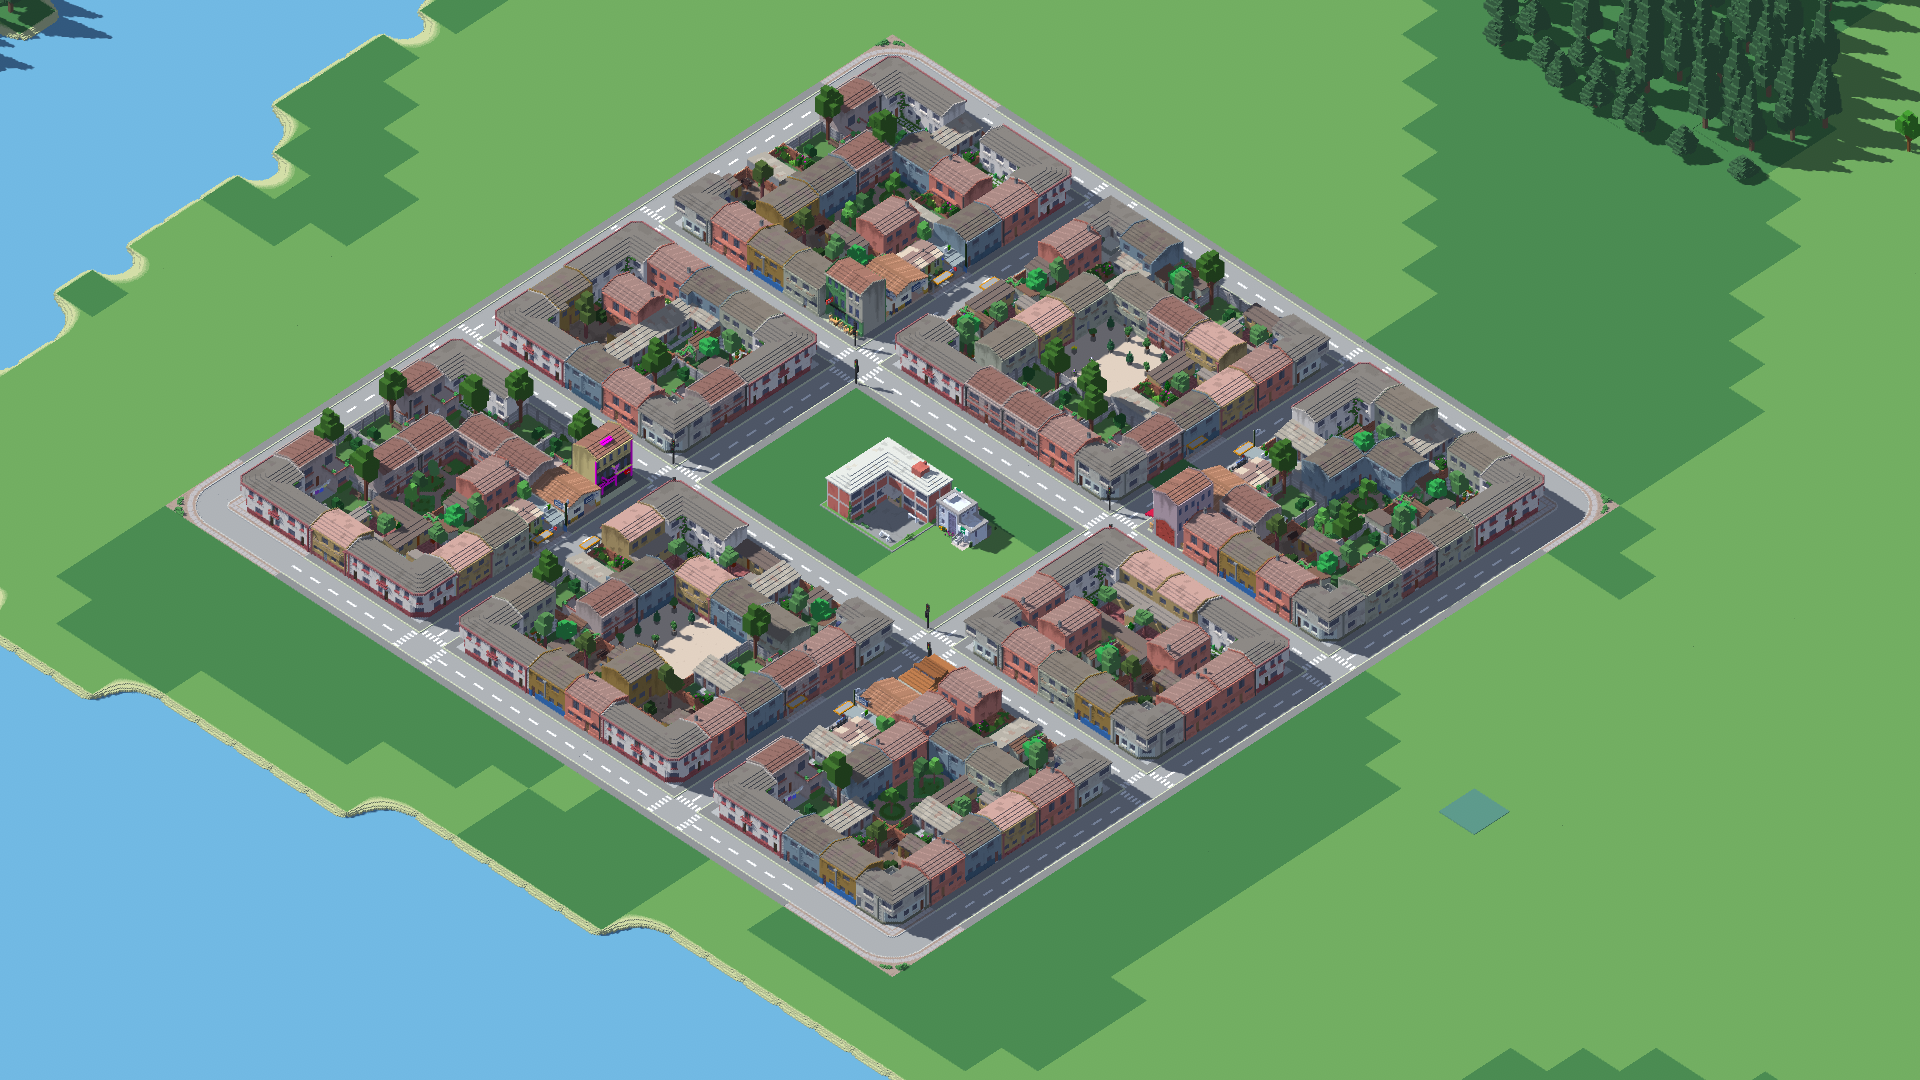
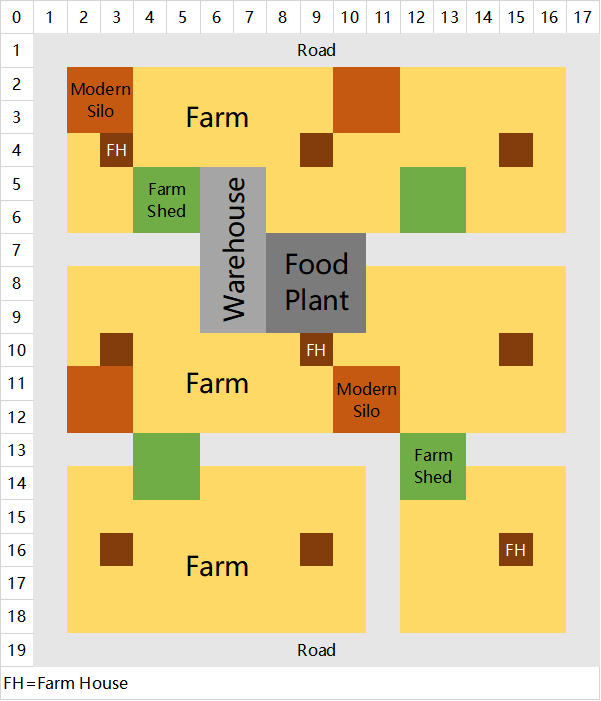
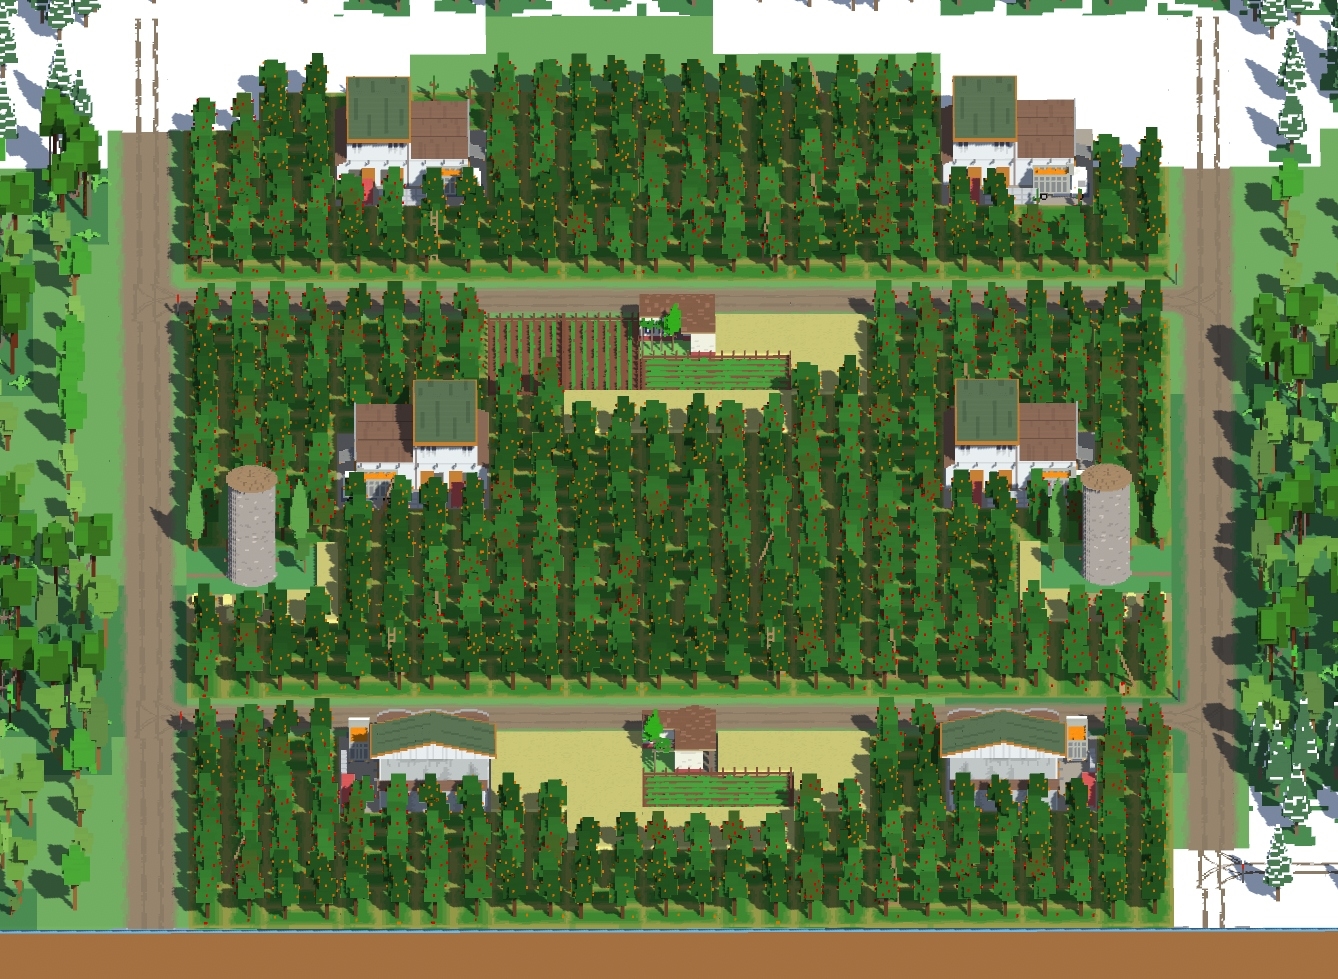
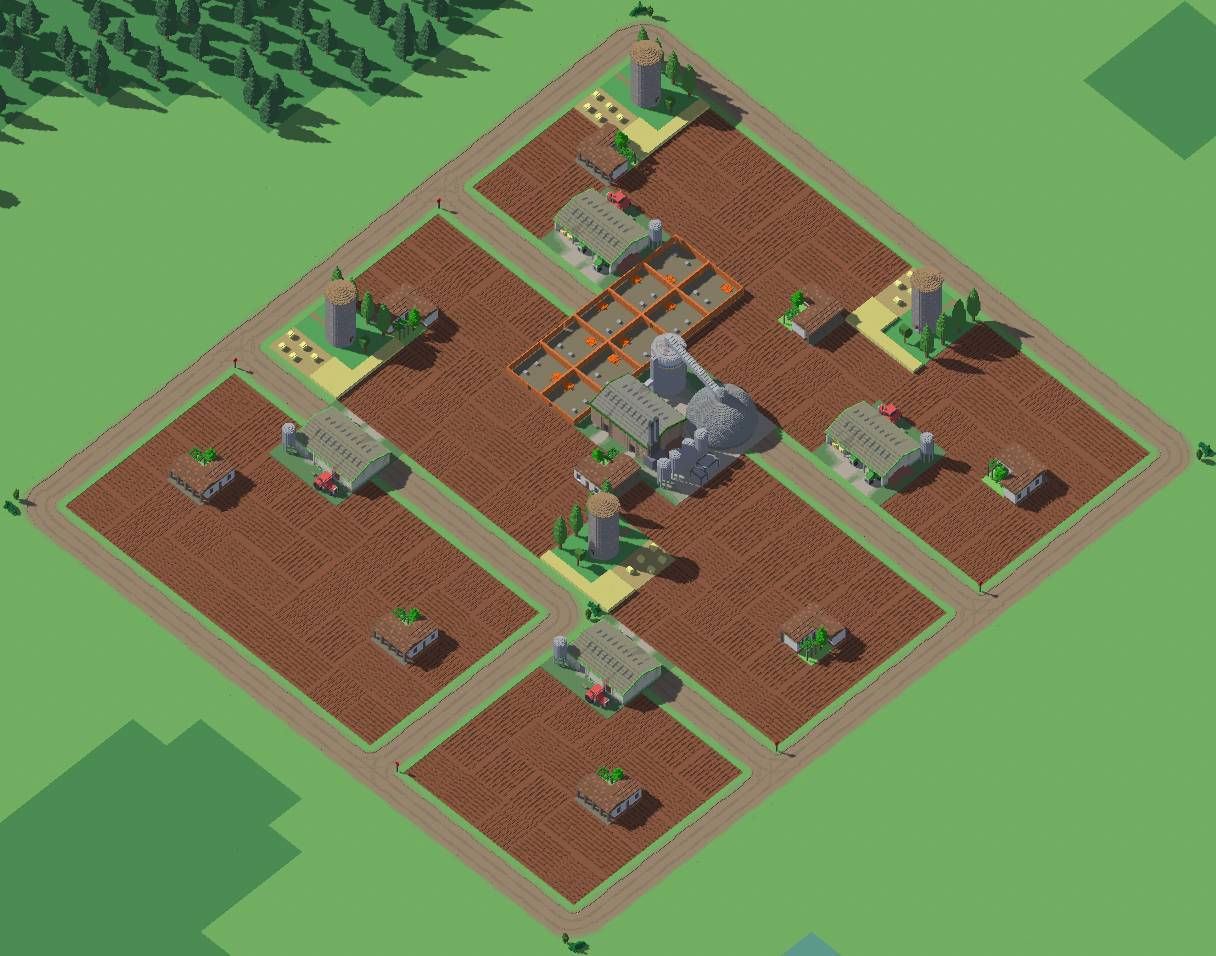
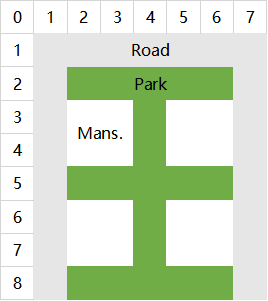
The tenet farmers and Landlord houses are part of the tutorial, showing you how it can be built. But for efficiency, the layout above is far better. You don't have to follow either, you can build as you please, they are both examples of what if.
Mizohican 8 May @ 7:26pm 
Just wondering if the game has been updated after this guide was made? Because I just started playing and I am trying to follow your farm layout, but in my game I am seeing elements like "Tenant Farmer" and "Landlord's House" in my farm setup, which are not there in your farm layout, so I am a bit confused.
OOHHBABY 7 May @ 9:27pm 
Thank you!
notstats 29 Jan @ 1:46pm 
very thank you.
Qwykfyx 17 Aug, 2024 @ 8:29pm 
Here is a link to the orchard layout:

https://imgur.com/dv8au6B
eightroomsofelixir  [author] 26 Jul, 2024 @ 6:09am 
@Bubbiboor - Nice tip! And it's been years since I have heard the word magnasanti last time. Glad there are still people aware of this interesting piece of the city-building-genre history.
Bubbiboor 25 Jul, 2024 @ 4:13pm 
tip: if you're planning a production run and disregarding happiness for maximum resource output, make sure you unlock the book store before letting turning your city into a magnasanti-esque dystopia.

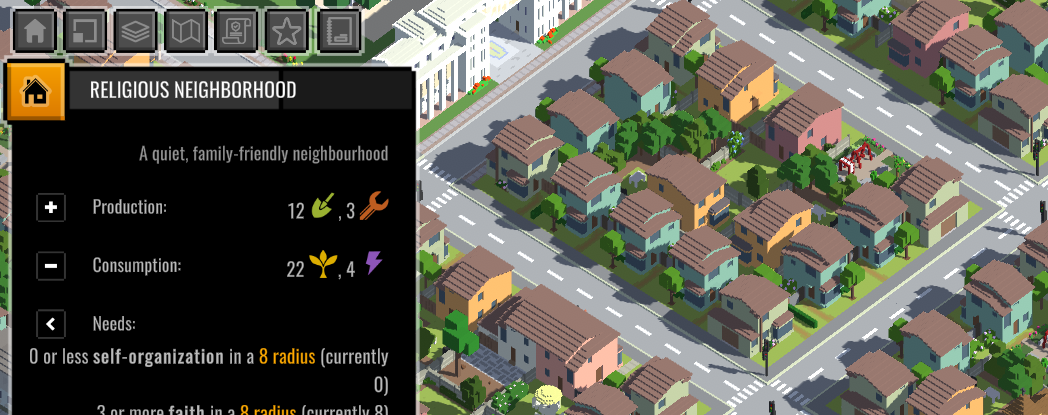
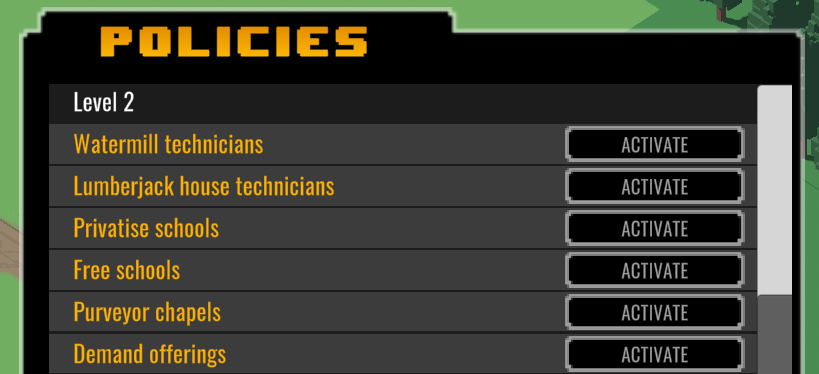
the reason is that you will need culture to build a school of arts and letters to unlock the city hall—this will make your life much easier as you can use the level-3 legislation to exploit more resources and conserve more food and whatnot.