GROUND BRANCH

GROUND BRANCH

37 ratings
Easy Performance Guide - For Weaker/Older Gaming Laptops/PCs - Updated For 1034! - Now Supports Linux!
By MissNurseXochi and 1 collaborators
This game has relatively poor optimization.

This guide aims to help you increase your FPS.
   
Award
Favorite
Favorited
Unfavorite
Part 1: In-game Settings Menu
This should get you closer to 60 FPS* on less demanding maps and lower player counts... while keeping performance more stable on the more demanding maps with higher player counts.

*As long as you also follow Part 2, this downscaled version will look like a pseudo-1080p (like 1080p just slightly blurrier with some flickering and artifacts).

I used a laptop with a Core i7-7700HQ, GTX 1050 (4GB VRAM), 16 GB RAM, and a 500GB SSD.


Start out by copying the settings in the following screenshots. After you are finished, move on to Part 2.


Other notes:

The following settings have a huge impact on performance.
- Screen Space Reflections (SSR)
- Shadows
- Screen Space Global Illumination (SSGI)

The following have fairly big impact on performance.
- Effects
- Post Processing

Textures don't usually have a impact on performance, but can cause "Out Of Memory" crashes if they are set too high. Textures also have a huge effect on how the game looks (outside of your overall resolution of course)... so keep it as high as possible.

If you are a long distance player (for example: you like being far from the enemies, like a sniper) then you should keep your "View Distance Quality" and "Detail Mode" in "Advanced Settings".
BTW, if you get big framerate drops when you use scopes... lowering your "PIP Scope Resolution Scale" can help with scoped performance.

Setting "Foilage Quality" to "Low" makes the foilage look like crap. Setting it above "Medium" seems to not have a major effect on the quality... so "Medium" should be fine, but you can set it higher if you want without much performance penalty.

As for TAA, it kinda sucks because it causes flickering/jittering or blurring/ghosting... especially when in motion. These effects are especially amplified when looking through scopes.
The "TAA Current Frame Weight" in the "Advanced Settings" affects this - higher values cause more flickering/jittering while lower values cause more blurring/ghosting.
There is a bit of a saving grace though... with TAA and Sharpening, like I explained above... it is possible to use a lower resolution but make it look detailed like a higher resolution.

Capping your framerate a little bit below the maximum framerate your PC is able to handle can also help with your frame timing, which will make your game feel smoother and less stuttery.
Part 2: In-game Console Commands
Open the console and enter the following commands. These commands will help increase performance drastically, especially on older/weaker hardware.

r.DistanceFieldAO 0
r.AmbientOcclusionLevels 0
r.Fog 0

These commands are optional; however, I have not really noticed any changes when using them.
r.DepthOfFieldQuality 1
r.MotionBlurQuality 0

These commands are optional; however, the performance impact is pretty minimal.
r.BloomQuality 0 (This disables bloom completely and gives better visibility, but looks really bad. However with bloom on, it also looks bad IMHO. To re-enable bloom, change 0 to 1.)

Note: You must enter the commands each time you play the game, these settings are not permanent. At least after entering them in the console once, you can open the console the next time you play and use the up/down arrow keys to select them and press enter.


UPDATE: I just found a way to make the console commands permanent so that you don't have to enter them into the console every time you want to play! For more details on this, proceed to Part 3.
Part 3: Permanent Console Commands
As described in Part 2, there are some console commands that can dramatically increase performance... but every time you wanted to play, you would of had to open up the console and enter the commands (which could be really inconvenient, especially when playing multiplayer).

In this section, I will show you how you can make the console commands "permanent". In other words, the game will be ready to play once you load into a match... no typing of commands necessary!

Please note there is one caveat to this method. Your graphics settings won't be saved if you change them in game unless you uncheck "Read-only" in "Properties". You can still change some settings in game, but they won't be saved for your next launch though.


Start by browsing to the following directory:
C:\Users\*YourUsernameHere*\AppData\Local\GroundBranch\Saved\Config\WindowsNoEditor

Find the file called "engine.ini" and open it with notepad or your favorite text editor. The file will look a lot like the screenshot below.

BEFORE MAKING ANY CHANGES, SAVE A BACKUP OF THE FILE SOMEWHERE SAFE.

Delete everything below the highlighted section. DO NOT DELETE THE HIGHLIGHTED SECTION.


After deleting the text below the highlighted section, copy following text (from between the dashed lines, but without the dashes) to the end of the file... then save the file.

Make the file "Read-only" by right clicking on the file, selecting "Properties", checking the box for "Read-only", then clicking "Apply" and "OK". This will prevent the game from undoing your changes.

-------------------------------------------------------------------------------------------------------
[/script/engine.engine]
DisplayGamma=1.800000
bSmoothFrameRate=0

[SystemSettings]
r.MotionBlurQuality=0
r.FastBlurThreshold=0
r.TranslucencyVolumeBlur=0
r.BlurGBuffer=0
r.Tonemapper.Quality=0
r.Tonemapper.GrainQuantization=0
r.MaxAnisotropy=4
r.MaterialQualityLevel=0
r.BloomQuality=1
r.DefaultFeature.Bloom=0
r.LensFlareQuality=0
r.LightShaftQuality=0
r.SSGI.Quality=0
r.SSGI.HalfRes=1
r.SSR.Quality=0
r.ReflectionCaptureResolution=32
r.ShadowQuality=0
r.Shadow.MaxResolution=256
r.Shadow.DistanceScale=.5
r.DistanceFieldShadowing=0
r.DistanceFieldAO=0
r.AmbientOcclusionLevels=0
r.DepthOfFieldQuality=0
r.EyeAdaptionQuality=0
r.SceneColorFringeQuality=0
r.Fog=0
r.VolumetricFog=0
r.VolumetricFog.Jitter=0
FX.MaxCPUParticlesPerEmitter=200
FX.MaxGPUParticlesSpawnedPerFrame=200

[/script/engine.renderersettings]
r.Streaming.Boost=1
r.Streaming.PoolSize=1000
r.Streaming.LimitPoolSizeToVRAM=0
r.Streaming.DefragDynamicBounds=1
r.CreateShadersOnLoad=1
r.Shaders.Optimize=1
r.Shaders.FastMath=1
r.UseShaderCaching=1
r.UseShaderPredraw=1

[/script/engine.inputsettings]
bEnableMouseSmoothing=False

[ConsoleVariables]
r.Color.Max=0.8
r.TemporalAACurrentFrameWeight=0.25
r.TemporalAASamples=2

[WindowsApplication.Accessibility]
StickyKeysHotkey=False
ToggleKeysHotkey=False
FilterKeysHotkey=False
StickyKeysConfirmation=False
ToggleKeysConfirmation=False
FilterKeysConfirmation=False
-------------------------------------------------------------------------------------------------------

Performance Bug - Razer Cortex
If you are using Razer Cortex, close it. It can cause poor performance in Ground Branch.

If you are using OpenRazer/Polychromatic on Linux, you can leave it open.
Linux is just superior and doesn't need stuff like Razer Cortex to get better performance. xD

Penguin Master Race! - AKA The Linux Section - Part 1: Intro To Linux
Intro to Linux:

Linux is a FREE and OPEN SOURCE (FOSS) operating system.
It's free not in just cost (being $0 - no Windows License Keys needed), but also in the fact that you can do just about anything with it... because the code is available to anyone (hence Open Source).

With Windows becoming worse over time due to:
- Greed (Changing Microsoft Office into a subscription with Office 365, Removing WordPad, Pushing advertisements, etc. - "Embrace, Extend, Extinguish!")
- Leftist ♥♥♥♥♥♥♥♥ (Censorship, Attempting to force users to use Microsoft Edge, Forcing users to buy new hardware to run Windows 11 if they don't use workarounds even if their few year old PC still works completely fine, implementing invasive Spyware/Telemetry, etc. - "You will own nothing and you will be happy!")
- Terrible Updates (Constantly ruining the Start Menu, releasing buggy/broken updates that prevent software/hardware from working properly... and possibly even deleting files! - "Windows has ran into a problem and needs to restart." X_X)
- Bloat (Constantly adding useless features like Cortana, Preloading junk like Candy Crush, etc. all leads to a slower PC over time... and making people wasting more money while creating more e-waste as "old and slow" PCs end up in landfills. - "Sustainability - missing in action!")
...and Mac OS still being a travesty for gaming, this has led more users to switch to Linux.

Fortunately, even Valve is in the Linux lane... since they developed Steam's Proton compatibility layer, which enables most Windows game to run on Linux!
This also includes the Steam Deck, as Valve ships Linux as the default operating system on it!


Prerequisite: Enabling Steam Proton for all games!

Go to Steam Settings > Compatibility and turn on "Enable Steam Play for support titles" and "Enable Steam play for all other titles"... then restart Steam.


If you haven't bought the game, then do so! Ground Branch is much better than most modern games. The game works offline in addition to online, you can use mods, and you can self host your own server to play with friends. There are no P2W Mechanics/Lootbox Gambling "Surprise Mechanics" (looking at you EA), or Microtransactions/DLC, etc. ...Of course, you need to download the game also!

After this, you may proceed to give me a hug. If not, Microsoft Clippy, Microsoft Bob, Bonzi Buddy, and Cortana may come back with a vengeance. 3:) jk
Penguin Master Race! - AKA The Linux Section - Part 2: Editing The Config Files
Intro to tweaking Ground Branch:

The steps to applying the tweaks are almost identical to the Windows steps, just the files are in different locations.

The specific location of your files may also vary depending on your "Distro" (Linux Mint, Debian, Arch, Gentoo, UwUuntu [yes, that's a thing! OwO], Kali Linux, etc.) and where you put your Steam library.


Step 1 - Browsing Local Files:

As for me (Random Fandom), I created a Steam library in a "Games" folder located in my home directory to simplify things... but you can find where your Ground Branch installation is by right clicking on Ground Branch and going to Manage > Browse local files


This will probably open your file browser in Linux to where your Ground Branch installation is.
Your file browser may look different, depending on your Distro and Desktop Environment (Budgie, XFCE, Cinnamon, Gnome, KDE, etc. - As for me I'm using Linux Mint with the Cinnamon Desktop Environment and a custom dark blue theme).

Note: this is not the Steam Proton Prefix (pfx) folder, which is where the sub-directory that contains engine.ini is stored.

My installation of Ground Branch is installed in:
"/home/randomfandom/Games/Steam/steamapps/common/Ground Branch"


Step 2 - Finding the Steam Proton Prefix directory:

Every game on Steam has an ID number. The ID of a game can be found in the URL of the Steam Store Page. For Ground Branch it's 16900.


The Steam Proton Prefix for each particular game lies within it's ID number folder; within the compatdata folder... so my Ground Branch Steam Proton Prefix location is as follows:
"/home/randomfandom/Games/Steam/steamapps/compatdata/16900/pfx"

To navigate to the "compatdata" folder, go up two folders.


Then open the "16900" folder for Ground Branch.


Finally, open the "pfx" folder.
This is the Steam Proton Prefix folder that contains the standard "Windows" directories (such as "AppData" and "My Documents") for the game.


Step 3 - Editing the Engine.ini file

Go to "drive_c" > "users" > "steamuser" > "AppData" > "Local" > "Ground Branch" > "Saved" > "Config" > "WindowsNoEditor"

Then find the Engine.ini file.


My engine.ini is located in:
"/home/randomfandom/Games/Steam/steamapps/compatdata/16900/pfx/drive_c/users/steamuser/AppData/Local/GroundBranch/Saved/Config"


Simply edit the file with the same tweaks from the Windows section.
Of course, don't forget to make a backup of the file first!

++++++++++++++++++++++++++++++++++++++++++++++++++
As described in Part 2, there are some console commands that can dramatically increase performance... but every time you wanted to play, you would of had to open up the console and enter the commands (which could be really inconvenient, especially when playing multiplayer).

In this section, I will show you how you can make the console commands "permanent". In other words, the game will be ready to play once you load into a match... no typing of commands necessary!

Please note there is one caveat to this method. Your graphics settings won't be saved if you change them in game unless you re-enable write permissions. You can still change some settings in game, but they won't be saved for your next launch though.


BEFORE MAKING ANY CHANGES, SAVE A BACKUP OF THE FILE SOMEWHERE SAFE.

Open the Engine.ini file with your text editor.
(Geany is similar to Notepad++ on Windows, is FOSS... and is available in most repos too!)

Delete everything below the highlighted section.
DO NOT DELETE THE HIGHLIGHTED SECTION.


After deleting the text below the highlighted section, copy following text (from between the dashed lines, but without the dashes) to the end of the file... then save the file.

-------------------------------------------------------------------------------------------------------
[/script/engine.engine]
DisplayGamma=1.800000
bSmoothFrameRate=0

[SystemSettings]
r.MotionBlurQuality=0
r.FastBlurThreshold=0
r.TranslucencyVolumeBlur=0
r.BlurGBuffer=0
r.Tonemapper.Quality=0
r.Tonemapper.GrainQuantization=0
r.MaxAnisotropy=4
r.MaterialQualityLevel=0
r.BloomQuality=1
r.DefaultFeature.Bloom=0
r.LensFlareQuality=0
r.LightShaftQuality=0
r.SSGI.Quality=0
r.SSGI.HalfRes=1
r.SSR.Quality=0
r.ReflectionCaptureResolution=32
r.ShadowQuality=0
r.Shadow.MaxResolution=256
r.Shadow.DistanceScale=.5
r.DistanceFieldShadowing=0
r.DistanceFieldAO=0
r.AmbientOcclusionLevels=0
r.DepthOfFieldQuality=0
r.EyeAdaptionQuality=0
r.SceneColorFringeQuality=0
r.Fog=0
r.VolumetricFog=0
r.VolumetricFog.Jitter=0
FX.MaxCPUParticlesPerEmitter=200
FX.MaxGPUParticlesSpawnedPerFrame=200

[/script/engine.renderersettings]
r.Streaming.Boost=1
r.Streaming.PoolSize=1000
r.Streaming.LimitPoolSizeToVRAM=0
r.Streaming.DefragDynamicBounds=1
r.CreateShadersOnLoad=1
r.Shaders.Optimize=1
r.Shaders.FastMath=1
r.UseShaderCaching=1
r.UseShaderPredraw=1

[/script/engine.inputsettings]
bEnableMouseSmoothing=False

[ConsoleVariables]
r.Color.Max=0.8
r.TemporalAACurrentFrameWeight=0.25
r.TemporalAASamples=2

[WindowsApplication.Accessibility]
StickyKeysHotkey=False
ToggleKeysHotkey=False
FilterKeysHotkey=False
StickyKeysConfirmation=False
ToggleKeysConfirmation=False
FilterKeysConfirmation=False
-------------------------------------------------------------------------------------------------------
++++++++++++++++++++++++++++++++++++++++++++++++++


...Then set the file as read-only, like this.


To re-enable write permission, set the file properties like this.


LOOK MA! NO TERMINAL! :)

Linux is not always hard to use. You can use it!
\(^v^)/
39 Comments
RFGCRebelAlpha  [author] 21 Jun @ 7:52am 
I will be very surprised if it runs well at all on a GT 1030. I hope it works for you!
Sean2111 21 Jun @ 6:08am 
Post your results -
I am curious.
Ubica Divova 21 Jun @ 3:14am 
I'll be trying this on my really damn old PC. I've got a GT 1030 and a i5-2500, we'll see how it goes lmao
RFGCRebelAlpha  [author] 19 May @ 6:43pm 
no problem ;)
Sean2111 18 May @ 7:38pm 
Thanks -
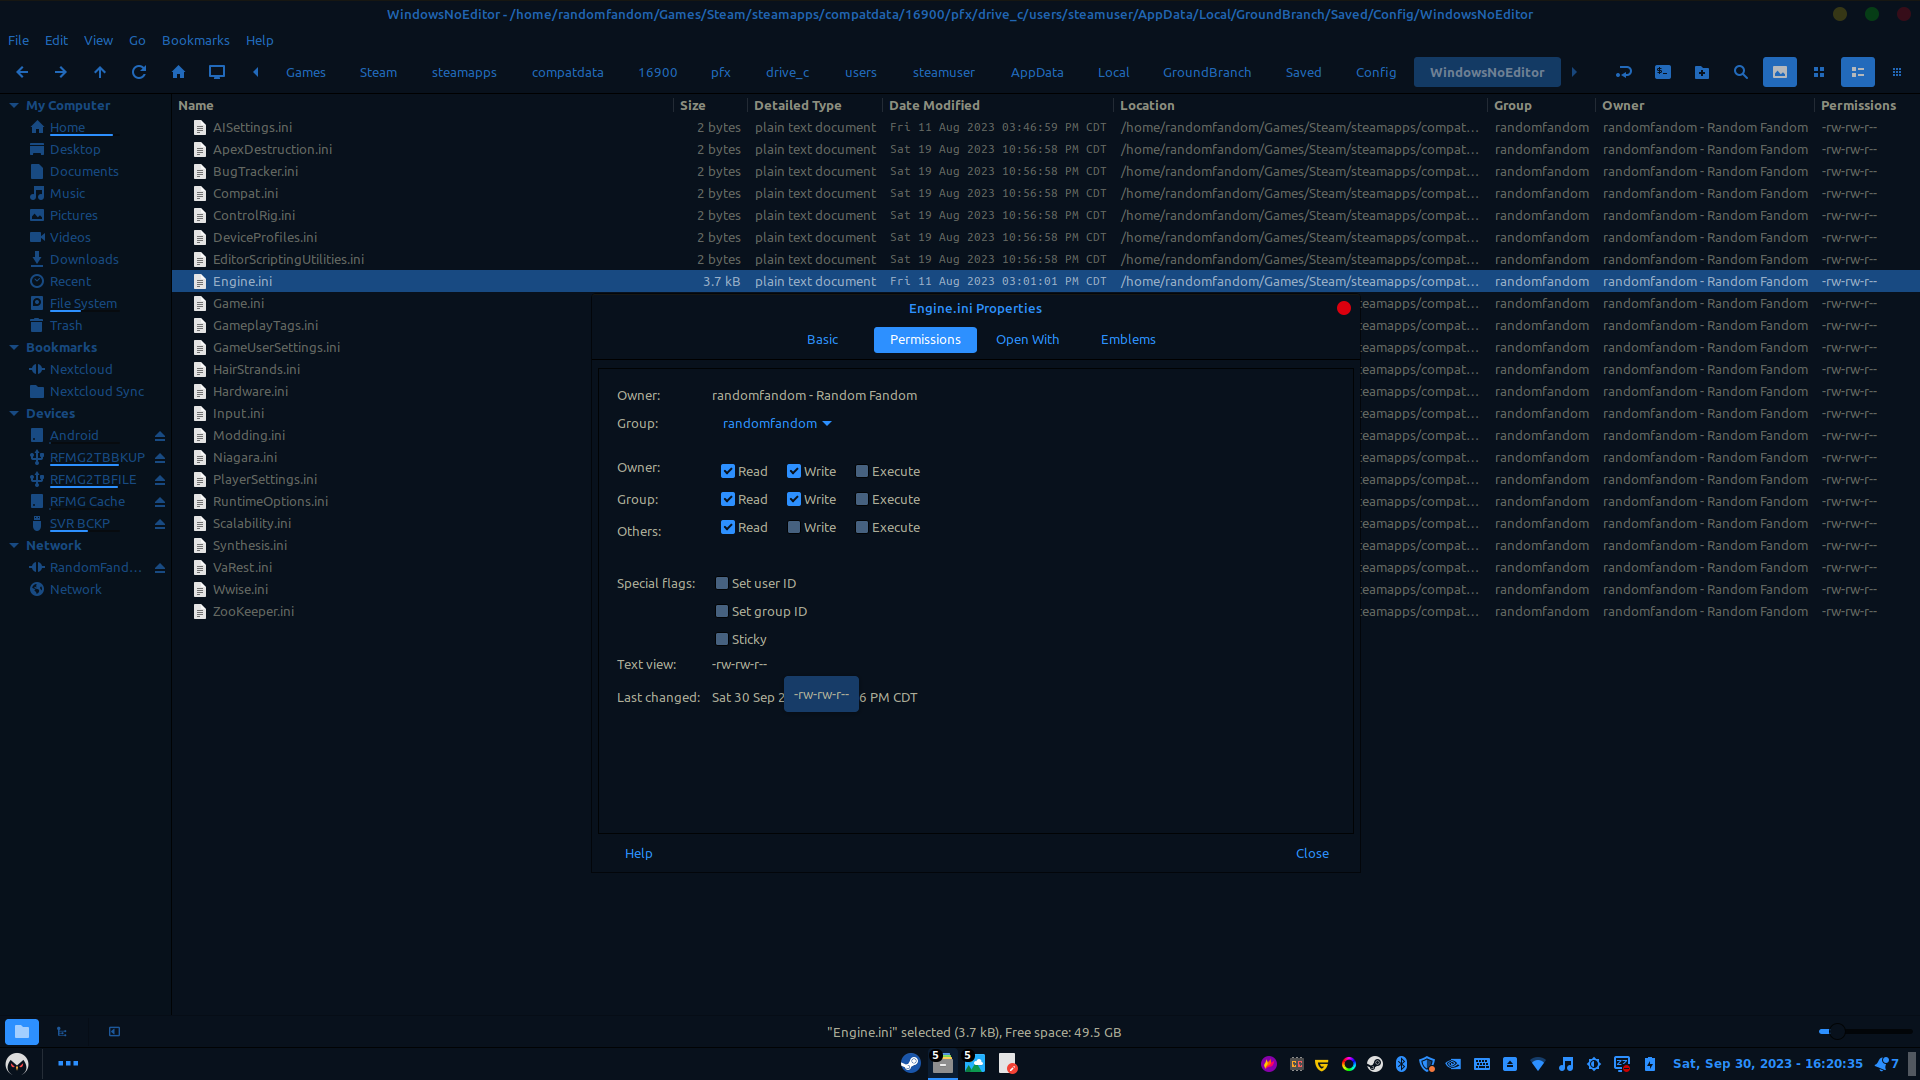
I have made read only.
You have made a guide that works well.
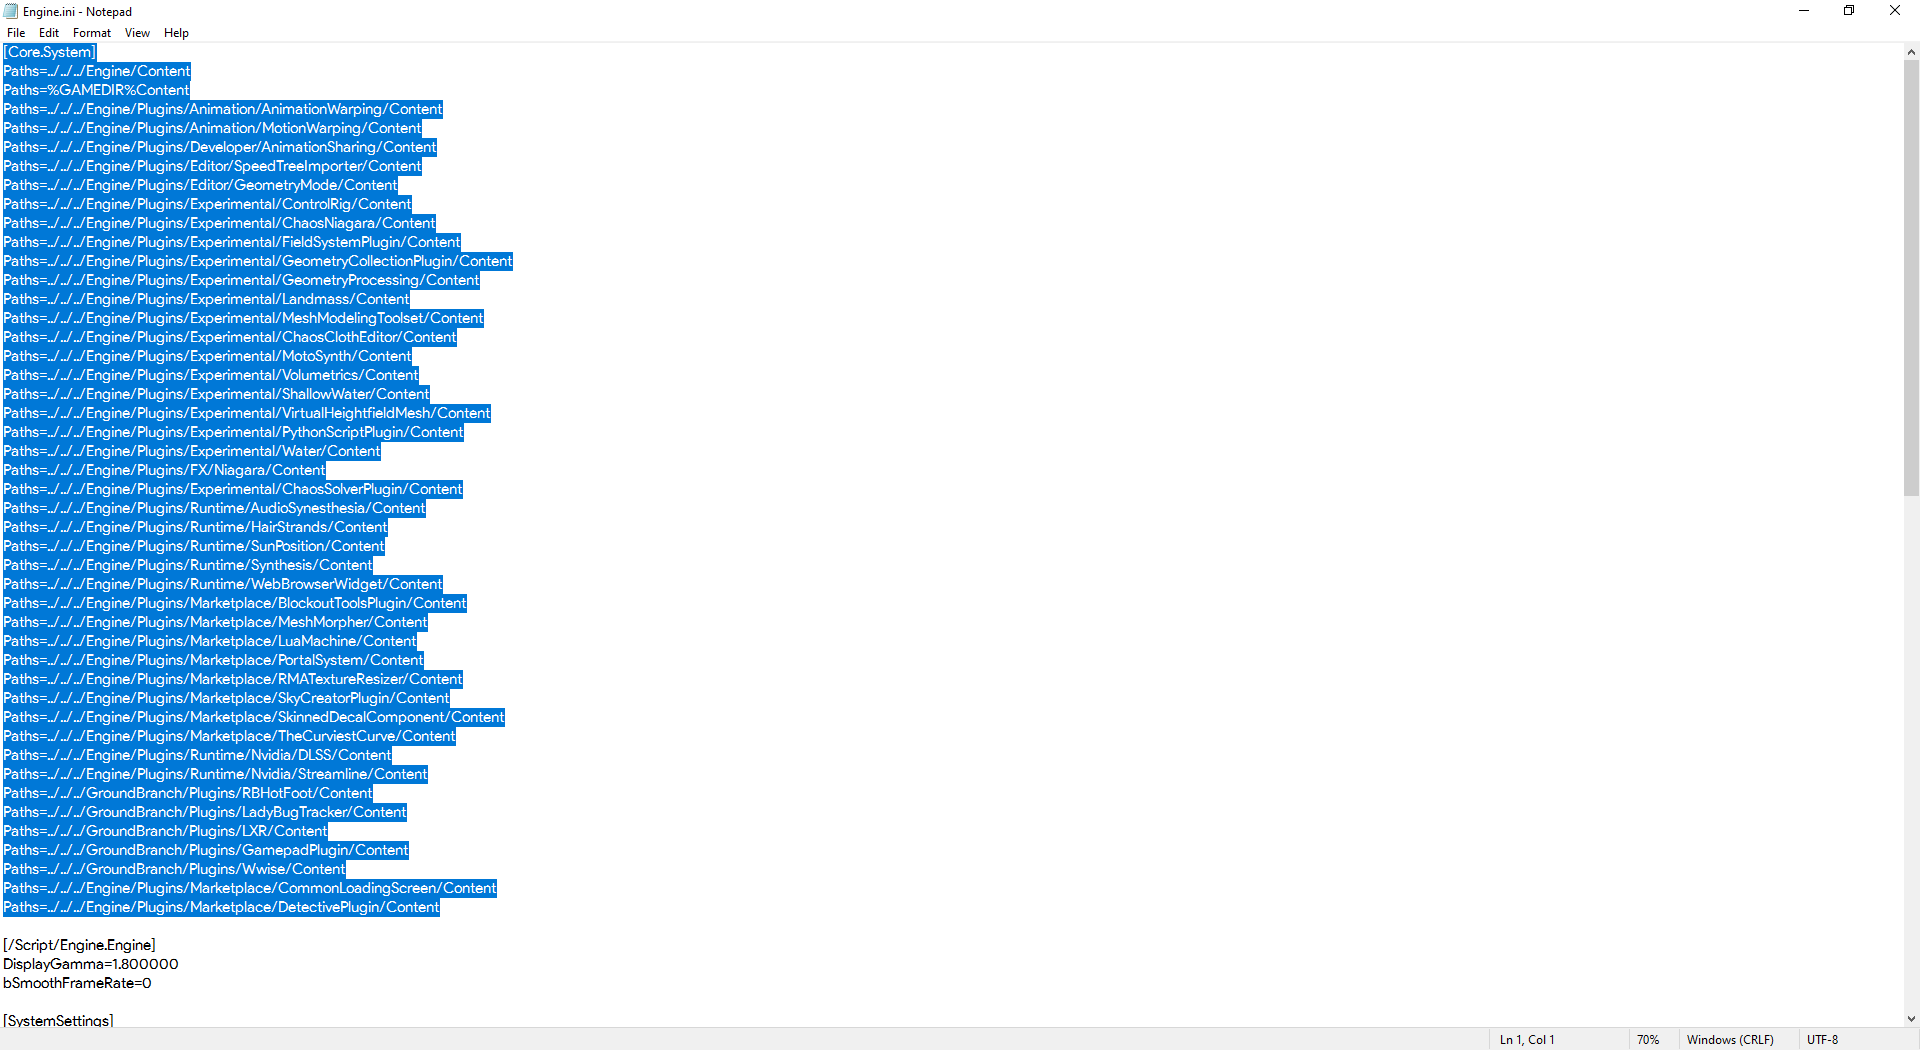
I did change 2 bits for myself.
0 for Streaming.LimitPoolSizeToVRAM
8192 for PoolSize itself
This is for my 16 gig laptop with 4 gig geforce gtx 1650.
It works well.
RFGCRebelAlpha  [author] 18 May @ 9:47am 
Some changes in the menu affect the engine.ini file. Some other changes do not affect the engine.ini file.

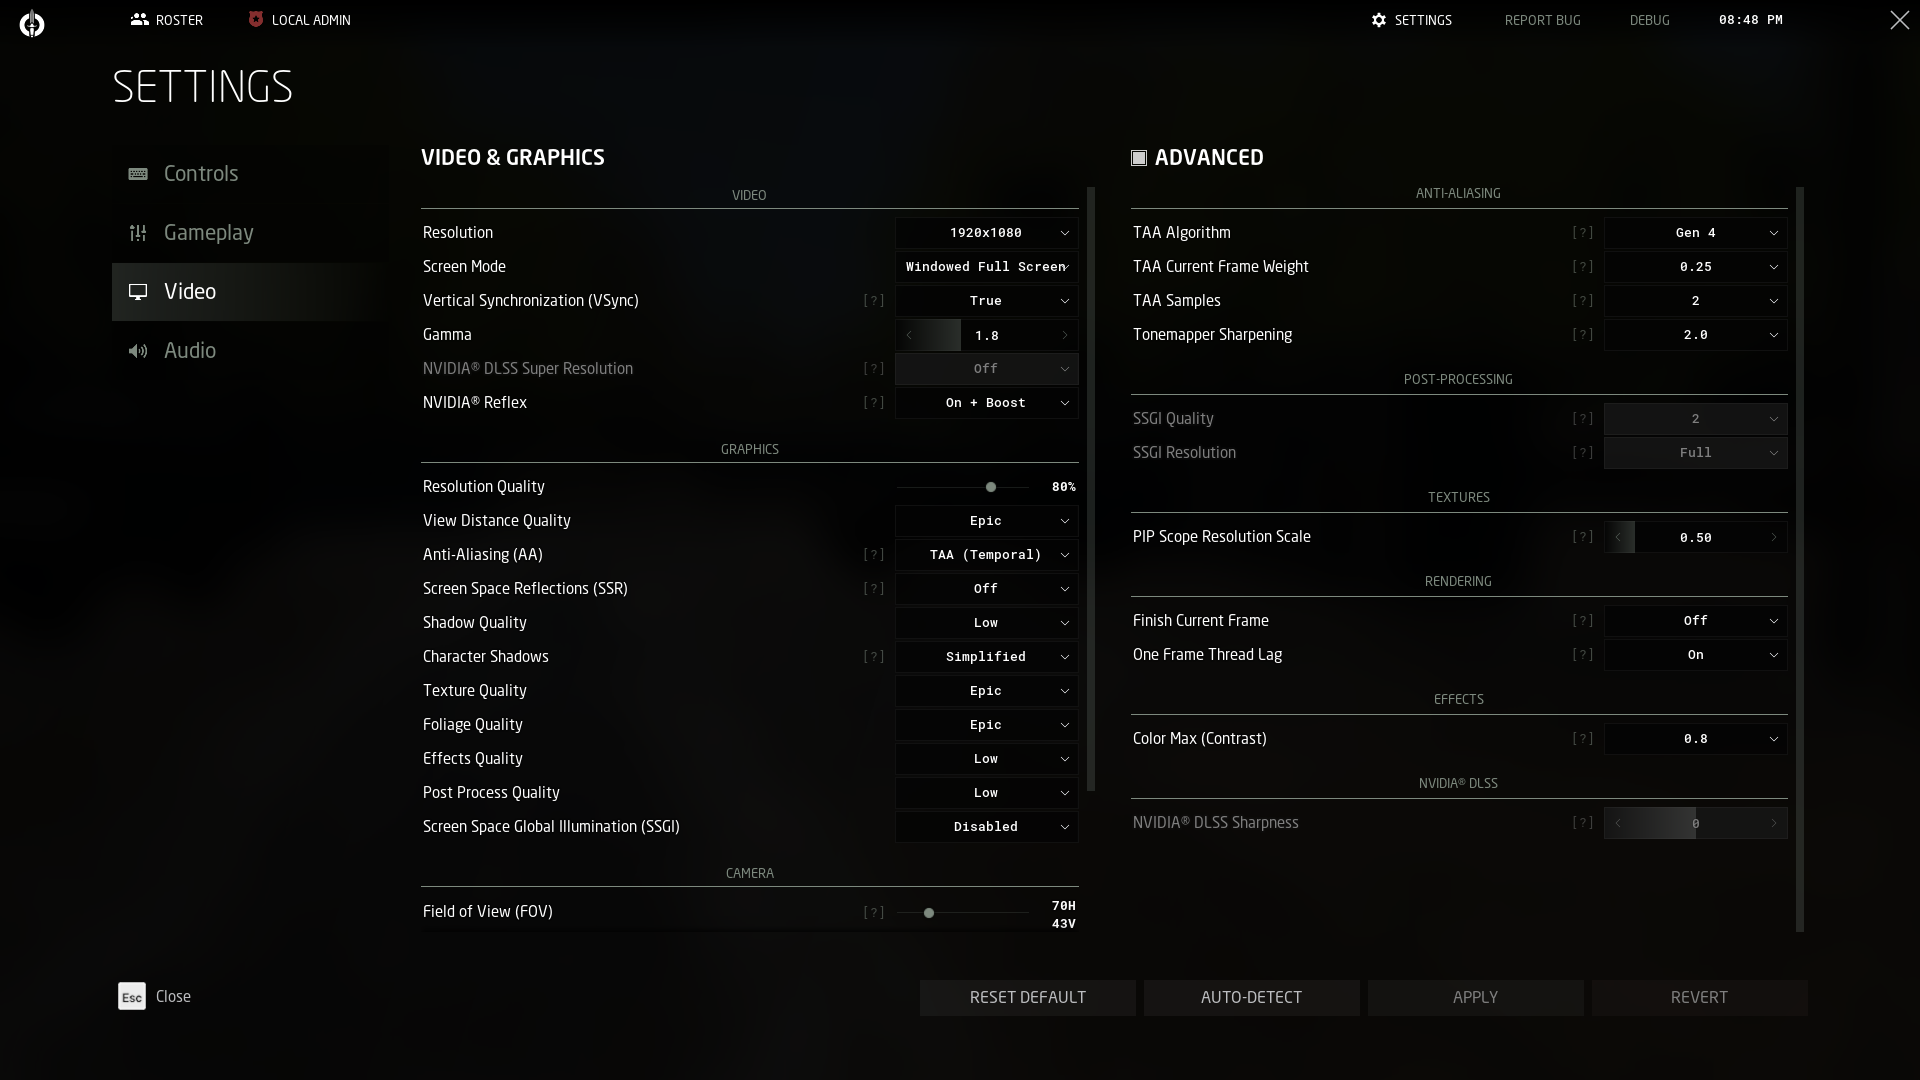
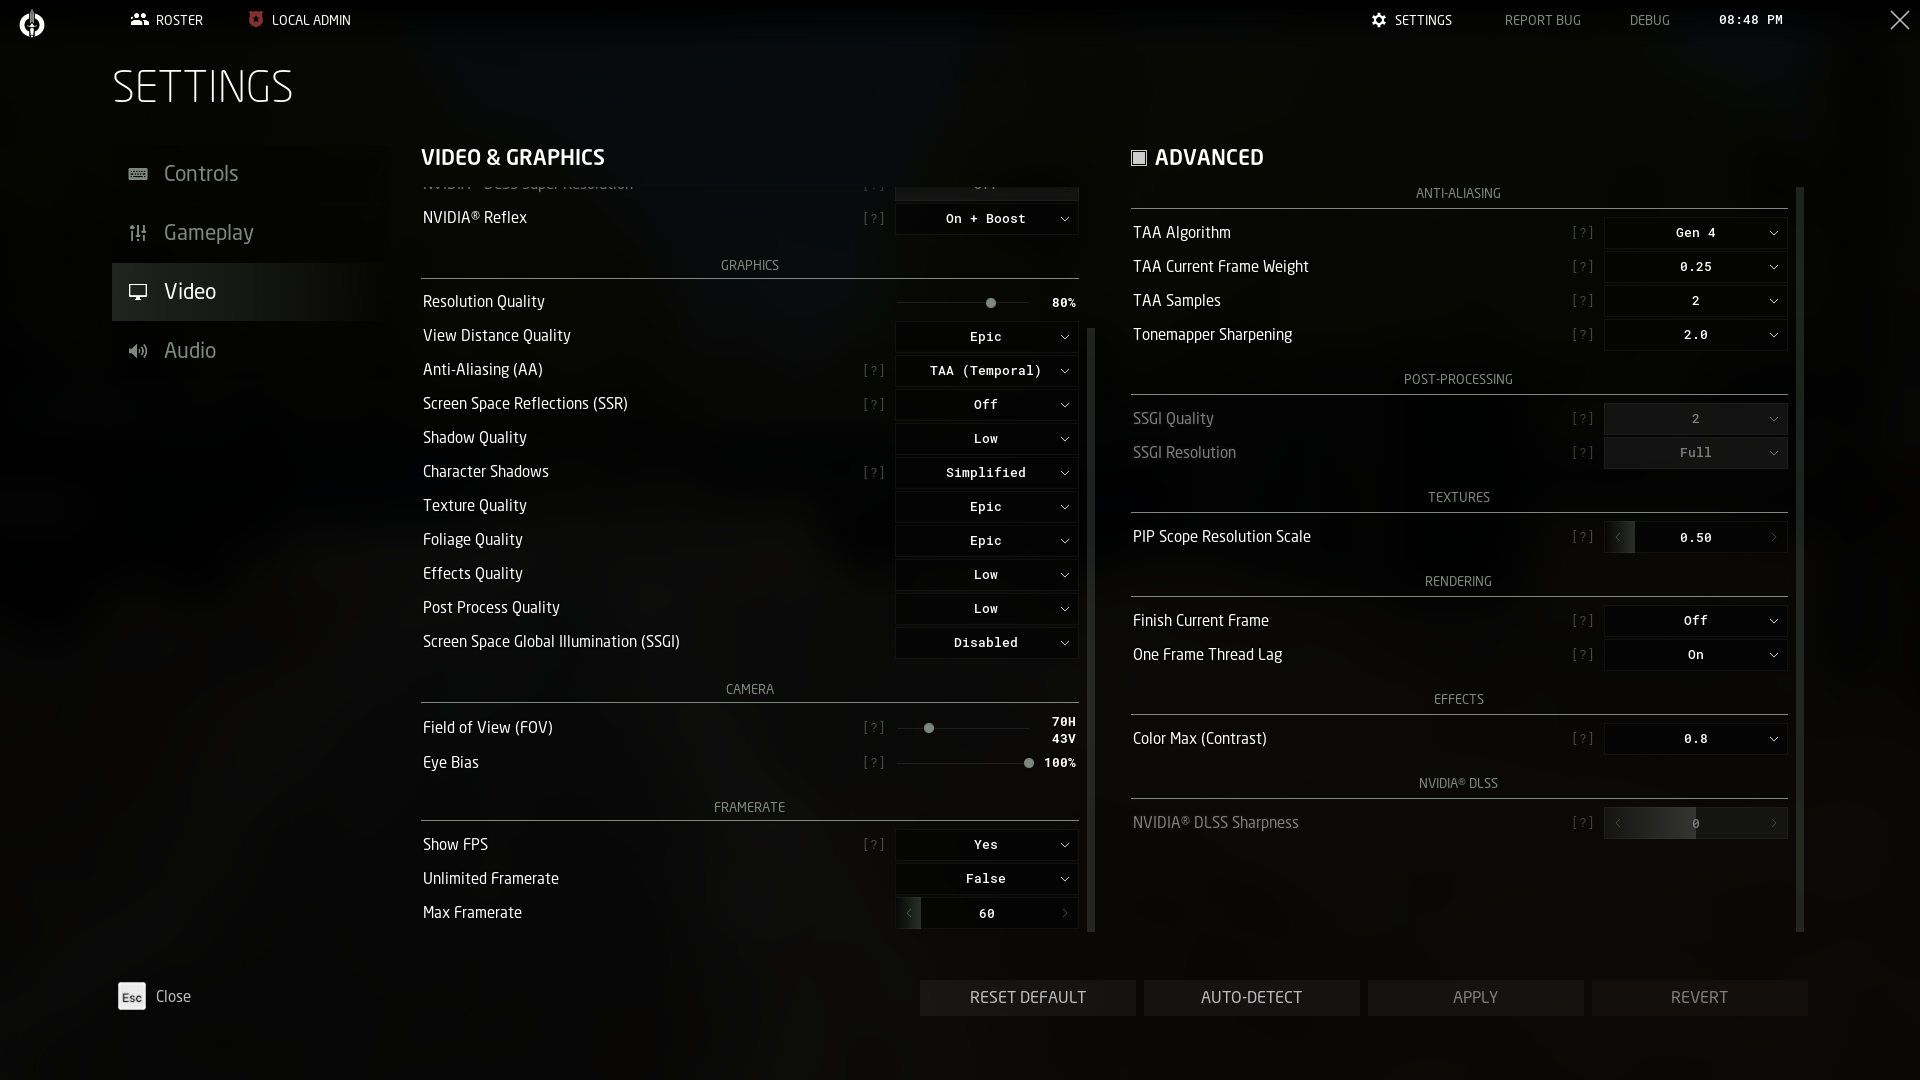
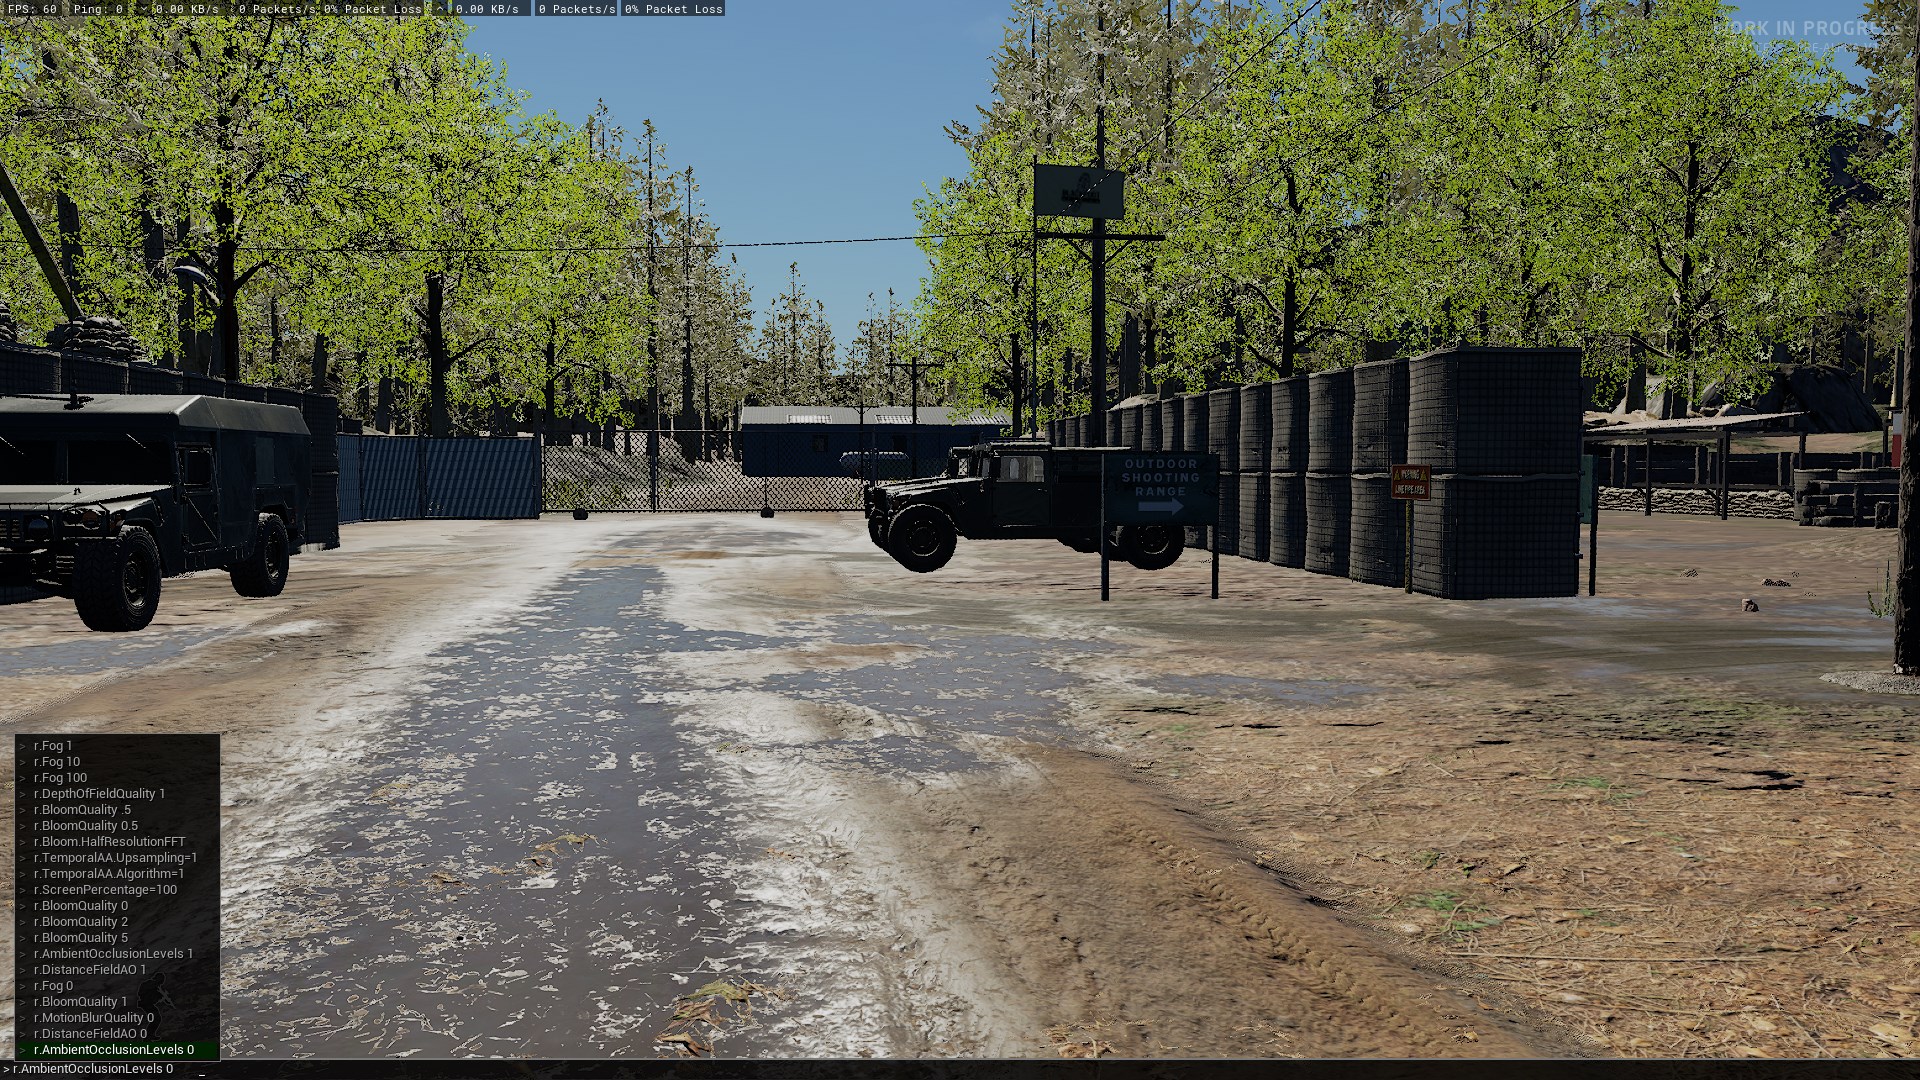
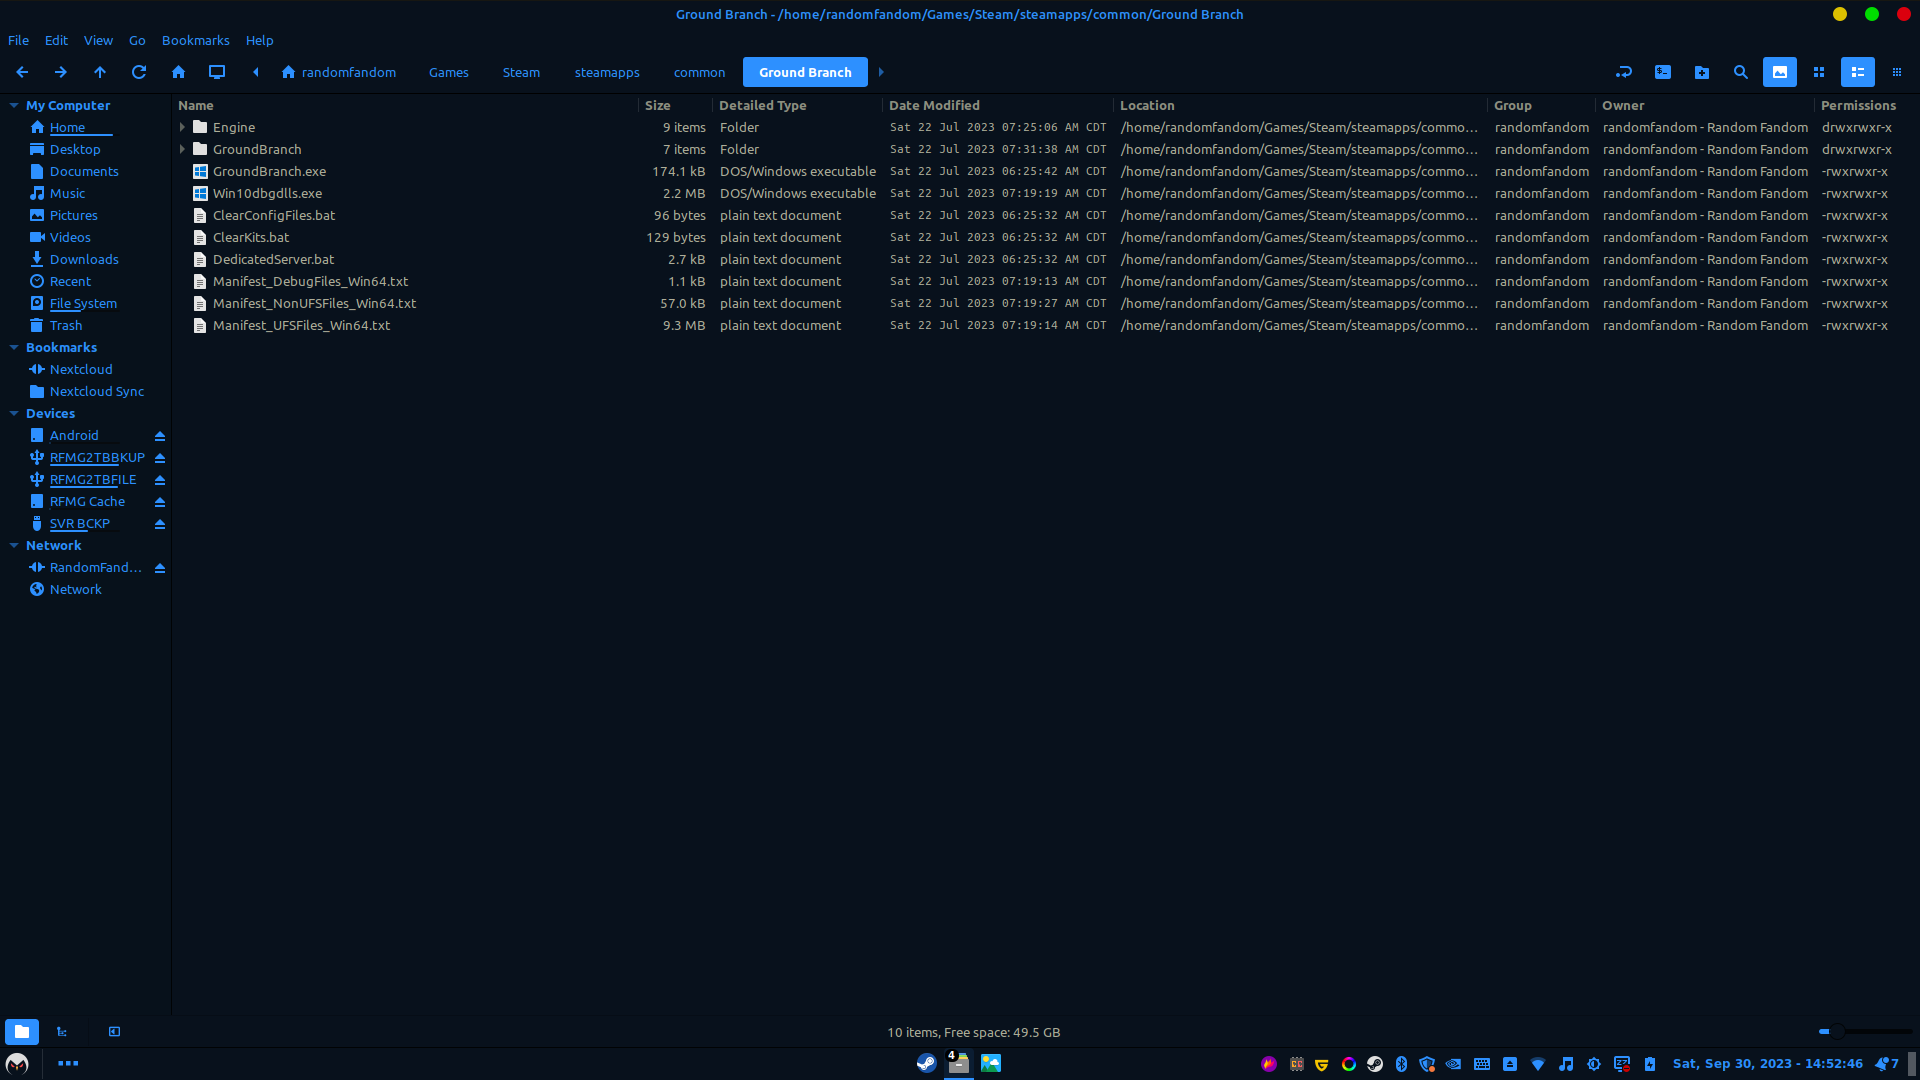
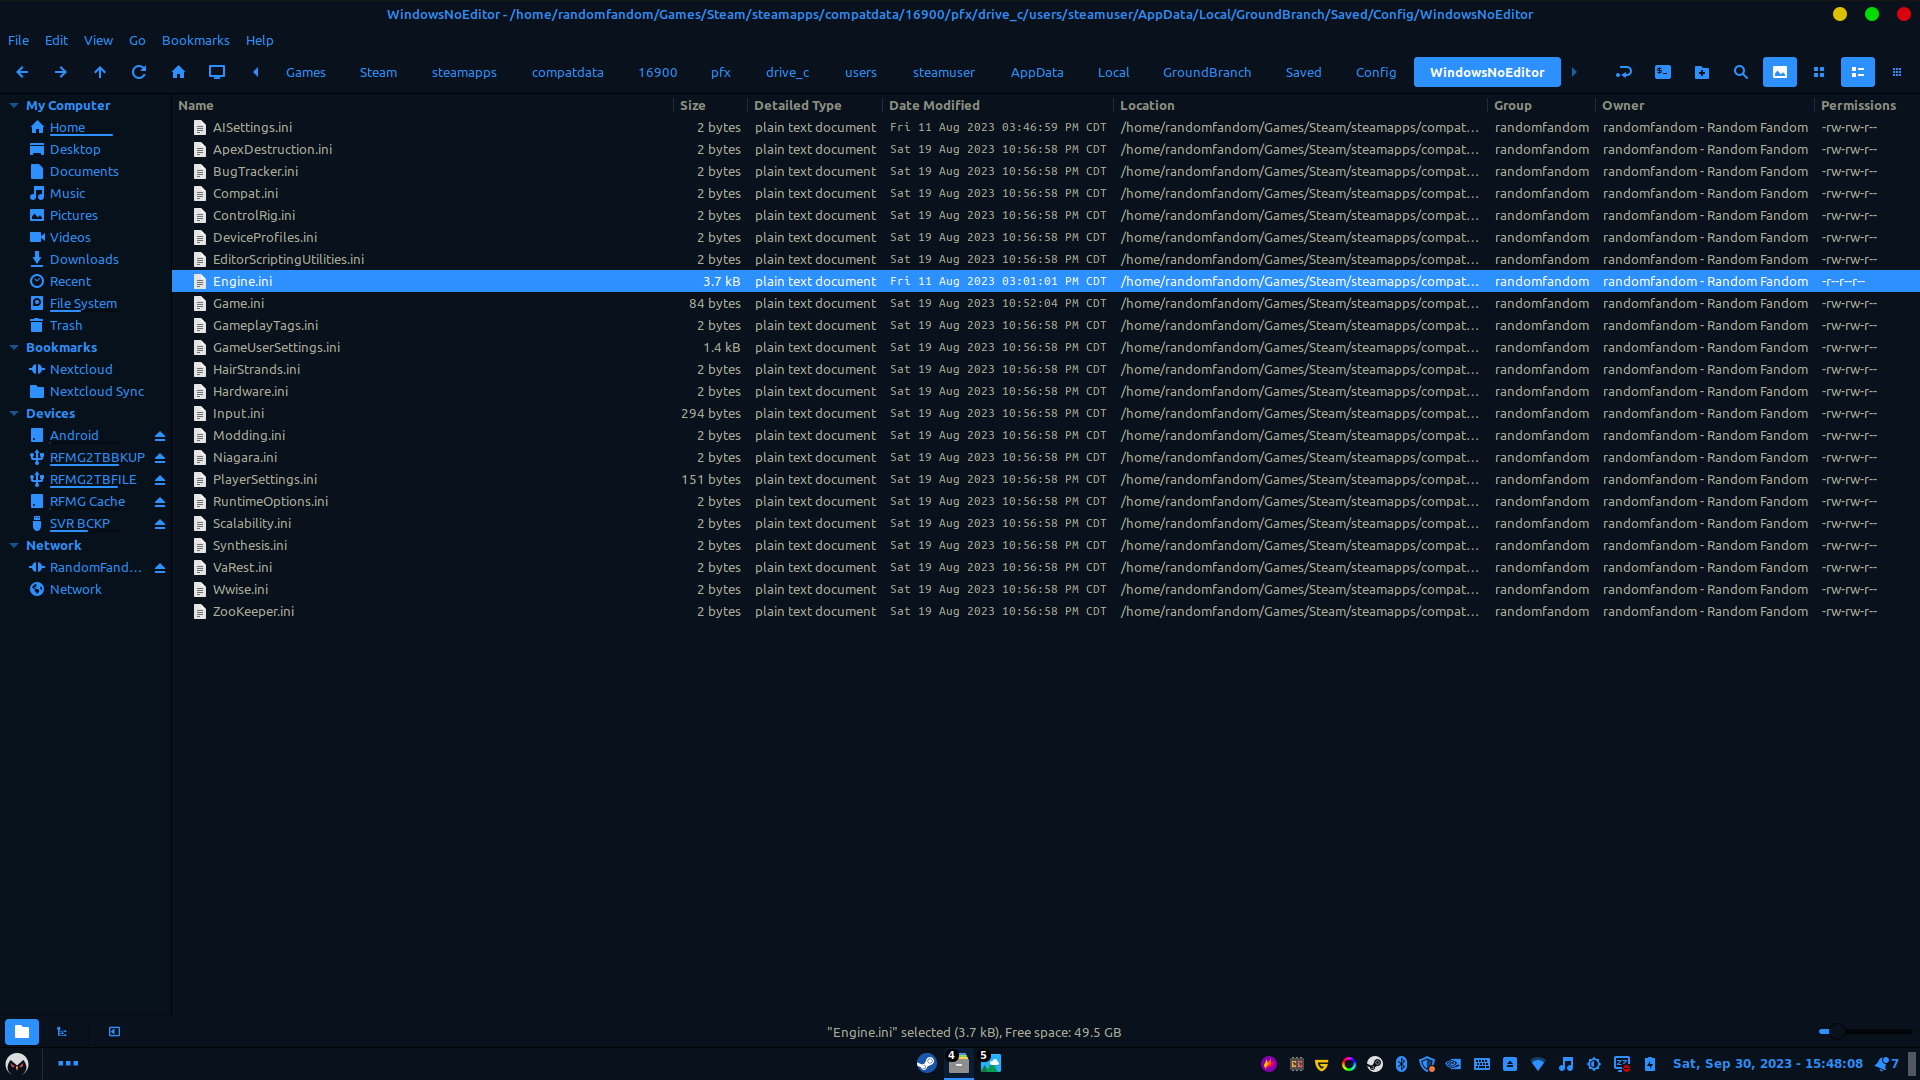
Ultimately, some of the changes I make to the engine.ini are not exposed to the player in the in-game settings menu, and can only be made manually to the engine.ini file.

By customizing the engine.ini file and making it read only, you can force the game to run better on older/weaker/lower-end hardware.
Sean2111 10 May @ 9:08pm 
If i make game changes in the game menus -like idk ,change res or AA or some such -are these what changes the game ini OR does the game do it automatically if I don't change any game settings in game myself.
RFGCRebelAlpha  [author] 10 May @ 8:55pm 
If you don't want your changes overwritten, then yes.

You can also easily re-enable write permission on the .ini file if you need to.
Sean2111 10 May @ 8:52pm 
Is it necessary to make engine.ini read only?
RFGCRebelAlpha  [author] 30 Nov, 2024 @ 6:14pm 
I'm getting a Steam Deck soon... just waiting on it to arrive!

I may add some more sections for the Steam Deck specifically. :)