PAYDAY 2

PAYDAY 2

251 ratings
A Comprehensive Stealth Guide for The Big Bank
By Temjin
This guide thoroughly covers the daunting task of sneaking through The Big Bank heist. It details everything relevant to sneaking through the mission from start to finish--even without teammates or money--and aims to provide a helpful flowchart of the mission tasks.
   
Award
Favorite
Favorited
Unfavorite
Introduction
Please note: I haven't had much time to update the guide (or play the game for that matter), so please keep in mind that this was written in July 2014, and some elements of the game may have changed (such as the skill trees). I encourage you to read through the comments, some users have posted some good insights. Other than that, not too much has changed about the mission itself, so everything should still be relatively relevant!

A proper successor to the First World Bank has hit Payday 2: The Big Bank. It is a large mission and extremely lucrative, but at a high risk. Sneaking through the Benevolent Bank is difficult because there is a lot to do and innumerable opportunities to fail--it has a level of difficulty to rival that of Framing Frame (which turned from an easy mission to a difficult one after the stealth rework).

However, trying to look for a verbose guide on the heist has proven to be a big mess. Thus, I decided to write my own in the level of detail I desired. I will cover as many relevant details for completing the mission in stealth. I will not not cover any of the details of going loud before opening the vault--let's face it, you are likely looking at this guide to avoid just that. Plus, have you seen how long this guide is already? If you are itching to go to Plan B from the get-go, then this is not the guide you are looking for.

On lower difficulties, you can fail stealth but possibly still be able to complete the mission in Plan B; however, the cops are so numerous that they can be hard to deal with, and doing all of the crane and drill tasks take up precious time. In all likelihood, you will want to get good at sneaking this mission up to opening the vault, because getting the vault open in stealth greatly increases your chances of success.

I recommend having at least a two man team. But it is entirely possible to solo stealth the mission, as well as without any spending cash. However, if you intend to attempt going solo, keep in mind this will take a great deal of time and will become very costly in civilian casualties.

Many of the items in this guide assume you are doing Deathwish difficulty. Since not many details change between difficulties (besides numbers of civilians, guards, etc), I highly recommend attempting the stealth on Deathwish too.
Perfect Sneak Cheat Sheet
I will go over each of these points thoroughly--and I do mean thoroughly--in the following sections. This is just a basic outline of the mission flow.

Note: These are guidelines and not absolute. The order in which you do the items in each phase is often determined by chance.

Planning
  • Ensure you have the necessary skills and equipment
  • OPTIONAL: Choose the Elevator Trick escape
  • OPTIONAL: Place any extra pre-planning assets.

Phase 1
  • Enter the Bank
  • Find the security door to the server room and hack the computer
  • Neutralize both guards (they WILL be able to see the open time lock door later)
  • Disable as many cameras as possible (cameras by the time lock WILL detect it opening)
  • Control the four wandering bank employees.
  • HIGHLY RECOMMENDED: Pacify the offices on the east upper floor.
  • OPTIONAL: Pacify the offices on the east lower floor
  • OPTIONAL: Pacify the canteen in the northwest lower floor
  • Search for both keycards and the correct computer
  • VARIABLE: Search for vault cage keys
  • OPTIONAL: Have one member of the crew remain in casing mode to go places the masked crew can't

Phase 2
  • Activate the time lock
  • Answer the phone
  • VARIABLE: Neutralize any extra police
  • Pacify civilians from the Northeast elevators
  • VARIABLE: Neutralize the guard from the Northeast Elevators
  • OPTIONAL: Disable one or both of the security lasers

Phase 3
  • Avoid killing guards and destroying cameras (they WON'T see the open time lock door)
  • OPTIONAL: Neutralize camera guard (not usually recommended)
  • VARIABLE: Search for vault cage keys
  • Reach the vault's thumbprint scanner
  • Press both security room buttons
  • Retrieve a the vault code from the manager's computer
  • Return to the vault to open it

Phase 4
  • Loot the vault
  • Keep suspicious activities out of line of sight of the vault entrance
  • Stage the loot you intend to steal near the vault entrance

Phase 5
  • Sneak the loot one bag at a time to the elevator (or the roof in default escape)
  • Throw the loot in the van
  • Escape
Companion Videos
I've created two videos: one that details the entire mission in the pre-planning screen, and one that shows gameplay of the mission to completion. Please excuse my quiet microphone and quirky editing.

Pre-planning:


Gameplay:

Phase 0: Pre-Planning and Mission Details
These are things that you should have and know before diving right into the mission.

Bare Necessities:
  • SKILL: Aced Shinobi (Ghost Tier 3; Silent guard kills)
  • SKILL: Aced Bagger (Ghost Tier 2; 2 Body Bags + pre-planning asset)
  • EQUIPMENT: Low detection rating (at least <20)
  • EQUIPMENT: Suppressed weapon(s) (I use a suppressed signature 40)
  • EQUIPMENT: ECM Jammer(s) (Ghost Tier 0; To delay the alarm if things go south)

Highly Recommended:
  • SKILL: Aced ECM Specialist (Ghost Tier 4; 2 ECMs that delay pagers)
  • SKILL: Aced ECM Overdrive (Ghost Tier 5; For Security Doors)
  • SKILL: Aced Cable Guy (Mastermind Tier 1; Extra ties, very important)
  • SKILL: Aced Lockpicking Expert (Ghost Tier 5; For lockboxes, manager safe, and money counting machine)
  • SKILL: Transporter (Enforcer Tier 1; For faster bag movement, ace optional)
  • SKILL: Chameleon (Ghost Tier 2; Casing mode marking, more concealment)
  • ASSET: Elevator Trick escape (Easier bag transport; 6 favors)
    • Despite what pre-planning says, you DO NOT need any money to do this escape as of this writing (But I'm pretty sure it deducts that much from your account if you have money, so that people without money don't prevent their teammates from doing the plan)

Nice to have:
  • SKILL: Aced Dead Presidents (Ghost Tier 1; More instant cash)
  • SKILL: Aced Fast Hands (Ghost Tier 2; Ease of interacting with loot bags)
  • SKILL: Aced Silent Drilling (Technician Tier 4; If keys are in bad spots, or no ECM Overdrive)
  • SKILL: Aced Inside Man (Mastermind Tier 2; for Poisoned Cake and Keycard assets)
  • SKILL: Aced Spotter (Mastermind Tier 3; For Spycam asset)
  • One or more teammates (That know what they're doing)
    • Extra ECM jammers with ECM Specialist are great for emergency end-of-mission rushes
    • Extra members can cable tie more civilians, keep un-tied civilians in check, and reduce overall civilian casualties
    • Extra members can also suit up in heavy armor and battle their way to the end, just in case

Relevant Pre-planning Assets (in order of usefulness):
  • Poisoned Cake (Causes a guard to be stationary; Need Inside Man skill; 3 favors)
  • Spycam(s) in Vault Area (Marks guards; Need Spotter skill; 2 favors)
  • Silent Alarm Delay (Buys you 30 more seconds if you're detected; 2 favors)
  • Extra Body Bags (If you're sloppy; Need Bagger skill; 2 favors)
  • Extra Keycard (If you want to conserve ECMs or open an extra door; Need Inside Man Skill; 2 favors)
  • Open Loading Dock Door (If doing Default escape; 1 favor)
  • Time Lock Reduction (Reduces by 30 seconds; Not necessary; 2 favors)

More Useful Info:
  • It is absolutely possible to sneak this mission solo (even on Deathwish) without any assets from pre-planning, albeit this is quite a difficult feat.
    • You will want all of the necessary and highly recommended skills, but after a few attempts it is likely you won't have enough money to afford any pre-planning besides the Elevator Trick
  • If one member of your crew stays in casing mode through the entire mission, then they will be able to infiltrate and spot in the back area with very low risk
    • So long that they do not bump into a guard, they will remain undetected
    • Being able to spot in casing mode sidesteps the need for a camera feed or spycams
  • If you do not have extra cable ties (or you are solo stealthing the mission), you will likely be killing many civilians
    • Besides the wandering staff, there are about 6-13 that need to be dealt with, unless you can sneak around them effectively
    • Make sure you have no money that you could have used to buy something else, just in case
    • If you have a full party and not enough cable ties, you can assign some people to stay with the civilians and yell at them if they try anything
    • On Deathwish, cleaner costs are 32k/civ
  • Difficulty does not fundamentally alter any part of the stealth mission, but in higher difficulties:
    • There are more guards
    • There are more cameras
    • The lasers cycle faster
    • There are significantly more civilians
  • You will want to control wandering civilians and neutralize guards in safe spots on the upper floor 99% of the time. The lower floor is too heavily trafficked by constantly spawning civilians
    • The exception downstairs are the back cubicles and usually the canteen, but watch for cameras
    • You cannot treat this like a regular bank heist where you can neutralize everyone; this is more akin to doing GO Bank
      • Most spots on the top floor are safe to leave civilians and bodies as long as the upstairs workers are subdued, since civilians will stop walking upstairs
      • If you need to move a cable-tied civilian on the west upper floor, tellers can see the moving civilians, but not very well--keep them moving and it won't be a problem
  • If civilians in the lobby become alerted, the mission will have a 99% chance of becoming FUBAR
    • Even if you secure/slay every civilian in the bank without setting off the alarm, a new civilian will still spawn about once every 30 seconds out front
    • New civilians never stop spawning
    • If you have more members of your party than just you, one can be assigned to take out the civilians at their spawn points
      • Killing the civilians like this should be a last-resort plan. You can often shoot the civilians where they spawn, but sometimes the boundaries and building walls get in the way
      • Absolutely do not use grenades (even to kill that civilian around the corner) unless your intent is to alert all of the guards in the back
      • You might think having the OVE9000 saw and Control Freak skill (Mastermind Tier 6) is a clever way to keep the civilians in check, but the guards in the back will hear the saw
Maps
(Updated July 21, 2014)

Front:

 
Back:

 
Phase 1: Set Yourself Up For Success
(Approximately 5-10 minutes)

 
Remember: These are guidelines, and not the absolute order that things should be done! Many recommend taking out the guards first.

  • Enter the Bank
    • If you're unfamiliar with the bank, walk around in casing mode and familiarize yourself with the area
    • Look around for locations of any of the items described below
  • Find the security door to the server room and hack the computer
    • There is a small chance that this computer is the right one already (and this chance is even smaller on Deathwish)
    • There are three places the security door can spawn:
      • Upper northwest next to the manager's office
      • Lower west near the stairwell and break room
      • Lower east, north of the tellers
    • If you have more members to your party than just you:
      • One person will mask up and hack the console
      • The other person will remain in casing mode, go to the office area on the east side of the bank, and determine which computer needs to get accessed
    • Mask up early only if you have a good opportunity to take out a guard or wandering civilian upstairs
    • If your ECMs cannot open security doors, you will either need to drill it or use a keycard. If you are going to drill, then it is essential that you remove the guards and wandering civilians from the equation first
  • Neutralize both guards
    • They do not look like guards in the normal missions, but are wearing a more olive-green and beige outfit
    • Front guards will notice if the vault area doors are open, but not if the lasers are disabled
    • Kill them in the upstairs area out of sight from the downstairs civilians
    • If you are solo sneaking and don't have extra bags, do not bag these corpses unless they are in a bad spot or in front of the elevator doors. Be vigilant for wandering civilians
    • EXCEPTION: If you bought the poisoned cake for the canteen, do not kill the guard that is puking his guts out into the sink
  • Disable as many cameras as possible, especially in front of the vault area's doors
    • Cameras will detect an open door but not disabled lasers
    • Deathwish will not add Titan cameras
  • Control the four wandering bank employees
    • The wandering employees never change and are as follows:
      • Bald Male in a Black Suit (Bank Manager)
      • Female in Brown Attire
      • Female in Blue Attire
      • Female in Black Dotted Dress
    • If they do not fit any of these descriptions, then they are either a street civilian or other staff
    • Make sure to control them in the upstairs area or out of sight of street civilians
  • HIGHLY RECOMMENDED: Pacify the offices on the east upper floor
    • Often there will be three employees and three street civilians upstairs
    • Neutralizing these upstairs tellers will prevent street civilians from wandering upstairs--it will make life easier
    • It will also make finding the correct terminal on your own easier
    • EXCEPTION: If you are confident that you can sneak around and hack the computer without any civilians getting line of sight on you, then you do not need to take out this room. Just keep in mind that street civilians will continue to walk upstairs, and any killed guards and controlled civilians need to be moved to the manager's office out of sight of any passerby's.
  • OPTIONAL: Pacify the offices on the east lower floor
    • Often there will be four employees
    • You only need to take this out to aid in the keycard search or the terminal search
    • Be mindful of civilians that can look into the room via the tellers
    • This room is very easy to sneak around while crouching due to the cubicle walls and the fact that you can hack terminals through these walls
  • OPTIONAL: Pacify the canteen in the northwest lower floor
    • Often there will be three or four employees (except on lower difficulties)
    • You only need to take this out to aid in the keycard search
    • Be mindful of civilians that can wander near the south entrance to this room
    • If you got the poisoned cake for this room, one guard will become stationary here only after walking by it
  • Search for keycards, vault cage keys, and the correct console
    • As of this writing, you can use the keyboards through walls (and civilians sometimes if you're lucky) if you are trying to sneak around the civilians on the lower floor
    • There are almost always two keycards that spawn
      • one will either be on the bank manager or in his safe behind the painting in his office
      • the other will either be:
        • In the office areas
        • On an upstairs table south of the offices
        • In the downstairs canteen (sometimes behind a sign in the north part of the room)
        • Next to the tellers (don't bother, this one is a lost cause for stealth)
    • There are seven places that vault cage keys can spawn, three of which are in the front:
      • Behind the tellers (very risky can grab this through the wall)
      • In the manager's office west wall
      • In the neighboring office's north wall
  • OPTIONAL: Take a breather, nothing else will happen until you activate the time lock
    • Right now is a good time to learn the laser patterns if you cannot or are not going to disable the lasers
    • Right now is also a good time to remove any bodies from in front of the elevator doors in the northeast.
Phase 2: Any Good Stories?
(Approximately 3 minutes)


  • Activate the time lock
  • At some point during the countdown, the elevators in the northeast upper and lower can activate 2-3 times
    • Have at least one person monitoring each of these doors
    • One or two civilians in white dress shirts will spawn. They can potentially become stationary, but will likely wander--subdue them
      • If you kill a civilian in the elevator, I am uncertain if it just disappears as of this writing
    • One or zero guards with a pager will spawn. ABSOLUTELY DO NOT SHOOT UNTIL HE IS OUT OF THE ELEVATOR. Otherwise, you will not be able to get past the invisible wall to answer his pager
    • If you are solo sneaking, it can be difficult to keep an eye on both doors at once. Keep your volume up and pay attention for the elevator jingle
  • At some point during the countdown, the phone will ring
    • It rings for about 20-30 seconds, so you have enough time to answer a pager and run to the phone from across the bank in an emergency
    • Not answering the phone will set off the alarm
    • Bain will try to work his magic on the GenSec operator over the phone, but only has about a marginal success rate
      • If he doesn't convince the operator, she will send two or three blue-shirt cops without pagers through the front entrance
      • Shadow them and take them out when it's safe
  • After the time lock finishes, make a judgement call on the lasers
    • If you have two cards, you can disable them completely, or use one and save the other for the camera security room if you're so inclined
    • If you have only one card, you can still randomly disable either the horizontal or vertical lasers
    • If you want the Entrapment achievement, do not use either of the card readers
      • The lasers are generally on a three-step or six-step cycle. Identify the safe configurations you can crouch through and move forward immediately when the cycle reaches a safe step
Phase 3: Open The Vault
(Approximately 5-10 minutes)

 
Important Note: If you or any of your crew are still in casing mode, they CAN walk around back here (almost) safely! This is especially useful if they are able to mark guards in casing mode. (Thanks go to Bubbay for confirming this)
  • Avoid the guards unless it is absolutely necessary to take one out
    • There is a lot of open space and very little cover
    • You will only have one or two pagers left, depending on if the elevator guard spawned or not (two or three if you had poisoned cake!)
    • Five or six guards will be in the back on Deathwish (as opposed to only three on normal). Generally, at least one or two of them may have taken up a permanent position
    • If you are soloing the mission, this is the phase that you've hopefully conserved your body bags for, just in case (it is entirely possible to sneak through phases 1 and 2 without using a body bag if done correctly)
    • A Spycam will help immensely by marking patrolling guards
    • These back room guards will neither patrol by the open time lock door nor notice the open vault door
  • Do not disable individual cameras or leave bodies around in this area
    • Only take out the camera guy if the camera placements are cripplingly bad. Pagers are better saved for the wandering guards in my opinion
    • Body bags are not safe to be left in the camera rooms, take them to the front area or open vault
  • If the keys were not in the front area, get them at your own risk here
    • The other four places they can spawn are:
      • North wall of west security room
      • East part of the east security room on a south wall
      • In the room below the east security room on a north wall
      • Behind the desk in the lower lobby
  • Make it to the vault for the thumbprint verification
    • The thumbprint outline is visible from the start of the mission, so you can tell which floor it is on right away
  • Head upstairs to press the two buttons in the security rooms
    • These areas are heavily trafficked, be careful
    • The layout of the upper floor near the east security room can vary
    • If a guard is stationary next to a button, you are going to have to be very quick about pressing it and exiting before he notices you, or take him out
  • Head back out to the manager's office in the first area to get the code
    • It is easiest to just have another team member wait in the office if at all possible so you don't have to sneak back out
  • Finally, head back to the vault to enter the code and pop it open
    • Guards won't notice the vault opening in front of them, so don't worry
  • CONDITIONAL: If by some miracle you have as many pagers as there are mobile guards, then you can take them out
    • This is extremely unlikely and will only happen if:
      • You bought poisoned cake for the front
      • The elevator guard didn't spawn
      • Several guards take stationary positions
    • If all mobile guards are taken out, then it is safe to disable cameras
  • At any point in phase 3, if a guard is alerted to you or a dead body and you are out of pagers, it is time to do an emergency ECM rush.
    • Coordinate placing ECM jammers with your team members to get the most time out of them, and rush the objectives as quickly as possible
    • Having ECM specialist will delay pager responses if you kill a guard
    • If you open the vault before you are out of jammers, then you do not have to drill or thermite the vault in plan B
    [/i]
[/list]
Fun fact: There are phones in both of the conferce rooms in this area that give the tooltip "Press F to answer the phone" as long as you are still undetected. Pressing one will have you prank call someone. There is speculation that these phones are tied to The Secret, but this guide is not the place to speculate about that.

BONUS Fun fact: The vault is inscribed in the bottom-right with the Greek lettering AΠATE (Apate), one of the spirits that was released from Pandora's Box that personified 'deceit' in Greek Mythology.
Phase 4: Loot The Vault
(Approximately 2-20 minutes)


  • Guards will not wander into the open vault or notice open cages
    • They can, however, get line of sight on drills/bags and become alerted
    • Keep loot bags and body bags out of sight of the vault entrance
  • The vault will have 2-6 cages with cash on the table and sometimes gold on the side shelves
    • Getting into the cages requires a drill or vault cage keys (alternately, saw or C4)
      • It will take a few seconds to try a key
      • Drilling would take 3 minutes per cage with vanilla drills
    • Two of the cages will have 40 deposit boxes.
      • Acing Lockpicking Expert lowers the picking time to about 8 seconds per box, making this endeavor take about 6 minutes per cage (or 12 without)
      • Every box will have something in it, (about 500k-700k in loose items total in Deathwish)
      • Each cage with deposit boxes will have either 3-5 cash or gold bags
    • All in all, you'll average about 20 loot bags
  • Stage the loot bags next to the vault entrance if you are still undetected
Phase 5: Escape
(Approximately 1-4 mins per bag)


  • Sneak the loot bags out one by one
    • Guards and cameras will notice you more quickly if you have a loot bag
      • If cameras are a problem for the safest route out and you have a pager left, take out the camera guy through the security door.
    • If you got the elevator trick, carry distance will be greatly reduced
      • Guards won't notice a breached elevator door
    • If you haven't disabled the lasers and are doing the default escape, just keep in mind that you move slightly slower if you are carrying loot through the lasers
      • You can throw bags through the lasers without them setting off the alarm; just ensure that if you bought the poison cake that the canteen guard doesn't see it (Thanks Spyder638 for the info)
      • If you don't have the Transporter skill, you might be too slow to walk through the lasers with the bags. In this case it is best to throw bags
      • In addition, you can grab bags through lasers just fine. If you pile up bags on one side of the door, you or another member of the team can grab them from the other side, just make sure a guard on the vault side doesn't see the pile. (thanks to Doctor_Insano_PhD and Hovsky for the info)
    • If you are doing the default escape, bring the bags to either the roof ladder or the roof, but don't throw them down to the van until you're happy with the amount of bags retrieved
      • Civilians constantly walk by your van, so you don't want to alert them by throwing a bag down (It was brought to my attention that civs don't notice loot bags)
      • DO NOT jump down from the roof unless you are aiming for the top of the van--you will go down
      • If you try to throw bags down and the alarm goes off, you will have to bring them all the way back up to the roof
      • If you accidentally are at the van but need to sneak back in, it is difficult to get back into the bank undetected due to the sheer number of civilians
      • EXCEPTION: If you unlocked the loading dock door asset in the pre-planning, you can throw the bags directly into the van
    • If the alarm goes off in the default escape, the van will leave and a helicopter will arrive on the main roof with a bag cage instead
      • This does not happen in the Elevator Trick escape
      • Each party member will be able to get one or two more bags to the escape until the cops show up
  • OPTIONAL: if you have lockpicking expert aced, you can pick the money counting machine in the counting room on the first floor

    • This machine's contents are worth over 300k on Deathwish
    • Since this room is heavily trafficked by guards, and it takes as long to pick one of these machines as it does a safe, do this only if you know you are completely safe
    • The machine can be lockpicked through the wall to its right
  • At any point in phase 4 or 5, if a guard notices you and you are out of pagers or body bags, it is time to do an emergency ECM rush to keep the heat off of you for a bit longer
    • Coordinate placing ECM jammers with your team members to get the most time out of them, and rush the objectives as quickly as possible
    • Having ECM specialist will delay pager responses if you kill a guard
    • If you get all of the bags you need in the van before the jammers run out, you can get to the exit and still complete the heist in stealth
    [/i]
[/list]
Phase 4 and 5: Plan B
If the alarms already started going off due to an ECM rush in phase 3, or you let a guard see you in the vault, don't panic
  • If you purchased the Alarm Delay asset in pre-planning, that will give you an extra 30 seconds to move bags
  • Get a cage or two open with the keys, and everyone can get one or two bags to the exit before the assault starts
    • If you have heavily armed members of your group, the vault is an excellent place to hole up during an assault
    • If none of you are well armed, get out ASAP
  • If you are solo sneaking the mission and have the elevator trick, you will barely have time to grab the minimum four bags before the assault starts
  • If you are solo sneaking the mission, have the default escape, and haven't secured any bags already, you will not have time to move all four required bags before the assault starts UNLESS:
    • You have already staged some of the loot by the vault door
    • You take only money bags
    • You have the aced Transporter and Fast Hands skills
    • You juggle the bags by throwing one ahead and carrying another, throwing each time you reach the other bag
    • OPTIONAL: You purchased the Alarm Delay asset
    • CONDITIONAL: You're extremely lucky
  • OPTIONAL: If you can't finish the heist in time, have an extra zip-tie, and don't have the "Backing Bobblehead Bob" achievement, try to find Bob and bring him to the vault door. I mean, you've come this far already, might as well try to squeeze more out of a bad situation. If you do not know which civilian is Bob, it is the one featured in the Big Bank Teaser Video
A Special Note About Lasers
As per request, here are some more in-depth analysis of the lasers, to help with those attempting the entrapment achievement.

In the lower difficulties, there are more lenient laser positioning with both standing and crouching configurations, and a longer delay between changes. In higher difficulties, you are not very likely to run into a laser setup that has a configuration that you can stand up with; pretty much all of them will require crouching.

Here is a sample 6-cycle laser setup:


Lasers are always 3-cycle or 6-cycle. One out of every three will have at least one safe spot in it. As long as the lasers aren't at foot or knee level, you can likely crouch through no problem. At that point, it's just choosing the vertical lasers that are wide enough apart (for example, check the last image; all 3 are technically wide enough I think, but the one on the right requires more precision than the other two). If you are lucky, you can get a 6-cycle laser setup that has two safe spots in a row, and both in the same spot.

Another helpful technique is counting. Right when each laser changes, assign it a number. Identify if it's a 3 or 6 cycle configuration. Right when each laser changes, count. Soon, you will be counting in your head each time the laser changes, and then you add emphasis on the one that has a safe spot (eg; "1, 2, 3, 1, 2, 3..." etc). The moment you hit your emphasized number, move forward and you will make it in time--just don't jump the gun.

Lastly, if you're still having trouble, lower the difficulty. You won't get as many rewards from the end, but it is much more forgiving.
Success!
Congratulations! You've just completed the heist, hopefully in stealth (as of this writing, I've been unsuccessful at actually finishing the heist before the alarm goes off on Deathwish). It's a hard mission, but don't give up so easily.

This guide was brought to you by hours and hours of failure after failure, so that you may not suffer quite so much. Hopefully.

If you liked this guide, please make sure to rate it or leave a comment. I'll certainly make more guides in the future of some of my other favorite missions. (Shadow Raid or Election Day, anyone?)

One last note, I am getting flooded with friend requests after writing this guide. Please do not get offended if I do not accept! I mean no disrespect, I am just a rather private person.
 
34 Comments
Pastapockets 2 Nov, 2018 @ 6:45am 
This guide is no longer functional because the entire pillar upon which its strategy works (ie bugging out the vault guards via destroying cameras) no longer works or does anything.
Knolle 7 Jan, 2017 @ 8:42am 
some keycard locations are missing
Temjin  [author] 17 Nov, 2016 @ 6:30pm 
@aii limão: Wow, that's a great trick I never considered, I imagine that could be extremely useful!
ENTREGATOR 15 Nov, 2016 @ 8:14pm 
I'd like to add that setting up a unsilenced drill on the safe behind the painting, will group up 2 to 3 guards on the otherside of the wall, as long you dont fix it after it breaks, making it much easier to walk around the other part of the bank. On my playthrough solo stealth on OD, 3 guards grouped up there and I was left with only 1 wandering, I killed him then after some time a blue cop (don't know if he had a pager) spawned on the waiting room but just stood there, he was easy to avoid by just simple crouching to reduce your dectection.
Killr7 16 Aug, 2016 @ 9:22pm 
Just finnished on Deathwish, got spotted moving bags, but my ecm slowed em down long enough that I was able to bag four before the assault teams got to me, alarm still went off tho. Very helpful guide
Nitroscout 18 May, 2016 @ 8:12am 
how many guards are in big bank?
Temjin  [author] 28 Nov, 2014 @ 11:48pm 
@Sneakblade: I haven't updated this guide to reflect the new skill tree, so I should consider doing that. Thanks!
Sneakblade 28 Nov, 2014 @ 8:37am 
Very helpful got away with 4 bags on my first try on deathwish after only 4 practice runs on normal. (I got really lucky.)

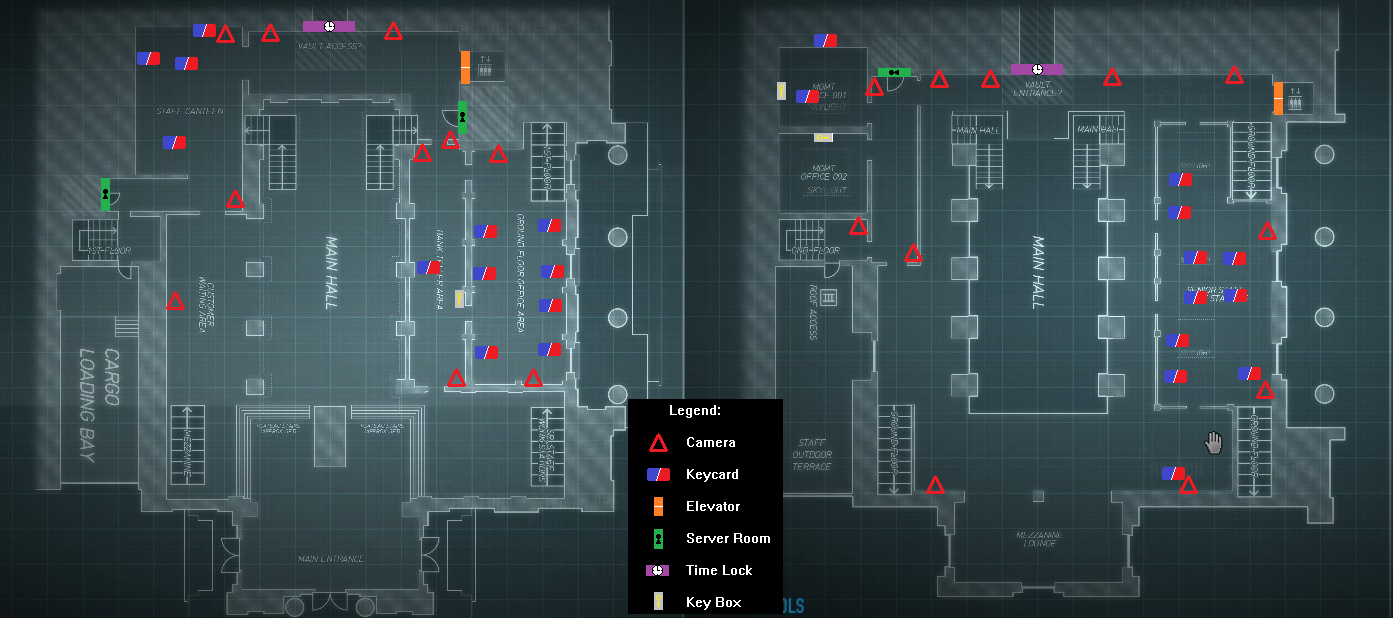
It should be mentioned that you can now pick up the first keycard before masking up with Sixth Sense ACED and that Winston Wolfe ACED reduces your cleaner costs significantly (75%).
Feynman PLAYS THE BONGOS 26 Sep, 2014 @ 1:46pm 
Gensec won't come if you haven't killed any civs, just a heads up
Undefined 28 Jul, 2014 @ 11:39am 
Thanks to this guide, I've now stealthed Big Bank on Death Wish 3 times as of this writing.

I did make my own adjustments though: I substituted Elevator Trick with 3 Spy Cams in the First Floor Vault area along with the unlocked Loading Bay so I can secure the bags without having to kill civs.

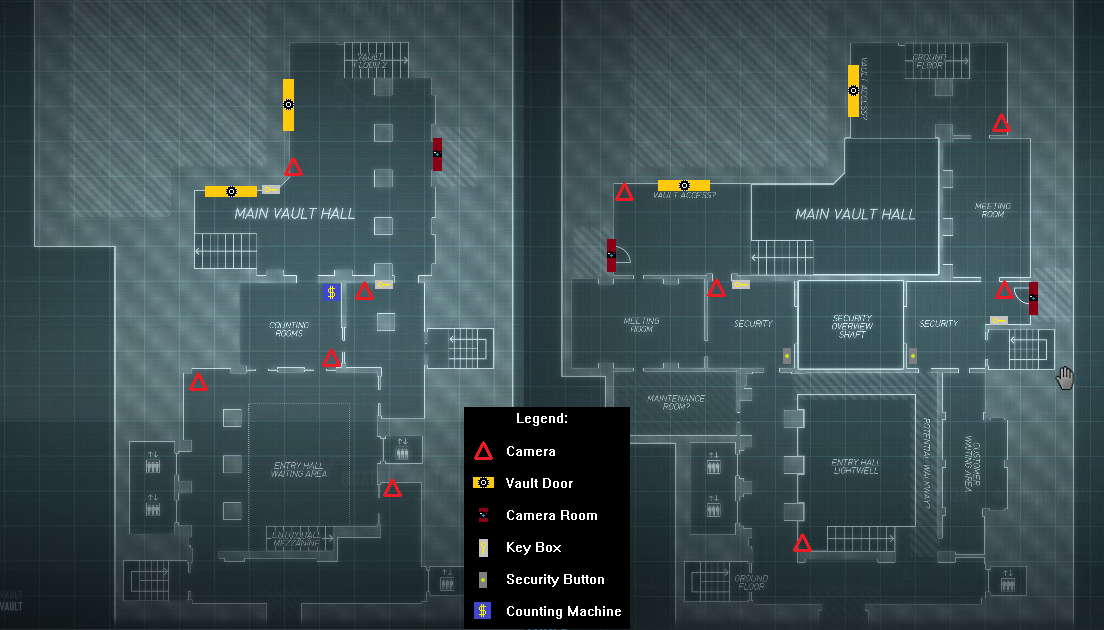
The few times I have stealthed it, I've gotten some bad RNG with no guards being permanently stationed in two attempts and only 1 being stationed (<- for that last one, I experimented with Poisoned Cake in the Ground Floor Vault area, so technically it was 2 guards stationed).

I'm beginning to wonder if picking Elevator Trick has something to do with increaing the odds of Guards being permanently stationary.

In one of the ones I did with no guards being permanently stationed, a guard did not appear from the elevator during the time lock sequence.