Team Fortress 2

Team Fortress 2

27 ratings
MvM: How to play Engineer on "Bavarian Botbash"
By Burrito Fingas! and 1 collaborators
This is a complete guide on how to effectively play Engineer on "Bavarian Botbash".
Most of this guide focuses on a support-offense playstyle and aims to help new players by offering tips, tricks, and strategic advice.
It covers essential topics and game mechanics such as loadouts, upgrade paths, optimal building placements, wave-by-wave tasks, how to deal with Sentry Busters and Sentryblocking.

As mentioned earlier, this guide is primarily intended for newcomers to MvM and for those interested in improving their skills.
It's not a Bible—don't treat it as one. This guide reflects what we've learned through experience and what has worked well for us.
Adapt it to your own playstyle, and above all, have fun!
   
Award
Favorite
Favorited
Unfavorite
Introduction
What You Should Know Before Playing
Before you start playing Engineer in MvM, there are a few important things you should know.
Engineer is a class that takes time to master and can be challenging for inexperienced players. However, once you main Engie and learn how to play it properly, you'll find that it's an extremely powerful and versatile class for any map and mission.
New players often overlook important mechanics and make avoidable mistakes. Playing Engineer isn’t just about placing your buildings in one spot and hiding behind your Sentry like a turtle. Proper positioning, smart upgrades, and wave knowledge are all essential when playing this class effectively.

Move Your Buildings if Needed
This applies to your Sentry, Dispenser, and Teleporters.
During certain waves, robots will only come from specific areas of the map (for example, the balcony in Mannhattan or the hill on the right side of Rottenburg). In these cases, it's important to move your buildings closer to the bot spawn to help your team eliminate them quickly before you start to lose ground.
Also remember: there are many viable building spots on every map, each fitting different playstyles. This guide will cover the most effective placements for this mission.

Don't Turtle with Your Sentry
Avoid standing behind your Sentry all the time. Pay attention to your other buildings and repair them when needed.
You can also use Rebuild Canteens to fix or replace your buildings instantly.

Know How to Sentryblock
"Sentryblocking" is a game mechanic that involves placing your Sentry in specific spots to block giant robots—especially Giant Scouts.
If your team isn’t doing a good job blocking them, you can solve that skill issue by setting up a proper and reliable Sentryblock.
Weapon loadout: Options to Consider
Generally, based on the classic MvM meta regarding weapon choices, Engineer has several options that can be very effective to equip and use. You can skip this section if you’re already familiar with viable weapons:

Primary: The Rescue Ranger
The Rescue Ranger lets you pick up any building within your line of sight. Right-click picks up the building, and left-click shoots projectiles that repair it—provided you’re aiming at the building you want to move or fix.
For support-focused play, the Rescue Ranger is an excellent tool that makes the Engineer easier to play. It is by far the most reliable primary weapon for beginners.

Primary: The Widowmaker
Although this option isn’t ideal for support-only playstyles, we included it here to show that it can be used effectively if players are skilled enough.
The Widowmaker is a reliable damage-dealing weapon that consumes your metal instead of ammo. All damage dealt is returned as metal, essentially giving you infinite shots if you have good aim.
An Engineer using the Widowmaker is a good choice for taking down giant robots and even tanks.

Primary: The Pomson 6000 (Only for Bavarian Botbash)
Even though the Pomson 6000 is a very rare weapon to see in MvM, its main and most notable feature shines at the moment of playing this specific mission.
The Pomson 6000 allows players to substract 10% of the ÜberCharge from enemy Medics on each hit they make on their target, including their robot versions. Some players might try to use this primary against little Über Medics in different missions like Empire Escalation or Hamlet Hostility, but this can be completely avoived when you have better and less risky alternatives for Medic Picking (Sticky Demoman, Explosive Headshot Sniper, Crit Soldier and Gas Passer Pyro, as some examples), but the best situation in which you can use the Pomson is against the Giant Medics.
On this mission, there are a total of 13 Giant Medics and some of them can activate their charges at low health, and this is very annoying, since it's normal to see some teammates (especially those who are inexperienced) getting killed by the Medic's pocket shortly afterwards. You can avoid this whole drama by using the Pomson or having someone that can one-shot the Giant Medics.


Secondary: The Wrangler
The Wrangler lets you manually control your Sentry and increases its range, which is very effective for taking out Sniperbots or leaving the robot Über Medics to your teammates.
Additionally, a wrangled Sentry gains a shield that reduces damage by 66%, making it an excellent tanking option against giant robots.
You can also perform a Sentry jump with the Wrangler to reach certain locations faster (especially when leaving the upgrade station) or help a teammate Medic build Übercharge quicker by shooting yourself with your Sentry.

Secondary: The Short Circuit
This weapon counters explosive spam from robots by firing electricity orbs that destroy any enemy projectiles.
When playing this mission, you can use this secondary on practically any wave. It's an excellent counter against blast damage spam coming from the robots on early waves.


Melee: Default Wrench


The default Wrench is a solid melee option with no downsides that affect gameplay. It’s reliable for keeping your buildings operational.


Melee: The Jag

Unlike the default Wrench, the Jag increases building deploy speed by 20% with each hit.
However, you’ll need to hit a building three times to remove a Spybot sapper, which can make your job more difficult in some situations.
The Map
This short chapter is made for new players to understand map knowledge—something that is very important when playing Engineer or any class that requires specific positioning.

Frontline

The frontline is the place where all the teams start playing at the start of a mission and can be divided into 3 places: Left side, Right side and the Left side tunnel.
  • The Left side is the place where most part of the robots are going to spawn on the mission.
  • On the other hand, the Right side, also known as "the hill" or "cliff", is the secondary robot spawn point, used by Sniperbots and some hordes during all waves.
  • The Left side tunnel is the Tank spawn point.

Town square

Once the team has lost the frontline, it's very common to see players defending from the tunnel that connects the Rottenburg town with the frontline. The town square surrounds a tall tower that divides the Bomb and Tank path in two: Left and Right (In this case, the screenshot shows the right one).


When the robots take the left bomb path, they'll surround the tower in the middle of the town square, going through the dirt path underneath it. This place tends to be a choke point when the team fails to keep a defense on the town tunnel. Dispenser and Teleporter exit can go next to the pitfall down below the tall tower and the Sentry can be placed on the corner next to the pit, covering the dirt path and also working as a good sentry-blocking spot.


In case the robots are following the right bomb path, they'll go through the bridge next to the tall tower in the middle. This is another choke point when the team fails to keep the town tunnel clear. Dispenser and Teleporter exit can go close to the two barrels showed on the image above, next to the corner of the dirth path in the middle. Sentry usually goes on a similar spot with the Dispenser; as long as it's bomb guarding, it's acceptable.


Outer hatch Tank gates
This is in case the players taking the role of Tank Busters are taking too long to destroy a Tank. Exclusively for the left bomb path. Both entrance and exit gates for the Tank are part of the outer hatch area.


Entrance. The door opens when the Tank is close to it and once it's on the inside it will close. At this point, the Tank Busters will have to move to the exit gate to continue attacking the Tank.


Exit, connected to the bomb hatch. Tank Busters won't have a lot of time to destroy the Tank, so using Crits canteens are an option to consider.
Building Placements
Teleporter

Standard Teleporter Entrance with 2-Way, always facing the nearest upgrade station. This guide only shows Teleporter placements optimized for players who have purchased the 2-Way Teleporter upgrade.


Standard Teleporter Exit with 2-Way, always placed near the frontline. Robots do not attack the Teleporter exit unless a player is standing on it, so placing it in an exposed location is often better than placing it far away. A 2-Way Teleporter near the frontline is especially useful for players who tend to upgrade or buy canteens mid-wave (e.g., Instakill Demoman, Canteen-sharing Medic, or Damage Scout).
As the Engineer, you can also use your own Teleporter to go back to spawn for canteens or additional upgrades mid-wave.


Another variation for the Tele exit, commonly used on teams with experienced players. Not really recommended to use at early waves if you're with subpar or new players.


By far, this is the most common placement for the Teleporter exit in Rottenburg, in most cases without the 2-Way upgrade.
Anyways, if you have such upgrade, you can place it here if you have a good and effective Sniper on your team. Some players picking this class tend to do the same thing of upgrading midwave and might ask you to place the Tele exit close to them—this is for their convenience only.


Teleporter exit in case you lost the frontline and the team is forced to defend close to the Tank barricade.


Another Tele exit placement on the right side of the town tunnel. Can be used if the team lost both frontline and the Tank barricade area.


Dispenser

Standard placement behind the left side rock. Very reliable and effective spot as long as the team has a solid crowd control. Spot only focused when the robots are spawning on the left.


Dispenser placement when the robots are coming from the right.


Another variation when it comes to defend the right side. Very aggressive placement and can be used if you have some teammates standing on the hill. The Teleporter exit also shares this spot close to the Dispenser for those who like to spam canteens or upgrading midwave.


If the team is losing the frontline, a Dispenser behind the right side rock next to the Tank barricade is also a good placement if you have to fall back.


Dispenser placement if you have teammates defending on the town tunnel.


Passive Dispenser next to the town tunnel. Can be used if there's a lot of spam from the robots and you can't keep a solid Dispenser on the tunnel.


Sentry

Some kind of aggressive Sentry placement when the robots come from the left. It's a solid spot if you want your Sentry to take less damage from the robots, as they'll already be targeting your teammates instead of your buildings.


Standard Sentry placement when the robots come from the right. It's exposed, but offers a solid crowd control if your teammates are helping you. Having this placement is kind of tricky at the beginning for new players because demands you to place the Sentry on a very specific point on the rock. We decided to include an extra screenshot of how you can place the Sentry on this spot.


Another placement for the Sentry in case you lost the frontline and the robots are starting to drop from the hill. If the team is losing the frontline, a Sentry behind the right side rock next to the Tank barricade is also a good placement if you're stuck on that point.


Sentry spot placed close to the town tunnel in case you lost the entire frontline. If you decide to use this one, we suggest you to equip and use The Wrangler to counter possible high spam from the robots.


Only a good spot for the Sentry when it comes to attack a Tank. Otherwise, it can be very vulnerable in early waves, since the robots will start shooting it very quckly, forcing you to use Building Canteens or move the building to a safer spot.
Wave 1
Bavarian Botbash kicks off with a relatively simple wave. As you’ll see from the wave composition, there are Giant Scouts, and if you’re familiar with playing Engineer in MvM, you already know part of your job here: performing Sentryblocks.
The real challenge comes when the Giant Soldier + Giant Quick-Fix Medic combo shows up. This is where the Pomson 6000 comes into play—a primary weapon that drains ÜberCharge from enemy Medics. In this guide, you’ll learn when and how to use the Pomson to prevent Giant Medics from popping.
Everything else in this wave is a low threat and can be cleared out quickly with proper teamwork and coordination.

Main Objectives
  • 1) Sentryblock the 2 Giant Scouts spawning on the left side.
  • 2) Use the Sentry to kill the groups of Heavies coming from the right side.
  • 3) Use the Pomson 6000 to prevent the Giant Medic from popping its charge.
  • 4) General task: Use the Sentry to provide a safe bomb guarding if the team lost the frontline and has to fall back.

Upgrades
From Wave 1 through Wave 7, the following upgrades can be purchased safely without the need for refunds.
Only consider rearranging your upgrades if your team’s Scout is missing money. In that case, adjust your priorities—but always put full Dispenser range and 2-Way Teleporter first.


  • Buy 3 ticks of +100% Dispenser Range: A wider range allows your teammates to receive ammo, health, and metal without having to “hug” the Dispenser. Without this upgrade, players must stay too close to it, which makes the Dispenser vulnerable to splash damage.
  • Buy 2-way Teleporters: Excellent for buying upgrades or canteens mid-wave. This upgrade allows your team to return to spawn quickly without walking or using a killbind. It’s especially useful for players with aggressive playstyles or canteen-sharing Medics.
  • Then, you can buy 1 tick of +100% Building Health if you want to make your buildings more tanky or you can try getting 1 tick of +10% Sentry Firing Speed if you want your Sentry to kill the robots faster.
  • Buy 3 Building canteens and use them for rebuildings or insta-repairs if needed.

How to Play
Wave 1 starts with groups of Soldiers spawning on the left, followed by a Giant Scout—your first task is to sentryblock this giant.


After the first Giant Scout is taken down, 20 Demoknights will come from the right. Warn your teammates so they can deal with them quickly, as you’ll need to keep your Sentry on the left. When you hear the Demoknights charging their shields, the last Giant Scout will spawn from the left. Use a Sentryblock again and finish it off with your Wrangler.


Once that Giant Scout is destroyed, 50 Scouts will rush in from the left while 20 Heavies spawn on the right. Move your Sentry to the rock on the right side, where it can cover both spawn points—your Sentry will wipe out the Scouts while your teammates handle the Heavies.


The final section of the wave brings a Giant Soldier + Giant Medic combo spawning on the right, along with 16 Demomen from the left. Be aware that the Giant Medic can pop its ÜberCharge at low health, but there’s a trick to prevent it: equip the Pomson 6000 and drain the Medic’s charge to make the fight easier for your team.
Here’s how: once the Heavybots are gone, temporarily switch your primary to the Pomson. Use a killbind to respawn quickly, then ask your Medic to revive you so you’re ready with the Pomson right away. Tell your team’s Heavy or Soldier to focus on the Giants while your Sentry handles the Demomen on the left.
Next, head up the hill and wait for the giants to drop. Don’t stand too close to their spawn so the Giant Soldier won’t target you. Wait for it to start firing at your teammates first, then hit the Giant Medic with the Pomson. With decent aim, you can drain most of its charge, making it much easier for your team to finish off the giants.


Then, clear all remaining robots to complete the wave.
Wave 2
This wave is even more straightforward, mostly filled with giant robots and a Tank. The Tank isn’t much of a problem—just like in Hamlet Hostility, a Widowmaker-equipped Engineer can handle it solo while the rest of the team focuses on holding the frontline. Keeping the frontline under control is important in order to not lose ground and waste time.
The Giant Crit Pyros are easy to deal with, and the wave ends up with three Giant Soldiers using banners (Concheror, Buff Banner, Battalion’s Backup). As long as the team has a solid crowd control, this wave should be smooth.

Main Objectives
  • 1) Help your team by attacking the Giant Pyros and the groups of Flare Gun Pyros and Scouts by using your Sentry and/or the Widowmaker.
  • 2) Follow the Tank once it spawns and use the Widowmaker to destroy it.
  • 3) General task: Use the Sentry to provide a safe bomb guarding if the team lost the frontline and has to fall back.

Upgrades


  • You can buy the second tick of +100% Building Health to make your buildings even more tanky, or you can also buy one tick of such upgrade and then combine it with one tick of +10% of Sentry Firing Speed.
  • Equip the Widowmaker and buy 4 ticks of +10% of Firing Speed. This will be used to destroy the Tank.
  • Optional: Buy 3 Crit canteens and use them when shooting the Tank in order to destroy it quickly.

How to Play
Wave 2 begins with five groups of Giant Crit Pyros, Flare Gun Pyros, and Scouts. They’re easy to handle, so this section shouldn’t be a problem. Use your Sentry and the Widowmaker to help clear them out.


Once the last group of Pyros and Scouts is dealt with, a Tank will spawn in the left tunnel. Whether you’re using the Widowmaker or not, start attacking the Tank and ask your teammates (especially your Heavy) to hold the frontline. Groups of Soldiers will spawn from the left soon after, so keeping the robots from pushing forward is key to avoid wasting time.
Make sure to keep your Dispenser on the frontline—don’t place it close to the Tank Busters, as your teammates up front will need it more.


After the Tank is destroyed, the rest of the wave is straightforward. You’ll have more groups of Soldiers, ending with three Giant Soldiers equipped with the Concheror, Battalion’s Backup, and Buff Banner—all coming from the left side. Once they’re taken down, you'll complete the wave.

Additional Tips:
  • Try using the Widowmaker to attack the Giant Soldiers.
  • If you have a Medic, stay behind their shield and use cover to avoid getting hit by the enemy rockets.
  • Consider equipping the Short Circuit to destroy incoming rockets, helping your team survive the final push.
Wave 3
Another wave with Giant Scouts and Giant Quick-Fix Medics, so once again Sentryblocking and using the Pomson are part of your tasks.
However, the Support Spybots can complicate things if your team doesn’t have good crowd control. It’s crucial to eliminate robots quickly so the team doesn't lose the frontline.

Main Objectives
  • 1) Place your Sentry on the right side rock so it can kill the groups of Hyper League Scouts coming from the hill.
  • 2) Use the Pomson 6000 to reduce the ÜberCharge meter of the 2 Giant Medics so they can't pop they charges.
  • 3) Use the Sentry to kill the groups of Heavies and Scouts coming from the right side once the first Giant Heavy is gone.
  • 4) General task: Use the Sentry to provide a safe bomb guarding if the team lost the frontline and has to fall back.

Upgrades


  • Buy the third and last tick of +100% Building Health in order to make your buildings as tanky as possible.
  • In case you didn't get the 1 tick of +10% Sentry Firing Speed on Wave 2, you can do it now so your Sentry can shoot and kill the robots faster.
  • Buy 3 Building canteens and use them for rebuildings or insta-repairs if needed.

How to Play
Wave 3 starts with 40 Shotgun Heavies spawning on the left, along with 3 Giant Scouts. Meanwhile, 30 Hyper League Scouts will come in from the right. Set up your Sentry on the right side rock so it can wipe out the Hyper League Scouts as they fall down the hill, while your teammates clear the hordes from the left.


After the last of the 3 Giant Scouts is taken down, switch your primary to the Pomson 6000. You can use your 2-Way Teleporter to return to spawn and change weapons there, or, if you have a Medic, use a killbind on the frontline and ask to be revived so you can rejoin the fight with your Pomson ready.

With the Pomson equipped, hide behind the fence near the left rock and wait for the Giant Heavy to drop. Once it spawns, sneak around to the Giant Medics and hit both of them with your Pomson—2 or 3 shots each will drain their ÜberCharge, making it easy for your teammates to finish off the Giants.


Shortly after the Giant Heavy and Medics arrive, 12 Spybots will spawn across various spots on the frontline. They can cause chaos if your team isn’t paying attention, so keep your distance and deal with them after the Giant Heavy is gone.

Next, groups of Heavies and Scouts will approach from the right. Place both your Sentry and Dispenser on the right side to hold the frontline. These bots are easy to take down and shouldn’t pose much of a threat.


The wave ends with 3 more Giant Scouts coming from the left. Place your Sentry near the right side rock to block them and finish the wave.

Wave 4
On this wave, it's important to have one or two teammates following the Tank while the rest of the team holds the frontline. Also, be aware that 8 Giant Crit Demomen will spawn on the right side, so cover both spawn points effectively.
Once again, be aware of the Support Spybots when they spawn!

Main Objectives
  • 1) Follow the Tank and destroy it while using the Widowmaker.
  • 2) Once the Tank is destroyed, help your team on the frontline and use both your Sentry and Widowmaker to kill the Giant Crit Demos spawning on the right.
  • 3) General task: Use the Sentry to provide a safe bomb guarding if the team lost the frontline and has to fall back.

Upgrades


  • Having 1 tick of +50% Max Metal Capacity allows you to build a Sentry, Dispenser and Teleporter exit without having to search for metal around the map, and this is quite helpful if the team lost the frontline and you need to rebuild everything instantly in order to not lose too much ground.
  • Buy 3 ticks of +30% Crit Resistance to be less vulnerable against the crit pipe spam from the Giant Crit Demos.
  • You can also buy Projectile Penetration for the Widowmaker if you're willing to use the weapon with the Giant Demos as well. This upgrade is optional, so it's up to you.
  • Buy 3 Crit canteens and use them while you're attacking the Tank with the Widowmaker.

How to Play
The wave begins with groups of Demoknights and Soldiers spawning on the left.


Shortly after, a Tank will roll in through the tunnel while Giant Crit Demomen spawn on the right. Make sure to ask your teammate Heavy or Soldier to focus on the Giant Demomen and keep control of the frontline instead of following the Tank, as this won't be necessary.
*insert image*

Once the Tank is destroyed, most of the wave is nearly over. If you’re using the Widowmaker, help your team by dealing extra damage to the Giant Demomen and kill them faster.


More Demoknights and Soldiers will spawn on the left, along with additional Giant Crit Demomen on the right. Clear out the remaining bots to finish the wave.
Wave 5
This wave brings more damage spam, but it’s manageable as long as the team keeps solid crowd control and the Engineer has good building placements.
There are also Giant Quick-Fix Medics, so you’ll need to use the Pomson again to drain their charges. Other than that, the wave is fairly easy—just watch out for Support Spybots, and eliminate them as soon as they appear.

Main Objectives
  • 1) Use the Pomson 6000 to reduce the ÜberCharge meter of the 2 Giant Medics so they can't pop their charges.
  • 2) Use the Sentry to kill the groups of Heavies, Demomen, Engineers and Soldiers coming from the right side once the first Giant Heavy is destroyed.
  • 3) General task: Use the Sentry to provide a safe bomb guarding if the team lost the frontline and has to fall back.

Upgrades

  • At this point, you'll already have all the upgrades that are needed for a decent game. Of course, having Building canteens is recommended in any situation. If you're having an A+ rating, you'll have some extra credits with you. If you don't know what additional upgrades you can buy, you have some extra options: Buying 1 or 2 ticks of any type of resistance or even getting some ticks of Metal Capacity or Attack Speed for your Wrench/Jag.

How to Play
Wave 5 starts with 40 Crit Scouts on the left, followed by a Giant Heater Heavy + Giant Medic combo. Before the wave begins, make sure to equip the Pomson 6000, as you're going to need it to deal with the Giant Medics.
As explained in the Wave 3 section, sneak behind the Giants without drawing their attention and hit the Giant Medic with your Pomson to drain its ÜberCharge. Your teammates will take care of the rest.


Once the giant combo is dealt with, more Scouts will attack from the left while 20 Heavies spawn from the right. Since your teammates will usually be focused on the left, place your Sentry to cover the right side and eliminate the Heavies quickly. Ask at least one teammate to assist you on the right in case your Sentry is destroyed. Be sure to place your Dispenser on the right as well, since the next section of the wave will unfold there.


After the Scouts and Heavies are cleared, 40 Demomen followed by Engineers will spawn from the hill. At this moment, your entire team should be on the right side to deal with the incoming robots.
*insert image*

Once the Demomen are wiped out, the final Giant Heavy + Giant Medic combo will spawn on the left. At the same time, 20 Crit Soldiers and 15 Huntsmen will appear on the right. The giants are a bigger priority—help your team by using the Pomson again to drain most of the Giant Medic’s charge.


Meanwhile, your Sentry should remain on the right to kill some of the Crit Soldiers while your teammates handle the Giants.

In this screenshot, the Crit Soldiers killed most of the team but the Sentry managed to clear all of them close to the Tank barricade.

After the Giants are down, the wave is essentially over. Clean up the remaining robots to complete the wave.
Wave 6
More of the same: giants, a Tank, and plenty of blast spam. Thankfully, the 8 Giant Quick-Fix Medics in this wave don’t pop their charges, so you won't have to use the Pomson.
Your tasks are simple: help destroy the Tank, and support your team with good Sentry and Dispenser placements.

Main Objectives
  • 1) Use the Widowmaker to eliminate the Giant Demo + 2 Giant Medics combo.
  • 2) Follow and destroy the Tank with the Widowmaker.
  • 3) Once task 2) is completed, place your Dispenser and Sentry on the right side to help your team killing remaining hordes of robots.
  • 4) General task: Use the Sentry to provide a safe bomb guarding if the team lost the frontline and has to fall back.

Upgrades


  • Having full Blast Resistance really comes in handy for this wave, specially at the start of it, when you have to deal with the groups of little Demos and a giant one pocketed by Giant Medics on the left, and also nearly at the end, when you have Concheror Soldiers and a giant one with Giant Meds, followed by groups of little Crit Demos on the right. Almost at the end of the wave you can get full Bullet Resistance too, due to the 2 Giant Heavies coming from the right robot spawn
  • Buy 3 Crit Canteens and use them if you're attacking the Tank with the Widowmaker

How to Play
Wave 6 begins with 20 Crit Scouts and Crit Huntsmen attacking from the left, followed by 30 Demomen. Set up your Sentry on the left to assist with crowd control.


Once those are cleared, a Giant Demoman supported by 2 Giant Quick-Fix Medics will arrive from the left, along with a Tank. If you’re using a fully upgraded Widowmaker, you can either help damage the Giants or focus on the Tank—it’s up to you.


After the giants combo and Tank are destroyed, most of the action shifts to the right side. Move your buildings to cover that area. If the robots manage to carry the bomb near the town tunnel, consider placing your Sentry close to it to safely guard the bomb while the rest of your team holds the frontline.

Next, 20 Crit Scouts will spawn from the left and 20 Crit Huntsmen from the right. Once the Scouts on the left are gone, the rest of the wave takes place entirely on the right. After the Huntsmen, you’ll face 30 Concheror Soldiers followed by a Giant Soldier pocketed by 2 Giant Quick-Fix Medics.


At this point, using the Widowmaker is highly effective for dealing damage to the Giants. Wait for the Giant Soldier to start targeting your teammates, then move behind the Giant Medics and take them out to avoid drawing aggro.


The wave continues in a similar pattern: more groups of Crit Scouts and Huntsmen, followed by 20 Crit Demomenbots. Finally, the wave ends with 2 Giant Deflector Heavies, each supported by 2 Giant Quick-Fix Medics (split between the 2 groups).


Wave 7
Finally, the last wave. This one is all about giant robots and a Tank—make sure they’re destroyed quickly before they cause problems.
By this point, it’s strongly recommended for Engineers to use the Widowmaker to help burn down the Tank and the Giant Demomen. Since all the giants have crits, your entire team should have crit resistance upgrades (including the Engie)—otherwise, things can get ugly fast.

Main Objectives
  • 1) Follow and destroy the Tank while using the Widowmaker.
  • 2) Sentryblock and kill the 8 Giant Crit Demos coming from the right side once the Tank is destroyed.
  • 3) General task: Use the Sentry to provide a safe bomb guarding if the team lost the frontline and has to fall back.

Upgrades


  • We already explained this thing above. If you have the money, then buying full resistances is a good choice to tank better with giants. Anyways, remember that Engineer is a class with not too much health. You can be tanky, but not immortal—learn to dodge projectiles in order to survive.
  • Buy 3 Crit canteens and use them to attack the Giant Demos on the right.

How to Play
The wave starts with a Tank on the left, so use the Widowmaker and shoot until you destroy it.


After that, the rest of the wave consists of 4 Giant Crit Deflector Heavies paired with 4 Giant Crit Soldiers, supported by Über and Quick-Fix Medics on the left, and 8 Giant Crit Demomen on the right.

Most of the team will usually stay near the Dispenser defending the left, so if you want to handle the right spawn and eliminate the Giant Demomen before they kill you or your teammates, you can use your Sentry to block them while dealing damage with your primary. Place your Sentry on the middle of the edge that the robots use to fall off the hill, then use the Wrangler for a few seconds. Keep some distance and wait for the Demomen to fall, and they’ll get blocked by your Sentry.
When that happens, use the Widowmaker with Crit canteens to quickly melt them. If you’re fast enough, you can take out both Giants before your Sentry gets destroyed, then repair it if needed in order to keep attacking the remaining Giants.


Watch out for the groups of 3 support Snipers that will keep spawning on the hill. If you’re taking on the task of dealing with the Giant Demomen, Crit canteens are almost mandatory—which is why they’re included in the upgrades section earlier.
However, you can skip this task entirely if a teammate Soldier is already handling the Demomen or if a Demoman is setting up crit sticky traps on the hill.

Then, the wave—and the mission—is practically done. Congratulations!
Engineerbot Spawn Points
Engineer bots can spawn in multiple locations across the map, depending on where the bomb is. If you want to stop Engiebots from setting up Sentries and Teleporter exits—which can quickly become a problem for your team and slow down the wave—you’ll need to know all of their possible spawn points.

Below, you’ll find all their spawn locations in order:


Dealing with Sentry Busters
The Engineer’s most frequent nuisance in MvM.
There are several ways to “trigger” (detonate) Sentry Busters, and here you’ll learn each method so you can choose the one that best suits the situation.

Passive Triggering
Passive triggering refers to detonating Busters without actively attacking them. There are three common ways to do this:
  • Using the Rescue Ranger: The simplest method. If the Buster is about to explode near your Sentry (you’ll hear its warning beeps as it begins the detonation animation), aim at your building with the Rescue Ranger and right-click to safely pick it up. This moves the Sentry away from the explosion, saving it from destruction. The Rescue Ranger’s alt-fire costs 100 metal, so make sure you have enough before trying to rescue your building.
  • Detonation Baiting: A variation of passive triggering that doesn’t require the Rescue Ranger. If you want to trigger a Buster quickly, simply pick up your Sentry and walk toward it, or wait for the Buster to approach you. When it collides with you, it will begin its detonation animation—just walk away before it explodes.
    Important: Always bait Busters away from your teammates and your other buildings.
  • Destroy and Rebuild: Some Engineers prefer to simply let the Buster destroy their Sentry, then rebuild it instantly by using a Building Canteen. This method is often simpler, especially if multiple Busters are spawning and your Sentry is already drawing heavy aggro.

Aggressive Triggering (Damage Farming)
Another way to deal with Busters is to destroy them before they reach your Sentry. Teammates can help by using stickybomb traps, explosive or bullet damage, or even slowing them with The Mad Milk (with the “-35% Speed on Target” upgrade).
This approach not only saves your buildings but also lets your team farm extra damage.
Just remember: killing a Buster is fine as long as you don’t destroy it near a teammate or a building. Always make sure everyone and everything is away from the explosions.

Special Trick: The Sentry Buster Glitch
There’s a trick that allows you to instantly detonate a Sentry Buster before it reaches your buildings—or even lock it in place without triggering, essentially turning it into an “Übercharge dispenser” for a teammate Medic.
If you want to learn how to pull off this trick, check the article below. Full credit goes to its creator.
https://steamproxy.com/sharedfiles/filedetails/?id=1680114554
In Conclusion
  • Learning to play this or any mission as Engineer requires both map knowledge and wave memorization.
  • Know which robots are and aren’t your priority targets on each wave. Having a competent Demoman or Sniper on your team can make a huge difference in how you play.
  • The Rescue Ranger is the best primary weapon for new players. If you’re skilled and confident enough, try using the Widowmaker for a different, more challenging, and fun playstyle.
  • Learn how to Sentryblock; it’s one of the biggest differences between a good and a bad Engineer.
  • Adjust your Dispenser placements—aggressive or passive—based on your teammates’ playstyles.
  • If you run out of canteens mid-wave, you can always take your 2-Way Teleporter back to spawn and buy more of them—it won't take too long and it's an excellent option to keep a solid performance.
  • Don’t hesitate to use multiple Building canteens during a wave. They only cost 50 credits each and are an excellent option to always keep your buildings operational.
  • Learn how to handle Sentry Busters. Always trigger them away from teammates and buildings.
  • Make sure Spybots are dealt with quickly, either by asking for help or kill them on your own—never ignore them.
  • Generally, this mission has way more spam if we compare it with Hamlet Hostility. It's recommended for the team to coordinate with some roles like Tank Busting and covering both robot spawns. As the Engineer, you're going to multi-task constantly by dealing with Tanks, sentryblocking, bomb guarding, using the Pomson to drain the Giant Medics ÜberCharges and chaging your building placements when needed.

We hope this guide can benefit the plethora of beginner Engineer players in MvM, and we hope to see you using our tips and tricks in a future game!
If you have questions related to this mission we'll be more than happy to answer them in the comment section down below, cheers.
More Guides Available
For those who are interested in maining Engineer on Two Cities, check the rest of our guides:
https://steamproxy.com/sharedfiles/filedetails/?id=2785801375
https://steamproxy.com/sharedfiles/filedetails/?id=2814488742
https://steamproxy.com/sharedfiles/filedetails/?id=2822139543
-- We appreciate any kind of feedback or comments related to the guide. Off-topic comments will be ignored/deleted/blocked. --
13 Comments
Bradster2214 9 Jul @ 4:04am 
You already have the spot, just with a sentry on it. the alternative is have a teleporter on that rock, and when people go through it, if they stay ON the rock, the bots can't target them (they can shoot past people on the rock and hit them, or a pyro that is always firing might look at the bot but won't target, will still do damage as they're always firing
Burrito Fingas!  [author] 23 Jun @ 2:45pm 
Appreciate your comment!
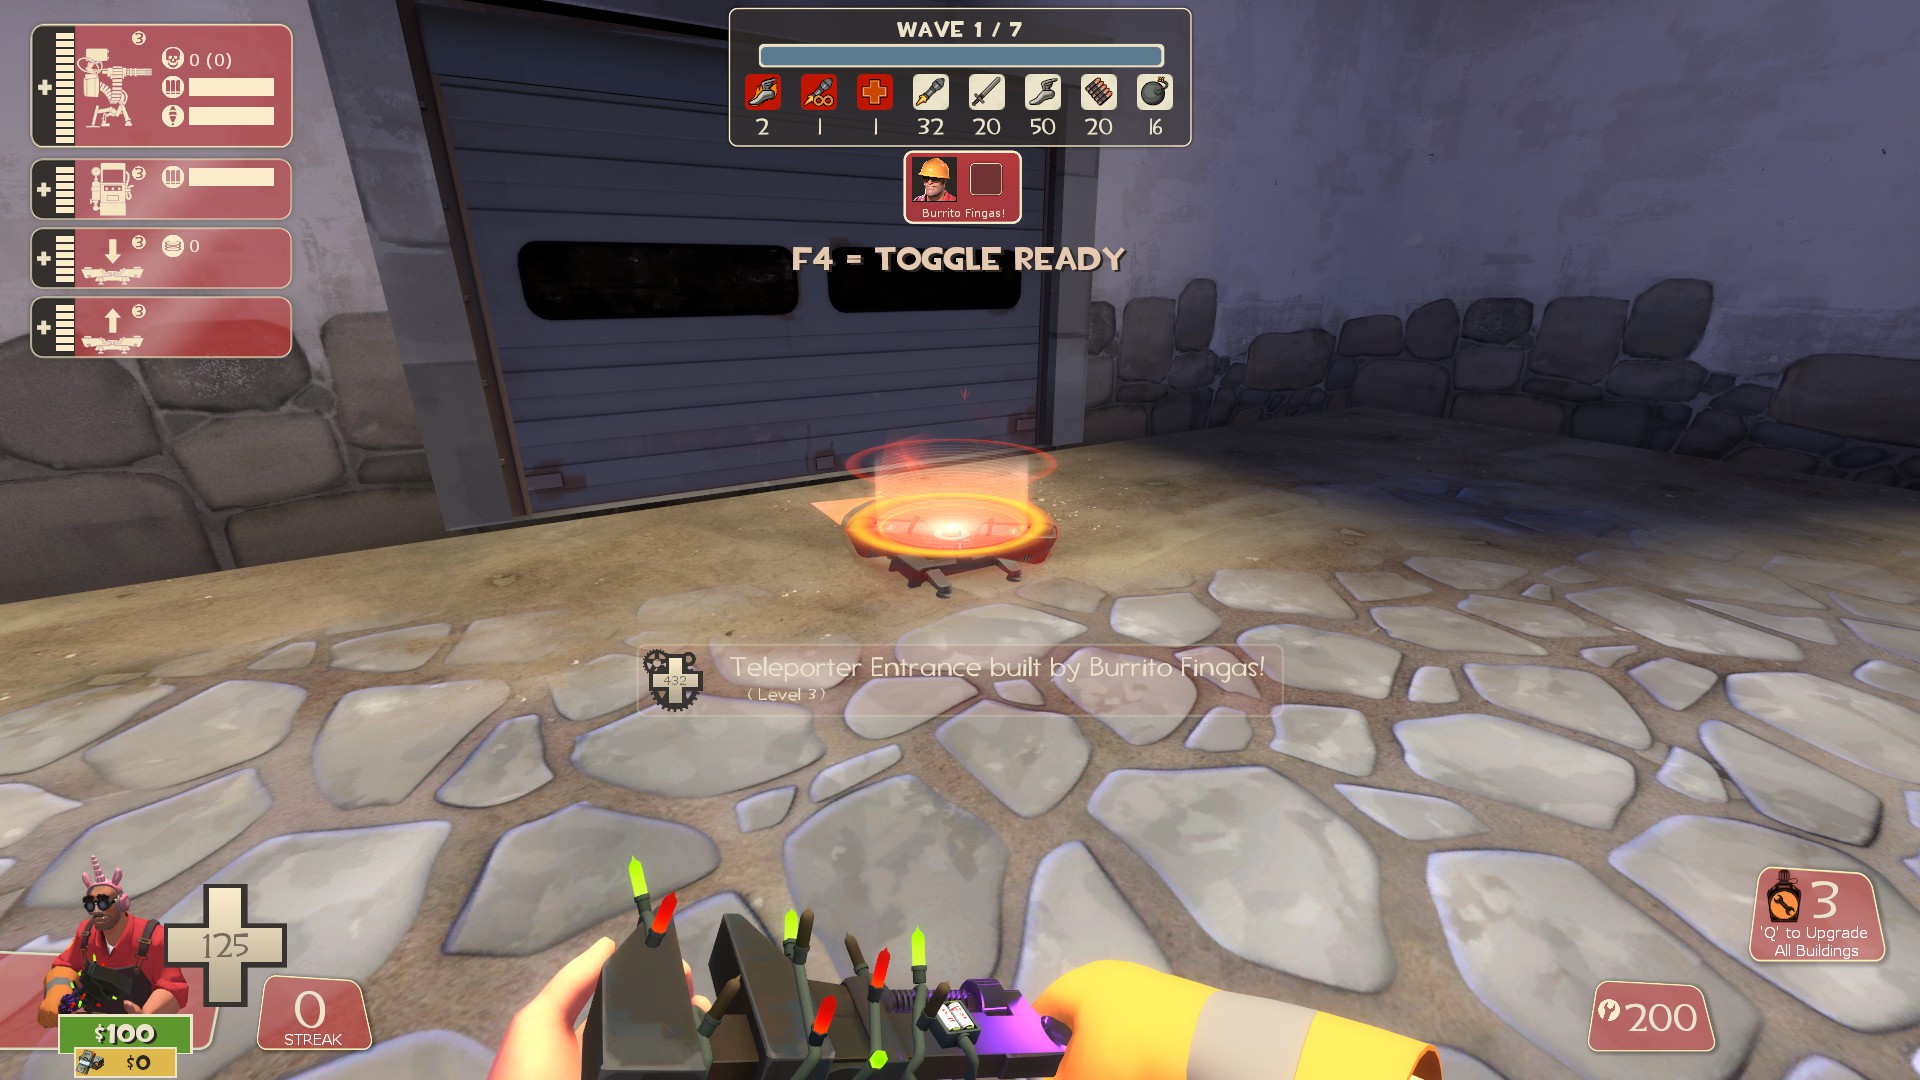
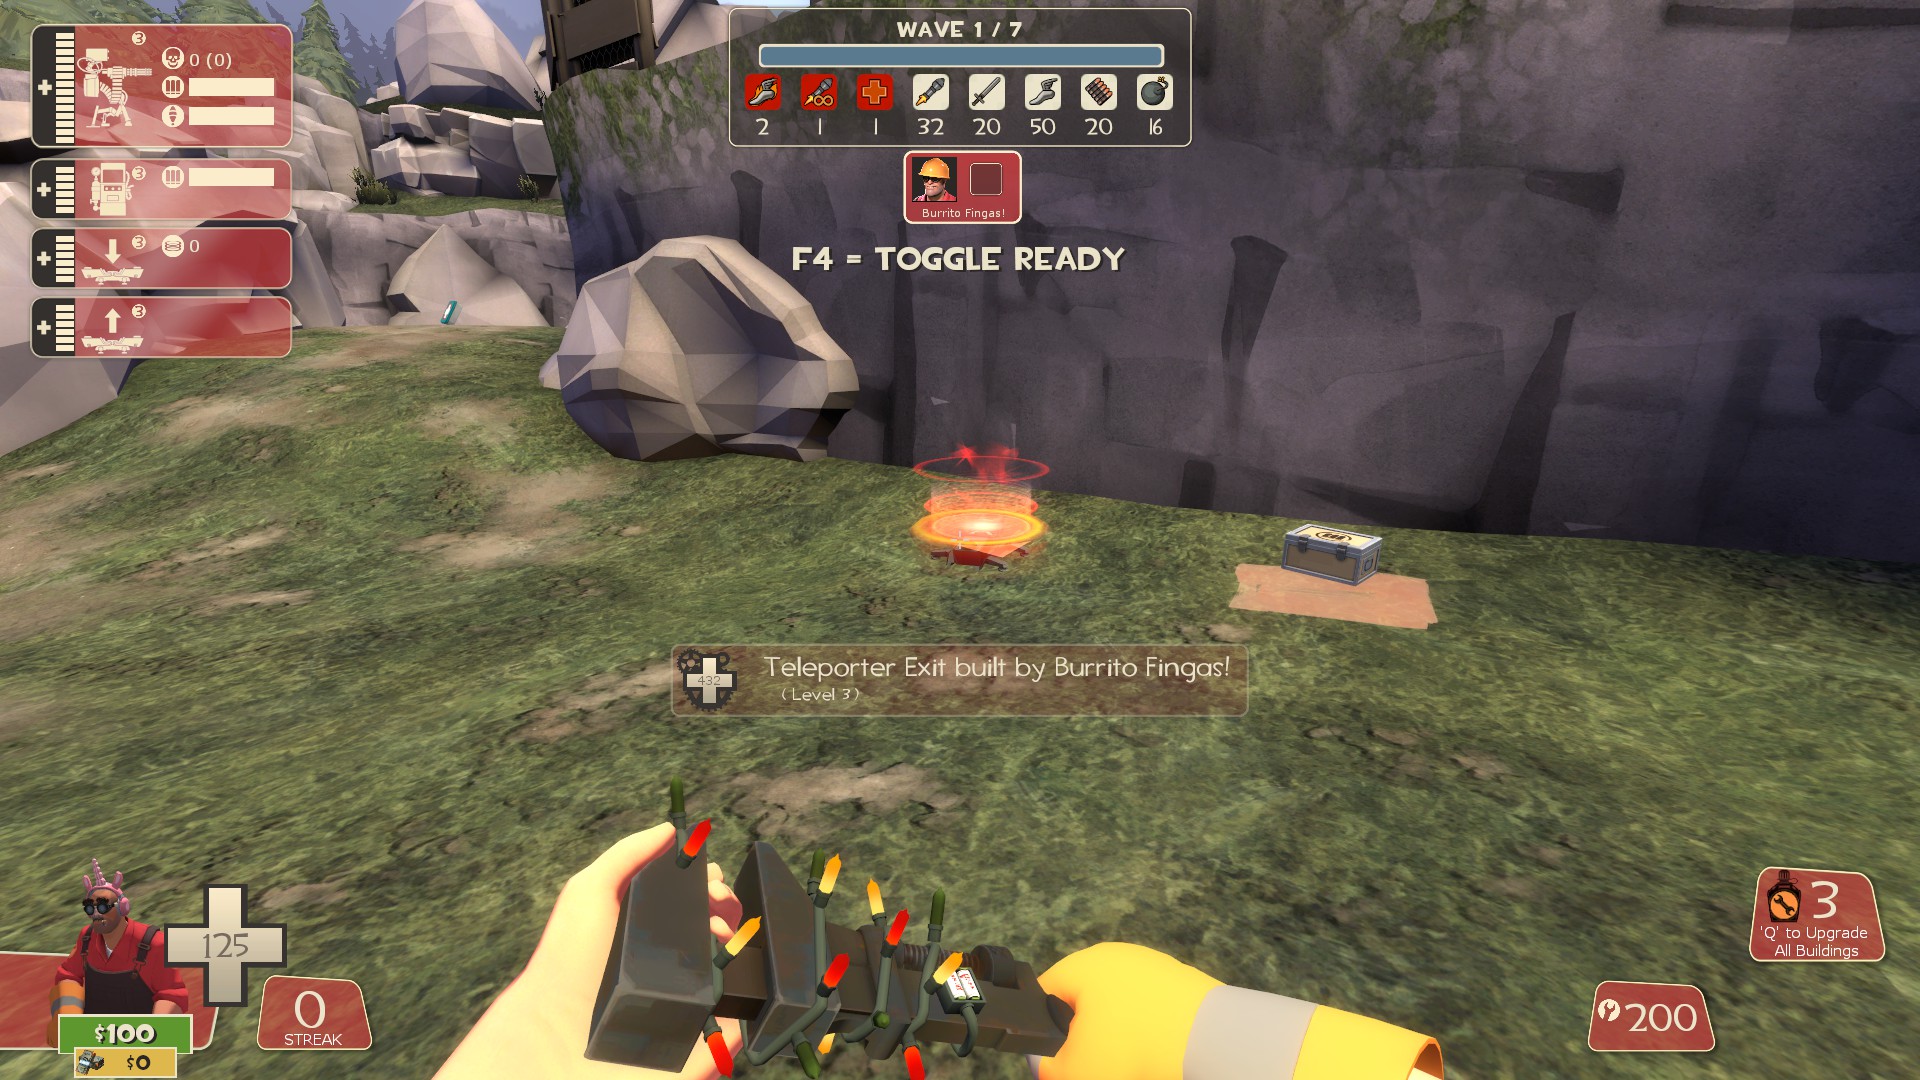
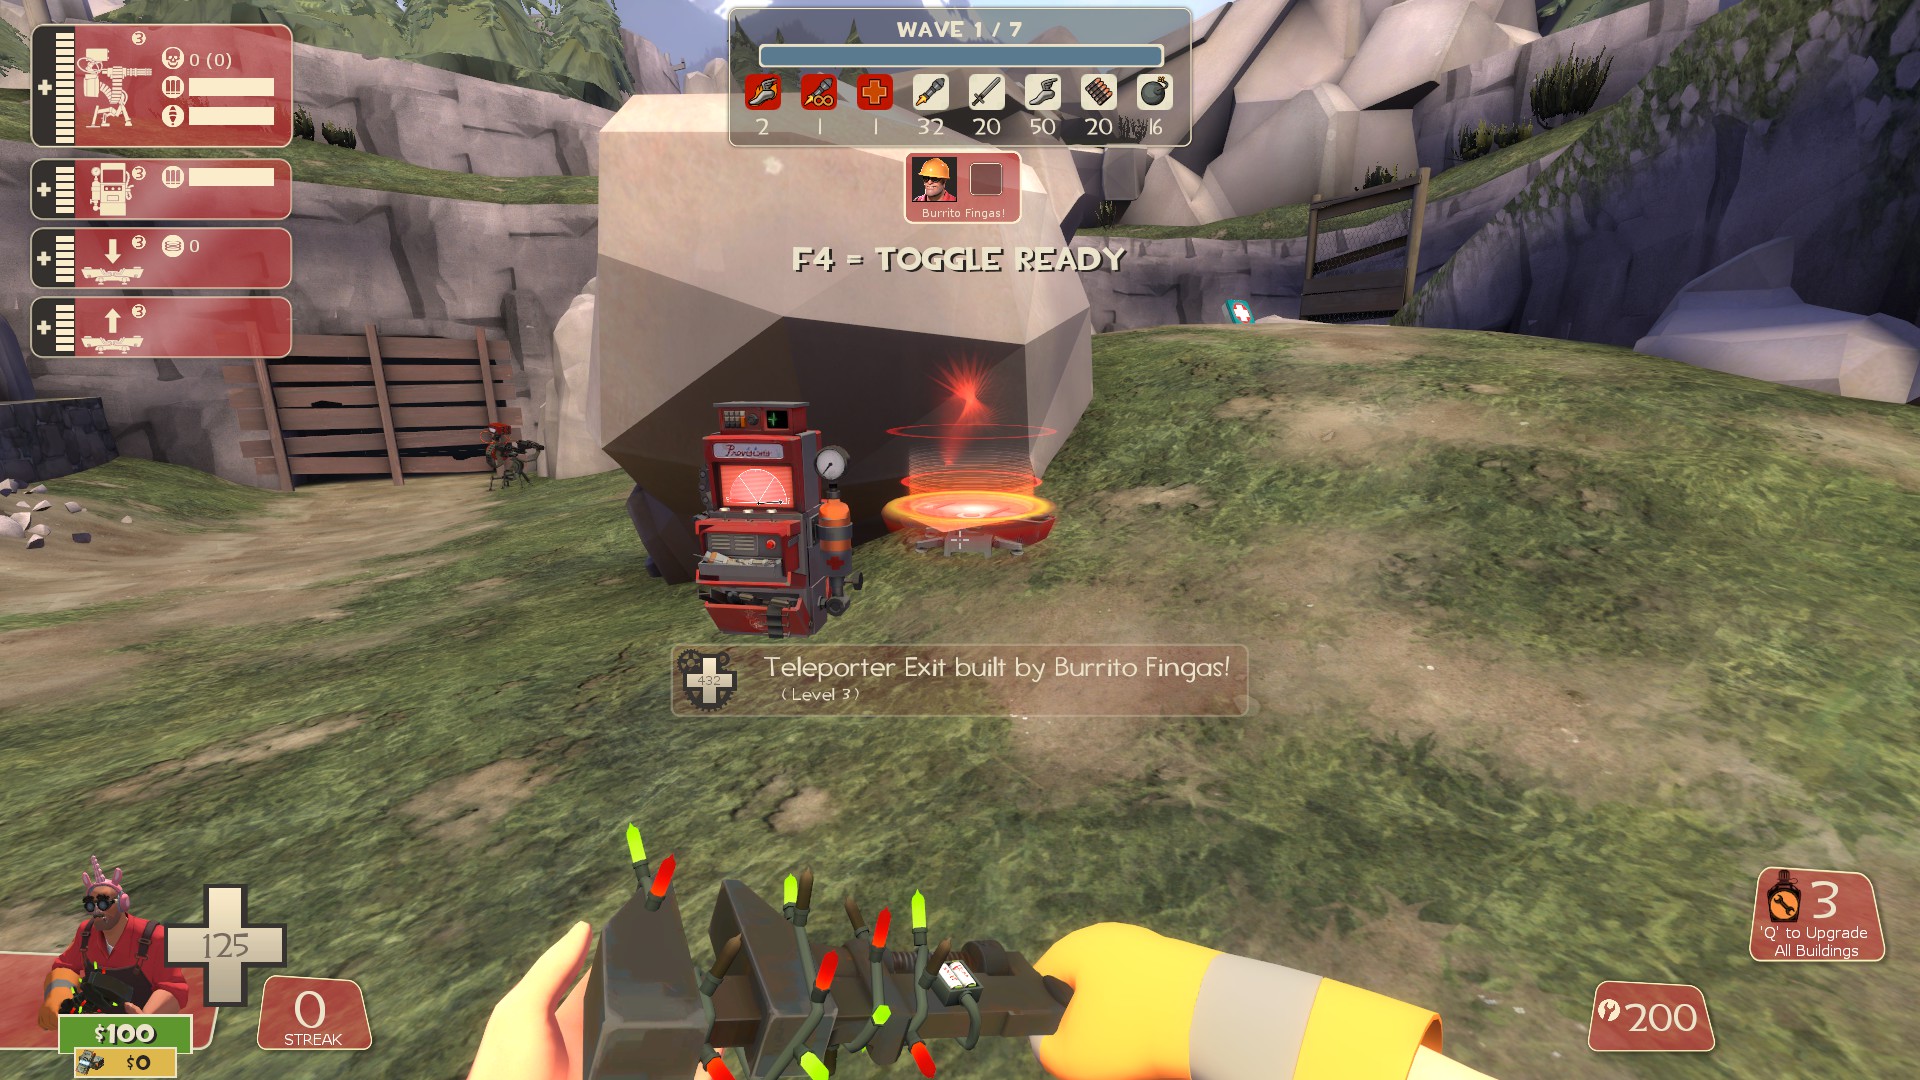
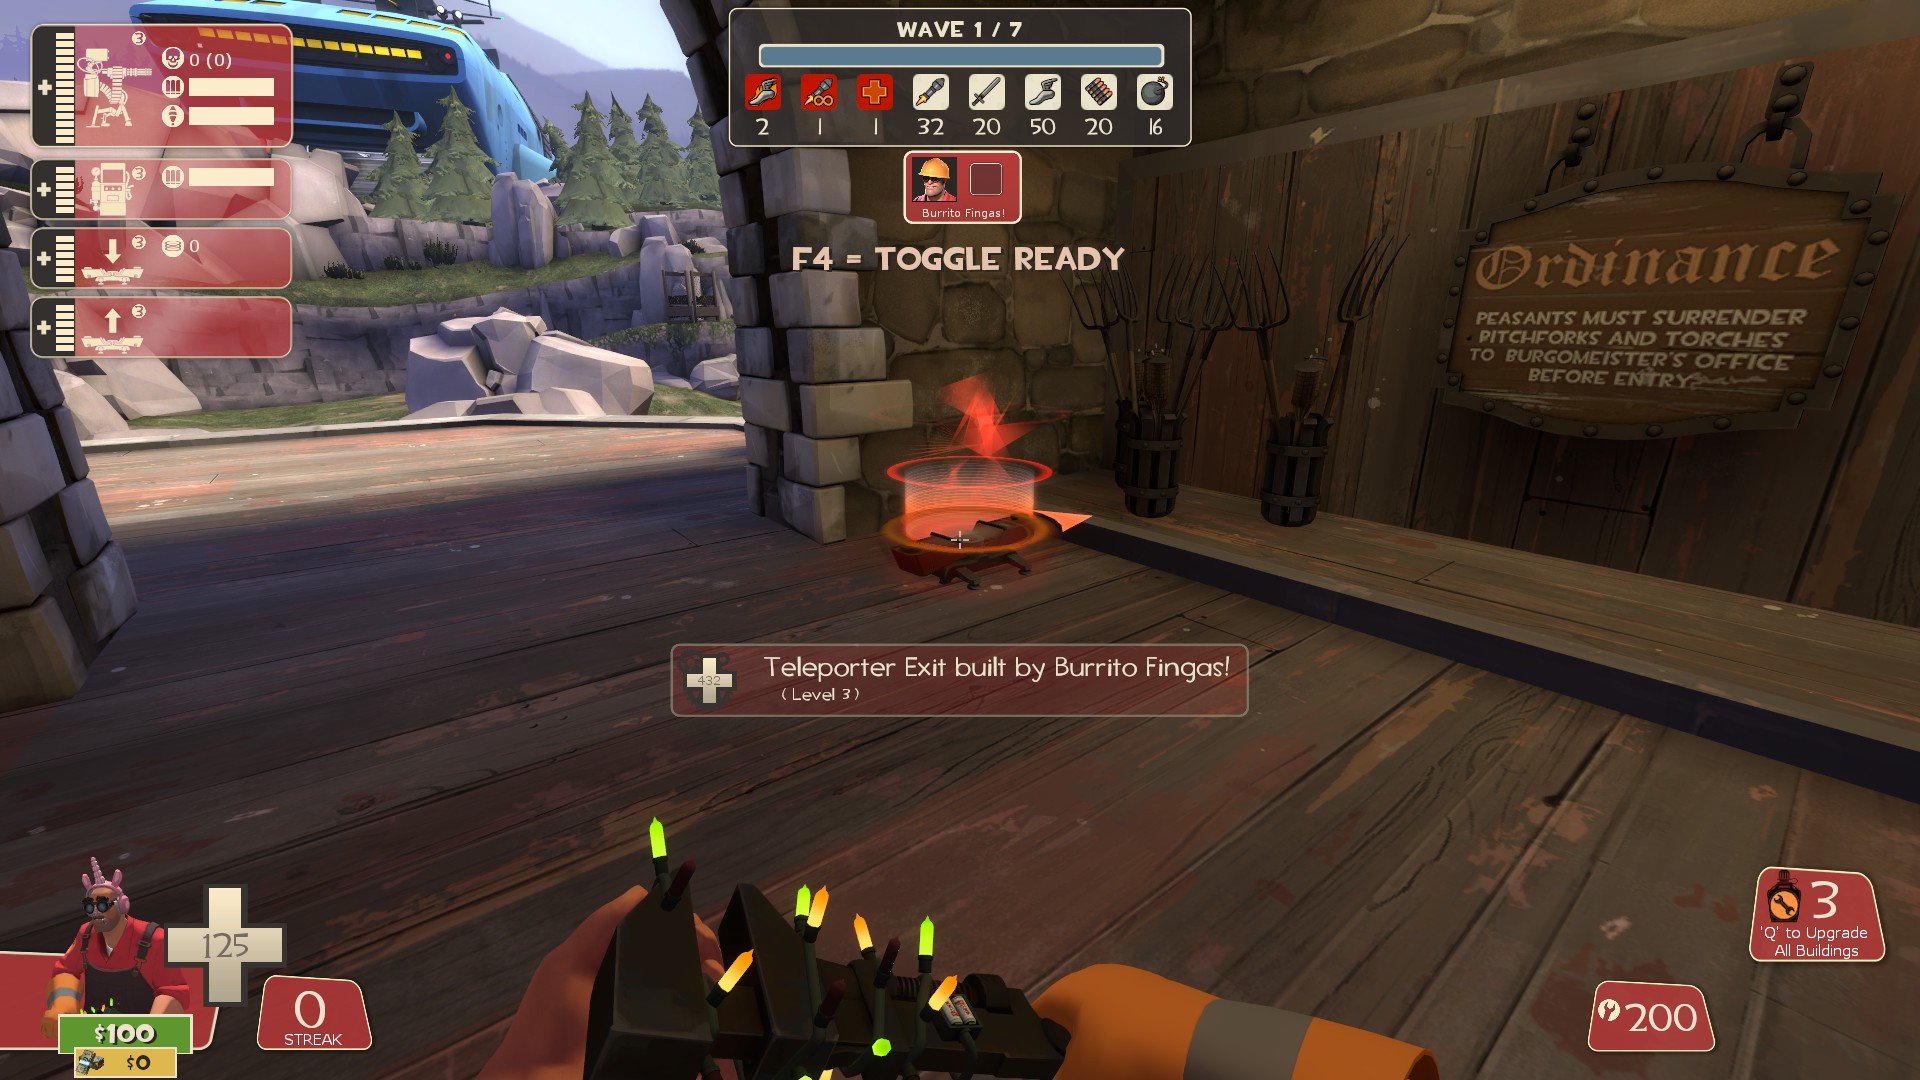
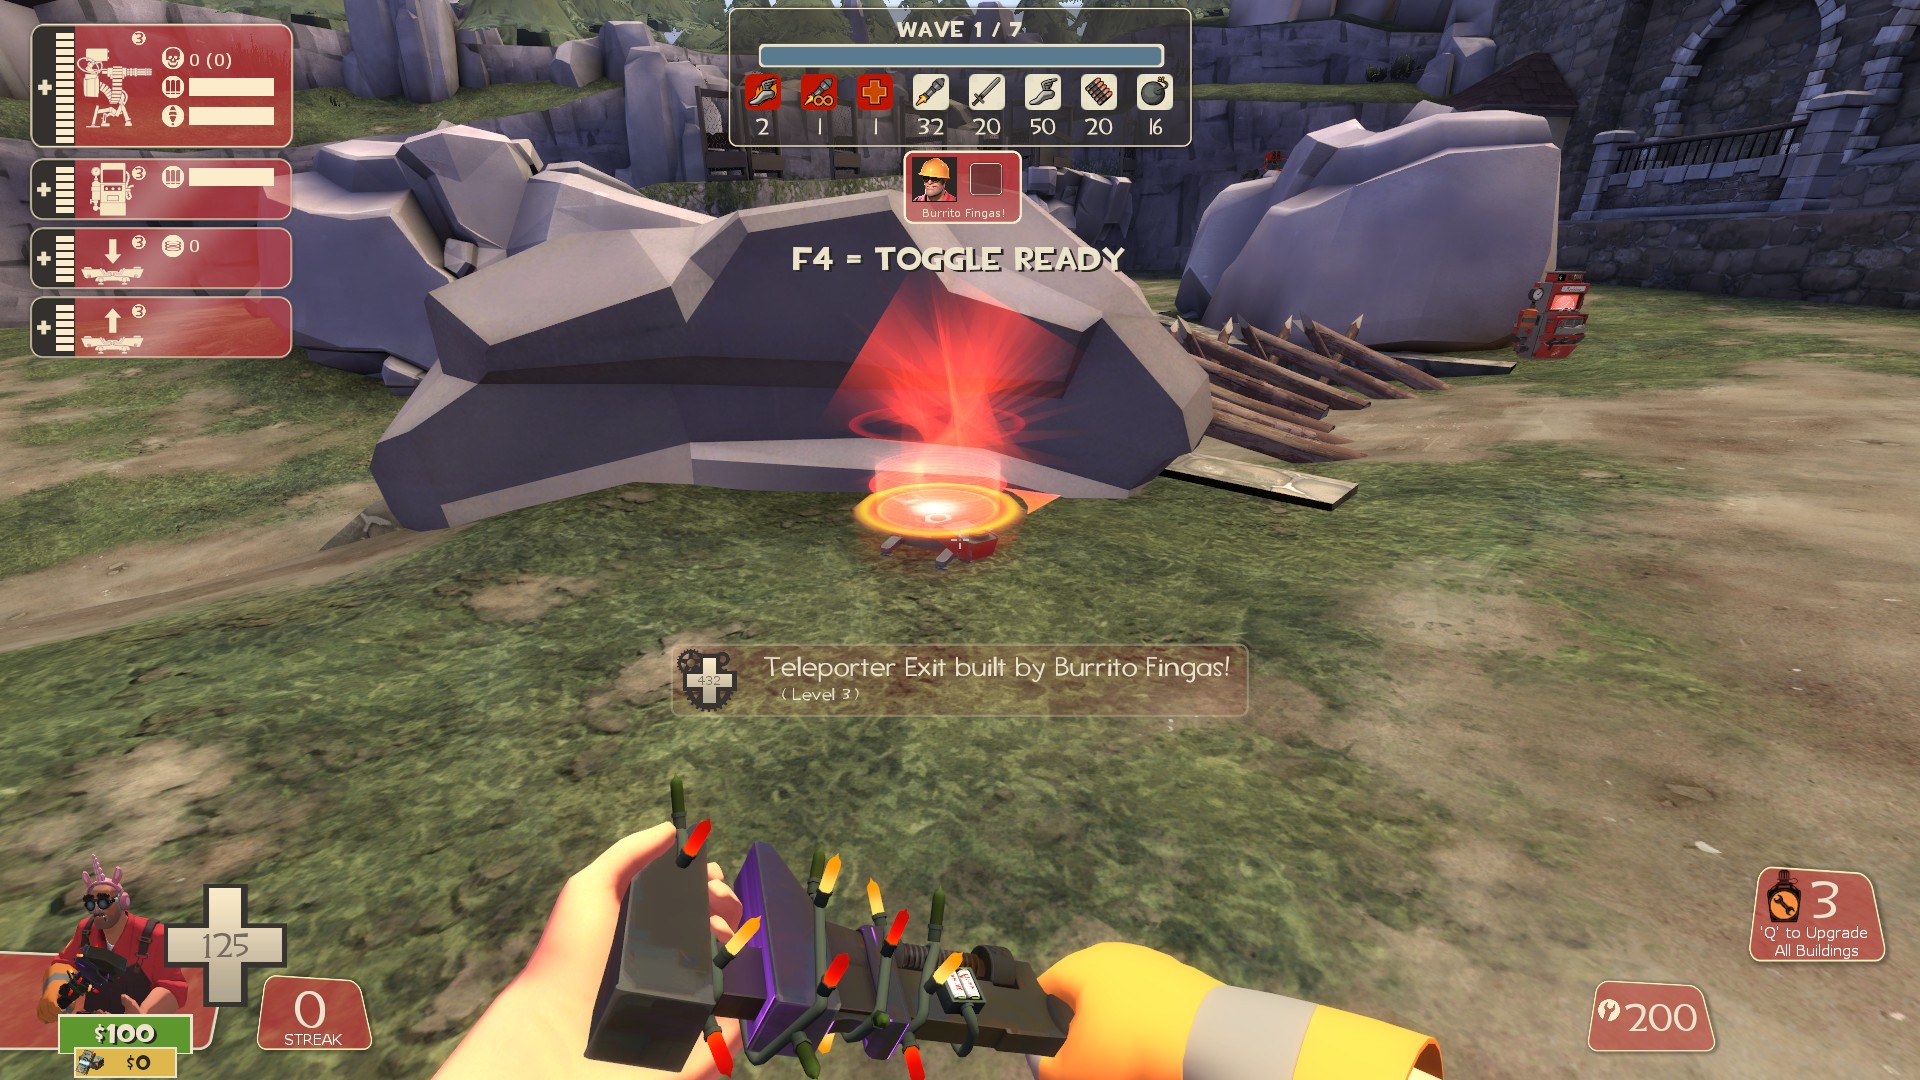
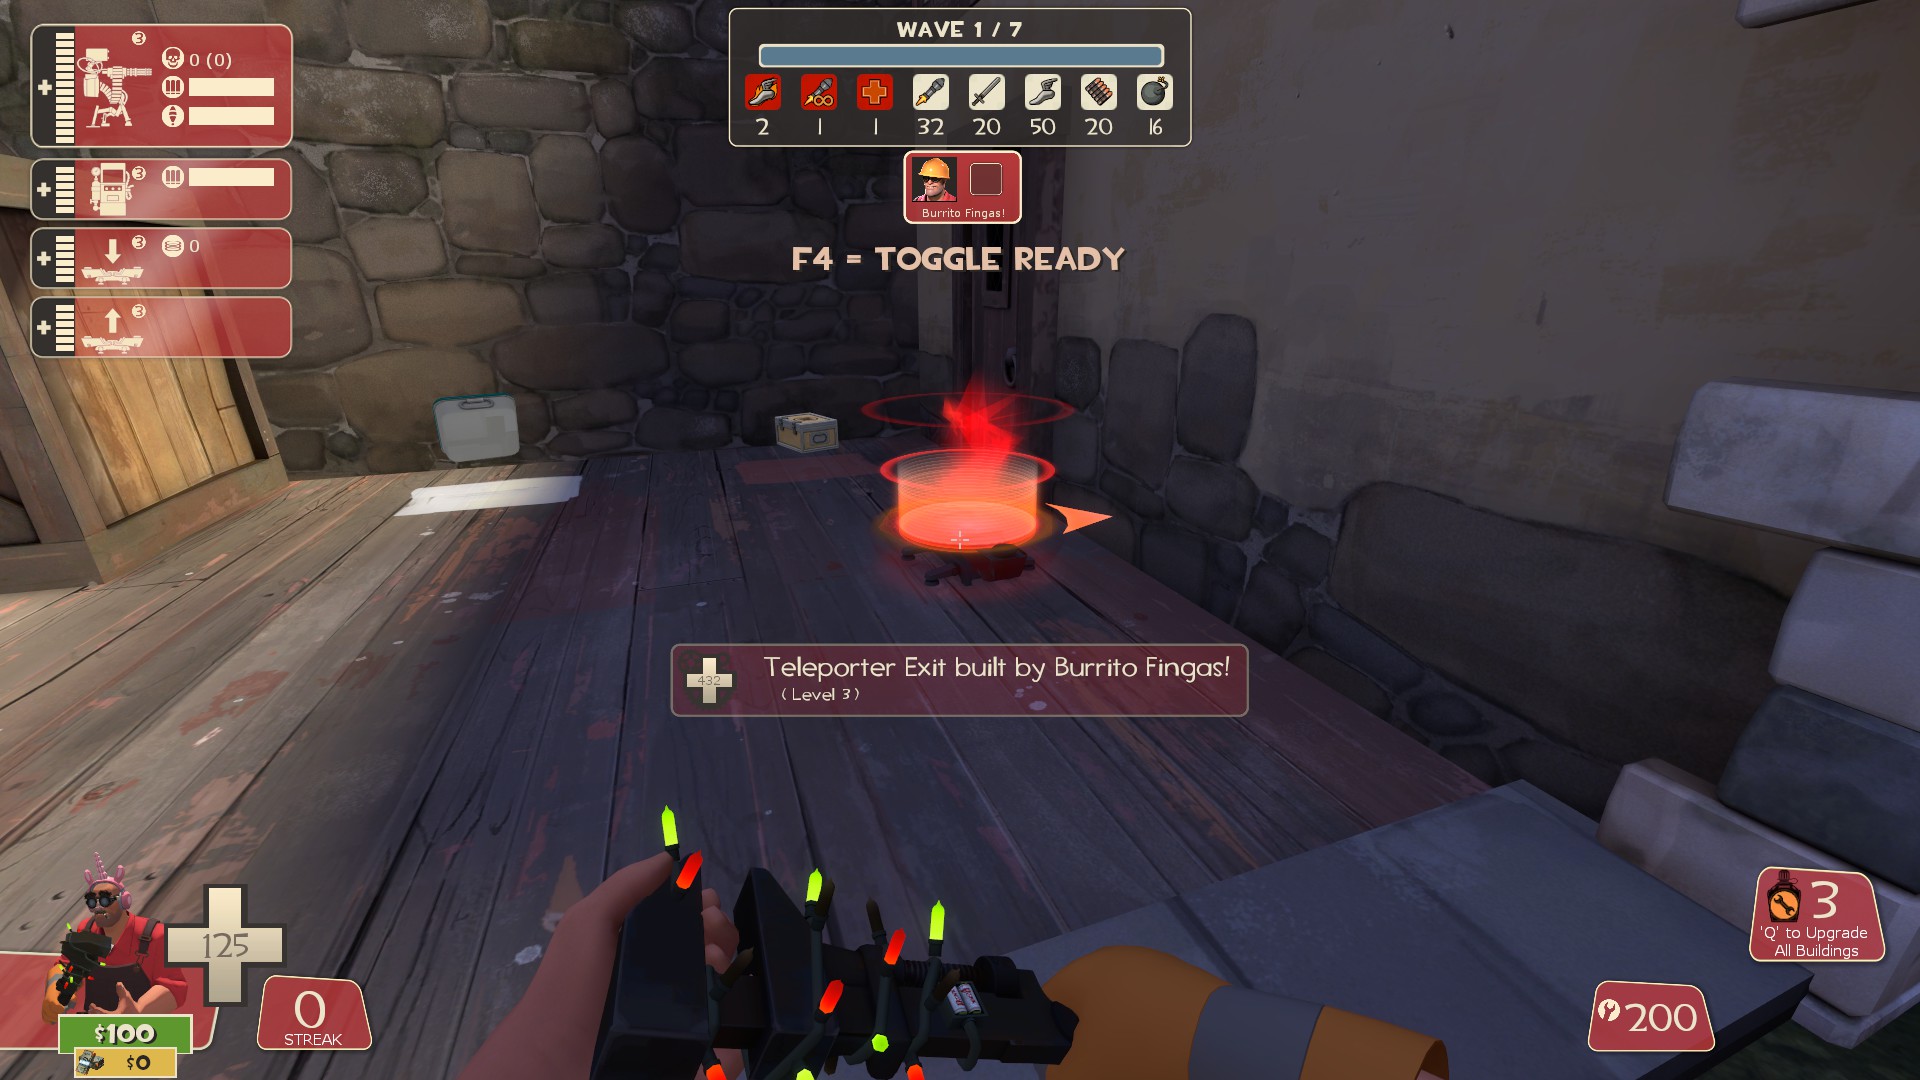
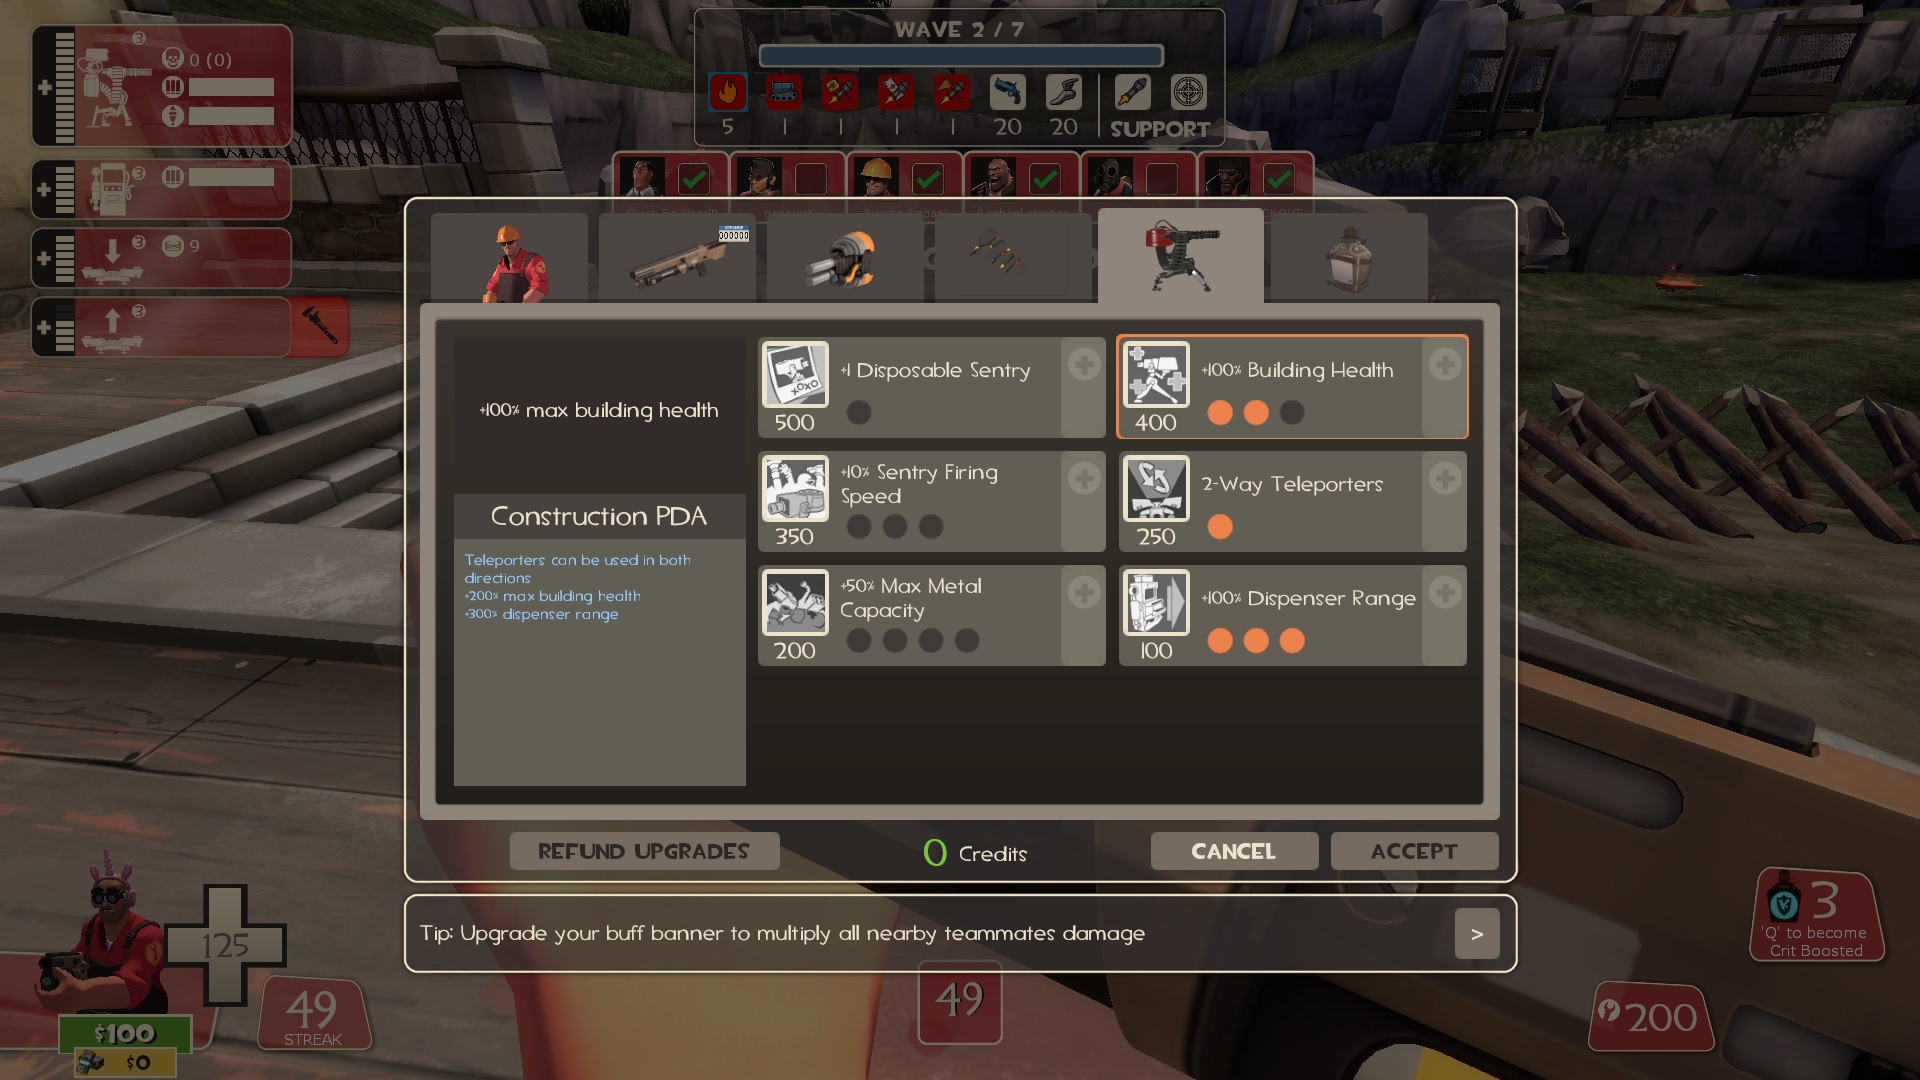
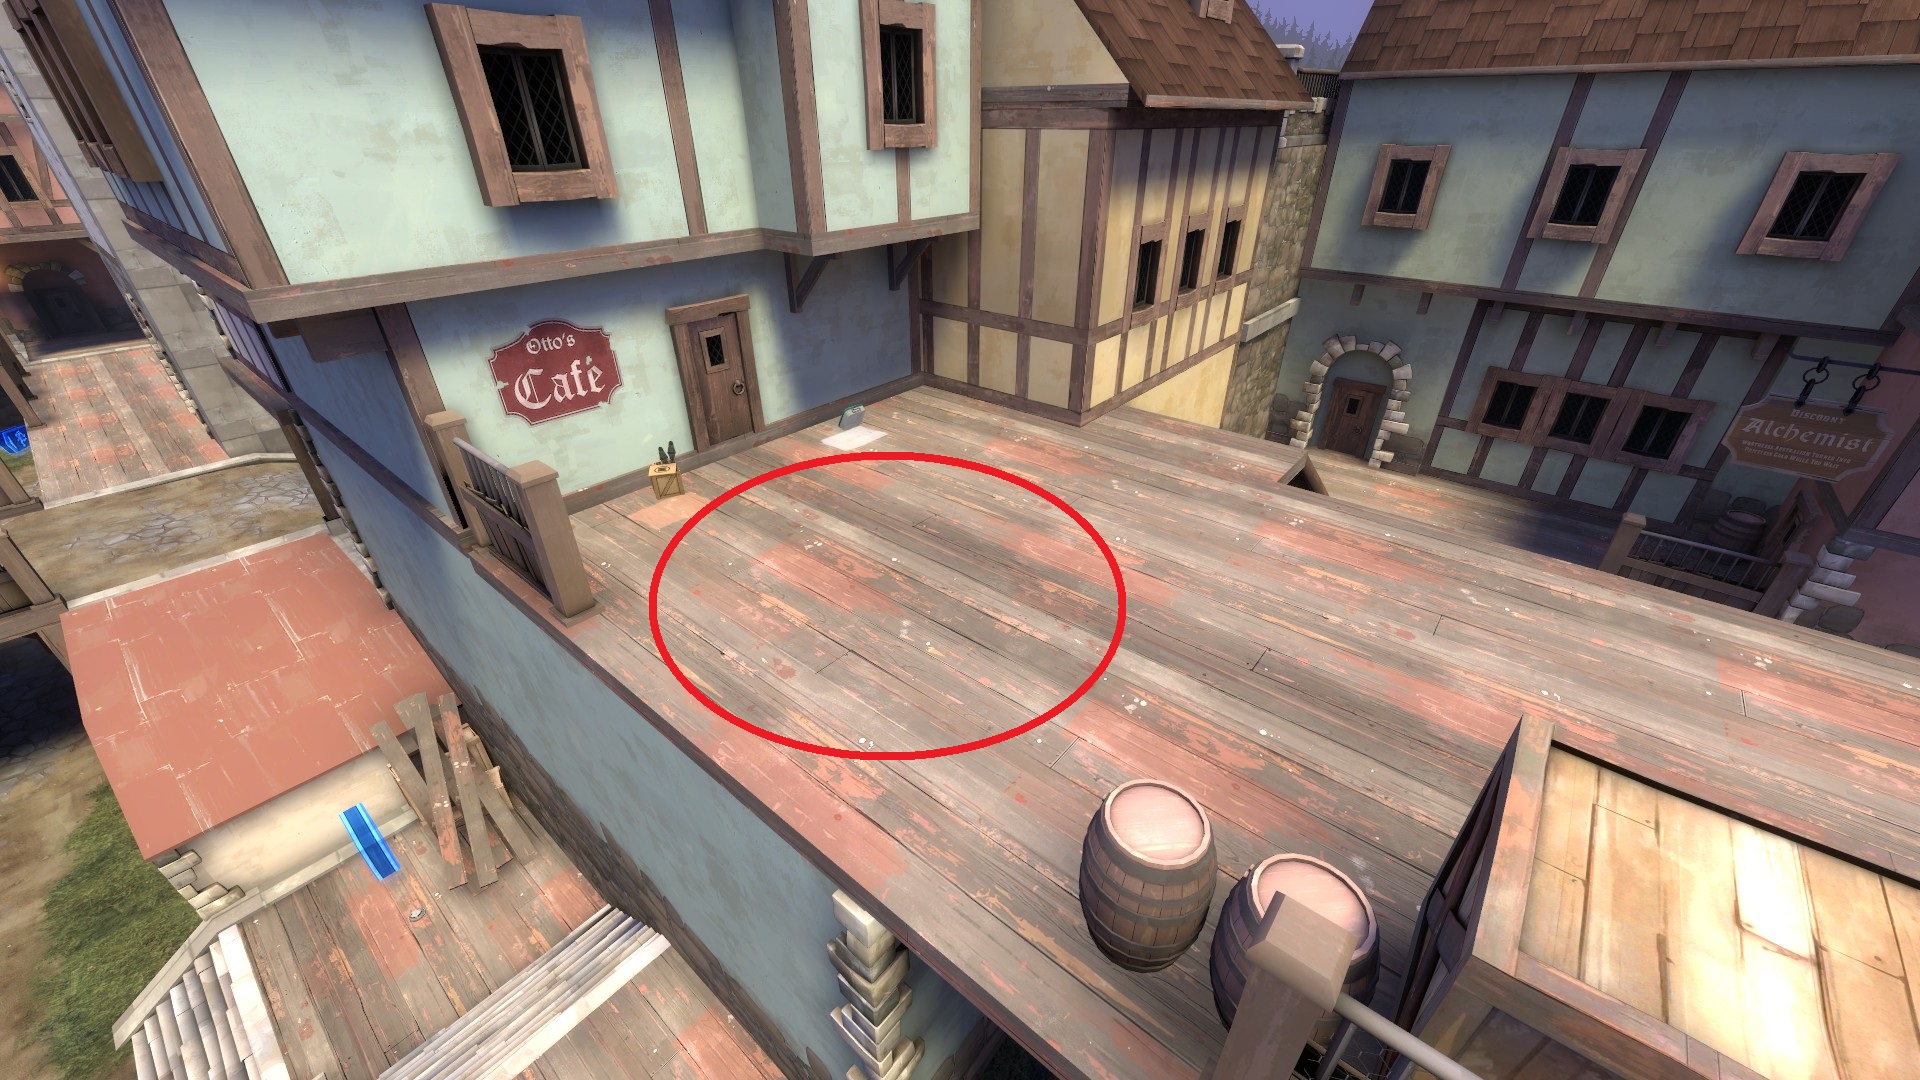
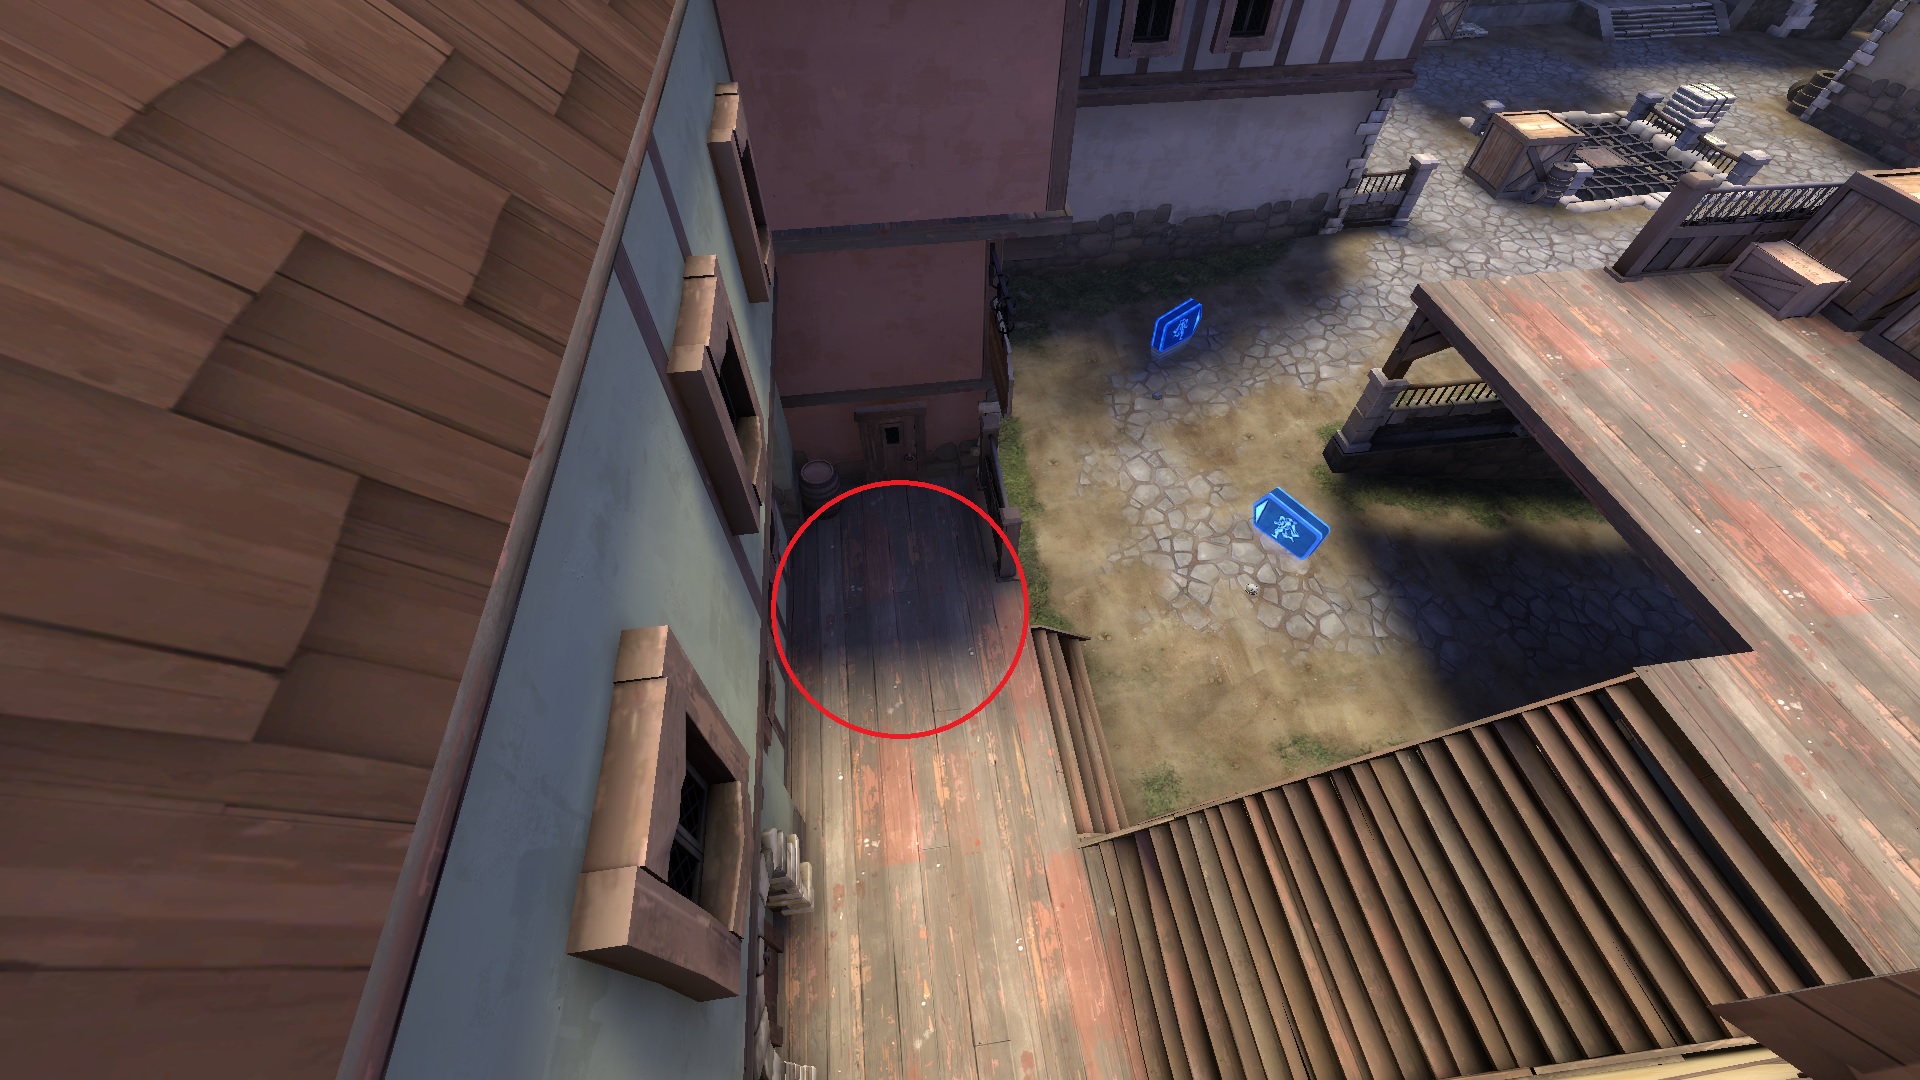
I haven't been playing MvM for quite a while but I heard about that tele placement. It'll probably be added in a future guide update.

Cheers
-BF
Bradster2214 23 Jun @ 3:07am 
downvoting purely coz you missed the best tele spot on the map, ontop of the right rock :P
Burrito Fingas!  [author] 11 Jan, 2023 @ 8:36pm 
Muy pronto. :steamhappy:
Lord StarKill 11 Jan, 2023 @ 7:26pm 
Spanish translation for those who do not know English :c
Burrito Fingas!  [author] 16 Dec, 2022 @ 9:59pm 
Thanks for the comment.
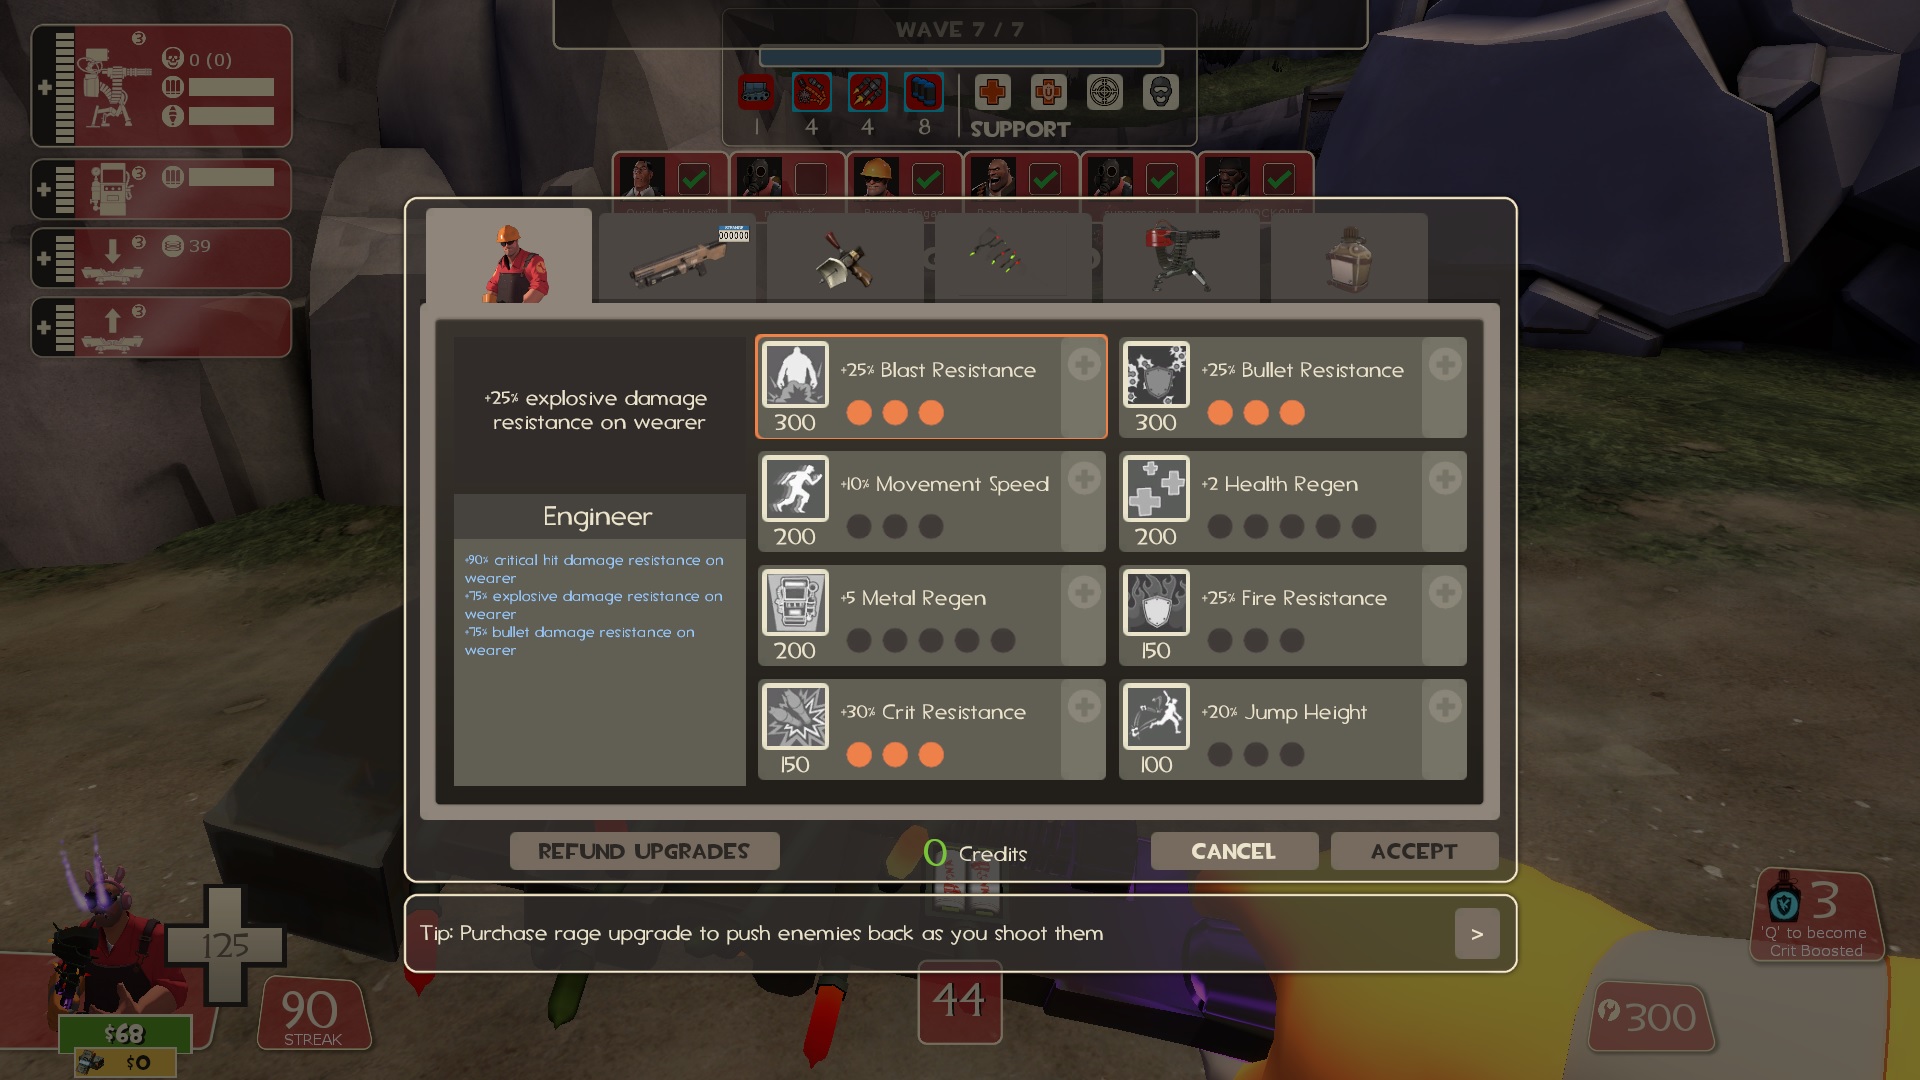
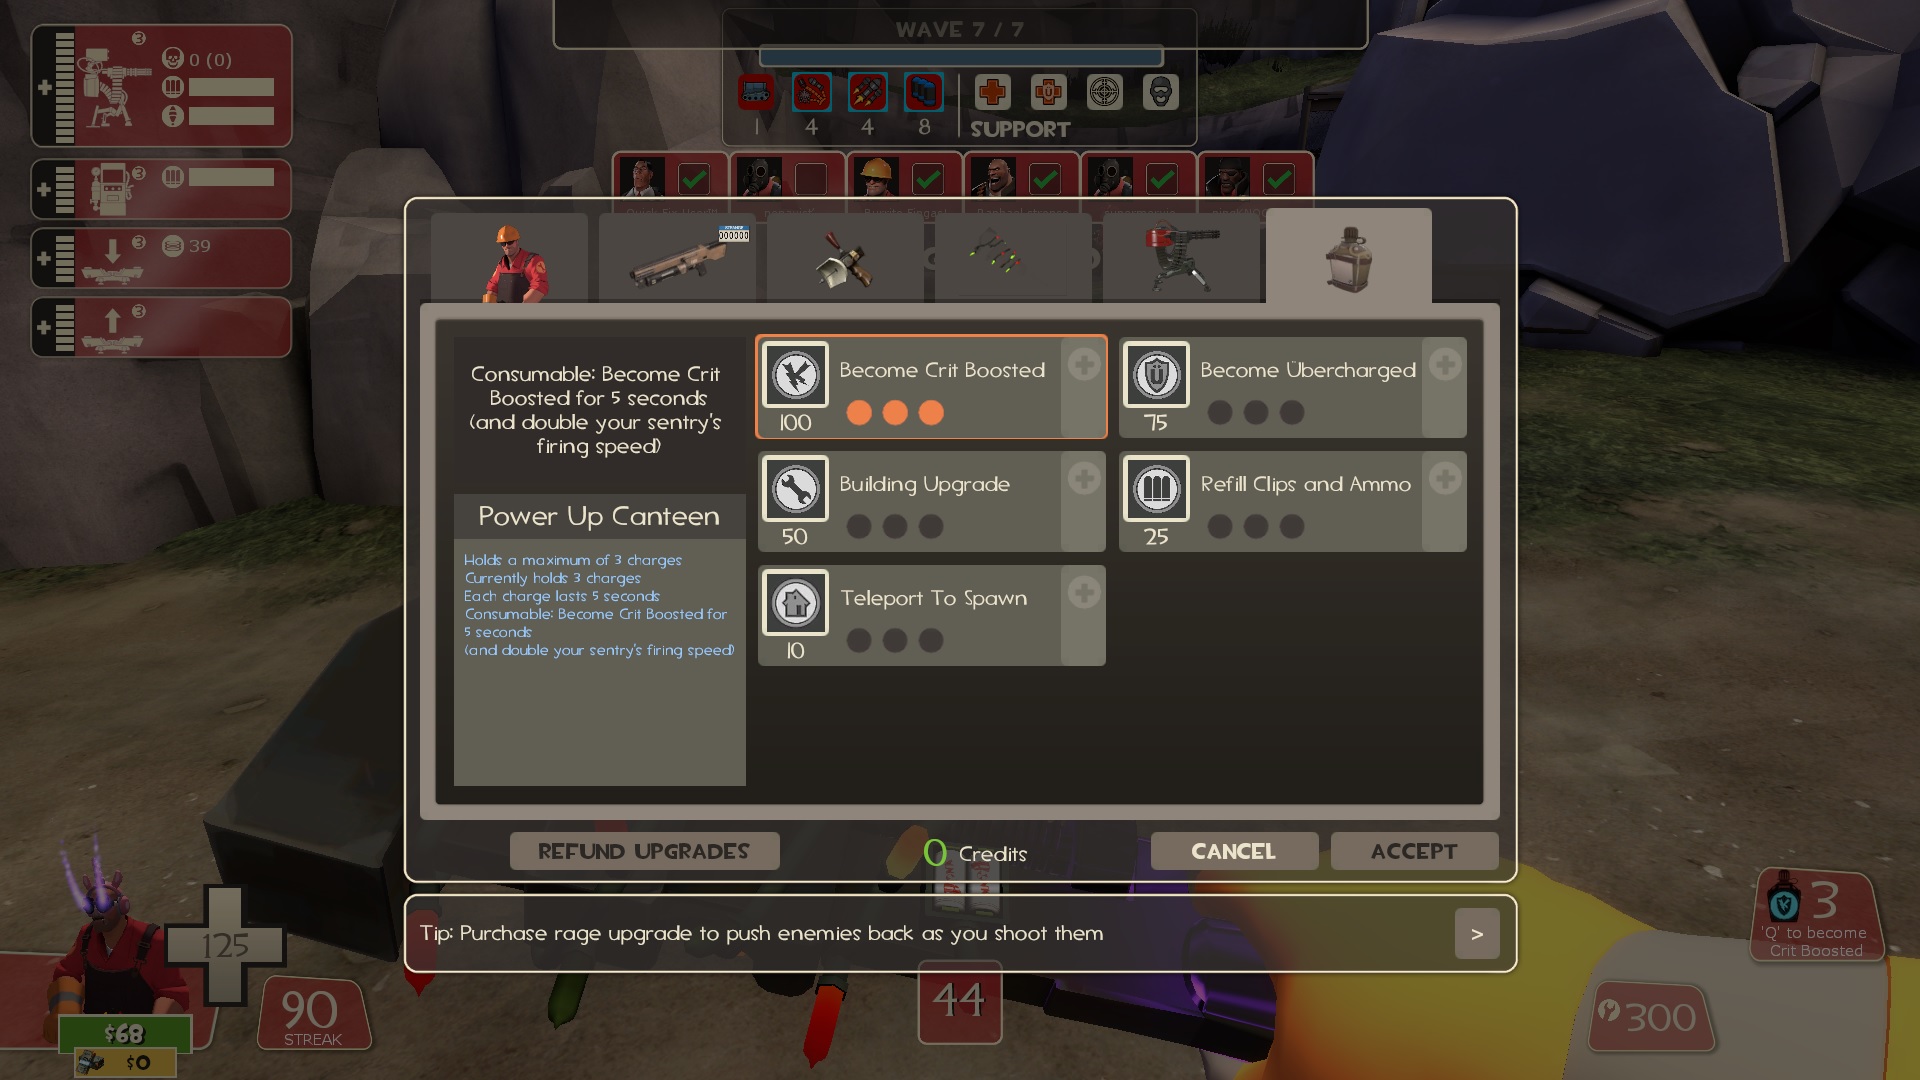
At the moment of writing this, I have no plans of doing more guides because my main goal was to cover the entire Two Cities operation and only focused to the Engineer.
how aim 16 Dec, 2022 @ 8:38pm 
And DANG that is long.
how aim 16 Dec, 2022 @ 8:38pm 
We need more high-effort guides like this.
☆Abbie☆ 15 Dec, 2022 @ 9:45am 
engineer gameing.
Burrito Fingas!  [author] 13 Dec, 2022 @ 1:24pm 
Thank you for leaving your point of view. I'm always trying to improve my playing style and it's always good to take advice and opinions from more experienced players.
I'm not currently thinking of making Gear Grinder guides, since that's not my main operation and I don't really remember its missions properly. Anyways, I'm thinking of grinding some tours there soon and maybe I'll try to do proper guides once I get enough experience.