Team Fortress 2

Team Fortress 2

189 ratings
Facial Flexes Tutorial for Blender, 3ds Max and Maya - TF2 import tools compatibility
By Napy Da Wise and 3 collaborators
This tutorial will help you making items with facial flexes compatible with the TF2 import tools.
   
Award
Favorite
Favorited
Unfavorite
Introduction
You'll need :
-Blender, of course.
-the smd tools plugin for blender
-Crowbar[sites.google.com]
Importing the player facial flexes
First, you'll need to import into blender the player's facial flexes to help you modifying your mesh.
You'll of course need a decompiled player model (use Crowbar[sites.google.com]).
Once you decompiled them, you can load the reference mesh, then the vta file to have easy access to all the flexed versions of the player model.
Flexing time
Now that you have the player model flexes, you can use them as a reference in order to flex your item.

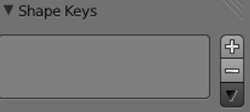
Open your item in blender. Go to the Object Data tab . Go to ShapeKeys.


This is where all the flexes will be stored. Add a shapekey using the plus button.
It'll create a Basis Key. That's your base model, non-flexed. Now, add another one. This will be your first flex. Now you want to rename it to match it's actual ingame name.
Open the player .QC that you decompiled in the first step. Go to the line $model "class" etc. The flexes names will be right under it.


In this exemple, the first flex is CloseLidLo. So you'll rename your shape key to match that.

Now you can check if your item needs to be edited to match the new flex. If it does, just go to edit mode while having your shapekey selected. Be sure to not edit the basis key, as it'll apply the change to every keys. Make the modifications and go back to object mode.
Once it's done, you can use the sliders to see your flexes in movement (the number next to your shapekey being the influence of the key on your model)

Redo this for every flexes.

The first 2 flexes should be the eyelid ones, which won't probably need any change to your model. The OO, OH, EE... ones are based on the sound they're supposed to make. The scaredupper, evilsmile, etc are self explanatory.
Export and compile !
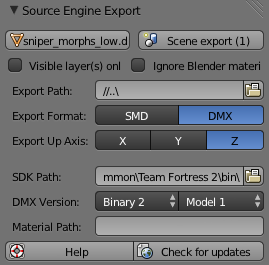
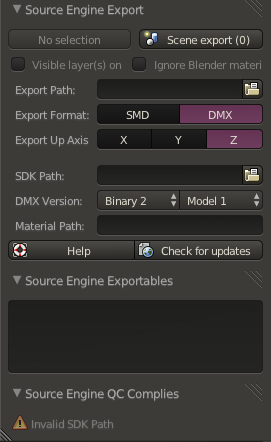
Go to the Scene tab and use those export settings :


Export your item as DMX. It might give you an error R6034, but as long as that message appears :
it should work.

Now you can just import your dmx like any smd using the TF2 import tools.
If you have trouble, refer to this guide :
http://steamproxy.com/sharedfiles/filedetails/?id=148063940

Congrats, you know have a facial flexed item 100% made in blender, that also have a gold star !
What else?
Facial Flexes in 3ds Max - A Foreword
This section has been added to the main flex tutorial thanks to Mickyan’s great support in the common interest of spreading knowledge about the trickier aspects of making items for TF2. The tutorial has been written entirely by him and edited slightly in places to match the style of the existing tutorial better.

A duplicate (maintained by Mickyan) featuring just the 3ds max tutorial can be found here. - Sid
Facial Flexes in 3ds Max - What you'll need
Here are a list of resources you will need to created flexed items in 3ds Max.

  • Main Resource Pack[www.dropbox.com] ( Created by Mickyan for ease of use)
    Subfolder names and what they contain:
    flexnames - List of names for flexes and respective frame number
    ref_fbx - Flexed class models in .fbx format. Maya and Blender users get these.
    ref_max - Flexed class models in .max format. 3dsmax users get these.

  • Source Pack[www.dropbox.com] (Contains the smds for ever single flex, for all classes)
  • 3ds max 2012 (Which has been used for the purposes of this tutorial, but really, any 3ds max version with the correct SMD importer/exporter plugins should do the job)

Notes regarding the Main Resource pack:

  • The engineer is based on the community-made goggles-less model. The differences are minimal however.
  • The medic has problems with the vertices around the neck and eyes.
  • The soldier has his eyes closed on frame 0.
    These are not something I can fix, as far as I know. Some of the flexes can't be extracted properly. If any of this is a problem to you, please use the Source Pack and utilize the individual flexes as reference.
Facial Flexes in 3ds Max - Brief Overview
Note: This is currently a first draft, feel free to point out any flaws or if something isn't clear. We are going to be using 3dsmax 2012 in this guide. Naturally, there may be some differences depending on your version.

The above resource pack should more or less save you from doing the first section of his guide. This guide requires a basic understanding of how to use 3dsmax and make items for TF2.
Do not be alarmed by the wall of text! The process is actually quite simple once you know how it's done. I will be trying to point out common mistakes as well as give a few tips on how to make your workflow a little bit faster.
Facial Flexing in 3ds Max - The Process
  • Download the Main Resource Pack.[dl.dropboxusercontent.com]
    Go in the "reference_max" subfolder and pick your class of choice.
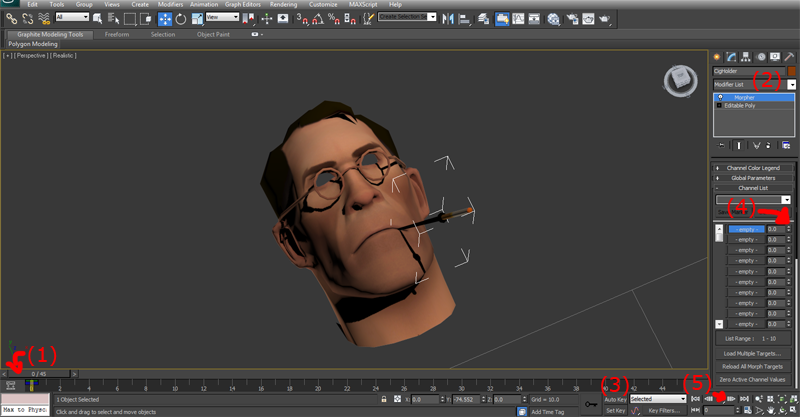
    At the center of the screen is what we will call "reference model". If try to move the animation slider (1) you will see that the model changes facial expression.

  • Make sure your item is finished and fits the reference model (on frame 0) properly before flexing it! Modifying a flexed item is likely to break something and could force you to start over. I find it is better to leave the skinning to after flexing but anything will work so long as the Skin modifier is on top of your modifier stack once you're done.

  • Make a copy of your item, call it something like YOURITEM001 for now. Drag the frame selection (1) to frame 1. Modify the copy accordingly to fit the reference model. IMPORTANT: Do not add vertices! Only move existing ones or the morph target won't work. Once you're done you can hide it so it doesn't get in the way.

  • Do the same for each frame (minus frame 0). Make sure the object name contains the number of the reference frame. 3dsmax should add the numbers by itself but be sure to double check.

  • Now it's time to rename your morph targets to match Valve's flexes. I've included a list of names and the respective frame numbers in the resource pack, in the "flexnames" subfolder. For example, if we're making an item for the heavy, we will rename "YOURITEM032" to "upperSuprise1" (note: I didn't make a typo! Some flexes contain typos, you need to copy those aswell!)

  • Hide all your morphed copies and select your "original" model. Add a "Morpher" modifier from the Modifier List menu. (2)

  • Click on "Auto-Key".(3) Red borders will appear in your viewport.

  • Click on "Load Multiple Targets" in the morpher modifier. You should see a list with the names of all the copies you've made. Make sure they're all there, select them all and click Load. You'll see the names of your copies have filled the -empty- spots.

  • Put the frame slider back to 0 if it isn't already. Hit "Zero Active Channel Values" in the morpher modifier. Move to frame 1 by using the slider (1) or the arrow (5).

  • Hit "Zero Active Channel Values" again. Find what's the name of the flex for the current frame and click on the arrows next to your morph target's name in the morpher modifier and drag up untill the 0 changes to 100.(4) Move to the next frame.

  • Repeat the above step for all frames.

  • Success! If you've done everything right, moving the frame selector back and forth will change your model to match the reference model.

    Something's out of place? There's three possible causes:
    1.You didn't set the morph ratio correctly. Check that the correct frame is set to 100 and all the others are set to 0.
    2.You gave the wrong name to a morph target
    3. A morph target was moved out of place accidentally. See below for instructions how to edit a morph target properly.

    If you need to make changes to a morph target, disable "Auto-Key", make the necessary changes and click "Rebuild All Morph Targets" button afterward to make the changes take effect. This only applies to morph targets, not the base model!

    If you really need to modify your base model, do so by adding modifiers on TOP of Morpher. Note that you're still not allowed to add new vertices, only move existing ones. It's possible to remove vertices but that requires you to copy paste your modifier to ALL of the morph targets, or 3dsmax will refuse to export the morph data when you try to save it as fbx. I do not recommend this but sometimes it can't be helped.

    Make sure your item is properly skinned. Once you're done, delete everything except your morphed object and the bones you're using (including any hidden objects) and save your file as .FBX. You're done!

    Always, always test your items before uploading! HLMV is the best choice but Source Filmmaker can also do the job in case the SDK doesn't work for you. I recommend that you additionally check your flexes actually work ingame by launching tf2, using the workshop to compile and pack your items (you don't necessarily have to sort all the options right now, just select models and textures) and use itemtest to preview your item ingame.
Facial Flexing in Maya - The process,what you'll need and why.
The Process:


Note - October 8th, 2013: As of a recent update a few patches ago, Valve has made FBX's work again, so you don't need to use this section as such anymore in order to get usable DMX files to create flexes with. All you need to do is export as an FBX. This is still being left in, however, as a backup method and doesn't need to be used as the FBX's should cover your needs adequately.

  • Setting up the SFM SDK plugins for Maya so you can import/export dmx files.
  • Importing reference files and creating flexes
  • Final Checklist, creating DMX File from Maya via the SFM SDK plugin
  • Using Blender and the DMX/SMD import tools to bring in your created DMX file and re-export it out as a DMX file that works with TF2's compiler
  • Export an FBX file out of Maya using the default settings that can be used in the Item Import tool
What you'll need before we begin:

  • Source Filmmaker (mostly for the valuable SDK it has)
  • Blender, with the relevant SMD/DMX tools set up which is listed in this tutorial as well (not required anymoe for users of Maya)
  • Autodesk Maya
  • Source SDK (for the reference DMX models of all the character classes)
Facial Flexing in Maya - Step 1 (Getting the Reference Models into Maya)
Before we begin, you will need to set up the SFM SDK Plugins for Maya and you will also need to have Source SDK installed. A handy tutorial detailing how to do this can be viewed here.

http://steamproxy.com/sharedfiles/filedetails/?id=171153928

After setting up the plugins to work in Maya, you should now be able to see the ability to import/export a variety of Valve formats listed in the drop down menu.


Now, you will need to bring in a reference model of the class your item needs flexes for. To do this, you need to go to the location where Source SDK is installed - more specifically, where the sourcemodels for TF2 characters are stored. For 64 bit systems this is usually:

C:\Program Files (x86)\Steam\steamapps\<username>\sourcesdk_content\tf\modelsrc\player

and for 32- bit systems, it is

C:\Program Files\Steam\steamapps\<username>\sourcesdk_content\tf\modelsrc\player

Once there, navigate to <class name> > parts > dmx. You should see a list of dmx files. The file that is important to making the standard flexes is the file that is marked <classname>_morphs_low.dmx. Import this file into Maya.

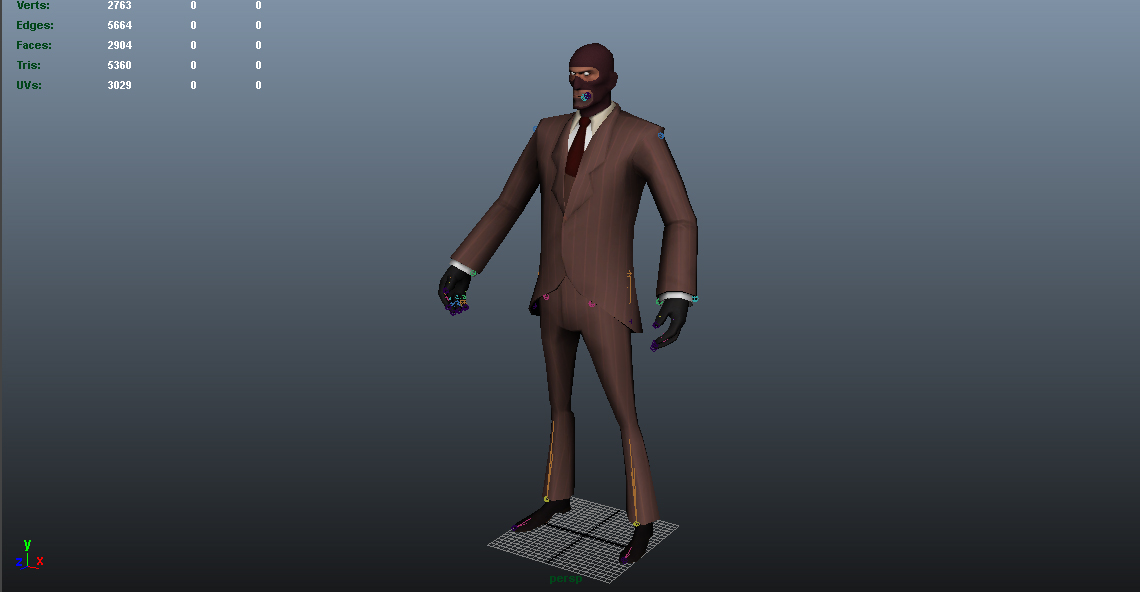
The image below shows the successful import of the file spy_morphs_low.dmx into Maya 2012.


Facial Flexing in Maya - Step 2 (Making Blendshapes (Flexes))
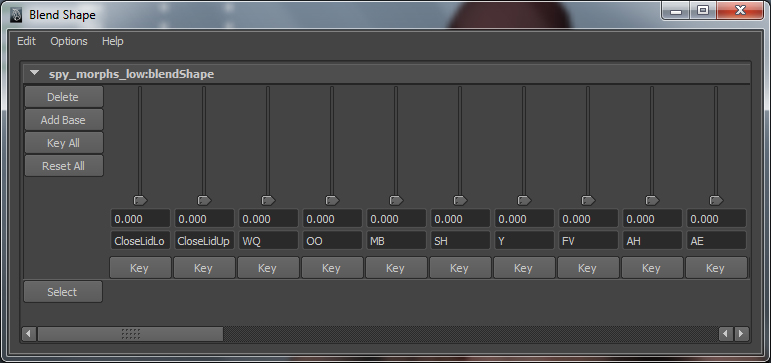
Once you’ve imported the morphs_low.dmx file successfully, you should be able to see all the facial expressions that the character can make, called “flexes”. In Maya’s terminology, these are called blendshapes and both mean one and the same thing. In order to see the blendshapes of the character in Maya, go to Window > Animation Editor > Blend Shape. You should see a window as shown below:


There are a total of 40 Expressions available per character, which means that you’d need to make 40 blendshapes for your item. The first two, CloseLidLo and CloseLidUp can be ignored as they usually don’t affect the rest of the face. Of course, this total of 40 Expressions varies a bit from character to character. Also, the pyro has none (which is pretty obv-HUDDAHUDDAHUD)

There are some excellent resources out there on Youtube for making flexes, the best I've come across so far has been linked below.


However, apart from this I will also outline for those of you already familiar with Maya the two different methods you can use to quickly iterate flexes, based on the topology of your mesh. Each of these methods have been described in the following two sections.
Facial Flexing in Maya - Step 2a (Making Blendshapes - Wrap Deformer Method)
The wrap deformer method relies on a feature in Maya that is usually used to allow a mesh to be influenced by another. A good example of explaining how this works would be to take the example of a hand and a glove. If you had already rigged the hand but would like the glove to also follow the rigged movements of the hand and the fingers, without having to bind the mesh to the bone itself, then you could use the wrap deformer to do it for you. It essentially mimics the skin weighting on the hand and then transfers it to the glove so it moves with the hand and acts like a glove should. This works to our advantage when creating flexes, as it quickly allows our item (say, a moustache) to move correctly for each of the blendshapes as they are triggered. A description of the process to be followed using this method is as follows.

  • First, position your item correctly on the reference model so that it deforms using the correct position on the mesh.

  • Make sure you are using the Animation Subset (you can cycle through this by simply pressing F2 on your keyboard or clicking on the little dropdown box right below File and selecting Animation).

  • Select first your item, then the skinned mesh of the character you imported, and go to Create Deformer > Wrap.

  • To quickly test the results of your wrap, try using a blendshape from the Blendshape Editor by moving the slider from 0 - 1. If done correctly, your mesh should also deform along with the face of the character.

  • Go through all the expressions, one by one. Activate one, then select the deformed mesh and make a duplicate of it (Either by going to Edit > Duplicate or pressing Ctrl +D). Rename the Duplicated mesh as that of the expression used to create it. Once you’re done, make sure all the sliders are set to zero and go to Edit > Delete by Type > History to remove the Wrap deformer and give back your original mesh. DO NOT use Edit > Delete All by type > History, this will remove all history from all items in your scene, including the blendshape setup being used for your character as well.

  • Once you’ve cleared this process, you should be left with 40 individual meshes, each showing the flexed item for a specific expression.

  • Now, select all 40 meshes, in the same order as the blendshapes you see on the character. Then select the base mesh (The original mesh that you'd like to see flexed) and go to Create Deformers > Blendshape. If done correctly, your blendshape window should now reflect a new set of blendshape controllers for your item. In all, there should now be two sets of blendshape controllers in your Maya Scene file - one for your character’s facial blendshapes and the other, the flexes for your item.

  • Once this is done, you may proceed in the normal fashion, treating this mesh as you would preparing a file to export an SMD. Skin the mesh to a bone, delete everything else except the bone and (unlike the usual export mode), you will choose to export as DMX file (covered in a later section).

Pros and Cons:

PRO - Easy way to get all flexes done without manual editing
PRO - Very Quick, less time is spent
CON - Results may not always be spot on, a lot of corrective shape adjustment may be required which, depending on severity, could negate the speed advantage.
CON - Some characters have geometry that interfere with his facial flexes of meshes close to it (for instance, the cigar in the spy’s mouth), which can result in them either not looking right at all or requiring a lot of correction.
Facial Flexing in Maya - Step 2b (Making Blendshapes - The Manual Method)
If you’re reading this section, prepare for the boring and mind numbing task of manually tweaking and creating the blendshapes from scratch to get your desired flexes. In some specific situations, such as the topology of your item not moving well with the facial flexes of your character or in the interference of other skinned meshes with your item’s flexes, you would need to manually adjust the vertices of each single blendshape yourself in order to hit the correct expressions. For people familiar with modeling in other programs, The tools/shortcuts that would be relevant for you to do this task in Maya have been listed in an appendix at the end of this guide.

A basic pipeline for doing this is as follows below.

  • Activate a blendshape of the character. Select the Head mesh (this should usually be seperate from the body mesh), and Duplicate (Edit > Duplicate/Ctrl + D).

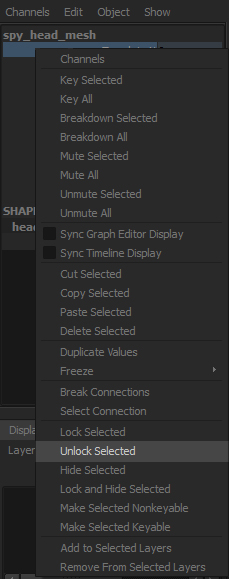
  • Now, you will need to move this slightly away from the base model so you can adjust the blendshapes for it. To do this, you will need to unlock the attributes. The box on the left hand side of your screen is called the Channel Box and lets you do this. In case the Channel Box isn’t visible, you can click ( if in Maya 2010 or in 2012). Right click the attribute which is locked (this should appear greyed and and choose Unlock Selected, as shown in the picture below.


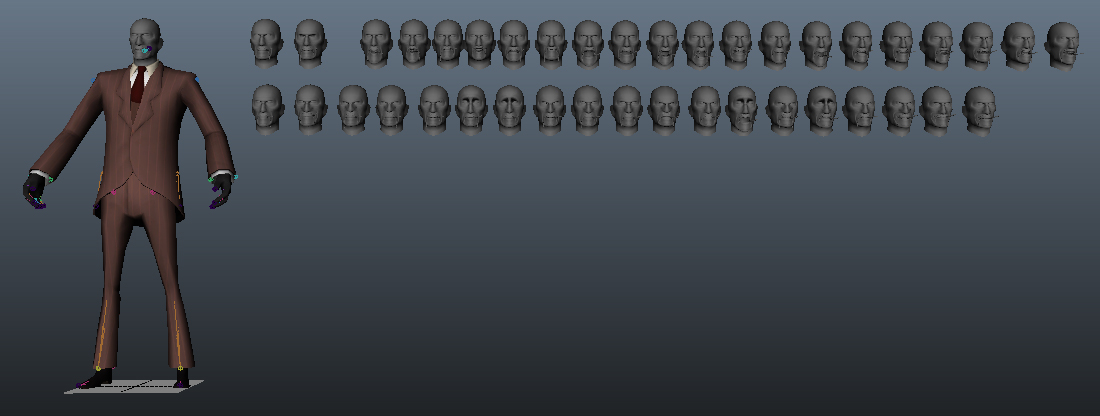
  • Do this process for all 40 expressions and arrange them in a manner that you will find easy as you move from one expression to another and makes it easy to do all the blendshapes.

    Here’s an example of image of an arrangement of 40 spy expression blendshapes while the example item was being worked on.


    It’s also a good idea to duplicate a copy of your item along with the facial expression as you arrange them, so you won’t need to need to repeat the process all over again and re-align your item meshes with the faces again. A rule of thumb is to try and use definite increments of,say, 10 units on the X axis.

  • Now, begin tweaking your blendshapes individually based on the expressions of the face. Spend your time on each flex and try to retain the edge flow as possible, even for the most extreme expressions.

  • Once you’re done, you may then proceed with the normal method of creating a blendshape deformer for your item. You may find them at Step #7 of Section 2A (The Wrap Deformer Method) of this guide. Follow step 7 through to the end to reach a file ready for DMX export.

Pros and Cons:

PRO - Fine control over each vertex, which can lead to much more precise flexes
CON - Time consuming, boring, makes you question your sanity on more than one occasion.
Facial Flexing in Maya - Step 3 The FBX Export
As of a recent update courtesy of the fine folks at Valve, FBX's seem to work again. The workflow is considerably simpler and less complicated through this method. Simply export your mesh and the bone that it's skinned to from Maya as an FBX using default settings (which should, automatically, include the blendshapes as well) and you should be good to go in Maya.

Feel free to disregard the workaround method as it is both tricky to get working and now, unnecessary. However, the workflows outlined (the two ways to go about making blendshapes/"flexes) are still valid - the only thing that has changed is the final export format, so you don't need to go into Blender anymore.
Facial Flexing in Maya - Step 3 (Exporting to DMX - Now Deprecated)
Note - October 8th, 2013: As of a recent update a few patches ago, Valve has made FBX's work again, so you don't need to use this section as such anymore in order to get usable DMX files to create flexes with. All you need to do is export as an FBX. This is still being left in, however, as a backup method and doesn't need to be used as the FBX's should cover your needs adequately.

Well, the hard part is done - you’ve made the flexes. Now comes time to export the file into a DMX that StudioMDL can compile. But first, an important checklist of things to make sure of before you export so that it gets done right the first time around.

  • Expressions have been named correctly. Make sure you go through all your expressions and make sure that they have been named and set up exactly as the facial flexes in the character you used to create them with. Ideally, if you have set out with a correct process and double checked everything as you were doing it, this should only be a cursory check.

  • Bones have been named correctly. Maya during import has the tendency to add the file name before any components. As a consequence, all the bones imported will also have the name tagged on to them, which would need to be removed before export or it will fail to compile. For example, if the bone your item is skinned to is named “spy_morphs_low:bip_head”, make sure to correct it to just “bip_head” as this is the bone the studioMDL program looks for during compile time.

  • Materials have been set correctly. With the help of the Source plugins, Maya has the ability to recognize VTF files as valid textures. So, assuming you have assigned your textures correctly, they should show up in the viewport at the time of export. Make sure to reflect the texture location correctly in the .qc file (used to compile the model) as well.

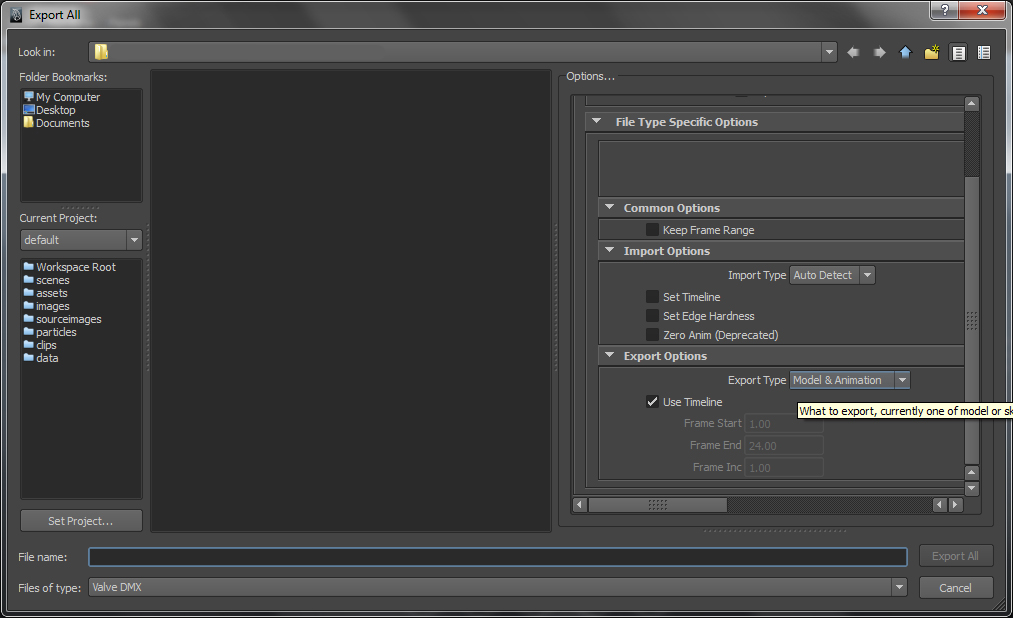
These checks having been done, it’s now time to export your model. Delete everything except your item mesh and the bone(s) it is skinned to and go to File > Export All. Once there, choose the format as “Valve DMX” and in the settings, make sure to choose “Model and Animation”, as shown in the image below.


Facial Flexes in Maya - Step 4 (Conversion of DMX in Blender - Now Deprecated)
If you’ve done the export correctly, you should now be left with a .dmx file. However, as we've outlined in the beginning of this series for Maya, this DMX is not in the correct version we'll need for TF2's item importer tool.

Now, you'll need to download Blender (which you can grab here[www.blender.org]) and you'll also need to get the Blender SMD tools[code.google.com].

Once you've set up both - the instructions on how to set up the Blender SMD tools can be found on the Valve Developer Wiki here, you can now proceed to quickly import and re-export your DMX file to the correct version.

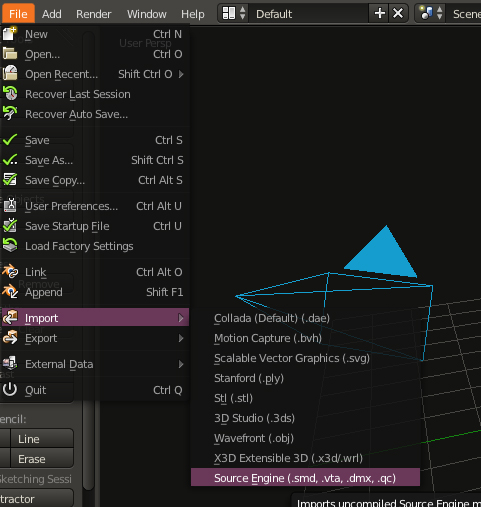
  • In Blender, navigate to File > Import > Source Engine data (.smd, .dmx, .vta, .qc) as shown in the image below


    If this doesn't appear for you, it means that you haven't correctly installed the Blender SMD toolset and you will need to consult with the Instructions they've given to see if you've missed anything.

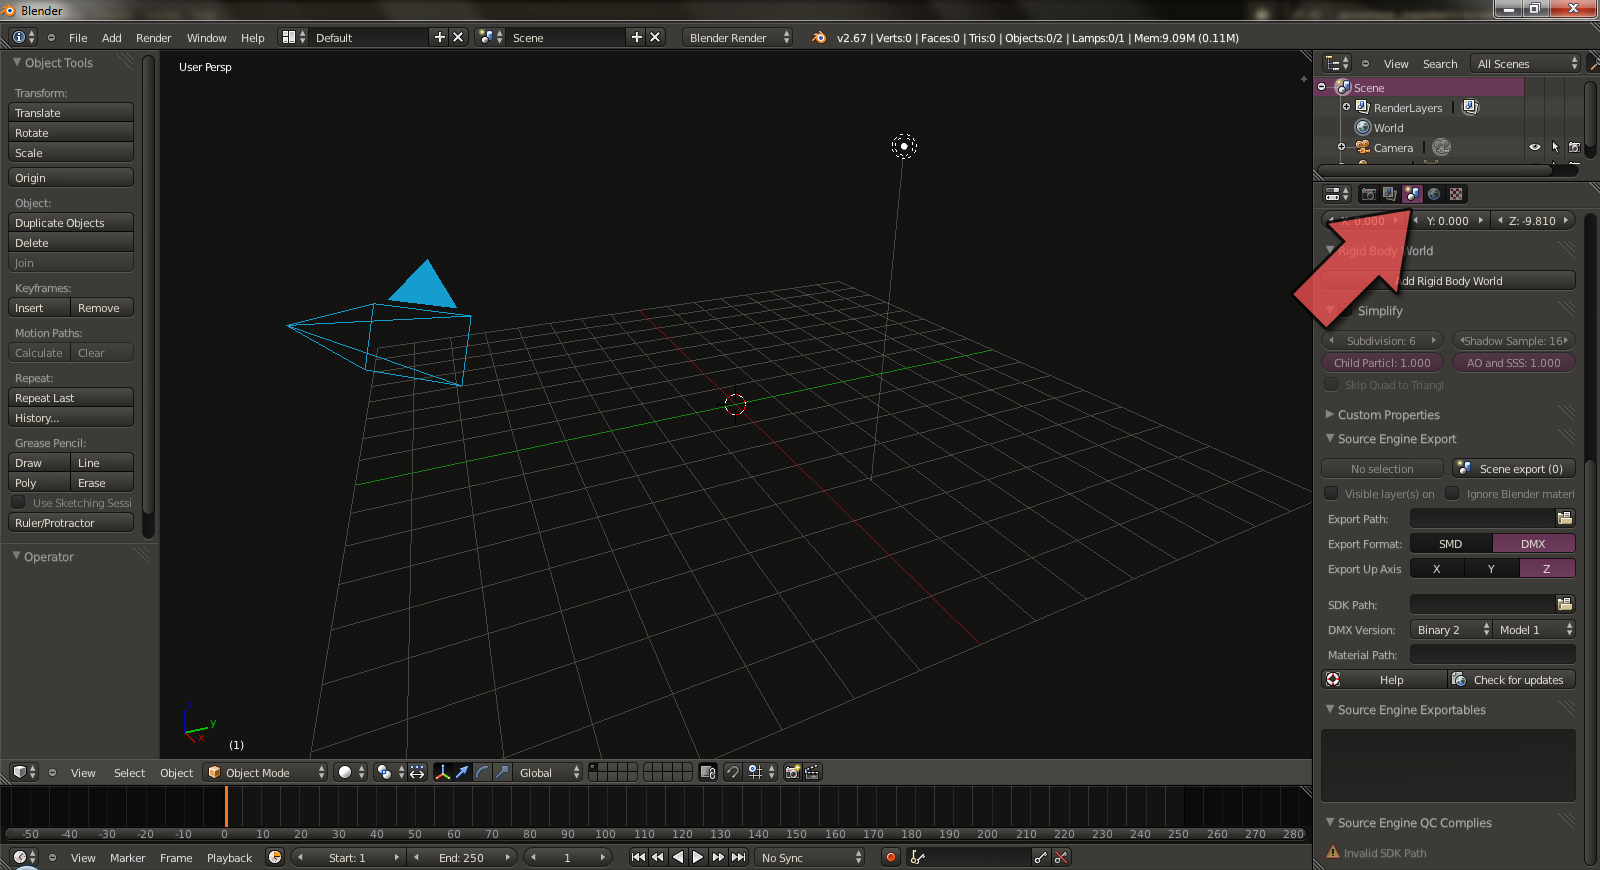
  • Assuming you've installed and have opened Blender for the first time, you should be in the default viewport setup. You will need to go to the Scene Properties by clicking the Scene Icon Properties Icon . For those of you unaware of where to locate this icon as a new user of Blender, you can find it in the image below (while using the Default Viewport setup).


    If you scroll down a bit you should find a section called Source Engine Export.

  • While this has already been quite extensively covered by the Valve Developer Wiki, I'll be giving a brief overview of most of the relevant stuff we'll be needing/using when we do our re-exporting to the correct DMX.


    The Scene Export button - Since we'll be importing in a DMX file that only consists of our required mesh and the bone that it is bound to (most likely bip_head because it'll be a facial item that requires flexes), we really don't need to do anything apart from click this button once we're done.

    Export Path - Click on the little folder icon next to it to choose where you want Blender to output the compiled DMX model that we'll need - I usually recommend assigning a special folder for this so you don't mix up your SFM SDK exported DMX with this one.

    Export Format - Make sure the DMX option is chosen. You don't really need to worry about using this method to produce SMD's, as you can export SMD's natively from Maya through the SFM SDK with no problems.

    Export Up Axis - By default, this is shown as Z ,but as a rule of thumb, remember that TF2 characters use the Y Axis as their default up axis. Also, you might've noticed upon importing your DMX that it would appear "lying down" as it were, because it was correctly uses the Y Axis as the up axis.

    SDK Path - This is important, very important. For your DMX to correctly export in the correct format, make sure to set this to your TF2's bin directory. If you've done a bog-standard instal of steam and TF2, this would be

    C:\Program Files (x86)\Steam\SteamApps\common\Team Fortress 2\bin (on a 64 bit OS)

    or

    C:\Program Files\Steam\SteamApps\common\Team Fortress 2\bin (on a 32 bit OS)

    The reason for this is that it needs to know the location for TF2's studiomdl.exe file, whic is what the SMD tools use to compile your TF2 Item importer compliant DMX file.

    DMX Version - By default, this should show up as Binary 2, Model Number 1 which is fine and what we need, so you don't can't touch this. (Hammertime, etc.)

    Material Path - I haven't had any reason to touch this because when you use the importer it automatically recognizes the materials you have applied to the mesh and merely asks you for tga's which it then converts the relevant vtf files it needs.


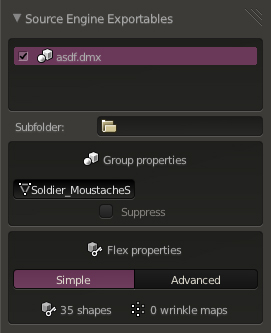
    The main thing to note here is the line that says "35 shapes" . If you've set up your DMX file correctly in Maya, you should definitely get this in Blender as well when you import the DMX file in as it'll also come with all the necessary shape keys as well. In other words, that number shows your DMX file is A-okay.

  • Once you've done all the necessary settings - aka setting the SDK path, the export path, choosing the correct export up axis and making sure DMX is ticked, click the scene export button and you should create a dmx file in the export path you've set up.

Notes:

  • If you'd like to double check to make sure the file you've gotten out of Blender is indeed a DMX file of the correct binary and version, simply open it up in a program like Notepad++. The first line should be a comment that shows you what version of DMX the file is in.
Facial Flexes in 3ds Max - A quick recap of the process
  • Finish modelling your item
  • Make a copy of your item for each frame and edit it to match
  • Rename your copies using the included list
  • Add a morpher modifier to your original object and set the ratio for the correct morph target in the correct frame to 100
  • Check for errors in each frame
  • Save as .fbx
  • Test your item ingame!
67 Comments
grepi 3 Feb, 2023 @ 1:14pm 
I have the exact same issue as POLERGUY. I made a helmet with a chin strap and the preview area laugh animation just pushes it awkwardly downwards and at the end of the animation it stays there.
PyroFireGamer 31 Mar, 2022 @ 6:06am 
will this work for sfm?
POLTERGUY 16 Aug, 2021 @ 4:19pm 
I'm using blender and I have modeled my face model and such (I am making a clown face paint). I've exported it as a DMX and then imported into tf2 and clicked preview, but when I click the taunt button the model seems to faze off his face. When the taunt is completed it just sort of stays fazed off his face. How do I fix it?
I don't know where else I can post my problem so I've posted it here.
RuV 21 Nov, 2020 @ 1:31am 
can you make the explanation more detail? cause im not understand the entire step in blender. except decompiling model that can be used in blender. also where is $model code comes from? i didn't found that in blender. VTA data also not working. it saids the vertex not matched. any idea how to import tf2 model with face morph? im sorry but, this tutorial seems impossible to understand to me.
ChungleMcBungle 9 Nov, 2019 @ 6:09am 
For Blender is it necessary to create a shapekyey for every flex or only the ones that have any alterations in them.
STAR 7 Apr, 2018 @ 2:41am 
My Flaxes are stuck, this is expected? i dont know if its right, its my first one. ;--
Napy Da Wise  [author] 5 Nov, 2016 @ 5:21am 
Best way to test the flexes is by importing them ingame. The model viewer doesn't work quite well with them. Also, if your lod0 has flexes, the lod1 and lod2 don't need them, they'll automatically get them from the lod0.
WhoDooVooDoo 4 Nov, 2016 @ 9:21pm 
Great tut, came in VERY handy!

Curious about LOD's though, is everyone just using a base model lod or do at least the first lod get morphs too? So much work without a facial rig.

I know 3rd level lods get bones removed, does valve do same with morphs?
----
I will state in case anyone else gets messed up...

Model viewer in TF2 import messes up lod's on models that have fewer bones, but in game they work fine.

If I hit the 'laugh' button in model viewer the morphs seem to work but don't reset at the end, selecting a different weap resets. Haven't got as far as getting in game lod's to test yet.
ChiliChapters 26 Sep, 2016 @ 5:01pm 
Why can't I rate, mate? Wanna give this bad boy a 6 out of 5!
strawbunny 15 May, 2016 @ 3:43pm 
I read the whole thing and I'm really confused how it works.. im trying to facial rig scout on blender, i have him imported in the game and all, how do i get the facial flexes working??? tried reading the guide but its not working