Sengoku Jidai: Shadow of the Shogun

Sengoku Jidai: Shadow of the Shogun

55 ratings
The art of war (a strategy guide for new players)
By stegg88
This game has a pretty steep initial learning curve. Now, the best way to learn is to just play through the game and get a feel for it but here are some tips and tricks I got from playing through the game. Seeing as there is zero material up right now, I thought someone should make a start. If you are complaining about RNG then you are probably playing it wrong. This game can be won easily without relying on RNG once you understand how it works, how it is won and some RNGless mechanics that guarantee victory.
2
2
   
Award
Favorite
Favorited
Unfavorite
Introduction to sengoku jidai shadow of the shogun
Welcome everyone to my first attempt ever at writing a guide. This game, sengoku jidai has been for me an amazing experience that sadly doesnt get a lot of the love it deserves. In the review section of steam there are many complaining about things like RNG or the computer being unfair and I am writing this to tell you, no, that is not the case. If you are losing to the AI on normal mode at this game, it is due to a fundamental flaw in your own strategy and is not as a result of unfair RNG or any other lame excuse. I lost in the tutorial of all places and got so frustrated. I threw myself at this game however time and time again until I got good. All it takes is practice and a little patience. So lets get started, go through the basics of the game and how to start cleaning the floor with the computer.


As a note, since I got good I have not lost to the computer in normal mode even when being quite badly outnumbered. I have since upped the difficulty and it is indeed proving challenging. Truly, these claims of RNG screwing me over are absolute baloney. Battles are won before they start....

One more note, as this game has a lot going on under the hood and this is being wirtten with a bit of guesswork in some situations, it will constantly be getting updated and or edited. On top of this, I wish to note that this guide is aimed at those complaining about the main game being too tough. The multiplayer is still an arena in which I frequently get my mens heads handed back to me on platters however with this guide I hope that you will at least get through the main campaigns, understand the mechanics, after which you can then experiment with multiplayer. I understand not everything I mention here will be 100 percent accurate, there really is not a lot of information here at all on this game and I wanted to make a labour of love and pool all that I have learned and that of others into this guide that I hope compliments this fantastic game. If there are errors, or you wish to add something, please let me know and I will be more than happy to add it in.
Winning the game, breaking morale!
In ancient wars, the majority of the enemy fled the battle rather than getting cut down. Our digital warriors act in a similar manner to those of real life in that they would prefer to flee the field of battle if things aren't going so well.


In Sengoku Jidai, there are 4 states of morale that range from: (highest to lowest)

- Ready
- Disordered
- Fragmented
- Routing

(I refer to it these as morale yet there actually is another morale function in this game, however, the units status on the battlefield is far more important. The other "Morale" shall be exaplined later.)

Generally speaking, Ready units will fight the best, disordered units won't stick around to long, fragmented units are on their last legs and routed units will be home in time for dinner. Units that have lost morale will fight worse in subsequent combats or their shooting ability will be reduced. As such, disordering a strong unit and then charging it with weaker troops is a great way of defeating stronger units with weaker soldiers.

There are a couple of ways of breaking morale:

- A flank charge should make a ready unit drop to disordered. (this is not true if using light cavalry for example who instead just get a damage buff)
- Focused fire on one unit using bows, guns or artillery will force the unit to make morale checks. Failing these checks will reduce the unit to disordered from ready, or fragmented if already disordered. Shooting at fragmented units will generally rout them.
- Winning a round of combat will force a morale check on the loser. Well disciplined units however may continue to keep morale up even after suffering heavy casualties.
- Units routing nearby force morale checks on surrounding units. This can cause mass chaos. and can rout an entire army.

The most important of these is BY FAR the 4th, morale checks due to nearby units routing. One good flank charge can cause a unit to rout, which can set off a whole load of overrun charges, new flank charges, other units routing which then cause even more routing or morale dropping. Basically this is the goal of the game, to set up big domino routs.

Now, a few tips on doing this. When you have a unit disordered or even better fragmented, do not just rout it for the sake of routing it. Any cavalry charge should rout a fragmented unit. So wait until there are more enemy troops near it then hit it. Better yet, take 2 turns, one turn to reposition your cavalry on the flank, the second to charge in, lining up your over run so that you charge into fresh units. (more on this later in the guide). When the enemy lines are coming, you should either be setting up flank chargers as much as you can OR using your tanged fire to soften the targets, lining them up for that domino rout.

The game is won by routing 60% of your enemys units (Or 40% if you routed 25% more of the enemys troops than they have of yours). You can charge in headlong and hope you will win through attrition, sure. If you match up your units with theirs, make sure your units all have the upperhand you may win on the RNG and grind your troops into theirs until they break but it is so much easier to simply hit them in the flank and guarantee that the unit will be come disordered/fragmented. The real geniuses at this game online know this and exploit exactly. Why leave your soldiers fate up to the RNG gods when some careful positioning will guarantee you victory. It's this very point here that many miss when playing the game. Those complaining online about the main game being impossible due to bad RNG don't realise that this game can be won without relying on any RNG whatsoever.

Combat, the basics
Combat looks super complicated, but it's pretty easy once you get the hang of it, every now and again RNG has a small influence, but the battle as a whole should be going in your favour if your positioning and strategy is correct. For now, lets look at the factors that influence close combat.

First thing to notice is that all the units have different qualities. Samurai are better than their ashigaru counterparts, for example, and in an even fight, samurai will generally win. However combat has a lot to consider, lets take a look.

Things that can influence the combat:

- Terrain
Being on the high ground will give you a combat bonus, the bigger the difference between your unit and your opponent (you can look at the size of the hill by just moving your cursor over the terrain) the more of a combat bonus you will get.

Spear units work well in the open, heavy weapons and swordsmen work better in rough terrain or forests or rivers. (spearmen cannot form up properly in rough terrain, at which point the other weapons become advantageous)

Forests and marshes will also give your units a cover safe as will barriers.

- Troop experience. Troops will get a rating based on their experience. Now, this being a slitherine game there are many things to learn that take a long time, I know there is some sort of flag system that denotes strong troops and such but I am not sure entirely how it works. Basically though, if you move the cursor over a unit, it will tell you the quality of the troops. This is based off of the initial cost of the unit AND if in campaign mode how many battles they have come through. From what I gather it goes something like:

- Raw
- Below average
- Average
- Above Average
- Superior

it goes without saying, the more experienced the unit, the longer they are likely to hang around and not flee the battle and the better they are at cutting down the enemy unit.

- Numbers
From what I gather the number of soldiers in a unit also play a big part on both their morale and their damage. Even a small elite unit will feel overwhelmed by 10,000 angry peasants regardless of your ability. Fighting is very tiring and more than a couple of minutes is enough to tire even the hardiest of soldiers. Having those extra numbers means you have fresh soldiers coming at you constantly AND a mob mentality to boot. On the map, these larger units are of couurse shown by using a larger unit icon on the map, so be careful when charging a bigger unit.

- Flanks and rears

Getting charged in the flank and the rear is a big problem for any military unit. In stead of forming up, you just here the chaos from behind, the screams of your buddies being cut down by some unknown enemy, and as you turn to face the new threat you are aware of the enemy currently in front of you eyeing victory....

Any unit that charges in the flank or the rear will gain a huge combat bonus. Now one thing to note is that, if you charge an UNENGAGED opponent in the flank or rear, in the first turn you will have an advantage. Not only will you disorder the enemy but you will get a damage bonus (or maybe they get a debuff, I don't know the mechanics). However in subsequent turns, if the unit is unengaged, it will turn to face you in subsequent combat rounds and you will lose your flanking bonus.

Also, for a flank charge to count as a flank charge, you must start the charge from the same row as the enemy at least. It is possible for some cavalry units to charge from very far away, starting from infront of the unit, swing into the flank and smashing in. However, It is assumed that the men receiving the charge would have enough time to prepare some sort of a defence when the charge is very easy to spot.

- State of morale


The units current state of morale will be one of the biggest impacts on how it performs in combat. Steady units perform the best. Disordered units can sometimes do ok if stuck in a combat. A tough unit can draw the combat out, generally speaking though, a disordered unit that receives a charge is very likely to drop to fragmented. Fragmented units generally break upon receiving a charge or if in combat have about 1-2 rounds left before fleeing. As mentioned before, the key to winning this game is dropping the enemy morale while protecting your own. Attack enemy disordered and fragmented units while letting your own disordered and fragmented units have some time out of battle.

- Armour?
Now I am not exactly sure, like I said, but I am pretty sure that armour somehow reduces damage done. If anyone has any info on this please let me know. I read somewhere that heavy weapons do better against armour but I cannot be entirely sure. matchlock guns certainly do have armour piercing properties.


- Protected units and mixed units


Protected units are mixed units where the front line consists of spearman and the rear lines consist of ranged infantry of some sort. Due to the Chinese and the Steppe tribes constant wars, these formations were a reply to the cavalry archers of this period. (I am not a historian, do not quote me)

In game terms, what this translates to is that the unit has the protected trait. What this means is that in the first round of combat the unit will fight like a regular spear unit. Be aware though that in subsequent combat rounds the unit will begin to fight like any other ranged unit in close combat, pulling out their swords and fighting for their lives. Protected basically gives your unit more time for some intervention before they gey munched in combat. As a result of this however their shooting is weakened in comparison to specialist shooting units.


- Attacked by multiple units

When multiple units attack a single unit FROM ANY ANGLE you get an attack bonus. As such, if you have lots of cheap troops, sometimes just throwing them into the fray is the way to go if they are doing nothing else. Even if the fight is a predicted draw, it will boost the damage output of all friendly units in the combat driving the enemy unit to rout even quicker.

- Using the damage calculator

Before you charge, when you hover over the charge icon, you will be given predictions for both the first round of combat and the second round of combat. Certain units like cavalry fight really well on the charge but become weaker when bogged down in a battle of attrition. There are 2 things to note about this:

1. The subsequent battle predicitons are the predictions IF there is no change in morale. For example, if you are flanking an enemy and it gives you bad subsequent round predictions, go for the charge regardless as generally speaking a flank charge will reduce the enemy to disordered at the very least meaning the second round predictions will be off.

2. Sometimes if the first round goes bad for you but the second round is looking like a win, it may be worth to take the risk, roll the dice and hope the damage is not so much that your unit drops morale. Conversely, if the second round looks bad but you are convinced you will do enough damage in the first round to drop the units morale, its worth the shot sometimes.


- impact and close combat rounds.

After the initial impact round if you charged, your subsequent round will be fought again at the end of your own turn and at the end of your opponents turn. When trying to guess how many turns it will take to break the enemy unit, it is worth remembering you fight a round of combat on both players turns.
Ranged combat
I read a lot of guides on line about ranged combat and how it is used to soften up either strong targets or to completely annihalate unarmoured targets. Many of these guides also suggest keeping your archers etc safe throughout the fight. This is an option that is available to you but it is not one that I personally choose to do. The ranged units in this game have way more uses beyond just softening up a unit or two before the lines collide. Let me explain:

- Ranged fire is used to demoralise and disorder the enemy, not kill them. Combats are won in the end in close combat. You will never do enough damage with archers to rout an army and once the hit your archers in close combat its game over. However, your ranged fire can focus on one or two enemies at a time, disorder them making them ripe for a charge from a close combat unit.

- After the lines collide, what do they shoot? Many try to protect their archers, and maybe get into an arrow trade off with the enemy archers. This is one option available but another I have seen is having the archers creep up the flanks (if there are no cavalry threatening them) and getting into position for a crippling flank charge. Very often, if many of the units are tied up in combat, by leaving your archers to hang back and pepper the occasional unit, you are effectively wasting the unit. Killing of 5-10 extra guys probably wont swing the tide of the battle, but a flank charge just might. Agincourt was a famous battle where this was done effectively, the light archers slamming into the flanks of the heavy infantry and routing them.

- They can also be used and the end of a hard fought battle to reach the elusive 60 percent routed first if its tight. Focus your fire on the fragmented units and break them. This is also an option although not one I personally do.

- teppo (gunpowder) units are slightly different from the archer units. The light teppo ashigaru are a frustration unit, they run up pepper the unit and flee when charged. They can be used to set up charges and harass key units. The medium foot however can be absolutely devastating if you can set them up properly. 2 volleys on one enemy unit is usually enough to drop the morale of the unit and having them stuck in at the edge of a forest can make them a nightmare to move. However they have an extremely short range and whatever you hit, if it doesnt drop morale, will probably flatten you on the return charge if you are caught out in the open. (in the forests and rough ground however they will give spear units a run for their money. be aware that archers don't do a lot of damage to armoured units but do mass damage to unarmoured units (peasants, warrior monks etc) whereas gunpowder units are devastating to armoured units.

- artillery in the game isn't really a big damage unit, nor was it in real life, but rather it is more of a morale damaging unit. combined ranged and artillery fire on one unit has an increased chance of dropping the units morale. Additionally artillery is of course armour piercing and focusing on some heavily armoured units will soften them before they hit the lines.
Cavalry
Cavalry are a key component of every army and can be split into 2 parts,
melee cavalry and ranged cavalry. Not all armies are reliant on them,
for examplem the Korean armies are often lacking strong melee cavalry and can get by with their mixed infantry, However cleverly used, cavalry can be the difference between victory and defeat.

Take note, one thing beginners do is charge cavalry into units and they sit there all game slowly hacking away at the enemy. This is not the purpose of cavalry and is one common mistake beginners make when playing the game. cavalry units have lesser numbers than infantry units and even if you think you are drawing a combat in terms of soldiers lost, you are in fact losing. Cavalry should always be charging and moving. Cavalry stuck in melee are generally dead cavalry. always aim for weak units you can punch through if you have to charge in the front. Aim for swordsmen and archer units. Run them down and then wheel round to get the rear.

Battle for the flanks!

- Breaking morale is how you win this game and although a strong unit can punch its way through the front, it will do so a lot quicker from the side or the rear. To get there though, you will want to run round the flanks. Now often, a battle can be decided on whether or not you control the flanks and the added maneuvrability of the cavalry help you do this. If you can defeat the army on the flanks, you can then use your flanking force to swing in and crush the centre defeating your opponent.

- Cavalry are strong on the charge but get stuck in combat quite easily. If you are going to charge a unit in the front with cavalry, check both the first and second turn fight conditions. If it suggests a very high percentage of a draw (as it may with big spear units) I would not recommend charging. Cavalry units are generally smaller than infantry units, and although you both losing say 10-15 soldiers per combat round seems like a fair exchange, your units fighting ability drops a lot more than the infantry units fighting ability due to your unit size being smaller. As such you may very well end up being ground down in melee through attrition. Cavalry are better when charging on the flanks, combined with the initial morale drop from being flanked, the extra damage done is very likely to drop the unit to fragmented meaning you should break through pretty soon.


- Terrain is VERY important for cavalry units. Make sure the unit you are charging is not sitting on a small patch of rough terrain or even worse, sitting in a forest. This means death for a cavalry unit. Unless you are hiding in wait planning to charge out, cavalry should never really be in forests if they can help it.
Ranged cavalry
Ranged cavalry come in two forms, A regular cavalry unit with bows and a fast cavalry unit with bows. They are quite different in their use and abilities! Regukar cavalry units function....well like regular cavalry units but with bows. They can pepper you with shots or charge in when necessary. They function well moving into the flanks and peppering the enemy on the way their and possibly disordering a unit or two. Regardless of all this, they are essentially still exactly that....good old cavalry.
Fast cavalry however are very different. They have bigger movement ranges and can also turn very easily getting into strong flanking positions. This however comes at a price, one that you must take note of. Fast cavalry DO NOT DISORDER UNITS WHEN THEY FLANK OR REAR CHARGE. They instead merely get a damage bonus. (Otherwise they would be beyond broken). Instead they are used to kite strong units, pepper the enemy, get in the way of charges and generally be and absolute nuisance. Used well, fast cavalry can disrupt a strong battleline by making it all arrive piecemeal. They are however also very susceptible to returning fire and so they should be kept away from enemy ranged units. (Likewise, if you are fighting against fast cavalry, make sure your flanks have some ranged ready to fire back and give the fast cavalry something to think about.

Fast cavalry excel in the open ground, if outnumbered and not sure how to deal with them, slow them down and head for the trees and the swamps. Not only will they terrain protect you from the sting of their arrows, if they dare follow you into the terrain they will be slowed down massively and you can hopefully catch them.

Not all armies have access to fast cavalry however. The Japanese armies in particular same to be lacking any sort of fast cavalry until the later years.
Work in progress
This guide is a work in progress. I am by no means a master at this game. In fact, some of the mechanics still confound me at times. Hopefully others can help contribute and this will be updated.
8 Comments
jomni 30 Jun, 2019 @ 11:42pm 
Yes that is still true. Armour reduce missile damage for arrows. Firearms are better vs armour. It’s just that firearms shoot slower and have shooting penalty vs horses (but not vs infantry). There’s a lot of nuances documented in the manual on page 120.
stegg88  [author] 30 Jun, 2019 @ 10:04pm 
@jomni
Does the armour do anything to negate missile damage? From playing it feels like arrows do waaay more damage to unarmed units and peasant mobs for example but I don't know the actual process well enough to write it in the guide.
jomni 30 Jun, 2019 @ 9:57pm 
For missile combat, take note that bows are generally still better at dealing with cavalry (long range and “better rate of fire”) than firearms despite lesser damage to armoured targets.
jomni 30 Jun, 2019 @ 9:48pm 
Regarding armour, when resolving close combat, both unit’s armour ratings are compared. The unit with higher relative armour rating is given a bonus.

Naginata and other big bladed pole armed (called Heavy Weapons in the game) will negate the enemy’s armour advantage bonus if it exists.

stegg88  [author] 28 Jun, 2019 @ 6:31pm 
So if you attack a unit in the forest, the battle will take place in the forest. It takes place on the defenders tile. Conversely, if the unit in the forest charge the unit in the plains then the combat will take place in the plains.
Zarkarion  [developer] 27 Jun, 2019 @ 3:38am 
Very nice guide
stegg88  [author] 13 Mar, 2019 @ 11:03pm 
Roberbond, the battle is essentially fought in the defenders tile.

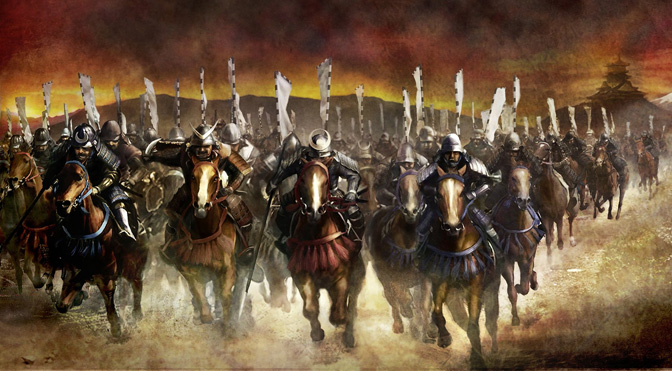
So if the cavalry attacks my swordsmen in the woods they get huge negatives for being disordered while charging into the woods. However if my swordsmen charge cavalry outside the forest (say a plains tile for example) the cavalry will have no such disadvantage as the cavalry are not charging into the forest.

For multiple combats etc....I have no idea but I assume the logic is the same.
roberbond 21 Feb, 2019 @ 8:22am 
Very good guide! I have the same feelings with this game.

I have a question: if you attack an enemy sitting in a rough terrain or forest but you are in plain terrain, do you have a penalty? I thought the penalty is given to the unit placed in the rough terrain.